


10
9
L = 4x
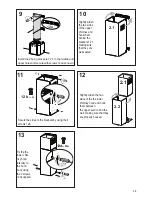
Install the 2 fixing brackets 7.2.1 to the middle and
upper holes and secure with screws 12a as shown.
10
11
2.1
N = 4x
12b
Slightly widen
the two sides
of the upper
chimney and
hook them
behind the
brackets 7.2.1,
making sure
that they are
well seated.
Secure the sides to the brackets by using the 4
screws 12b.
12a
N = 2x
12d
2.2
2.1
13
Slightly widen the two
sides of the the lower
chimney hood and hook
them between
the upper section and the
wall, making sure that they
are properly housed.
Fix the the
lower chim-
ney hood
laterally to
the hood
body using
the 2 screws
12d supplied.
12
Содержание BELA30SS600-B
Страница 5: ...5 RANGEHOOD DIMENSIONS Min 24...
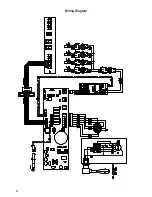
Страница 16: ...16 Wiring Diagram...
Страница 21: ...21 Min 24 DIMENSIONS DE LA HOTTE...
Страница 32: ...32 Sch ma de c blage...
Страница 34: ...34...
Страница 35: ...35...
Страница 36: ...991 0454 810_02 160504 D002767_01...