background image

Chapter 2
Unpacking and Installing the Switch

2 - 8

Slide-Rail Mounting Hardware

The slide-rail mounting hardware includes the following:

• Slide rails for the left side (1 pair)

• Slide rails for the right side (1 pair)

• Front-mounting bracket (1)

• Rear-mounting bracket (1)

• Thumbscrews (8)

• Wing nuts or kep nuts (8)

• Rail-locking bracket kit (in bubble bag), which includes rail-locking 

brackets (2), #6-32 pan head screws (4), and #8-32 pan head screws (2)

Installing the Slide-Rail Mounting Hardware

Before installing, review the environmental guidelines to make sure that you 
are installing and using the platform in the appropriate environment. For 
environmental details, see 

Environmental, on page 1-6

.

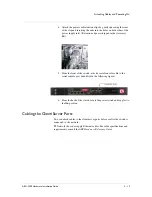
1. Separate the side chassis members by lifting the lever and sliding it 

out.

2. Align the large end of the key holes with the slide-rail mount studs 

on one side of the chassis. 

The flange on the slide-chassis member should be facing the front of 
the chassis. Slide the piece toward the back of the chassis until it 
snaps into place. Repeat this step on the other side.

Содержание ARX-2500

Страница 1: ...ARX 2500 Hardware Installation Guide MAN 0417 00 ...

Страница 2: ......

Страница 3: ...F5 DESIGN F5 Management Pack F5 Networks F5 World Fast Application Proxy Fast Cache FirePass Global Traffic Manager GTM GUARDIAN IBR Intelligent Browser Referencing Intelligent Compression IPv6 Gateway iApps iControl iHealth iQuery iRules iRules OnDemand iSession IT agility Your way L7 Rate Shaping LC Link Controller Local Traffic Manager LTM Message Security Module MSM Netcelera OneConnect OpenBl...

Страница 4: ...t his own expense will be required to take whatever measures may be required to correct the interference Any modifications to this device unless expressly approved by the manufacturer can void the user s authority to operate this equipment under part 15 of the FCC rules Canadian Regulatory Compliance This Class A digital apparatus complies with Canadian ICES 003 Standards Compliance This product c...

Страница 5: ...right c 1990 2003 Sleepycat Software All rights reserved Copyright c 1995 1996 The President and Fellows of Harvard University All rights reserved Copyright c 1998 2004 The OpenSSL Project All rights reserved Unless otherwise noted the companies organizations products domain names email addresses logos people places and events depicted in examples herein are fictitious No association with any real...

Страница 6: ...vi ...

Страница 7: ...Table of Contents ...

Страница 8: ......

Страница 9: ...Installing a Rack Mounting Ear Bracket Kit 2 6 About the Slide Rail Mounting Kit 2 7 Slide Rail Mounting Hardware 2 8 Installing the Slide Rail Mounting Hardware 2 8 Inserting the Optical Transceivers Optional 2 11 Attaching Cables and Powering On 2 12 Cabling the Client Server Ports 2 13 3 Connecting the Switch to the Network Identifying the Management Ports 3 3 Connecting the Console Port 3 3 Bo...

Страница 10: ...Table of Contents x ...

Страница 11: ......

Страница 12: ...Table of Contents xii ...

Страница 13: ...1 Introduction Audience for this Manual Document Conventions Related Documents Safety and Regulatory Notices Contacting Customer Service ...

Страница 14: ......

Страница 15: ...c text appears for emphasis new terms and book titles Note Notes provide additional or helpful information about the subject text Important Important notices show how to avoid possible service outage or data loss WARNING Warnings are instructions for avoiding damage to the equipment DANGER Danger notices help you to avoid personal injury Related Documents In addition to this guide the following F5...

Страница 16: ...ld be considered so that the rack remains stable and unlikely to tip over Class A ITE Label This is a Class A product based on the standard of the Voluntary Control Council for Interference by Information Technology Equipment VCCI If this equipment is used in a domestic environment radio disturbance may occur in which case the user may be required to take corrective actions Note the following radi...

Страница 17: ...ersonnel Warning WARNING Only trained and qualified personnel should be allowed to install replace or service this equipment ATTENTION Il est vivement recommandé de confier l installation le remplacement et la maintenance de ces équipements à des personnels qualifiés et expérimentés Battery Warning ...

Страница 18: ...rough the use of a special tool lock and key or other means of security and is controlled by the authority responsible for the location ATTENTION Cet appareil est à installer dans des zones d accès réservé Ces dernières sont des zones auxquelles seul le personnel de service peut accéder en utilisant un outil spécial un mécanisme de verrouillage et une clé ou tout autre moyen de sécurité L accès au...

Страница 19: ...st montée dans un casier partiellement rempli charger le casier de bas en haut en plaçant l élément le plus lourd dans le bas Si le casier est équipé de dispositifs stabilisateurs installer les stabilisateurs avant de monter ou de réparer l unité en casier Power International Power Cord Requirements International power cords should have the following characteristics Maximum length 4 5 m 15 feet Fe...

Страница 20: ...that a fuse or circuit breaker no larger than 120 VAC 15A U S 240 VAC 10A international is used on the phase conductors all current carrying conductors ATTENTION Pour ce qui est de la protection contre les courts circuits surtension ce produit dépend de l installation électrique du local Vérifier qu un fusible ou qu un disjoncteur de 120 V alt 15 A U S maximum 240 V alt 10 A international est util...

Страница 21: ... Networks Customer Service F5 Networks Online Knowledge Base Online repository of answers to frequently asked questions http support f5 com F5 Networks Services Support Online Online customer support request system https websupport f5 com Telephone Follow this link for a list of Support numbers http www f5 com support support serv ices contact ...

Страница 22: ...Chapter 1 Introduction 1 10 ...

Страница 23: ...structions Tools and Equipment Unpacking and Verifying Shipment Determining Which Rail Kit to Use About the Rack Mounting Ear Bracket Kit About the Slide Rail Mounting Kit Inserting the Optical Transceivers Optional Attaching Cables and Powering On ...

Страница 24: ......

Страница 25: ...nsole connected to the serial console interface Customer supplied standard 19 inch EIA rack Unpacking and Verifying Shipment The ARX 2500 is shipped in a single box with all components installed except the optional optical transceivers It weighs approximately 22 5 lb 10 2 kg not including packing materials Note After installation retain all packing materials Product returns are acceptable only in ...

Страница 26: ...pecifications and requirements and details about the LEDS cables external interfaces power supplies internal disk drives and many other hardware details This guide is available in PDF form from the ARX Manager GUI 5 Read the instructions for determining which rail kit to use at Determining Which Rail Kit to Use on page 2 4 In particular do not use the instructions that come with the slide rail mou...

Страница 27: ...onal cable routing options We recommend 100 mm spacing from the front panel to the rack front or rack door This provides enough room to route the cables without excessive bending or insulation damage A shelf or similar device is required to support the unit if only one person is installing the unit Important To prevent personal injury or damage to the unit it is recommended that at least two peopl...

Страница 28: ...t Installing a Rack Mounting Ear Bracket Kit Before installing review the environmental guidelines to make sure that you are installing and will be using the platform in the appropriate environment For environmental details see Environmental on page 1 6 Note The rack mounting ear bracket kit is located in the Accessory Kit 1 Align the bracket s keyhole slots with the PEM fasteners on the side of t...

Страница 29: ...r supplied hardware The component must be securely fastened to the rack to provide adequate stability and to prevent it from falling out of the rack If the rack does not provide adequate support a shelf kit may be necessary If you install a shelf kit it is recommended that you install one created by the rack manufacturer About the Slide Rail Mounting Kit The slide rail mounting kit enables you to ...

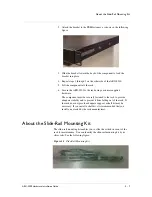
Страница 30: ... screws 2 Installing the Slide Rail Mounting Hardware Before installing review the environmental guidelines to make sure that you are installing and using the platform in the appropriate environment For environmental details see Environmental on page 1 6 1 Separate the side chassis members by lifting the lever and sliding it out 2 Align the large end of the key holes with the slide rail mount stud...

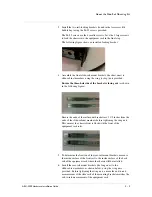
Страница 31: ... as shown in the following figure Ensure the ends of the rail mount brackets are 1 1 2 inches from the ends of the slide cabinet members before tightening the wing nuts This ensures the chassis front is flush with the front of the equipment rack rails 5 To determine the location of the rear rail mount brackets measure the inside surface of the front rail to the inside surface of the back rail of t...

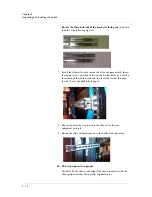
Страница 32: ...ded in the top and bottom holes by screwing them through the cabinet rails and into the slide bracket threaded inserts Leave the middle hole open 8 Repeat the previous step to secure the slide rail to the rear equipment rack rail 9 Extend the slide cabinet members to their fully locked position 10 This step requires two people Carefully lift the chassis and align slide chassis members with the sli...

Страница 33: ...to the rack 14 On each side of the chassis secure the rail locking brackets to the rack using the 2 larger screws from the rail locking bracket kit The following figure shows the result of this step Inserting the Optical Transceivers Optional If you ordered optical tranceivers you can locate them in the Accessory Kit packaged in thier own box Insert them in the optical ports as identified in the f...

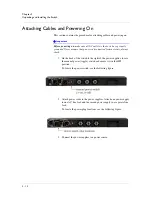
Страница 34: ...disconnected from a circuit always check 1 On the back of the switch to the right of the power supplies locate the manual power toggle switch and ensure it is in the Off position To locate the power switch see the following figure 2 Attach power cords to the power supplies Attach one power supply to one AC line feed and the second power supply to a separate line feed To locate the power plug locat...

Страница 35: ...ry Kit 5 From the front of the switch attach a serial console cable to the serial console port identified in the following figure 6 From the back of the switch locate the power switch and toggle it to the On position Cabling the Client Server Ports You can attach cables to the client server ports before or after the switch is connected to the network F5 Networks does not supply Ethernet cables For...

Страница 36: ...Chapter 2 Unpacking and Installing the Switch 2 14 ...

Страница 37: ...3 Connecting the Switch to the Network Identifying the Management Ports Connecting the Console Port Booting the Switch Connecting the Out of Band Management Port ...

Страница 38: ......

Страница 39: ...following figure Figure 3 1 ARX 2500 Management Ports During the initial boot process described in this chapter you can access only the serial CONSOLE port After you boot the switch you can connect the Ethernet OOB management port to a management station or network See Connecting the Out of Band Management Port on page 3 18 Connecting the Console Port Set the following terminal parameters to match...

Страница 40: ...and the ARX 2500 will remain red until the Switch Configuration process is complete This is normal For more information on the alarms and statuses for the ARX 1500 and ARX 2500 see the hardware installation guides for each platform sections ARX 1500 Alarm and Status LEDs and ARX 2500 Alarm and Status LEDs License Activation If you have any questions about license activation consult the ASKF5 Knowl...

Страница 41: ... default 10 1 14 1 10 1 14 1 A name server address must be assigned so that the software license can be activated 4 Enter the DNS name server IP address to access the license server in the format nnn nnn nnn nnn 192 168 90 54 A switch replacement requires additional configuration questions 5 Are you doing a switch replacement in the format yes or no default no no The base registration key is used ...

Страница 42: ...ch will now initialize the local database The boot up process continues to the Username prompt Confirm that an administrator can log in by logging in with the Crypto Officer username and password that you entered in the initial boot script as in the following example User Access Authentication Username admin Password mypassword SWITCH The switch is now ready for configuration through the CLI or GU...

Страница 43: ...ning configs one per ARX and a single global config These items and the procedures for saving them are described fully in the ARX Site Planning Guide Best Practice Regularly Saving the Configuration For details consult that guide available from the ARX Manager Choosing Switch Replacement When the initial boot script asks if this is a switch replacement answer yes to invoke the questions required t...

Страница 44: ... it marks each share with its UUID Universally Unique ID A replacement switch must use the same UUID or it will reject all shares imported by its predecessor Also you must set the UUID if the switch is brought back to its factory defaults A Manufacturing Installation by F5 personnel resets the switch and its UUID The UUID appears at the top of the output of a show running config command as in the ...

Страница 45: ...4 31 52 ONLINE 876616f6 79ac 11d8 946f 958fcb4e6e35 10 1 23 11 stkbrgA None 0 days 04 32 46 ONLINE 8fa98111 55ec d1c8 9380 8dtu78fab47d 192 168 66 62 stoweA None 0 days 04 31 45 OFFLINE 05d5a0fa f2fb 11df 8daf af50d57e388e 10 1 14 76 bstnA Applying the UUID Enter the UUID of the replaced switch when prompted by the initial boot script See the following example If this is a replacement switch the U...

Страница 46: ...m password is entered at initial boot time and validates that you have permission to access the master key See step 9 in the example shown in section Booting a Non Replacement Switch on page 3 4 The system password is 12 32 characters long Wrapping password The wrapping password is set with the show master key command The security software uses the wrapping password to encrypt and later decrypt th...

Страница 47: ...lacing a failed peer Private subnet UUID Master key Note If the replacement switch is running an outdated release of software this example may not exactly match the text on your screen F5 ARX Startup This F5 ARX switch does not currently have critical system information programmed The following wizard prompts you for this information You can connect to the switch through the out of band management...

Страница 48: ...137 82789 5523 0883750 Enter The crypto officer is the most privileged user in the system 10 Enter the crypto officer username in the format text 1 28 characters admin 11 Enter the crypto officer password in the format text 6 28 characters mypassword Confirm the crypto officer password mypassword A system password is required for access to the master key 12 Enter a system password in the format te...

Страница 49: ...ng confirm that the replacement switch is running software and firmware compatible with its peer This ensures a proper rendezvous with the redundant peer If the replacement ARX is running a lower release or outdated firmware upgrade it before you proceed Go to the redundant peer of the switch you are replacing and check the software version there To find this information you can log into the CLI a...

Страница 50: ...n 6 0 0 the interview script only connects the switch to your out of band management network If you are running 6 00 000 or later or if your ARX release files and running config files are accessible through the out of band network you can skip this section These steps are required for systems that need to access the client server network To access the client server network enable at least one clie...

Страница 51: ... sequence to upgrade both the software and the firmware on the new stoweB switch from 5 1 0 to 6 2 0 SWITCH copy ftp jusr jpasswd mysrv wwmed com 12345 rel releases test5 rel INFO Copying 1013 megabytes from the specified source INFO The copy completed successfully SWITCH show releases releases R A test1 rel Dec 8 00 14 800 MB B test2 rel Dec 7 00 06 800 MB test5 rel Sep 10 00 09 1 0 GB Arm the sy...

Страница 52: ...that can resolve the name of the F5 license server activate f5 com For example SWITCH enable SWITCH config SWITCH cfg ip name server 192 168 90 18 SWITCH cfg end SWITCH Confirm that you can reach the license server and then activate the software license To continue the example SWITCH ping license server base reg key CRJGVQP DYWST ANKR GBYYDMT INFO Activation server response Thu Apr 19 04 28 00 UTC...

Страница 53: ...nning config file to the replacement switch and then running it SWITCH enable SWITCH copy ftp juser jpasswd ftp wwmed com a2kconfig scripts running SWITCH show scripts scripts running Apr 12 17 45 2 1k SWITCH run scripts running The running config script set up all local parameters such as the hostname and the network settings SWITCH ARX 2000 SWITCH Version 6 02 000 14293 Dec 2 2011 20 04 01 nbuil...

Страница 54: ...ng to take effect For detailed configuration instructions consult the ARX CLI Network Management Guide Connecting the Out of Band Management Port After you boot the switch you can connect the Ethernet out of band management port to a management station or network To locate the management port see Figure 3 1 You can use this port to access the GUI ARX Manager or the CLI To access ARX Manager direct...

Страница 55: ...4 Maintenance POST Diagnostics ...

Страница 56: ......

Страница 57: ... 02 000 14353 Apr 6 2012 20 12 43 nbuilds Armed Release test3 rel Version 6 02 000 14353 Apr 6 2012 20 12 43 nbuilds Backup Release test2 rel Version 6 01 001 14115 Apr 9 2012 17 52 54 bmeifert System Configuration Version 602000 33 See the following example output for the show chassis command stoweA show chassis Identification Hostname UUID stowe 05d5a0fa f2fb 11df 8daf af50d57e388e Chassis Chass...

Страница 58: ...n ECC State 1 6 1 ACM 2 6 GHz 16128 MB Good Slot MAC Address BIOS Version 1 000A49753900 to 000A497539FF 8 15 1 3 2 0 Port Media Details Slot Port Type Vendor Status 2 1 N A N A Unknown 2 2 N A N A Unknown Disk Usage Name Total MB Used MB Free MB Used System 3173 1691 1320 57 Releases 6345 3327 2695 56 Logs 52838 152 50001 1 Cores DiagInfo Lists 21133 60 19999 1 Scripts 3172 48 2962 2 Reports 8458...

Страница 59: ...A Replacing Optical Transceivers or Chassis Before You Begin Replacing Optical Transceivers Replacing the Chassis ...

Страница 60: ......

Страница 61: ...base MAC address stoweA show chassis Identification Hostname UUID stoweA 05d5b0fa f2fb 11dg 8daf af50d57e388e Chassis Chassis Type Model Number Serial Number ARX 2500 ARX2500LE F5 F5 ABCD 0505 Chassis Environment Base MAC Address Power Fan setting System Temp CPU Temp CPU 00 0a 49 75 5f 00 Online Online high Normal 32 C 45 C 2 6 GHz Normal As a general rule perform all replacements on the backup s...

Страница 62: ...he current running configuration to another system copy running config If the ARX 2500 is a standalone installation copy the global configuration to another system copy global config 2 For the failed switch write down system password IP address subnet mask for the out of band management port UUID IP address for the private internal subnet system master key These parameters were set during the init...

Страница 63: ... 1 position The power button is located to the right of the power supplies 16 Complete the switch replacement option of the Switch Configuration Wizard When prompted enter the UUID and private subnet information collected in step 1 For an example see Preparing for Switch Replacement on page 3 6 Failure to perform the switch replacement option will require that you rebuild the cluster 17 Reboot the...

Страница 64: ...Appendix A Replacing Optical Transceivers or Chassis A 6 ...

Страница 65: ...Index ...

Страница 66: ......

Страница 67: ...ole port flow control 3 3 D diagnostics at switch bootup 4 3 F flow control 3 3 I initial boot script running 3 4 interface console connecting 3 3 interface serial console 3 3 L license activation 3 4 M management ports 3 3 connecting 3 18 P port serial console 3 3 ports management 3 3 POST diagnostics 4 3 power cords attaching 2 12 powering up the switch 2 12 R registering the license 3 4 running...

Страница 68: ...Index Index 4 ...
Отзывы: