| English
8
TECHNICAL DATA
Article Number
45 995
Model
DC 50 PLUS
Net weight
kg
10,5
IDENTIFICATION (FIG. 1-3)
1. Carrying handle
2. Quick release strap
3. Inlet
4. Main body
5.
Micron paper bag filter
6.
Cartridge filter
7.
On-Off switch
OPERATION
PREPARING THE UNIT
Unpacking and completing the assembly should
be done on a flat and stable surface, with enough
space for moving the machine and its packaging,
always making use of suitable equipment. The
machine is fully assembled from the factory. Us
-
ing a hose clip, use one of the recommended by
the manufacturer hoses or adapters to the inlet.
NOTE:
The installed electric motor is completely wired
ready for operation. The customer‘s connection to
the power supply system, and any extension cables
that may be used, must conform with local regula
-
tions. Check electrical connection cables regularly
for damage. Make sure the cable is disconnected
from the mains when checking. Electrical connection
cables must comply with the regulations applicable
in your country.
WARNING:
Connect the machine only to a socket with the prop
-
erly installed ground contact.
OPERATING THE UNIT
WARNING:
You must fully assemble the appliance before using
it for the first time.
Before each use, check the following:
f
Proper function of the ON / OFF switch.
f
Before you connect the equipment to the mains
supply make sure that the data on the rating plate
are identical to the mains data.
The ON/OFF switch (Fig. 3.7) is on the main body
of the machine. Press the green key “I” to switch
on the machine. Press the red key “0” to switch off
the machine.
MAINTENANCE AND CLEANING
WARNING:
For your own safety, turn the switch off and remove
plug from power source outlet before any operation
of maintenance on the drill press.
Keep your appliance clean. After a longer period of
use, it is recommended to have the machine checked
by an authorized dealer service. Connections and re
-
pairs of electrical equipment may only be carried out
by an electrician.
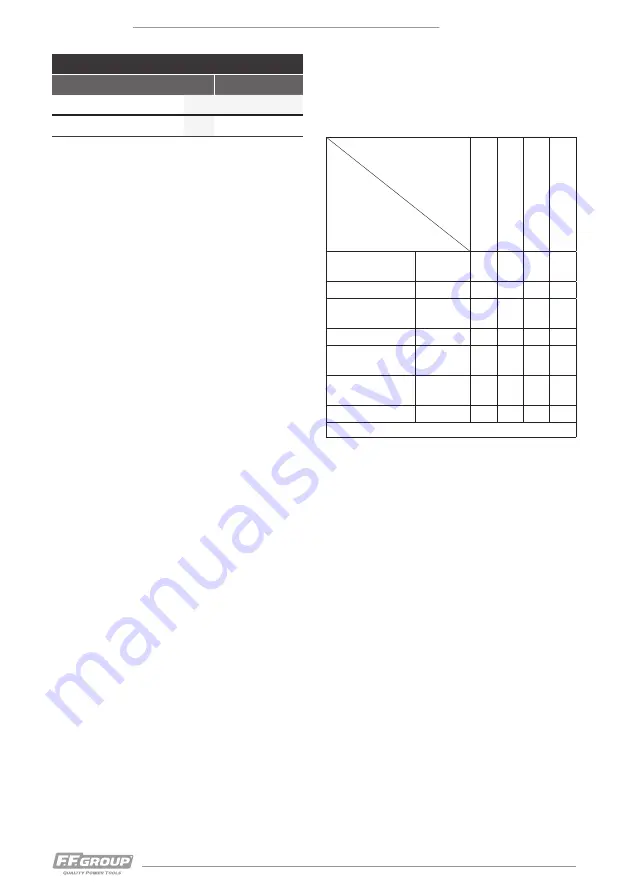
MAINTENANCE SCHEDULE
Items
B
ef
o
re e
ac
h u
se
Ev
er
y d
ay
Ev
er
y w
ee
k
Ev
er
y m
o
nt
h
Complete unit
Visual
Ispection
√
Collection drum
Empty
√
Inlet and Outlet
Check
and Clean
√
Inlet hoses
Check
√*
Motor
Check
and Clean
√
Vacuum
extractor
Clean
√
Cable and plug
Check
√*
*These items should be replaced if needed.
CHANGING THE FILTERS:
1.
Release the quick release strap and lower the
strap down (Fig. 4).
2.
Lift the motor assembly clear from the main
body (Fig. 5).
3.
Remove the micron bag and filter from
the motor assembly (Fig. 6).
4.
Remove the cartridge filter from the mi
-
cron bag (Fig. 7) and clean the cartridge using
an “M” class vacuum cleaner. Check the condi
-
tion of the cartridge for any signs of damage
and replace if necessary.
5.
Insert the cartridge filter into a new mi
-
cron paper bag and tuck the paper down into
the cartridge filter (Fig. 8).
6.
Replace the filter assembly on the motor
casing (Fig. 9).
7.
Lower the motor assembly down into the main
body and reposition the strap, locking it in po-
sition (Fig. 10).
POWER CORD
To avoid shock or fire hazard, if the power cord is
worm or cut, or damaged in any way, have it re
-
place immediately.
Defective electrical connection cables:
Electrical connection cables often suffer insula
-
tion damage. Possible causes are:
1. Punch points when connection cables are run
through window or door gaps.
2.
Kinks resulting from incorrect attachment or
Frequency
DC 50 PLUS
Содержание 45 995
Страница 3: ...3 www ffgroup tools com 4 6 8 5 7 9 10 DC 50 PLUS ...
Страница 35: ......


