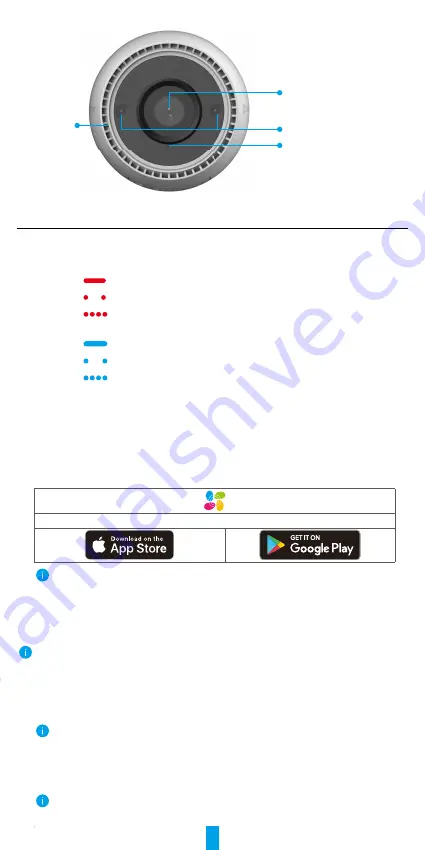
background image

2

Lens

IR Light
LED Indicator

MIC

Name         Description

RESET 

Button

When the camera is working, press and hold for about 4s until the LED 

indicator is solid red, and all parameters will be restored to default 

settings.

LED 

Indicator

Solid Red: Camera starting up.

Slow-flashing Red: Network exception.
Fast-flashing Red: Camera exception (e.g. Micro SD card 

error).
Solid Blue: App visiting camera.

Slow-flashing Blue: Camera running properly.
Fast-flashing Blue: Camera ready for Wi-Fi connection.

Get the EZVIZ App


1. Connect your mobile phone to Wi-Fi (suggested). 

2. Download and install the EZVIZ app by searching for “EZVIZ” in the App Store 

or Google Play

TM

.

3. Launch the app and register an EZVIZ user account.

EZVIZ App

If you have already used the app, please make sure that it is the latest version. To find 

out if an update is available, go to the app store and search for "EZVIZ".

Connect to the Internet

• 

Wired Connection: Connect the camera to a router. Refer to 

Option A

.

• 

Wireless Connection: Connect the camera to Wi-Fi. Refer to 

Option B

.

1. Option A: Wired Connection

1. Connect the power adapter cable to the camera’s power port.

2. Plug the power adapter into an electrical outlet.

• 

Use power adapter and power cable come with the camera in the box.

•  The LED turning fast-flashing blue indicates that the camera is powered on and ready 

for network configuration.

3. Connect the camera to the LAN port of your router with the Ethernet cable 

(purchase separately).

The LED turning slow-flashing blue indicates that the camera is connected to the 

Internet

Содержание C3W

Страница 1: ...INFRINGEMENT OF THIRD PARTY IN NO EVENT WILL EZVIZ ITS DIRECTORS OFFICERS EMPLOYEES OR AGENTS BE LIABLE TO YOU FOR ANY SPECIAL CONSEQUENTIAL INCIDENTAL OR INDIRECT DAMAGES INCLUDING AMONG OTHERS DAMAG...

Страница 2: ...tion A Wired Connection 2 2 Option B Wireless Connection 3 Installation 4 1 Micro SD Card Installation Optional 4 2 Installation Location 5 3 Installation Procedure 5 Operations on the EZVIZ App 6 1 L...

Страница 3: ...ng Template Waterproof Kit Screw Kit Power Adapter Regulatory Information Quick Start Guide The power adapter s appearance is subject to the one you have bought 2 Basics Micro SD Card Slot RESET Butto...

Страница 4: ...egister an EZVIZ user account EZVIZ App If you have already used the app please make sure that it is the latest version To find out if an update is available go to the app store and search for EZVIZ C...

Страница 5: ...on the body of the camera Scan QR Code Follow the EZVIZ app wizard to add the camera to the app 2 Option B Wireless Connection 1 Connect the power adapter cable to the camera s power port 2 Plug the p...

Страница 6: ...arameters to default Press and hold the reset button for about 4s in any of the following cases The camera fails to connect to your Wi Fi network You want to connect the camera to another Wi Fi networ...

Страница 7: ...e protective film from the lens 2 Stick the drilling template onto a clean and flat surface 3 For cement wall only Drill screw holes according to the template and insert anchors 4 Use screws to fix th...

Страница 8: ...hown below You can watch a live feed take snapshots record videos or choose video definition as needed C3TN Icon Description Share Share your device with anyone you want Settings View or change the de...

Страница 9: ...to a new network Cloud Storage You can subscribe and manage the cloud storage Storage Status You can see micro SD card capacity used space and free space here Device Version You can see device versio...

Страница 10: ...8...

Страница 11: ...EZVIZ account so that Alexa can control your EZVIZ devices 6 You will see EZVIZ has been successfully linked then tap DISCOVER DEVICES to allow Alexa to discover all your EZVIZ devices 7 Go back to A...

Страница 12: ...rks with Google and search for EZVIZ where you will find EZVIZ skills 5 Enter your EZVIZ username and password and tap Sign in 6 Tap the Authorize button to authorize Google to access your EZVIZ accou...

Страница 13: ...er the Device Details interface if the Initialize Storage Card button appears you need to initialize the micro SD card first 2 The micro SD card recording for the motion detection is enabled by defaul...

Отзывы: