background image

Installing the Multi-Touch software


)

NOTE

The illustrations and certain descriptions of the software may vary due to 

development process.

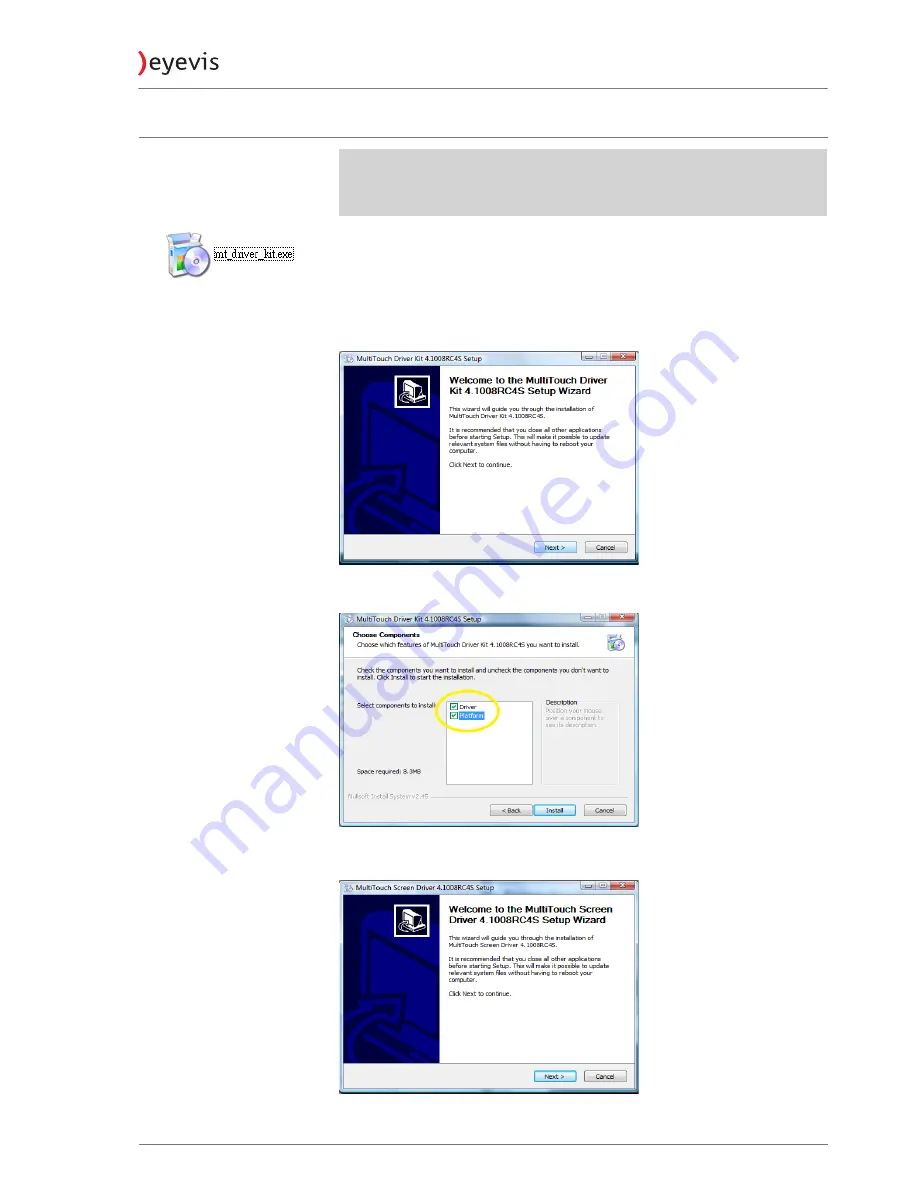
The True Multi-Touch touch screen requires drivers. Insert the attached 

Installation-CD into the dedicated PC´s CD-ROM drive.  

To start the software installation: 

1. 

Run mt_driver_kit.exe.

2. 

Press 

NEXT >

 to continue.


3. 

Check Driver and Platform than press 

INSTALL

 to continue.


4. 

Press 

NEXT >

 to continue.


EYE-LCD-4600/5500/6500-OPS

35

Version 1.1 | January 2015

Содержание EYE-LCD-4600-OPS

Страница 1: ...eyeLCD 4600 5500 6500 OPS EYEVIS LCD LINE User Manual Version 1 1 January 2015 Technical changes reserved...

Страница 2: ...licated according to the terms of the licence No part of this documentation may be reproduced stored in databases or transferred in any form electronically mechanically on recording media or in any ot...

Страница 3: ...Motion to ON 32 Operate display within its rated ambient environment 32 Avoid static content 32 Rotating the display 32 Installing Touch Screen 33 System requirements 33 EYE LCD 4600 5500 OPS 33 Conne...

Страница 4: ...ra 65 Failure of pixel 65 Accessories 65 Factory applied serial number 65 Reaction time 65 Advised procedure for raising a claim 66 Consider the manual before raising a claim 66 Prepare necessary info...

Страница 5: ...th In the text section the general warning symbol is used in conjunction with the warning levels described below CAUTION Indicates a hazard that could lead to minor or moderate injuries WARNING Indica...

Страница 6: ...duct in a place where water may splash onto it Be careful of equipment which drains water such as an air conditioner Ventilation The vents and other openings in the cabinet are designed for ventilatio...

Страница 7: ...nded by the manufacturer Heat sources Keep the product away from heat sources such as radiators heaters stoves and other heat generating products including amplifiers Batteries Incorrect use of batter...

Страница 8: ...ch as paper clips or pins enter the monitor as this could lead to fire or electric shock Do not place the monitor on top of unstable objects or in unsafe places Do not allow the monitor to receive str...

Страница 9: ...Do not use the power cord with a power tap Adding an extension cord may lead to fire as a result of overheating Do not remove or insert the power plug with wet hands Doing so could result in electric...

Страница 10: ...nsuring the monitor is not overhanging the edge of the supporting furniture Not placing the monitor on tall furniture for example cupboards or bookcases without anchoring both the furniture and the mo...

Страница 11: ...s allgemeine Warnsymbol in Verbindung mit den nachfolgend beschriebenen Warnstufen verwendet VORSICHT Kennzeichnet eine Gefahr die zu leichten oder mittleren Verletzungen f hren kann WARNUNG Kennzeich...

Страница 12: ...atzger te bzw Zubeh rteile besteht evtl Unfallgefahr Wasser und Feuchtigkeit Benutzen Sie das Ger t nicht in der N he von Wasser Montieren Sie das Ger t unter keinen Umst nden an einer Stelle an der W...

Страница 13: ...der Service Techniker nur die vom Hersteller bezeichneten Teile oder Teile mit gleichen Eigenschaften und gleichem Leistungsverm gen wie die Originalteile verwendet Die Verwendung anderer Teile kann z...

Страница 14: ...als ein Standbild ber l ngere Zeit hinweg anzeigen da dies ein Nachleuchten am Bildschirm zur Folge haben k nnte Vermeiden Sie es den Monitor mit harten Gegenst nden abzureiben oder zu ber hren Wir bi...

Страница 15: ...leicht zug nglich ist Das Netzkabel dient als eine Trennvorrichtung Das Netzkabel Besch digen Sie das Netzkabel nicht stellen Sie keine schweren Gegenst nde darauf und berdehnen oder knicken Sie es n...

Страница 16: ...en Sie den Monitor niemals auf ein gro es M belst ck z B einen Schrank oder in ein B cherregal ohne sowohl das M belst ck als auch den Monitor an einem geeigneten Element sicher zu verankern Stellen S...

Страница 17: ...la mort Dans le texte le symbole d avertissement g n ral est utilis en conjonction avec les niveaux d alerte d crits ci dessous PR CAUTION Indique un danger qui pourrait provoquer des blessures mineur...

Страница 18: ...ccidents Eau et humidit N utilisez pas cet appareil pr s de l eau N installez pas le produit un endroit o il pourrait recevoir de l eau vitez en particulier les emplacements sous les appareils vidange...

Страница 19: ...installez le en respectant la m thode recommand e par le fabricant Sources de chaleur Tenez l appareil l cart de sources de chaleur telles que radiateurs dispositifs de chauffage po les et autres appa...

Страница 20: ...aucoup de poussi res o le degr d humidit est lev ou encore l o il pourrait se trouver en contact avec de l huile ou de la vapeur car cela pourrait provoquer un d but d incendie Assurez vous que le mon...

Страница 21: ...e Utilisez seulement le cordon d alimentation fourni avec le moniteur Ne branchez pas le cordon d alimentation sur une prise multiple Ajouter une rallonge peut entra ner une surchauffe et provoquer un...

Страница 22: ...V rifier que le moniteur ne d passe pas du bord du meuble sur lequel il est pos Ne pas placer le moniteur sur des meubles hauts armoires ou tag res par exemple sans fixer le meuble concern et le moni...

Страница 23: ...U is an OPS compliant media player powered by 4th generation Intel Core processors Yet eyevis EPU has high scalability allowing for easy storage capacity expansion through pluggable 2 5 storage unit a...

Страница 24: ...ng shipping To unpack the device 1 Before unpacking your device prepare a stable level and clean surface near a wall outlet 2 Place the LCD monitor box in an upright position and open from the top of...

Страница 25: ...der 1 Remote Control 1 Batteries AAA in remote control included 2 USB cable Touch model available 1 Power Cord black VGA Cable D Sub IR Extender OSD Remote Control USB Cable included only with touch m...

Страница 26: ...n power of the monitor I is power ON O is power OFF Main power switch AC In socket Connectors Power switches The main power switch located directly below the AC power inlet Please see the chapter Main...

Страница 27: ...rt Source input HDMI input DVI input VGA PC input D Sub 15 pin PC audio In Mini jack IR Extender Mini jack PC audio Out Mini jack TOUCH USB USB EYE LCD 4600 OPS TOUCH 6IR available only RS232C input D...

Страница 28: ...B 2 0 USB 2 0 input EPU module input EPU EPU module input DisplayPort Source input HDMI input DVI input VGA PC input D Sub 15 pin PC audio In Mini jack IR Extender Mini jack PC audio Out Mini jack RS2...

Страница 29: ...t EPU EPU module input DisplayPort Source input HDMI input DVI input VGA PC input D Sub 15 pin PC audio In Mini jack IR Extender Mini jack PC audio Out Mini jack RS232C input D Sub 9 pin Communication...

Страница 30: ...devices mouse keyboard stick 4 USB 3 0 Connector for USB devices mouse keyboard stick 5 Line Out 3 5 mm jack connector plug for audio output 6 Mic in 3 5 mm jack connector plug for audio input 7 Ether...

Страница 31: ...evice s I is power ON O is power OFF 2 Plug in the signal source cables 3 Then press the power key on the keypad of the display or the power key on the remote control to turn on the display 4 Turn on...

Страница 32: ...time the display will automatically go into power saving sleep mode Adjusting volume and input source Adjusting the volume 1 Using the remote control press the VOLUME to decrease or VOLUME to increas...

Страница 33: ...ec pressing Display OFF and EPU shutdown Power button functions of EPU Pressing power button Description long pressing EPU force shutdown short pressing EPU shutdown NOTE If the display and EPU is tur...

Страница 34: ...c content For more information see Prevention of undesirable effects on page 61 Rotating the display When using the display in portrait position the display should be rotated clockwise so that the lef...

Страница 35: ...re Graphic Card DX 9 0 standalone VRAM 512 MB or better Minimum Processor Dual Core 2 5 GHz or better Memory 2 GB or more Graphic Card N A Operating System Operating systems that support Multi Touch W...

Страница 36: ...er to the display screen 2 Connect power to the display screen and switch on 3 Connect power to the computer and switch on 4 Plug the power adaptor into a wall socket 5 Connect overlay power adaptor i...

Страница 37: ...rue Multi Touch touch screen requires drivers Insert the attached Installation CD into the dedicated PC s CD ROM drive To start the software installation 1 Run mt_driver_kit exe 2 Press NEXT to contin...

Страница 38: ...press NEXT to continue 6 Press INSTALL to continue 7 Press on INSTALL THIS DRIVER SOFTWARE ANYWAY to continue 8 Press FINISH to continue After installation a new icon appears in the Windows notificati...

Страница 39: ...te it First close all applications so that you have a clear desktop with the normal mouse pointer showing To enter calibration mode 1 Double press icon in the Windows notification area Main Window ope...

Страница 40: ...process at all quadrants The calibration is finished The calibration modus will switched off and the settings will saved on the PC automatically TIP If cross is still white remove your finger and tou...

Страница 41: ...rease or decrease values or insert the values directly on the number block If using the arrow buttons for entering numerical values holding the keys pressed will toggle larger steps You can use the PO...

Страница 42: ...available at this model 8 P SOURCE Not available at this model 9 MENU Opens the monitor s on screen menu system When the menu system is already open pressing this button will select the previous subme...

Страница 43: ...ry cover in the direction of the arrow and snap it back into place NOTE Used batteries needed to follow the city rule to be discarded NOTICE About the remote control Don t drop shake or bump Don t pla...

Страница 44: ...e through the menus and adjust options Press MENU to return to the previous menu To exit the menu system press the EXIT button On Screen Display OSD overview NOTE The user interface of the OSD menu de...

Страница 45: ...ess or select the desired level and then press ENTER Range 0 100 Default 50 Hue Increases or decreases the green hue Only Video Mode Press or select the desired level and then press ENTER Range 0 100...

Страница 46: ...elect the desired level and then press ENTER Range 128 384 Default 256 Blue Gain Set Colour Temperature to User Mode in order to adjust this setting Adjusts the blue gain of image Press or select the...

Страница 47: ...Adjusts the balance of the left and right speakers Press or select the desired level and then press ENTER Range 0 20 Default 10 HDMI Audio Input Selects HDMI audio input mode Press or select the desir...

Страница 48: ...tation Options Landscape Portrait Default Landscape OSD Language Selects the menu language Press or to select the desired language and then press ENTER Options English and German Default English OSD T...

Страница 49: ...k continued Basic RTC Basic Settings RTC Current Time Current time setting Year Month Date Hour Minutes Timer Mode Selects the timer mode Press or ENTER to enter the submenu EYE LCD 4600 5500 6500 OPS...

Страница 50: ...the power on off timer and specify the on off times for each day of the week Press or to adjust the desired option and then press ENTER For each day of the week you have the following options Enable o...

Страница 51: ...cify the on off times for work days and individual weekend days Press or to adjust the desired option and then press ENTER For Monday Friday Saturday or Sunday you have the following options Enable or...

Страница 52: ...e the power on off timer and specify the on off times for all days Press or to specify the desired time for turning on off and then press ENTER For all days you have the following options Enable or Di...

Страница 53: ...es slight frame motion to help reducing the risk of image retention Press or select the desired option and then press ENTER Options On Off Default Off Baud Rate Selects the baud rate and enables more...

Страница 54: ...of the subnet mask Press or to select the desired number Press ENTER to set the entered subnet mask Range 0 255 0 255 0 255 0 255 Gateway Adjusts gateway address Press to select the next number of th...

Страница 55: ...e power To change the behaviour of Sleep Mode change the Wake up from Sleep setting in the Advanced menu 1 VGA Only default The RS232 DisplayPort HDMI and DVI inputs are inactive when the display is i...

Страница 56: ...or of the EPU and also switches the RS232 communication between the EPU and an external device e g Laptop PC Baud Rate contains a submenu with the settings for the baud rate and the setting UART Port...

Страница 57: ...xtern To control an external device Connect the external device to the USB connector of the display Press to enter the submenu of Baud Rate Press or to switch the option to EPU and then press ENTER TI...

Страница 58: ...controlled using the on screen display OSD and can also be controlled via the display s RS232 serial interface The display can also be turned on and off using the RS232 interface For more information...

Страница 59: ...t some peripherals such as keyboards include USB ports that do not provide sufficient power for certain devices Try connecting the touch screen to a different USB port on the computer Touch screen Cur...

Страница 60: ...ectric shock Immediately remove the power plug from the outlet Contact your dealer for inspection CAUTION Damage caused by dropping the device If you continue to use the device after it has been dropp...

Страница 61: ...47 Part 15 Subpart B Class A CISPR 22 ANSI C63 4 ICES 003 Issue 5 CE EN 55022 EN 55024 EN 61000 3 2 EN 61000 3 3 cTUVus UL 60950 1 CAN CSA C22 2 No 60950 1 07 CB IEC 60950 1 EYE LCD 4600 5500 6500 OPS...

Страница 62: ...hanisms Heavy Image Sticking may be reversed by long switch off of the LCD TFT displays Image Sticking of TFT panels is excluded from the warranty Mura Further effect is Mura a Japanese term for uneve...

Страница 63: ...device to Stand by mode for 4 hours NOTICE Avoiding static images Static images increase the risk of undesirable effects Activate a screen saver on the computer for these signals if they do not have...

Страница 64: ...15 Panel size from 71 to 82 N 14 G 18 Panel size from 83 to 110 N 16 G 24 Tab 3 Acceptable total number of defects for touch surfaces D diameter L length W width N number of pollution of a category G...

Страница 65: ...768 0 786 million pixel 2 2 4 4 n 0 0 2xn 8 SXGA 1280 x 1024 1 310 million pixel 3 3 7 7 n 0 0 2xn 14 WXGA 1366 x 768 1 049 million pixel 3 3 6 6 n 0 0 2xn 12 WXGA 1440 x 900 1 296 million pixel 3 3...

Страница 66: ...y his specialist supplier point of purchase immediately about the defect Otherwise the product will be treated under usual terms of warranty Return to Base Warranty Bring In Warranty Defective parts o...

Страница 67: ...wear and tear or defects caused by lack of service and maintenance e g cleaning the filter Act of God fire flood aggressive chemical aggressive biological activity event of war vandalism accidents et...

Страница 68: ...r Packing The customer has to pack the defective device properly in the original box to label it as fragile and to attach the RMA number visibly on the box eyevis can provide a new original box on req...

Страница 69: ...ge The policy sum regarding all requirements of the warranty does not exceed at discretion of eyevis the original purchase price of the product or alternatively the costs of substitution of the produc...

Страница 70: ...S232 In Control RS232 Control Buttons IR Remote Control MECHANICAL Dimensions W H 1068 3 620 68 6 mm 1257 2 728 66 3 mm 1522 8 897 8 68 4 mm Bezel Width left bottom ca 22 1 mm right top ca 23 5 mm lef...

Страница 71: ...Appendix Dimensions Dimensions EYE LCD 4600 OPS EYE LCD 4600 5500 6500 OPS 69 Version 1 1 January 2015...

Страница 72: ...Dimensions EYE LCD 4600 OPS Touch Dimensions in mm EYE LCD 4600 5500 6500 OPS 70 User Manual...

Страница 73: ...mensions EYE LCD 5500 OPS Touch Dimensions in mm A B C D E EYE LCD 5500 OPS 66 3 31 22 2 22 2 53 6 EYE LCD 5500 OPS Touch 84 1 48 8 20 1 20 1 71 4 EYE LCD 4600 5500 6500 OPS 71 Version 1 1 January 201...

Страница 74: ...Dimensions EYE LCD 6500 OPS Dimensions in mm A B C D E 68 4 33 5 43 1 43 1 55 8 EYE LCD 4600 5500 6500 OPS 72 User Manual...

Страница 75: ...may result in dropping the monitor and or serious injury When moving a monitor in its shipping carton lift the carton using the white handles Carrying the monitor This monitor is heavy please follow p...

Страница 76: ...itor LCD screen face down on a flat stable surface which has been covered with a soft cloth This will help prevent the monitor from being scratched 2 Remove the screws M8 15 screw x2 from the stand br...

Страница 77: ...a network LAN and or assistance from your system administrator may be required Locating the LAN connector on your display The EYE LCD 4600 5500 6500 OPS can optionally be equipped with a RJ45 Ethernet...

Страница 78: ...Network Settings to save the desired settings The default settings are shown below Control Item Setting Dynamic IP Disable Static IP Adress 192 168 2 1 Subnet Mask 255 255 255 0 Gateway 192 168 2 1 D...

Страница 79: ...gnored Write Instruction Description SET Instruction to write values implies the existence of one or more arguments Other Instruction Description FORMAT Service command to delete specific settings on...

Страница 80: ...Instruction Positive Response Negative Response FORMAT ACK 1 NACK 1 NOTE Unknown instructions are always answered with NACK DEVICE_ID Command GET DEVICE_ID ALL The device transmits all available data...

Страница 81: ...00 80 Gamma COLOR_GAMMA 0 Off 1 2 2 0 Saturation IMAGE_SATURATION 0 100 80 Backlight On Off BACKLIGHT_EN 0 OFF 1 ON 1 Backlight Brightness BACKLIGHT 0 100 80 Smart Light Control BACKLIGHT_SLC_EN 0 Off...

Страница 82: ..._ANALOG_PHASE 0 63 40 VGA Clock IMAGE_ANALOG_CLOCK 0 100 80 OSD OSD Language OSD_LANGUAGE 0 English 1 German 0 OSD Transparency OSD_TRANSPARENCY 0 12 0 OSD Timeout OSD_TIMEOUT 5 120 30 in seconds OSD...

Страница 83: ...AN_GW xxx xxx xxx xxx LAN DNS IP Setting COM_LAN_DNS_IP xxx xxx xxx xxx LAN Save Settings COM_LAN_SAVE_ SETTINGS 1 Trigger by sending value 1 Note To activate the LAN settings execute this command LAN...

Страница 84: ...IGATING 39 42 OPENING 39 USING 42 WOD 53 OSD KEYPAD 31 P PACKAGING 22 PACKING LIST 22 PIXEL 62 POLLUTIONS 62 BLISTERING 62 DEPRESSION 62 INCLUSION 62 LINT 62 MARK 62 SCRATCH 62 PORTRAIT 32 R RETENTION...

Страница 85: ...Notes...

Страница 86: ...0 7121 4 33 03 0 Fax 49 0 7121 4 33 03 22 Hotline 49 0 7121 4 33 03 290 netPIX eyeCON Hotline 49 0 7121 4 33 03 291 Cubes Displays web www eyevis de e mail info eyevis de service service eyevis de Ve...

Отзывы: