background image

Switcher Software, cont’d

MPX Plus 866 A Media Presentation Matrix Switcher • Switcher Software

5-14

PRELIMINAR

Y

A/V matrix block


(

c

)

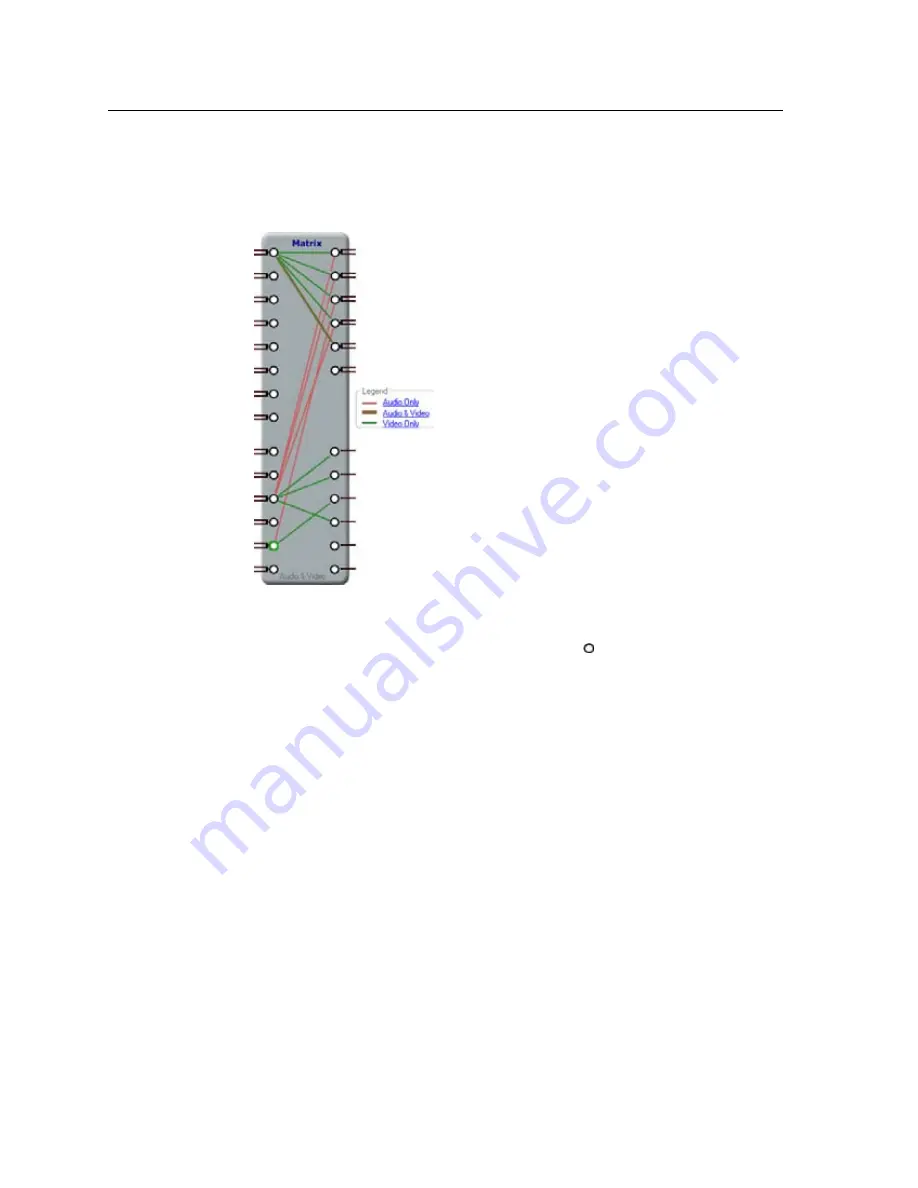
The A/V matrix block (figure 5-7) displays the current tie configuration of either 

the program’s own emulation or the connected matrix switcher and provides a way 

to make or break ties.

Figure 5-7 — A/V matrix block

• 

To create a tie, drag a line from an input node ( ) to one or more output nodes 

or right-click an input node and select 

Connect To All Outputs

.

• 

To remove a tie, click an input or output node and depress the keyboard 

Delete key or right-click an input or output node and select 

Delete All 

Connections

 (input node) or 

Delete Connection

 (output node).  The Legend 

field identifies the type of tie: video and audio, audio only, or video only.

N

  Video and audio ties between the low resolution video input group and the low 

resolution video output group are 

always

 made with the audio redirected.  In 

such an operation, the switcher automatically ties the audio to an output in the 

computer video/audio outputs group (outputs 1 through 6) as follows:


  If the video is tied to output 7, the audio is tied to output 1. 

  If the video is tied to output 8, the audio is tied to output 2. 

  If the video is tied to output 9, the audio is tied to output 3. 

  If the video is tied to output 10, the audio is tied to output 4. 

  If the video is tied to output 11, the audio is tied to output 5. 

  If the video is tied to output 12, the audio is tied to output 6.

• 

To set up audio in follow mode (audio and video have the same tie 

configuration), click 

Audio & Video

 in the Legend field or 

View

 > 

Audio & 

Video I/O

 on the task bar.

• 

To set up audio in breakaway mode (audio and video have different tie 

configurations), click 

Video Only

 or 

Audio Only

 in the legend field, or 

View

 > 

Audio I/O

 or 

View

 > 

Video I/O

 on the task bar.

Содержание MPX Plus 866 A

Страница 1: ...MPX Plus 866 A Media Presentation Matrix Switcher 68 1193 01 Rev B 05 09 ...

Страница 2: ...enden sollten Sie alle Sicherheits und Bedienungsanleitungen genau durchlesen und verstehen Aufbewahren der Anleitungen Die Hinweise zur elektrischen Sicherheit des Produktes sollten Sie aufbewahren damit Sie im Bedarfsfall darauf zurückgreifen können Befolgen der Warnhinweise Befolgen Sie alle Warnhinweise und Anleitungen auf dem Gerät oder in der Benutzerdokumentation Keine Zusatzgeräte Verwende...

Страница 3: ...ection against harmful interference when the equipment is operated in a commercial environment This equipment generates uses and can radiate radio frequency energy and if not installed and used in accordance with the instruction manual may cause harmful interference to radio communications Operation of this equipment in a residential area is likely to cause harmful interference in which case the u...

Страница 4: ......

Страница 5: ...t groups 2 5 Mic line audio input group 2 6 Audio outputs 2 6 Serial connections 2 7 Ethernet connection 2 8 Cabling and RJ 45 connector wiring 2 8 Reset button 2 9 Power 2 9 Front Panel Configuration Port 2 10 Chapter Three Operation 3 1 Front Panel Controls and Indicators 3 2 Input and output buttons 3 3 Input buttons 3 4 Output buttons 3 4 Control buttons 3 5 I O controls 3 7 Button icons 3 8 F...

Страница 6: ...3 34 Example 11 Viewing and adjusting an input audio level 3 36 Viewing and adjusting the output volume 3 38 Reading the displayed volume 3 39 Example 12 Viewing and adjusting an output volume level 3 41 Selecting the RS 232 Primary port s baud rate 3 42 Setting the front panel locks Executive modes 3 44 Selecting Lock mode 2 or toggling between mode 2 and mode 0 3 44 Selecting Lock mode 2 or togg...

Страница 7: ...IP SIS commands 4 19 Command response table for IP SIS commands 4 20 Special Characters 4 21 Chapter Five Switcher Software 5 1 Control Software 5 2 Installing the software 5 2 Software operation via serial port 5 3 Software operation via Ethernet 5 3 Ethernet protocol settings 5 3 DSP Configurator Program 5 4 Starting the program 5 4 Using the program 5 4 Audio signal processor chains and control...

Страница 8: ...ving a preset 5 34 Setting group master soft limits 5 36 Optimizing the Audio 5 36 Input clipping and clipping meters 5 36 Setting the input and output gain structure 5 37 Adjusting the pre matrix 5 37 Finalizing the output gain structure 5 38 Setting the mic input and mic mix point levels 5 38 Adjusting the post matrix trim 5 39 Setting the volume control for the amplifier stage 5 39 Calibrating ...

Страница 9: ...iguration Tab 6 5 System Settings page 6 5 IP Settings fields 6 6 Unit Name field 6 6 DHCP radio buttons 6 6 IP Address field 6 6 Gateway IP Address field 6 6 Subnet Mask field 6 6 MAC Address field 6 6 Date Time Settings fields 6 7 Video Input Settings page 6 8 Passwords page 6 9 Firmware Upgrade page 6 10 File Management Tab 6 14 File Management page 6 14 Control Tab 6 15 Set and View Ties page ...

Страница 10: ...ge return line feed A 5 Close A 5 Help A 5 Quit A 5 Subnetting A Primer A 6 Gateways A 6 Local and remote devices A 6 IP addresses and octets A 6 Subnet masks and octets A 6 Determining whether devices are on the same subnet A 7 Appendix B DSP SIS Commnads B 1 Command Response Table for DSP SIS Commands B 2 Symbol definitions B 3 Command response table for DSP SIS commands B 9 Appendix C Reference...

Страница 11: ...PRELIMINARY MPX Plus 866 A 1 Chapter One Introduction About this Manual About the Media Presentation Matrix Switcher Definitions Features ...

Страница 12: ...CO MP UT ER IN VID EO OU T O U T P U T S O U T P U T S 1 2 3 6 4 5 I N P U T S 1 2 3 4 5 10 7 11 8 9 6 13 12 14 7 9 11 8 10 12 RE SE T LAN AC T MIX MIX MIX MIX LIN K 9 11 13 10 12 14 PAS S TH RO UG H S V IDE O VID EO Y C Y V ID C VID EO IN AU X MI X RE MO TE AU DIO INP UT S CO MP UT ER OU T Y V ID C Y V ID C Y V ID C GEN LOC K VID EO VID EO 15 16 17 18 I N P U T S INP UT LEV EL RS 23 2 PR IMA RY M...

Страница 13: ...accomplished with virtually no crosstalk or signal noise between channels The audio switching can either be linked with the video audio follow or independent of the video audio breakaway The 14 inputs in the primary audio group can be switched along with inputs from either video group although audio ties can only be made to the computer audio group Adjustable input audio gain and attenuation compe...

Страница 14: ...e than one input Configuration One or more ties one or more sets of ties and or some or all of the signal processor settings made in the DSP Configurator program Current configuration The configuration that is currently active in the switcher also called configuration 0 Partial DSP Configurator created preset A partial configuration a subset of ties and or sets of ties and or signal processor sett...

Страница 15: ...are synced to input 9 Output Video format 7 Composite only 8 Composite only N For outputs 7 and 8 if the tied input is S video the switcher encodes it to composite If the tied input is composite video the switcher passes it through unprocessed 9 S video only 10 S video only N For outputs 9 and 10 if the tied input is S video the switcher passes it through unprocessed If the tied input is composite...

Страница 16: ...pe H V Vertical Freq 60 Hz Horz Freq 31 5 kHz Input 02 Signal PRESENT Sync Type H V Vertical Freq 60 Hz Horz Freq 31 5 kHz Input 03 Signal PRESENT Sync Type H V Vertical Freq 60 Hz Horz Freq 31 5 kHz Input 04 Signal PRESENT Sync Type H V Vertical Freq 60 Hz Horz Freq 31 5 kHz Input 05 Signal PRESENT Sync Type H V Vertical Freq 60 Hz Horz Freq 31 5 kHz Input 06 Signal PRESENT Sync Type H V Vertical...

Страница 17: ... gain or attenuation 0 dB to 80 dB using the DSP Configurator program or SIS commands and the Ethernet port or any RS 232 port Phantom power The switcher can provide 48 VDC phantom power a standardized method of providing power to condenser microphones Output two channel mono audio on the primary audio group outputs Audio output volume The audio volume of each output can be displayed and adjusted ...

Страница 18: ...ain and attenuation and volume control The front panel features illuminated pushbuttons that can be labeled with text or graphics Windows based control program For RS 232 remote control from a PC the two Extron Windows based control programs provide graphical interface and drag and drop point and click operation The Windows based control programs also have emulation modes that let you create switc...

Страница 19: ... open area where operation by unauthorized personnel may be a problem either of two security lockout modes can be implemented the third mode is unlocked When a front panel locked mode is enabled a special button combination or SIS command is required to unlock the front panel controller and make the front panel fully operational Power The matrix switcher s 100 VAC to 240 VAC internal power supply ...

Страница 20: ...Introduction cont d MPX Plus 866 A Media Presentation Matrix Switcher Introduction 1 10 PRELIMINARY ...

Страница 21: ...PRELIMINARY MPX Plus 866 A 2 Chapter Two Installation Mounting the Switcher Rear Panel Connections and Settings Front Panel Configuration Port ...

Страница 22: ...loading Mounting of the equipment in the rack should be such that a hazardous condition is not achieved due to uneven mechanical loading 4 Circuit overloading Consideration should be given to the connection of the equipment to the supply circuit and the effect that overloading of the circuits might have on overcurrent protection and supply wiring Appropriate consideration of equipment nameplate ra...

Страница 23: ...6 MIC LINE INPUTS N15779 1 2 13 15 10 5 3 8 9 11 7 4 6 12 14 11 11 Figure 2 2 MPX Plus 866 A Media Presentation Matrix Switcher Video input and output connections Computer video group N The switcher does not alter the computer video inputs in any way The signal output is in the same format as the input The switcher can connect to up to as many as eight computer video sources and output to as many ...

Страница 24: ... 10 Connect S video displays to these female BNC connectors N If the input tied to Output 9 or Output 10 is composite video the switcher decodes the input to S video If the tied input is S video the switcher passes it through to the output with no processing g Pass through outputs Output 11 and Output 12 Connect S video or composite video displays to these female BNC connectors Connect S video Y a...

Страница 25: ...ceptacle and partially into an adjacent receptacle This misconnection could damage the audio circuits Ensure that the connector is plugged fully and only into the desired input or output N The length of exposed wires is critical The ideal length is 3 16 5 mm If the stripped section of wire is longer than 3 16 the exposed wires may touch causing a short circuit between them If the stripped section ...

Страница 26: ... j Phantom 48 V LEDs These four LEDs numbered 15 through 18 light to indicate that 48 V phantom power is applied to the associated mic line inputs Audio outputs k Connections for balanced and unbalanced audio outputs These 5 pole 3 5 mm captive screw connectors output the selected unamplified line level audio Connect audio devices such as an audio amplifier or powered speakers See figure 2 6 to pr...

Страница 27: ...ing a short circuit between them If the stripped section of wire is shorter than 3 16 wires can be easily pulled out even if tightly fastened by the captive screws N These two ports are hardwired for RS 232 only The RS 232 Secondary port is active only if the front panel Configuration port is not in use If a front panel configuration connection is made the rear panel RS 232 Secondary port becomes ...

Страница 28: ...hernet Do not stretch or bend cables Transmission errors can occur The cable used depends on your network speed The switcher supports both 10 Mbps 10Base T Ethernet and 100 Mbps 100Base T Fast Ethernet half duplex and full duplex Ethernet connections 10Base T Ethernet requires CAT 3 UTP or STP cable at minimum 100Base T Fast Ethernet requires CAT 5e UTP or STP cable at minimum The Ethernet cable c...

Страница 29: ...tions in chapter 3 Operation for details Events mode 3 reset Toggles events monitoring on and off IP settings mode 4 reset Resets the switcher s IP functions N IP settings reset does not replace any user installed firmware Absolute mode 5 reset Restores the switcher to the default factory conditions Hard mode 1 reset Restores the switcher to the base firmware N Hard reset does not clear the curren...

Страница 30: ...e Figure 2 10 Optional 9 pin TRS RS 232 cable N This port is completely separate from the rear panel Remote port and is not affected by changes to the rear panel port s protocol This front panel port s protocol can be changed under SIS command control only This port is RS 232 only with its default protocols as follows 9600 baud no parity 8 bit 1 stop bit no flow control N The Configuration port ca...

Страница 31: ...PRELIMINARY MPX Plus 866 A 3 Chapter Three Operation Front Panel Controls and Indicators Front Panel Operations Rear Panel Operations Optimizing the Audio Troubleshooting Configuration Worksheets ...

Страница 32: ...n can be turned off see Background illumination on page 3 45 The buttons blink or are lit at full intensity depending on the operation when selected AUDIO VIDEO ENTER PRESET VIEW ESC PRESENTATION MATRIX SWITCHER MPX PLUS 866 A COMPUTER INPUTS 1 2 3 4 5 6 7 8 9 10 11 12 13 14 1 2 3 4 5 6 7 8 9 10 11 12 VIDEO INPUTS VIDEO OUTPUTS CONFIG COMPUTER AUDIO OUTPUTS I O CONTROL 1 2 3 4 10 9 8 7 6 5 Figure ...

Страница 33: ...configuration Action indication outputs Select indicate composite video Select indicate S video Input audio level Action indication inputs Inputs Select the input s audio for gain or attenuation adjustment Lit Input s audio is selected for adjustment Indication outputs Indicate the input gain or attenuation level Output audio volume Action indication outputs Outputs Select the output s audio for v...

Страница 34: ... resolution video input buttons display part of the RGB delay value the delay itself is applied only to ties within the computer video group Display the output volume level See Viewing and adjusting the output volume on page 3 38 Input 1 and Input 2 Toggle background illumination of the buttons on and off See Background illumination on page 3 45 Output buttons c Computer Audio outputs 1 through 6 ...

Страница 35: ...ges that you make on the front panel and indicate that a potential change has been created but not saved To create a simple configuration Specify video audio or both see I O selection buttons i and j Press the desired input button a or b Press the desired output button s c or d Press the Enter button N Video outputs in the computer video group c can be tied only to a computer video input a Video o...

Страница 36: ...se the volume of the selected output See Viewing and adjusting the output volume on page 3 38 With the Enter Preset and Esc buttons select Serial Port Configuration mode See Selecting the RS 232 Primary port s baud rate on page 3 42 Select 38400 baud for the RS 232 Primary port in Serial Port Selection and Configuration mode and indicate the selection See Selecting the RS 232 Primary port s baud r...

Страница 37: ...the front panel locks Executive modes on page 3 44 With the Audio button commands the front panel system reset See Performing a system reset from the front panel on page 3 46 Selects the Video mode in which you can set the RGB delay and select the input formats for inputs 11 through 14 See Setting RGB delay computer video group only on page 3 23 j Audio button The Audio button has one primary func...

Страница 38: ...or blank labels and a procedure for removing and replacing the translucent covers 9 11 13 14 7 9 10 11 12 VIDEO INPUTS VIDEO OUTPUTS VCR DVD Document Camera Figure 3 2 Sample button icons Front Panel Operations The following paragraphs detail the power up process and then provide sample procedures for the following actions Creating ties sets of ties and configurations Changing a configuration View...

Страница 39: ...ll ties only configuration that has been created via the front panel SIS commands or the Matrix Switchers Control Program N Up to 32 partial or global ties presets can be stored in memory Preset locations are assigned to the input buttons and output buttons Up to 26 preset locations can be selected from the front panel for either saving or retrieving When a preset is retrieved from memory it becom...

Страница 40: ...on The current configuration can be changed using the front panel buttons Change the current configuration as follows 1 Press the Esc button to clear any input button indicators output button indicators or control button indicators that may be lit 2 Select to configure video audio or both by pressing the Video button and or Audio button 3 Select the desired input and output s by pressing the input...

Страница 41: ...t 4 If the video is tied to output 11 the audio is tied to output 5 If the video is tied to output 12 the audio is tied to output 6 If video is selected for configuration the Video LED is lit and you press the input button for an input in one group and then try to select an output in the other group the associated output button cannot be selected The associated input LED remains lit Audio from the...

Страница 42: ...on lights green when selected Press the Audio button to toggle on and off The button lights red when selected 3 Select an input Press and release the input 5 button COMPUTER INPUTS 1 2 3 4 5 6 7 8 Press and release the Input 5 button The button lights amber to indicate that the video and audio signals on this input will be tied to the output s you select next 4 Select the outputs Press and release...

Страница 43: ... and output buttons return to unlit or background illumination Press the Enter button to confirm the configuration change The Enter button returns to unlit or background illumination The current configuration is now Input 5 video and audio tied to output 3 output 4 and output 6 Input 5 video audio tied to outputs 3 4 and 6 Input Output 3 4 6 5 Video Audio ...

Страница 44: ...off The button lights green when selected Press the Audio button to toggle on and off The button is unlit or background illuminated when deselected 3 Select an input Press and release the input 5 button COMPUTER INPUTS 1 2 3 4 5 6 7 8 1 2 3 4 5 6 COMPUTER OUTPUTS Press and release the Input 5 button The button lights green to indicate that the video signal on this input will be tied to or untied f...

Страница 45: ...llumination Press the Enter button to confirm the configuration change The Enter button returns to unlit or background illumination The current configuration is now Video Input 5 video tied to output 1 output 3 output 4 and output 6 Audio Input 5 audio tied to output 3 output 4 and output 6 Input 5 video tied to outputs 1 3 4 and 6 Input 5 audio tied to outputs 3 4 and 6 Input Output 1 3 4 6 5 Vid...

Страница 46: ...ground illuminated when deselected Press the Audio button to toggle on and off The button lights red when selected 3 Select an input Press and release the input 5 button 1 2 3 4 5 6 COMPUTER INPUTS 1 2 3 4 5 6 7 8 COMPUTER AUDIO OUTPUTS The Output 1 button does not light to indicate the tie created in example 2 because that tie is video only The Output 3 Output 4 and Output 6 buttons light red to ...

Страница 47: ...lumination Press the Enter button to confirm the configuration change The Enter button returns to unlit or background illumination The current configuration is now Video Input 5 video tied to output 1 output 3 output 4 and output 6 Audio audio models Input 5 audio tied to output 3 and output 6 Input 5 video tied to outputs 1 3 4 and 6 Input 5 audio tied to outputs 3 and 6 Input Output 1 3 4 6 5 Vi...

Страница 48: ... tied to output 3 If the video is tied to output 10 the audio is tied to output 4 If the video is tied to output 11 the audio is tied to output 5 If the video is tied to output 12 the audio is tied to output 6 N If you select an input in the low resolution video input group inputs 9 through 14 you can select outputs only in the low resolution video output group outputs 7 through 12 The switcher au...

Страница 49: ...icate the need to confirm the change The Computer Output 1 and Output 2 buttons blink red to indicate that the selected audio input will be tied to these outputs 5 Confirm the change Press and release the Enter button ENTER All input buttons and output buttons return to unlit or background illumination Press the Enter button to confirm the configuration change The Enter button returns to unlit or ...

Страница 50: ...ise when an output button for which there are no ties is pushed the output buttons turn on for all outputs without ties To see all ties of the current configuration press and release each input and output button one at a time with the Video button and the Audio button lit In View Only mode you can view video and audio video only or audio only ties Pressing and releasing the Video button and the Au...

Страница 51: ...cted 4 Select an input Press and release the input 5 button 1 2 3 4 5 6 COMPUTER INPUTS 1 2 3 4 5 6 7 8 COMPUTER AUDIO OUTPUTS The output buttons for outputs that are not tied to Input 5 are either unlit or background illuminated NOTE Video Outputs buttons not shown all are unlit or background illuminated The output buttons for outputs that are tied to Input 5 light the appropriate color Amber if ...

Страница 52: ...EO AUDIO 1 2 3 4 5 6 COMPUTER AUDIO OUTPUTS The output buttons for outputs that are tied to Input 5 light green to indicate video ties audio breakaway Press the Video button to select it The button lights green when selected Press the Audio button to deselect it The button is unlit or background illuminated when deselected The output buttons for outputs that are not tied to Input 5 are either unli...

Страница 53: ...ront panel See Setting the front panel Locks Executive modes on page 3 44 1 Press the Esc button to clear any input buttons output buttons or control buttons that may be lit 2 To enter Video mode press and hold the Video button until the button begins to blink green then release the button 3 Press and release an output button to select an output Each lit input button from Input 1 through Input 10 ...

Страница 54: ...ss and release the output 1 button N An output from the low resolution video group cannot be selected COMPUTER INPUTS 1 2 3 4 5 6 7 8 9 10 11 12 13 14 1 2 3 4 VIDEO INPUTS COMPUTER AUDIO O Press and release the Output 1 button The button lights green The input buttons 1 through 10 display the selected output s RGB delay Each lit input button indicates half a second of delay In this example the gre...

Страница 55: ...3 4 5 6 7 8 9 10 11 12 13 14 VIDEO INPUTS Press the Esc button to increase the RGB interval that is applied to ties to the selected output by a half second per button push The input buttons 1 through 10 display the selected output s RGB delay Each lit input button indicates half a second of delay In this example the green input buttons display 5 0 seconds of RGB delay 3 5 4 0 4 5 5 0 3 0 2 5 2 0 1...

Страница 56: ... indicates composite video and Video Output 8 indicates S video 4 Press and release the Video Output 7 or 8 button to select the associated video format 5 Press and release the Video button to exit the Video mode The Video button stops blinking N Pressing the Enter or Preset button also exits Video mode Pressing the Preset button changes to Recall Preset mode For the switcher to recognize the chan...

Страница 57: ...2 is selected and you try to perform step 4 the action is ignored 4 Change the format Press and release the unlit Video Output button 7 or 8 that relates to the desired format 7 8 9 10 11 12 VIDEO OUTPUTS Press and release the Video Output button to change the video format as follows 7 Composite 8 S video In this example the input is set to S video N If desired select another of configurable video...

Страница 58: ...he current configuration if a partial preset N When presets are saved from the front panel only the audio and video ties are stored Audio gain and volume settings are not saved as a global ties preset The video format composite or S video for outputs 11 through 14 are not saved as a global ties preset Saving global ties presets is protected when front panel lock mode 2 is selected See Setting the ...

Страница 59: ...t red If you then save the configuration to a lit preset number the configuration data at that preset location will be overwritten Preset Assigned COMPUTER AUDIO OUTPUTS No Preset Assigned 3 Select the preset number Press and release the input or output button for the desired preset C O N T R O L PRESET ENTER ESC VIEW COMPUTER INPUTS 1 2 3 4 5 6 7 8 The Enter button blinks to indicate the need to ...

Страница 60: ...resets light red Preset Assigned COMPUTER AUDIO OUTPUTS No Preset Assigned 3 Select the preset number Press and release the input or output button for the desired preset C O N T R O L PRESET ENTER ESC VIEW COMPUTER INPUTS 1 2 3 4 5 6 7 8 The Enter button blinks to indicate the need to recall the preset Press and release the Input 1 button The button blinks red to indicate that this preset number i...

Страница 61: ...state to indicate the unmute 5 Press and release the View button to return to normal switcher operation N Video and audio can both can be muted but in separate operations one and then the other Press and release the Video button and the Audio button to select each for muting or unmuting If you select Video and Audio in View Only mode and then attempt to mute an output the mute function will not wo...

Страница 62: ...f The button lights green when selected is unlit when deselected 3 Select View only mode Press and release the View button N This example shows the front panel indications if example 1 example 2 and example 3 have been completed 1 2 3 4 5 6 COMPUTER AUDIO OUTPUTS C O N T R O L PRESET ENTER ESC VIEW Until you select an input the buttons for all untied outputs light the appropriate color Green if vi...

Страница 63: ... outputs 7 through 12 and the computer video audio outputs group output in outputs 1 through 6 as follows If you mute output 7 video you must also mute output 1 audio If you mute output 8 video you must also mute output 2 audio If you mute output 9 video you must also mute output 3 audio If you mute output 10 video you must also mute output 4 audio If you mute output 11 video you must also mute ou...

Страница 64: ...UDIO VIDEO I O CONTROL ENTER PRESET VIEW ESC PRESENTATION MATRIX SWITCHER MPX PLUS 866 A COMPUTER INPUTS 1 2 3 4 5 6 7 8 9 10 11 12 13 14 1 2 3 4 5 6 9 10 11 12 13 14 VIDEO INPUTS COMPUTER OUTPUTS VIDEO OUTPUTS CONFIG Figure 3 6 Audio gain and attenuation 1 Press the Esc button to clear any input buttons output buttons or control buttons that may be lit 2 To enter Audio mode press and hold the Aud...

Страница 65: ... 5 6 7 8 2 1 3 4 5 6 7 8 2 1 3 4 5 6 7 8 2 1 3 4 5 6 7 8 2 1 3 4 5 6 7 8 2 1 3 4 5 6 7 8 2 1 3 4 5 6 7 8 2 1 3 4 5 6 7 8 2 1 3 4 5 6 7 8 2 1 3 4 5 6 7 8 2 1 3 4 5 6 7 8 2 1 3 4 5 6 7 8 2 1 3 4 5 6 7 8 2 1 3 4 5 6 7 8 2 1 3 4 5 6 7 8 2 1 3 4 5 6 7 8 2 1 3 4 5 6 7 8 2 1 3 4 5 6 7 8 2 1 3 4 5 6 7 8 2 1 3 4 5 6 7 8 2 1 3 4 5 6 7 8 Fast blinking button F Slow blinking button S S F S F S F S F S F S F S...

Страница 66: ... audio level is viewed and adjusted The steps show the front panel indications that result from your action The output buttons display the level as shown in the table on page 3 35 Output buttons lit green indicate gain output buttons lit red indicate attenuation 1 Clear all selections Press and release the Esc button C O N T R O L PRESET ENTER ESC VIEW Press and release the Esc button The button f...

Страница 67: ... 7 8 9 10 11 12 VIDEO OUTPUTS Press the View button to decrease the input audio level by 1 dB per button push The output buttons display the selected input s audio level and polarity gain or attenuation Each output button indicates 1 dB when blinking slowly 2 dB when blinking quickly and 3 dB when lit When the buttons are lit green they indicate a gain audio level When the output buttons are lit r...

Страница 68: ...tons that are lit the lower the volume For a more detailed analysis of decoding the displayed value see Reading the displayed volume on the next page 4 Press and release the Esc and View buttons to increase and decrease the audio volume 5 Press and release the Audio button to save the audio settings and exit the Audio mode The Audio button stops blinking N When adjusted from the front panel there ...

Страница 69: ...om 5 5 on each Esc push applies 1 5 more of the input audio signal to the output Push Esc button again 5 5 1 5 7 volume indicated by the Input 1 button blinking slowly Push Esc button twice more 7 1 5 1 5 10 volume indicated by the Input 1 button blinking quickly Push Esc button nineteen times more 10 19 1 5 38 5 volume indicated by the Input 1 through 4 buttons lit steadily When 12 input buttons ...

Страница 70: ...ink 3 3 Fast blink 3 Slow blink 4 4 Fast blink 4 Slow blink 45 44 32 5 34 43 42 35 5 37 41 40 38 5 40 39 38 41 5 43 37 36 44 5 46 35 34 47 5 49 33 32 50 5 52 5 Fast blink 5 Slow blink 31 53 5 30 55 29 28 56 5 58 27 26 59 5 61 25 24 62 5 64 23 22 65 5 67 21 20 68 5 70 19 18 71 5 73 17 16 74 5 76 15 14 77 5 79 13 12 80 5 82 11 10 83 5 85 9 8 86 5 88 7 6 89 5 91 5 4 92 5 94 3 2 95 5 97 1 0 98 5 100 6...

Страница 71: ...elect an output Press and release the output 1 button 39 dB attenuation 41 5 volume Slow blinking button 1 2 3 4 COMPUTER AUDIO O COMPUTER INPUTS 1 2 3 4 5 6 7 8 9 10 11 12 13 14 VIDEO INPUTS Press and release the Output 1 button The button lights green The input buttons display the selected output s audio volume level In this example the lit and blinking input buttons indicate 40 to 41 5 percent ...

Страница 72: ...t The unlit and unblinking input buttons indicate an audio volume attenuation of 26 dB to 27 dB 5 Deselect Audio mode Press and release the Audio button I O VIDEO AUDIO The Audio button stops blinking and lights Press the Audio button to exit audio mode All input buttons and output buttons return to unlit or background illumination The Video button lights green Selecting the RS 232 Primary port s ...

Страница 73: ...n blinks and the others remain lit In this example the port is set to 38400 baud 4 Deselect Serial Port Configuration mode Press and release an input or output button C O N T R O L PRESET ENTER ESC VIEW 5 All Control buttons return to unlit or background illumination Press and release an input or output button N The switcher requires some time to save the new serial port settings Wait at least 5 m...

Страница 74: ...ain and attenuation m Changing Lock modes Advanced features consist of m Setting RGB delay m Saving presets m Setting video and audio output mutes m Setting audio output volume m Setting the rear panel remote port baud rate N The switcher is shipped from the factory in Lock mode 2 Selecting Lock mode 2 or toggling between mode 2 and mode 0 N If the switcher is in Lock mode 0 or mode 1 this procedu...

Страница 75: ... 2 or to toggle between mode 1 and mode 2 2 seconds ENTER The Enter Video and Audio buttons blink twice to indicate mode 2 selection The Video and Audio buttons blink twice to indicate mode 1 selection Release the buttons Background illumination The buttons on the front panel can be set to provide amber background illumination at all times or the background illumination can be turned off Toggle th...

Страница 76: ...e switcher to the factory default settings by pressing and holding the Video button and Audio button while you apply AC power to the switcher N System reset does not reset the Internet protocol IP settings or replace user installed firmware Power I O VIDEO AUDIO Press and hold the Video and Audio buttons while you apply power to the switcher The switcher flashes the button indicators green red and...

Страница 77: ...m that the factory default firmware is no longer running look for the asterisk following the version number Use mode 1 to revert to the factory default firmware version if incompatibility issues arise with user loaded firmware 3 Hold down the Reset button for about 3 seconds until the Reset LED blinks once then press Reset momentarily 1 second within 1 second Mode 3 turns events on or off During r...

Страница 78: ...t Press and hold the Reset button Release then immediately press and hold 3 seconds Reset LED flashes once Release the Reset button Reset LED flashes three times IP Settings Reset Press and hold the Reset button Release then immediately press and hold 6 seconds Reset LED flashes twice Release the Reset button Reset LED flashes three times 2 3 3 3 Absolute Reset Press and hold the Reset button Rele...

Страница 79: ...g the Audio N This section addresses front ols setting the digital signal processor adjustments see Optimizing the Audio in chapter 5 Switcher Software Each individual input audio level can be adjusted within a range of 18 dB to 24 dB so there are no noticeable volume differences between sources and for the best headroom and signal to noise ratio Adjust the audio gain and attenuation as follows 1 ...

Страница 80: ...ed on The switcher is receiving power if any of the front panel button indicators are lit 2 Check to see if one or more outputs are muted 3 Ensure an active input is selected for output on the switcher 4 Ensure that the proper signal format is supplied 5 Check the cabling and make corrections as necessary 6 Call the Extron S3 Sales Technical Support Hotline if necessary See the rear cover of this ...

Страница 81: ...ludes low resolution monitors and audio tape The VTG 400 video test generator connected to input 8 or to input 13 enables a video test pattern to be sent to one several or all output devices within the video group for problem isolation or adjustment purposes An audio test tape or CD could be used in a similar manner to check out the audio components connected to the computer video audio group 1 2 ...

Страница 82: ...r video output 6 for recording The audio from her microphone input 16 is Played in the hall output 1 Distributed by the sound system output 5 Sent to the VCR output 6 Music from the CD player input 14 is played in the lobby output 3 1 2 3 4 5 6 7 8 1 2 3 4 5 6 Computer video group input sources Computer video audio subgroup output destinations Preset Title Video Audio Fill in the preset number and...

Страница 83: ...mputer video group input sources Computer video audio subgroup output destinations Preset Title Video Audio Fill in the preset number and use colors or dashes etc to make connecting lines Indicate if the configuration is for video audio or both 9 10 11 13 14 Low resolution video group input sources 7 8 9 10 12 11 12 Low resolution video subgroup output destinations PC 1 RGB 201 PC 2 RGB 201 ISS 50...

Страница 84: ...dio subgroup output destinations Preset Title Video Audio Fill in the preset number and use colors or dashes etc to make connecting lines Indicate if the configuration is for video audio or both 9 10 11 13 14 Low resolution video group input sources 7 Signal processing 8 9 10 12 11 12 Low resolution video subgroup output destinations 15 16 18 Mic audio input sources 17 Global ties preset Partial p...

Страница 85: ...lus 866 A 4 Chapter Four SIS Programming and Control RS 232 Ports Ethernet LAN Port Host to Switcher Instructions Switcher Initiated Messages Switcher Error Responses Using the Command Response Tables Special Characters ...

Страница 86: ...y 8 data bits 1 stop bit no flow control The RS 232 ports can be configured to operate at the 9600 19200 38400 or 115200 baud rate N These three ports are hardwired for RS 232 only The rear panel RS 232 Secondary port is active only if the front panel Configuration port is not in use If a front panel configuration connection is made the rear panel RS 232 Secondary port becomes inactive and the fro...

Страница 87: ...rear panel RS 232 Secondary port If a front panel configuration connection is made the rear panel RS 232 Secondary port becomes inactive and the front panel Configuration port is active The two paralleled ports protocol can be changed via SIS command control only See the Set serial port parameters command in Command response table for IP specific SIS commands on page 4 20 to configure this port un...

Страница 88: ...rossover cable A cable wired the same at both ends is called a straight through cable because no pin pair assignments are swapped 12345678 RJ 45 Connector Insert Twisted Pair Wires Pins Crossover Cable Straight through Cable Pin 1 2 3 4 5 6 7 8 Wire color White green Green White orange Blue White blue Orange White brown Brown Wire color T568A T568B End 1 End 2 End 1 End 2 White orange Orange White...

Страница 89: ...s timeout value is set to 5 minutes but the value can be changed See the Configure port timeout commands on page 4 20 N Extron recommends leaving the default timeout at 5 minutes and periodically issuing the Query Q command to keep the connection active If there are long idle periods Extron recommends disconnecting the socket and reopening the connection when another command must be sent Number of...

Страница 90: ...he switcher initiates the password message immediately after the copyright message when the controlling system is connected using TCP IP or Telnet and the switcher is password protected This message means that the switcher requires an administrator or user level password before it will perform the commands entered via this link The switcher repeats the password message response for every entry oth...

Страница 91: ...etermines that it is valid it performs the command and sends a response to the host device If the switcher is unable to perform the command because the command is invalid or contains invalid parameters the switcher returns an error response to the host The error response codes are E01 Invalid input channel number too large E10 Invalid command E11 Invalid preset number E12 Invalid output number too...

Страница 92: ... power supply 0 off mode 0 not OK 1 on mode 1 OK 2 mode 2 X Volume adjustment range 0 64 1 dB step except for 0 to 1 which is 34 5 dB see the table on page 4 11 X Audio gain 0 24 1 dB step X Numeric dB value 18 to 24 45 steps of gain or attenuation X Audio attenuation 1 18 1 dB step X1 Preset 32 maximum 0 current configuration X1 Name for presets inputs and outputs 12 characters maximum Upper and ...

Страница 93: ...tie input to all output commands activate all I O switches simultaneously The matrix switchers support 1 2 and 3 digit numeric entries 1 1 02 02 or 003 003 N The tie command for RGB and the tie command for video can be used interchangeably on the matrix switcher but you cannot switch between groups The switcher returns an X13 error if you try N The view tie command for RGB and the view tie command...

Страница 94: ...ut X tied to output X Read video output tie X X Video input X tied to output X Read audio output tie X X Audio input X tied to output X Set input format Set input video format X X2 TypX X2 Set the video format to X for input X 1 composite video 2 S video N The only valid input X numbers are 11 through 14 Example 11 1 Typ11 1 Set input 11 to composite video Read input format X X2 Show the video for...

Страница 95: ...ecrement volume X V OutX VolX Decrease volume by 1 step View output volume X V X 41 40 38 5 40 dB of attenuation Output volume 63 61 62 60 59 57 58 56 55 53 54 52 51 49 50 48 5 5 8 5 7 100 0 00 10 11 5 14 5 13 16 17 5 20 5 19 22 23 5 26 5 25 28 47 45 46 44 43 42 29 5 32 5 31 34 35 5 37 dB of attenuation Output volume 39 38 37 35 36 34 33 31 32 30 29 27 28 26 41 5 43 44 5 47 5 46 49 50 5 53 5 52 55...

Страница 96: ...ent in the DSP and available through software control see DSP Configurator Program in chapter 5 Switcher Software The results of these controls are not shown in the responses below Set input audio gain to dB value X X G InX AudX Example 1 2G In01 Aud 02 Set input 1 audio gain to 2 dB Set input audio attenuation to dB value X X g InX AudX Increment level X G InX AudX Increase audio level by 1 dB Ex...

Страница 97: ...r ties that are part of the previous version of the specified preset can unexpectedly become part of the newly created preset Clear a global ties preset E X1 P0 SprX1 Clear all ties in preset X1 Directly write a global ties preset E X1 PX X X X X X X X Enter as many ties as are valid for this model The tie all tie RGBHV tie video and tie audio commands are all valid SprX1 Example E 27P0 Spr27 E 27...

Страница 98: ...h 14 View output mutes EVM X1 1X1 2X1 3 X1 12 Each X1 response is the mute status of an output starting from output 1 Example EVM Mut023010000000 Output 2 audio left is muted output 3 video and the left audio channel are muted and output 5 video and the right audio channel are muted All other outputs are unmuted N The Mut portion of the response appears only when the switcher is in Verbose mode 2 ...

Страница 99: ...ut 7 and input 10 to outputs 10 through 12 No input is tied to outputs 6 and 8 N If you enter EX1 1 1VC where X1 0 the switcher returns its current video configuration View audio preset configuration EX1 1 2VC X 1 X 2 X 3 X 16 Aud Show preset X1 s audio configuration Show the audio input tied to 6 sequential outputs starting from output 1 Audio outputs 7 through 16 are not present on this switcher...

Страница 100: ..._remaining Bytes Left Erase user supplied Web pages files EfilenameEF Delfilename List individual sync frequency Computer video input group inputs 1 through 8 only X LS X1 X1 Listed as horizontal frequency vertical frequency Example 2LS 031 50 060 00 Input 2 horizontal frequency is 31 5 kHz and its vertical frequency is 60 Hz N The matrix switcher returns 000 00 000 00 if there is no connection or...

Страница 101: ...presets and their names Reset an individual preset EX1 ZG ZpgX1 Clear preset X1 Reset RGB delays EZD Zpd Reset all RGB delays to 0 0 seconds Reset audio input levels EZA Zpa Reset all audio input levels gain and attenuation to 0 dB Reset audio output levels EZV Zpv Reset all audio output levels volume to 100 no attenuation Reset all mutes EZZ Zpz Reset all video and audio mutes Reset a group EZX2 ...

Страница 102: ... Query software version verbose 0Q X1 X1 X1 Provide a detailed status of the Ethernet protocol firmware the MPX controller firmware and any firmware upgrade The firmware that is running is marked by an asterisk A caret indicates that the firmware has a bad checksum or an invalid load indicates that the firmware is not loaded Response description Ethernet protocol firmware version controller firmwa...

Страница 103: ...andard domain name conventions apply for example xxx com N The following characters are invalid in passwords space and The character is only acceptable as the lead in to the domain name such as extron com X4 DHCP 0 off 1 on X4 Port 01 rear panel RS 232 Primary port 02 rear panel RS 232 Secondary port front panel Cofiguration port N The rear panel RS 232 Secondary port X4 02 is active only if the f...

Страница 104: ...d of open connections ECC X3 Set subnet mask EX3 CS IpsX3 Read subnet mask ECS X3 Set gateway IP address EX3 CG IpgX3 Read gateway IP address ECG X3 Set administrator password EX3 CA Ipa X3 Read administrator password ECA X3 Reset clear administrator password E CA Ipa X3 Set user password EX3 CU Ipu X3 Read user password ECU X3 Reset clear user password E CU Ipu X3 Set DHCP on or off EX4 DH IdhX4 ...

Страница 105: ...Characters The HTML language reserves certain characters for specific functions The switcher will not accept these characters as part of preset names the switcher s name passwords or locally created file names The switcher rejects the following characters space spaces are ok for names semicolon colon and ...

Страница 106: ...SIS Programming and Control cont d MPX Plus 866 A Media Presentation Matrix Switcher SIS Programming and Control 4 22 PRELIMINARY ...

Страница 107: ...ELIMINARY MPX Plus 866 A 5 Chapter Five Switcher Software Control Software DSP Configurator Program Optimizing the Audio Matrix Switchers Control Program Special Characters Button Label Generator Program ...

Страница 108: ... functions The programs are compatible with Windows 2000 Windows XP and later Updates to these programs can be downloaded from the Extron Web site www extron com Installing the software The programs are contained on the Extron Software Products Disk Install the software as follows N For full functionality install all of the following programs DSP Configurator Matrix Switchers Control Program Firmw...

Страница 109: ...l port configuration commands on page 4 20 to configure any of the serial ports using an SIS command Software operation via Ethernet When a matrix switcher is connected to an Ethernet WAN or LAN up to 200 users can operate it locally or remotely using the DSP Configurator or the Matrix Switchers Control Program See Ethernet connection in chapter 2 Installation for installation details Connection t...

Страница 110: ...w in Emulate mode you can tailor a variety of audio parameters and then transfer them to the MPX by going to Live mode connected to an MPX You can also switch to Live mode and then tailor the audio settings in real time while listening to the audio output with a critical ear See Emulate mode vs Live mode later in this chapter N There are three possible DSP Configurator displays Audio and video I O...

Страница 111: ...k and a mic mixer block a Program audio input computer audio group and video audio group signal processor chains b Mic line input signal processor chain c A V matrix block d Output signal processor chain pre mic mixer e Mic mixer block f Output signal processor chain post mic mixer g DSP usage meter See DSP capacity and design rule verification on page 5 30 N The usage meter is shown partially fil...

Страница 112: ...ge or observe a live audio meter Gain and Trim blocks only double click the gain block icon figure 5 4 This action opens a dialog box a new window that contains the fader for that control NOTE A dialog box opens which contains the full fader control The meter display is for example only In Emulate mode the startup mode the meter is not operational Figure 5 4 Accessing a typical gain control dialog...

Страница 113: ...ctory defaults The Bypass button lets you temporarily suspend the processor without removing the processor block By default each processor block is automatically bypassed when inserted the Bypass button in the processor dialog box is selected although this can be changed for each processor block type see DSP Configuratotor Tools menu and the specific tabs for the processor types When a processor i...

Страница 114: ... Filter block The filter processor block when first inserted provides one of four filter selections additional filters can then be added A filter attenuates removes or boosts a range of frequencies from an audio waveform while passing other frequencies Click the desired filter to select it N Selecting Bass Treble Filter inserts two separate filters Additional filters for a total of up to three fil...

Страница 115: ...t volume Above a set threshold weaker signals receive more gain to reach a user defined target level stronger signals receive less gain or no gain at all A window range is also applied above and below the target level When the signal reaches the window gain control starts scaling in a linear fashion toward the target level to achieve smoother results The default threshold is 40 dB The default targ...

Страница 116: ...B The Gang button lets you couple the left and right faders Ganged faders move together at relative levels to the top or bottom of their travel If one fader reaches the limit of its travel first it retains that position while the other fader continues to travel When the ganged faders travel in the reverse direction the fader that was at its limit reverts to its position relative to the other fader...

Страница 117: ...the level of one or more microphones and or the program material when the processor detects a signal from another source Ducking lasts for the duration of the interrupting signal plus hold and release time and restores the ducked mic s original level once the other signal has ceased Ducking is useful when Program material needs to be attenuated in order to more clearly hear the narrator s voice On...

Страница 118: ...dio paths whose levels can be controlled individually When a summing amp is inserted the appearance of the Post Gain control changes to Mono Sum as shown at right N Summing increases the overall level by 6 dB N The summing amplifer function occurs before the Post Gain control any adjustments made in the control to summed audio are made to both mono audio paths Loudness block The loudness processor...

Страница 119: ...is block See Program audio input signal controls a N Selecting Bass Treble Filter inserts two separate filters Dynamics blocks The dynamics processor block when inserted provides one of four dynamics processors The available processors are identical to the processors available on the input in the dynamics processor block and described in Program audio input signal controls a Volume control The alw...

Страница 120: ...the low resolution video input group and the low resolution video output group are always made with the audio redirected In such an operation the switcher automatically ties the audio to an output in the computer video audio outputs group outputs 1 through 6 as follows If the video is tied to output 7 the audio is tied to output 1 If the video is tied to output 8 the audio is tied to output 2 If t...

Страница 121: ...as follows Muted Mixed into both left and right output channels Mixed into the left output channel only Mixed into the right output channel only N Unlike from line inputs 1 through 14 typically program audio more than one mic audio input can be mixed into a single audio output N Note the message Mic is muted at input in figure 5 8 This indicates that Mute is selected in the mic line input gain con...

Страница 122: ...trol group of stereo gain controls In figure 5 9 the group 2 master consists of six members Figure 5 9 Sample fader group master and associated gain controls Figure 5 10 Sample mute group master and muted inputs Assume that your system has several audio outputs dedicated to a single room You want all outputs to receive the same audio input but there are different audio dynamics in different parts ...

Страница 123: ...tron recommends that if you include a control in multiple groups that you do so with care overlapping group membership can quickly become unmanageable Configuring a group master Configure a group as follows 1 Click Tools Configure Groups to open the Configure Groups dialog box N Or click View Group Controls and then click the Add a Group menu selection 2 In the Select Group drop down box click a g...

Страница 124: ...dialog box Slide a group fader up and down to adjust all gain controls in the group Click and drag a soft limit to set the ceiling or floor for the group N The soft limits cannot be dragged beyond the current setting of the group fader the ceiling cannot be set below the fader and the floor cannot be set above the fader N None of the individual gain faders can be dragged below the floor or above t...

Страница 125: ...Increment Value or Decrement Value field to as fine as 0 1 dB Click Tools Group Details Report to create a Microsoft Word file that details all created groups figure 5 14 GROUP DETAILS REPORT Group 1 Processor Type Mute Current Value 1 Current Group Members Output 7 Left Channel Output 8 Right Channel Output 9 Left Channel Output 10 Right Channel Output 11 Left Channel Output 12 Right Channel Grou...

Страница 126: ...onfigurator program window video only I O page g S video composite video selection block Low resolution video inputs 11 through 14 are individually configurable as either S video or composite video Double click this block to toggle between S video and composite video h RGB Delay block The switcher can briefly blank the red green and blue planes of a Computer Video output 1 through 6 output when a ...

Страница 127: ...s desired a Click or right click Mark an output node The node is marked by a green outline The output and the tied input are selected to be saved as a preset b Ctrl click or right click Mark additional outputs as desired T If an input is tied to multiple outputs and you want the entire set of ties saved as a preset mark each output to save that tie To mark multiple successive outputs marking all o...

Страница 128: ...5 16 The selected preset appears in the Presets window marked processors appear indicated by green boxes ties that will be loaded as part of the preset are shown by dashed lines and ties that will be eliminated by the preset are indicated by the output node highlighted in green 1 2 Figure 5 16 Recalling a preset N The Recall Cancel and Delete buttons appear when a preset is selected N An asterisk ...

Страница 129: ...onfigurator program You are given the opportunity to either Pull data from the switcher and update the DSP Configurator program s configuration Push data from the DSP Configurator program to the switcher overwriting ties settings and presets in the switcher You can also switch to Live mode and then tailor the audio settings in real time while listening to the audio output with a critical ear Selec...

Страница 130: ...Synchronize with Device dialog box figure 5 18 on page 5 25 appears Proceed to step 5 4 If you selected RS 232 in step 2 a Click the Com Port drop down menu and select the PC s comm port that is connected to the switcher s front panel Configuration port or rear panel RS 232 port b Check the baud rate displayed in the comm port selection window If you need to change the baud rate to match the switc...

Страница 131: ...5 25 MPX Plus 866 A Media Presentation Matrix Switcher Switcher Software PRELIMINARY 7 7 6 6a 8 6b 6c 6e 6f 6d 6d 5 5 or Figure 5 18 Selecting Live mode continued ...

Страница 132: ...Configurator program is connected live to the switcher and the ties processors and presets are pushed or pulled as selected completing the selection of Live mode 8 If you have created ties or made any changes to the DSP parameters including gain and or processor blocks since the last time you saved to a file the DSP Configurator prompts you to save the file Click Yes or No as desired If a password...

Страница 133: ...f a selected processor block gain block or set of selected blocks to the clipboard Paste Inserts processor blocks and their parameters from the clipboard into the DSP Configurator program at the location selected DSP Configurator View menu Audio Video I O Selects the audio and video I O page for the DSP Configurator program the default view Audio I O Selects the audio only I O page for the DSP Con...

Страница 134: ...ocessors created ties and mic mixes as a password protected configuration The DSP Configurator program prompts for a PIN to save Recall Recall the protected configuration Change PIN Change the PIN associated with the protected configuration Design Rule Verification Compares all stored presets checking for possible DSP overloads See DSP capacity and design rule verification on page 5 30 Connect to ...

Страница 135: ...ory defaults for these processors Other Defaults Sets the default parameters for the ducking loudness delay and feedback suppressor processors The feedback suppressor parameters include whether they are initially bypassed default or not Also allows you to restore the factory defaults for these processors and for the entire DSP DSP Configurator Window menu Cascade Rearranges all open DSP Configurat...

Страница 136: ...ble shows the DSP usage for each processor type the maximum number of processors that can be active within a configuration or current state emulation and the potential DSP usage if all of those processors are active at the same time Processor type DSP usage Maximum of active processors Potential total DSP usage Dynamic processors 0 4 44 17 2 Ducking blocks 1 6 4 6 3 Delays 1 9 28 54 3 FBS blocks d...

Страница 137: ...esets if recalled will cause an overload To prevent a possible overload you need to make adjustments to your partial presets Run the design rule verification utility again to ensure that you have resolved the potential problem N Extron recommends performing a design rule verification before pushing a configuration to the switcher and frequently while designing partial presets to ensure that the DS...

Страница 138: ...Windows standards while other behaviors are specific to the DSP Configurator program When the program is started the cursor focus is in the upper left corner of the program audio input computer audio group and video audio group signal processor chains a on figure 5 20 The Input 1 Gain block is green highlighted N The callout numbers on figure 5 20 are not the same as on figure 5 3 7 1 10 6 11 3 4 ...

Страница 139: ... through 6 volume block e or the output 7 through 12 nodes on the A V matrix b into the output 1 through 12 name fields k Enter Key Performs the same action as a mouse double click For example opens the context menu from which a processor type may be selected or opens a dialog box when applicable When an action button is highlighted Enter executes the button action and toggles the button when appl...

Страница 140: ...ess the left arrow key once and repeat steps 1 through 7 9 Press the Tab Tab key Esc Esc key right arrow key or left arrow key to exit the set ties operation Highlighting and marking items cutting or copying saving a preset When an item within the program is selected it is green highlighted One or more highlighted items can be cut copied pasted or saved as a preset The cut copy and paste functions...

Страница 141: ...epeat steps 1 through 3 5 To cut or copy press the Ctrl X Ctrl X or Ctrl C Ctrl C key combination 6 To save a preset press Alt Alt T T right arrow down arrow Enter Enter figure 5 21 The Save a Preset dialog box appears a As desired Tab Tab to the Preset Number field and type a specific preset number b As desired Tab Tab to the Preset Name field and type a preset name N Unless you enter a specific ...

Страница 142: ...ursions of a signal This condition gives audibly undesirable results While it is difficult to clip the audio signal within the DSP audio signal chain it is extremely important that the audio signal is not clipped before the input to the switcher Once audio is clipped at the input there is no remedy further down the signal chain However if audio clipping occurs at the output of the DSP that is not ...

Страница 143: ...ng a compressor generally reduces the signal level while a filter can either boost or cut the overall signal level N This procedure is valid only if no processing is active in the output signal path and if post matrix trim value is set to 0 dB unity gain If you have processors inserted in the output signal path open them and bypass them to temporarily remove them from the signal path 1 After you h...

Страница 144: ... control see Adjusting the post matrix trim N Mic levels also contribute to possible clipping at the outputs They may need to be lowered at the mic mix points to maintain the balance between program material line inputs and voice mic Setting the mic input and mic mix point levels 1 Double click the mic mix point to be set opening the dialog box for that mix point 2 Unmute the mix point mixing in t...

Страница 145: ...e ensure that clipping does not occur at the amplifier you need to turn down the power amp s input attenuator the equivalent of 18 dB 18 4 22 dB which puts the amp s input level at 14 dB 4 minus 18 14 If you find that the amp setting when the DSP Configurator s output volume controls are at 100 is too loud for the room you can turn it down further If the amp is not loud enough for the room you wil...

Страница 146: ...ace the meter in an average listening location 4 Set the output volume fader to a relatively quiet listening level Filter compensation from the loudness processor is most prominent at low listening levels Set to the levels described earlier 5 Set the loudness dialog box s Loudness Compensation slider to its default center position 6 Release the loudness processor s bypass to hear the compensation ...

Страница 147: ...s Extron Electronics Matrix Switchers MATRIX Switcher Control Pgm The Comm Port Selection window figure 5 22 appears Figure 5 22 Comm port selection window 2 Choose the comm port that is connected to the matrix switcher s RS 232 port IP LAN or Emulate If you selected a comm port check the baud rate displayed in the comm port selection window If you need to change the baud rate click on the Baud bu...

Страница 148: ...s between the low resolution video input group and the low resolution video output group are always made with the audio redirected In such an operation the switcher automatically ties the audio to an output in the computer video audio outputs group outputs 1 through 6 as follows If the video is tied to output 7 the audio is tied to output 1 If the video is tied to output 8 the audio is tied to out...

Страница 149: ...rogram window no icons or ties Figure 5 25 Sample program window icons assigned and ties made T You can print a map of the current configuration by clicking File Print Tie Map If desired on the task bar click Tools IP Options to set the switcher s IP parameters in the IP Settings Options window figure 5 26 ...

Страница 150: ...are not masked If a password has been inadvertently changed to an unknown value you can look up and if desired change a password in this window without knowing the current password Address and Name fields The Matrix IP Address field contains the IP address of the connected matrix switcher This value is encoded in the flash memory in the switcher The Gateway IP Address field identifies the address ...

Страница 151: ...he current date in the Greenwich Mean Time zone The Time local field displays the current time in the local time zone The GMT field displays the amount of time in hours and minutes that the local time varies from the GMT international time reference N Rather than the following procedure your can click the Sync Time to PC button to set the switcher to your computer s internal time If desired adjust...

Страница 152: ...iting the Administrator Password field while connected via the Ethernet port can immediately disconnect the user from the switcher Extron recommends editing this field using one of the serial ports and protecting the Ethernet access to this screen by assigning an administrator s password to qualified and knowledgeable personnel only N An administrator password must be created before a user passwor...

Страница 153: ...on of firmware upgrade files on the Web site 2 Select the appropriate firmware file to download and click Download 3 Enter the requested personal information and then click Download to copy the firmware to your computer 4 Click Run twice figure 5 28 The PC downloads the firmware update from the Extron Web site and starts the Extron Installation Program to extract the firmware file ...

Страница 154: ...4 5 4 Folder where firmware is installed The version shown is a sample value only NOTE Figure 5 28 Downloading firmware upgrade files 5 Click Next The program extracts the firmware files and places them in a folder identified in the InstallShield Wizard window N Note the folder to which the firmware file is saved ...

Страница 155: ... Firmware Loader appears figure 5 30 See Serial port connected firmware upload on page 5 50 Ethernet connected firmware upload 11 10 Figure 5 29 Select file window 10 Navigate to the folder where you saved the firmware upgrade file Select the file N Valid firmware files must have the file extension S19 Any other file extension is not a firmware upgrade N The original factory installed firmware is ...

Страница 156: ...Valid firmware files must have the file extension S19 Any other file extension is not a firmware upgrade for your matrix switcher 12 Click Upload The File Loader advises you that using the Ethernet LAN port is preferred over using either serial port figure 5 31 To quit the firmware upload and start over using the LAN port click the Cancel button and return to step 7 Use the LAN port connection in ...

Страница 157: ... the OK button The Firmware Loader reports This process could take several minutes Please wait then displays a status bar that shows the progress of the upload When the upload is complete the Firmware Loader reports Unit resetting this can take some time please wait and then Transfer complete 14 When the Firmware Loader reports Transfer complete click the Exit button on the Firmware Loader and the...

Страница 158: ... file names space and 1 Connect the PC to the matrix switcher via one of the switcher s RS 232 ports or Ethernet port 2 Start the Matrix Switchers Control Program and connect to the MPX switcher See Starting the program in this chapter steps1 through 4 starting on page 5 41 3 Click Tools HTML File Manager 4 Click the Pick File s to Load to Server button An open file window appears 5 Navigate to th...

Страница 159: ...umber when prompted to do so Delete Allows the current preset to be deleted Changes Take Allows you to save to file any changes made to the displayed configuration Changes Cancel Returns to the previous screen undoing any changes you have made Trash can Drag and drop from an input or output button to the trash can to clear all ties associated with that input or output WCP Windows menus WCP File me...

Страница 160: ...ent 100 is full volume N Individual controls offering finer trim adjustments in 0 1 dB increments for the right and left channels and group master offsets are present in the DSP see DSP Configurator Program on page 5 4 These controls are not shown in the volume display described here Audio DSP Configuration Calls the DSP Configurator program and automatically switches to Live mode See DSP Configur...

Страница 161: ...and Show RS 232 Strings Displays the ASCII commands that are used by the current configuration You can refer to these for RS 232 programming Initialize Initializes and clears any or all of the following ties presets audio configuration preset names icon names and icons WCP Audio input Configuration menu bar selection Displays the audio gain level setting for a single input or for all inputs and al...

Страница 162: ...None To automatically refresh the display set this option to Automatically every 10 seconds To sample the sync and update the display whenever you make a configuration change set this option to On demand or by refresh Icons in I O Boxes Erases any numbers in the I O boxes in the Control Program window figure 5 25 You can place icons in the boxes Numbers in I O Boxes Erases any icons in the I O box...

Страница 163: ...described on page 5 42 Using the help system For information about program features you can access the help program in any of the following ways From the Extron Electronics program folder or group double click on the Matrix Switcher Help icon shown at right From within the Matrix Switchers Control Program click on the Help menu on the main screen From within the Matrix Switchers Control Program pr...

Страница 164: ...l Generator program click Start Programs Extron Electronics Button Label Generator Button Label Generator The Button Label Generator window appears figure 5 37 2 In the Systems selection box choose the Matrix Switchers 1616 option to match the button label size and quantities for your MPX switcher 3 Using standard Windows controls you can create and print labels that can be placed in the label win...

Страница 165: ...PRELIMINARY MPX Plus 866 A 6 Chapter 6 HTML Operation Download the Startup Page Status Tab Configuration Tab File Management Tab Control Tab Special Characters ...

Страница 166: ... Address field 3 Enter the switcher s IP address in the browser s Address field N If the local system administrators have not changed the value the factory specified default 192 168 254 254 is the correct value for this field 4 If you want the browser to display a page other than the default page such as a custom page that you have uploaded enter a slash and the file name to open after the IP addr...

Страница 167: ...ult startup page c If neither of the above conditions is true the switcher downloads the factory installed default startup page to the PC nortxe_index html figure 6 2 also known as the System Status page Status Tab System Status page The System Status page figure 6 2 provides an overall view of the status of the matrix switcher including the power supply status the individual voltages and the temp...

Страница 168: ...nputs and input signal status of composite video and S video inputs on the Digital Sync Validation Processing DSVP page figure 6 3 Click the DSVP link to the left of the Status page to download the DSVP page to the PC The DSVP page automatically updates itself every 30 seconds to show the latest input frequencies or if an input has been disconnected Refresh System Status Figure 6 3 DSVP page ...

Страница 169: ... clicking the appropriate link See appendix A Ethernet Connection for basic information about IP addresses and subnetting Video Input Settings Refresh Firmware Upgrade Passwords Figure 6 4 System Settings page On password protected connections there are two levels of protection administrator and user Administrators have full access to all switching capabilities and editing functions Users can crea...

Страница 170: ...alid IP addresses consist of four 1 2 or 3 digit numeric subfields separated by dots periods Each field can be numbered from 000 through 255 Leading zeroes up to 3 digits total per field are optional Values of 256 and above are invalid The factory installed default address is 192 168 254 254 but if this conflicts with other equipment at your installation you can change the IP address to any valid ...

Страница 171: ... If setting the time set the local time The Zone variable allows you to then select the offset from Greenwich Mean Time GMT N The Zone field identifies the standard time zone selected and displays the amount of time in hours and minutes that the local time varies from the GMT international time reference 4 Repeat steps 1 through 3 for other variables that need to be changed 5 If appropriate click ...

Страница 172: ...y clicking the Video Input Settings link on the System Settings page Refresh System Settings Firmware Upgrade Passwords Figure 6 6 Video Input Settings page Low resolution video inputs 11 through 14 are individually configurable as either S video or composite video Click the appropriate radio button on the Video Inputs Settings page to select between S video and composite video ...

Страница 173: ...e and lower case alphanumeric characters Each password must be entered twice once in the Password field and then again in the Re enter Password field Characters in these fields are masked by asterisks or dots If you do not want to password protect an access level leave the Password field and the Re Enter password field blank After entering the desired password in both fields click the Submit butto...

Страница 174: ...o Input Settings Systen settings Refresh Passwords Figure 6 8 Firmware Upgrade page Update the switcher firmware as follows N The Firmware Upgrade page is only for replacing the firmware that controls all switcher operation To insert your own HTML pages see File Management Page on page 6 14 1 Visit the Extron Web site www extron com click the Download Center tab and then click the Firmware link fi...

Страница 175: ...lus 866 A Media Presentation Matrix Switcher HTML Operation PRELIMINARY 3 2 3 1 1 The version release date and size shown are sample values only NOTE Figure 6 9 Location of firmware upgrade files on the Web site ...

Страница 176: ...RY 4 Click Run twice figure 6 10 The PC downloads the firmware update from the Extron Web site and starts the Extron Installation Program to extract the firmware file 6 4 5 4 Folder where firmware is installed The version shown is a sample value only NOTE Figure 6 10 Downloading firmware upgrade files ...

Страница 177: ...the Configuration tab 10 Click the Firmware Upgrade link 11 Click the Browse button An open file window appears 12 Navigate to the folder where you saved the firmware upgrade file Select the file N Valid firmware files must have the file extension S19 Any other file extension is not a firmware upgrade N The original factory installed firmware is permanently available on the matrix switcher If the ...

Страница 178: ... 11 File Management page N The files listed in figure 6 11 are shown for example only and may not be present on your switcher To delete a file click the Delete button at the right of that file Upload your own files as follows N The following characters are invalid in file names space and 1 Click the Browse button 2 Browse through your system and select the desired file s N If you want one of the p...

Страница 179: ...nsists of a matrix of input rows and output columns selection buttons of four different colors using the same color scheme as the front panel The amber buttons indicate video and audio ties The green buttons indicate video only ties The red buttons indicate audio only ties The gray buttons indicate no ties N If you lose track of the input and output associated with a specific button let the mouse ...

Страница 180: ...on to Create a pending tie if a tie does not exist of the input and output associated with that button Create pending untie if a tie exists of the input and output associated with that button A P for pending appears in the button N If you lose track of the input and output associated with a specific button let the mouse rest over one of the tie buttons for a moment A field pops up as shown on figu...

Страница 181: ...o and Audio Settings page figure 6 13 by clicking the Video Audio Settings link on the Set and View Ties page Refresh Set and View Ties Global Presets Figure 6 13 Video and Audio Settings page Change the input gain and attenuation Users can set each input s level of audio gain or attenuation 18 dB to 24 dB from the Video and Audio Settings page Adjustment ensures there are no noticeable volume dif...

Страница 182: ...utton until the desired audio level is visible 5 Click the desired gain or attenuation value Mute and unmute one or all outputs Mute one or all outputs as follows 1 To select an individual output to mute or unmute click the Output drop box A drop down box appears figure 6 16 Figure 6 16 Output selection drop box 2 Click the desired output 3 Click the Video Only Audio Only or Video and Audio button...

Страница 183: ...w long the screen is blanked when switching to a new input for the selected output Change the RGB delay as follows 1 Click the Output drop box A drop down box appears figure 6 18 Figure 6 18 Output selection drop box 2 Click the desired output 3 Click the RGB delay drop box A drop down box appears figure 6 19 Figure 6 19 RGB delay drop box 4 Click the desired RGB delay ...

Страница 184: ...box A drop down box appears figure 6 20 Figure 6 20 Output selection drop box 2 Click the desired output 3 Click the Volume Steps 64 Max drop box A drop down scroll box appears figure 6 21 Figure 6 21 Volume drop box N Individual controls offering finer trim adjustments in 0 1 dB increments for the right and left channels and group master offsets are present in the DSP see DSP Configurator Program...

Страница 185: ... 36 34 33 31 32 30 29 27 28 26 41 5 43 44 5 47 5 46 49 50 5 53 5 52 55 56 5 59 5 58 61 25 23 24 22 21 20 62 5 65 5 64 67 68 5 70 dB of attenuation Output volume 19 17 18 16 15 13 14 12 11 9 10 8 7 5 6 4 71 5 74 5 73 76 77 5 80 5 79 82 83 5 86 5 85 88 89 5 92 5 91 94 3 1 2 0 95 5 98 5 97 100 01 02 03 04 05 06 07 08 09 10 11 12 13 14 15 16 17 18 19 20 45 46 47 48 49 50 51 52 53 54 55 56 57 58 59 60 ...

Страница 186: ...n configuration 0 as a global ties preset as follows 1 Click the Save Preset button 2 Select the desired preset by clicking on one of the presets listed To create a new preset click one of the unassigned buttons Overwrite an existing preset by clicking an already existing preset 3 If desired type over the current name in the box adjacent to the Save Preset button N Preset names are limited to 12 u...

Страница 187: ...ecalled preset overwrites all of the current configuration ties in favor of the preset configuration ties When a partial preset is recalled it overwrites that portion of the current configuration addressed by the preset leaving the rest unchanged To recall a preset to be the current configuration click the button associated with the desired preset Special Characters The HTML language reserves cert...

Страница 188: ...HTML Operation cont d MPX Plus 866 A Media Presentation Matrix Switcher HTML Operation 6 24 PRELIMINARY ...

Страница 189: ...PRELIMINARY MPX Plus 866 A A Appendix A Ethernet Connection Ethernet Link Subnetting A Primer ...

Страница 190: ...ble because no pin pair assignments are swapped 12345678 RJ 45 Connector Insert Twisted Pair Wires Pins Crossover Cable Straight through Cable Pin 1 2 3 4 5 6 7 8 Wire color White green Green White orange Blue White blue Orange White brown Brown Wire color T568A T568B End 1 End 2 End 1 End 2 White orange Orange White green Blue White blue Green White brown Brown Pin 1 2 3 4 5 6 7 8 Wire color Whit...

Страница 191: ...54 Pinging 192 168 254 254 with 32 bytes of data Reply from 192 168 254 254 bytes 32 time 10ms TTL 128 Reply from 192 168 254 254 bytes 32 time 10ms TTL 128 Reply from 192 168 254 254 bytes 32 time 10ms TTL 128 Reply from 192 168 254 254 bytes 32 time 10ms TTL 128 Ping statistics for 192 168 254 254 Packets Sent 4 Received 4 Lost 0 0 loss Approximate round trip times in milli seconds Minimum 0ms M...

Страница 192: ...the Open command Once you are connected to the switcher you can enter the SIS commands the same as you would if you were using the RS 232 link Connect to the switcher as follows 1 At the Telnet prompt type open IP address and then press Enter If the switcher is not password protected no further prompts are displayed until you break or disconnect the connection to the switcher If the switcher is pa...

Страница 193: ...strokes are displayed even those that should be masked such as the password entry For example when entering a password with local echo turned on you see a display such as a d m i n where admin is the keyed in password and is the masked response You can turn off local echo by typing unset local_echo and then pressing Enter at the Telnet prompt If you are connected to the switcher and need to access...

Страница 194: ... using the controlling PC to set TCP IP values in the switcher see IP Settings Options window in chapter 5 Switcher Software and System Settings page in chapter 6 HTML Operation IP addresses and octets Valid IP addresses consist of four 1 2 or 3 digit numeric subfields properly called octets separated by dots periods figure A 4 Each octet can be numbered from 000 through 255 Leading zeroes up to t...

Страница 195: ... octet contains the value 0 the related octets of the local device s and remote device s IP addresses are masked Masked octets are not compared indicated by X in figure A 6 If the unmasked octets of the two IP addresses match indicated by in figure A 6 example 1 the two addresses are on the same subnet If the two unmasked fields do not match indicated by in figure A 6 example 2 and example 3 the a...

Страница 196: ...Ethernet Connection cont d MPX Plus 866 A Media Presentation Matrix Switcher Ethernet Connection A 8 PRELIMINARY ...

Страница 197: ...PRELIMINARY MPX Plus 866 A B Appendix B DSP SIS Commnads Command Response Table for DSP SIS Commands ...

Страница 198: ...rehensive understanding of the DSP s audio signal flow is helpful to understanding these commands Figure B 1 shows the specific DSP processors and the mic mix points that can be set via SIS commands The signal flow is described in more detail in DSP Configurator Program in chapter 5 Switcher Software 1 5 3 6 2 4 Figure B 1 DSP processors addressable via SIS commands a Program audio input pre matri...

Страница 199: ...te 1 mute X6 Group master group number 01 32 repeated as X2 in chapter 4 SIS Programming and Control X6 Group fader setting dB value in 0 1 dB increments The valid range depends on the type of gain block that is assigned to the group number X6 specified in the command a 120 to 120 12 dB to 12 0 dB b 000 to 800 0 00 dB to 80 0 dB c 1 000 to 120 100 0 dB to 12 0 dB d 350 to 250 35 0 dB to 25 0 dB e ...

Страница 200: ... d Mic mix point X6 d Mic mix point X6 d Mic mix point X6 d Mic mix point X6 Output 1 left mic 1 21200 Output 1 right mic 1 21201 Output 4 left mic 1 21206 Output 4 right mic 1 21207 Output 1 left mic 2 21300 Output 1 right mic 2 21301 Output 4 left mic 2 21306 Output 4 right mic 2 21307 Output 1 left mic 3 21400 Output 1 right mic 3 21401 Output 4 left mic 3 21406 Output 4 right mic 3 21407 Outpu...

Страница 201: ...Output 3 left 60004 Output 3 right 60005 Input 4 left 30006 Input 4 right 30007 Output 4 left 60006 Output 4 right 60007 Input 5 left 30008 Input 5 right 30009 Output 5 left 60008 Output 5 right 60009 Input 6 left 30010 Input 6 right 30011 Output 6 left 60010 Output 6 right 60011 Input 7 left 30012 Input 7 right 30013 Input 8 left 30014 Input 8 right 30015 Input 9 left 30016 Input 9 right 30017 In...

Страница 202: ...1 1787 26 0 1788 25 9 1789 25 8 1790 25 7 1791 25 6 1792 25 5 1793 25 4 1794 25 3 1795 25 2 1796 25 1 1797 25 0 1798 24 9 1799 24 8 1800 24 7 1801 24 6 1802 24 5 1803 24 4 1804 24 3 1805 24 2 1806 24 1 1807 24 0 1808 23 9 1809 23 8 1810 23 7 1811 23 6 1812 23 5 1813 23 4 1814 23 3 1815 23 2 1816 23 1 1817 23 0 1818 22 9 1819 22 8 1820 22 7 1821 22 6 1822 22 5 1823 22 4 1824 22 3 1825 22 2 1826 22 ...

Страница 203: ...9 2019 2 8 2020 2 7 2021 2 6 2022 2 5 2123 2 4 2024 2 3 2025 2 2 2026 2 1 2027 2 0 2028 1 9 2029 1 8 2030 1 7 2031 1 6 2032 1 5 2033 1 4 2034 1 3 2035 1 2 2036 1 1 2037 1 0 2038 0 9 2039 0 8 2040 0 7 2041 0 6 2042 0 5 2043 0 4 2044 0 3 2045 0 2 2046 0 1 2047 0 0 2048 0 1 2049 0 2 2050 0 3 2051 0 4 2052 0 5 2053 0 6 2054 0 7 2055 0 8 2056 0 9 2057 1 0 2058 1 1 2059 1 2 2060 1 3 2061 1 4 2062 1 5 20...

Страница 204: ...262 21 5 2263 21 6 2264 21 7 2265 21 8 2266 21 9 2267 22 0 2268 22 1 2269 22 2 2270 22 3 2271 22 4 2272 22 5 2273 22 6 2274 22 7 2275 22 8 2276 22 9 2277 23 0 2278 23 1 2279 23 2 2280 23 3 2281 23 4 2282 23 5 2283 23 6 2284 23 7 2285 23 8 2286 23 9 2287 24 0 2288 24 1 2289 24 2 2290 24 3 2291 24 4 2292 24 5 2293 24 6 2294 24 7 2295 24 8 2296 24 9 2297 25 0 2298 X6 Mic line input level values dB va...

Страница 205: ...rim to a value of 0 8 dB Example 2 mix control EG21308 2213AU DsG21308 2213 Mix 16 5 dB of mic 2 into output 5 left Set a mic line gain EGX6 X6 AU DsGX6 X6 Set mic line gain control X6 to a value of X6 dB Example EG40001 2288AU DsG40001 2288 Set the mic line input 2 gain to a level of 24 0 dB Read a DSP trim or mix excluding mic line inputs EGX6 AU DsGX6 X6 DSP trim or mix control X6 is set to a v...

Страница 206: ...e X6 group fader by X6 dB View the group fader control level EDX6 GRPM GrpmX6 X6 In verbose modes 1 and 2 the response is simplified to X6 Mute a group mute control EDX6 1GRPM GrpmDX6 00001 Mute all blocks in group X6 Clear unmute a group mute control EDX6 0GRPM GrpmDX6 00000 Umute all blocks in group X6 View a group mute control EDX6 GRPM GrpmDX6 X6 For group masters X6 is always expresed as a po...

Страница 207: ...exception of the switcher s IP address The protected configuration is useful to establish the MPX Plus 866 A in a known state either as a troubleshooting tool or as a baseline configuration Save the configuration ESX6 PCFG PcfgS Save the configuration to the protected memory location Recall the configuration ERPCFG PcfgR Recall the protected configuration Change the PIN EPX6 old X6 new PCFG Overwr...

Страница 208: ...DSP SIS Commands cont d MPX Plus 866 A Media Presentation Matrix Switcher DSP SIS Commands B 12 PRELIMINARY ...

Страница 209: ...PRELIMINARY MPX Plus 866 A C Appendix C Reference Information Specifications Part Numbers ...

Страница 210: ...VGA QXGA RGBHV RGBS RGsB RsGsBs component video S video composite video Up to 4 S video and 2 composite video or 6 composite video Connectors RGB VGA 8 female 15 pin HD S video composite video 4 x 2 female BNC for S video or composite video inputs 11 to 14 and 2 x 1 female BNC for composite video or genlock only inputs 9 and 10 Nominal level 1 Vp p for Y of component video or S video and for compo...

Страница 211: ...og 0 3 V to 1 5 Vp p with no offset follows input S video composite video Analog 0 0 V to 2 0 Vp p with no offset Impedance 75 ohms Return loss RGB VGA 40 dB 5 MHz S video composite video 30 dB 5 MHz DC offset S video composite video 5 mV with input at 0 offset VGA 10 mV with input at 0 offset Switching type RGB VGA Triple Action S video composite video Vertical interval Sync Input type VGA group ...

Страница 212: ...pedance 11 5k ohms unbalanced 22k ohms balanced DC coupled Nominal level 4 dBu 1 23 Vrms Maximum level 24 dBu at 1 THD N Input gain adjustment 18 dB to 24 dB adjustable per input by RS 232 Ethernet or front panel N 0 dBu 0 775 Vrms 0 dBV 1 Vrms 0 dBV 2 dBu Mic line input Number signal type 4 balanced unbalanced Connectors 4 3 5 mm captive screw connectors 3 pole Impedance 2 5k ohms unbalanced 5 0k...

Страница 213: ...b server Up to 200 simultaneous sessions 7 25 MB nonvolatile user memory Program control Extron s control configuration program for Windows Extron s Simple Instruction Set SIS Microsoft Internet Explorer ver 6 or higher Telnet General Power 100 VAC to 240 VAC 50 60 Hz 48 watts internal Temperature humidity Storage 40 to 158 F 40 to 70 C 10 to 90 noncondensing Operating 32 to 122 F 0 to 50 C 10 to ...

Страница 214: ...a Presentation Matrix Switcher User s Manual Replacement parts Included parts Part number Button and cap diffuser kit 70 352 01 Button overlays 100 196 01 5 pole captive screw audio connectors qty 10 100 460 01 Optional accessories These items can be ordered separately Adapters power supplies labels Part number MKP 1000 remote keypad Black 60 239 02 White 60 239 03 WT water tight black 60 239 52 W...

Страница 215: ...3 RG6 super high resolution cable Part number RG6 500 non plenum 1 conductor 500 150 m 22 098 02 RG6 1000 non plenum 1 conductor 1000 300 m 22 098 03 RG6P 500 plenum 1 conductor 500 150 m 22 164 02 RG6P 1000 plenum 1 conductor 1000 300 m 22 164 03 Termination tools and connectors Part number 15 pin HD connectors VGA style qty 10 100 070 51 CTU 200 universal crimp tool 100 241 01 MHR universal crim...

Страница 216: ...35 to 100 10 6 m to 30 4 m backshell 26 438 nn VGA male to female with audio cables Part number VGA A M F MD 3 to 50 0 9 m to 15 2 m molded 26 491 nn VGA A M F BK 3 to 50 0 9 m to 15 2 m backshell 26 491 nn VGA A 90º M F MD 3 to 12 0 9 m to 3 6 m molded 26 509 nn VGA A 90º M F BK 3 to 12 0 9 m to 3 6 m backshell 26 509 nn VGA A 90º Up M F MD 3 to 12 0 9 m to 3 6 m molded 26 509 nn VGA A 90º Up M F...

Страница 217: ...from the front panel figure C 1 TEXT Separate the two piece button here at the corner Pry the two pieces apart Diffuser Base Button Label Clear Lens Figure C 1 Illuminated button label replacement 3 Locate the notch in the corner of one side of the clear button cap lens 4 Separate the white backing diffuser from the clear button cap lens insert the blade of the small screwdriver into the corner no...

Страница 218: ...Reference Information cont d MPX Plus 866 A Media Presentation Matrix Switcher Reference Information C 10 PRELIMINARY ...

Страница 219: ...C 11 MPX Plus 866 A Media Presentation Matrix Switcher Reference Information PRELIMINARY Button label blanks ...

Страница 220: ...Reference Information cont d MPX Plus 866 A Media Presentation Matrix Switcher Reference Information C 12 PRELIMINARY ...

Страница 221: ... Emirates Dubai This Limited Warranty does not apply if the fault has been caused by misuse improper handling care electrical or mechanical abuse abnormal operating conditions or non Extron authorized modification to the product If it has been determined that the product is defective please call Extron and ask for an Applications Engineer at 714 491 1500 USA 31 33 453 4040 Europe 65 383 4400 Asia ...

Страница 222: ...USA Canada Only 1 919 863 1794 1 919 863 1797 FAX Extron Europe 800 3987 6673 Inside Europe Only 31 33 453 4040 31 33 453 4050 FAX Extron Asia 800 7339 8766 Inside Asia Only 65 6383 4400 65 6383 4664 FAX Extron Japan 81 3 3511 7655 81 3 3511 7656 FAX Extron China 400 883 1568 Inside China Only 86 21 3760 1568 86 21 3760 1566 FAX Extron Middle East 971 4 2991800 971 4 2991880 FAX ...

Отзывы: