background image

3

Panels and Features

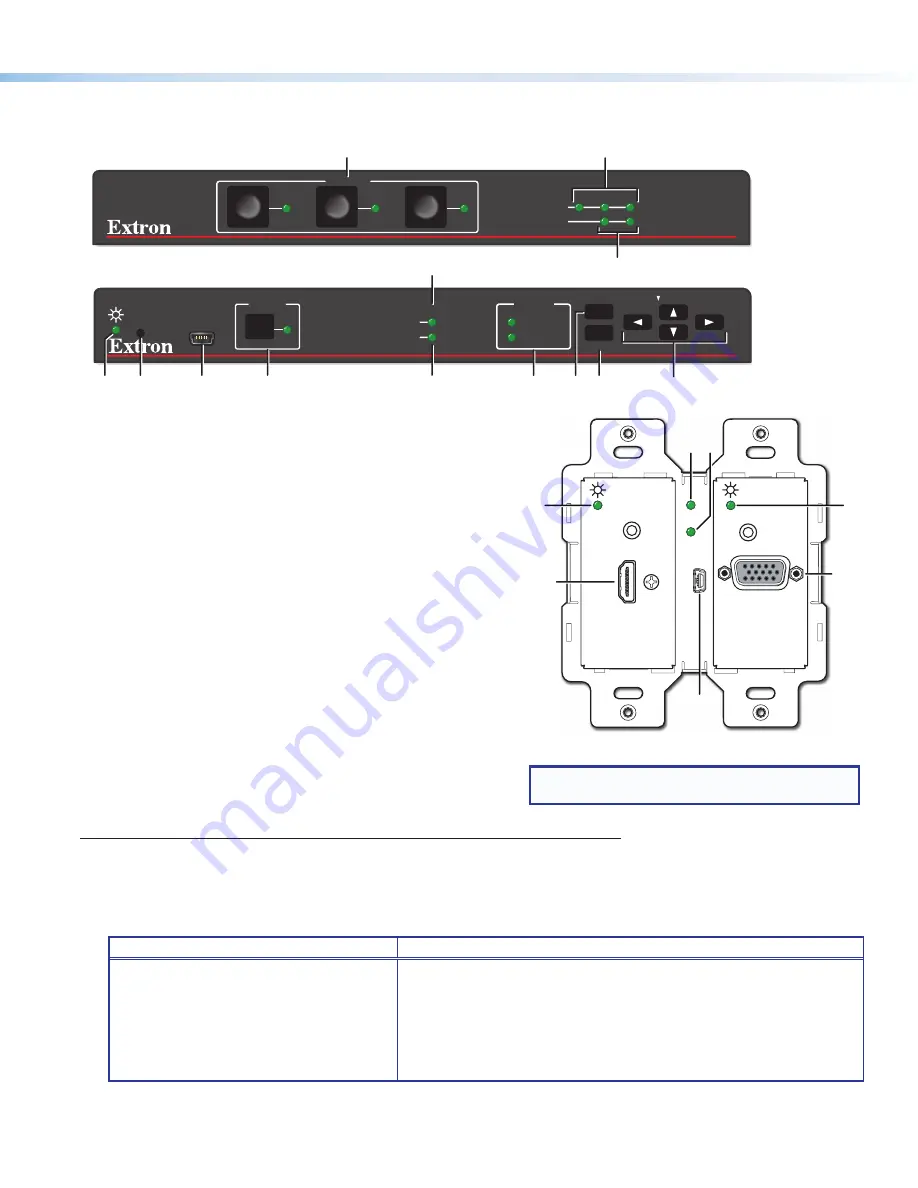
Front Panel Features


CONFIG

HCR 102

1

INPUT

LPCM-2CH
MULTI-CH

HDCP

SIGNAL

R

MENU

ENTER

HOLD    FOR 720p/1080p

1

HCT 103

2

3

4

INPUTS

HDCP

SIGNAL

2

3

4

AUDIO

HCR 102

A

I J

B

C

D

H

FG

E

HCT 103

B

C

D

Figure 3. 

HCT 103 Front Panel (Top)  
HCR 102 Front Panel (Middle),  
HCT 102 D Front Panel Without Wallplate  
(Bottom, Right)

A


Configuration

 (Config) connector (USB mini-B), page 13

B


Input selection buttons

 and 

LEDs

, page 16

C


Input signal presence (Signal) LEDs

, page 16

D


HDCP status LEDs

, page 16

E


Audio input type LEDs

 (LPCM-2Ch and Multi-Ch, page 16

F


Menu

 button,

G


Enter

 button, and

H

 Navigation (

right


left


up


, and 

down


 arrow) 

buttons (see 

To configure the AV settings using the OSD 

and front panel buttons:

 on page 9)

I

 Power LED (HCT 102 D), power and reset indicator LED 

(HCR 102) (see below)

J


Reset button

 (HCR 102) (see below and page 17)

K

 Auto Switch LED (see below)

L

 Service connector (for use by Extron support staff)

J


Reset button

 (HCR 102) — Pressing this recessed button causes various product settings to be reset to the factory defaults 

(see 

Reset Modes: a Brief Summary

 on page 17). 

I


Reset and power LED

— This green LED indicates either the power status of the HCT 102 D transmitter or the HCR 102 

receiver, or the reset mode of the receiver. LED indications are as follows:

HCT 102 D Transmitter

HCR 102 Receiver

• 

Off

 — The unit is not powered on.

• 

On, lit amber

 — The unit is powered on 

but there is no active signal at that input.

• 

On, lit green

 — The unit is powered on 

and there is an active signal at that input.

• 

Off

 — The unit is not powered on.

• 

On, lit steadily

 — The unit is powered on.

• 

Blinking

 — The unit is powering up or the HCR 102 is performing a 

reset. The blink pattern depends on the selected reset mode.

For full descriptions of reset modes, how to use the reset button to activate 
them, and details of LED indications of each mode, see the 

HC 400 Series 

User Guide

.

K


Auto Switch LED

 — This LED on the HCT 102 D lights green if either of the auto-switching modes is enabled, and it turns off 

if both of the auto-switch modes are disabled. For details on auto-switching modes, see the 

HC 400 Series User Guide.

NOTE:

  For AV connectors on the HCT 102 D, see 

Rear and Side Panel Features

 on page 4.

AUDIO IN

AUTO SW

HDCP

HDMI IN

AUDIO IN

VGA IN

SERVICE

Extron

L

I

I

D

K

HCT 102 D Front (Without Wallplate)

Input

1

Input

2

Содержание HC 403

Страница 1: ...lf rack wide enclosures and are also rack mountable The HC 403 features three AV inputs and one output It consists of a two input switching transmitter HCT 102 D and a scaling receiver HCR 102 that has one HDMI input and one connection from the transmitter The transmitter has a decorator style wallplate and can be mounted into a standard US 2 gang junction box and the receiver is wall furniture or...

Страница 2: ...0W Wall Mount Occupancy Sensor Wireless Ethernet Laptop Room Wireless Access Point Tablet Smartphone TCP IP Network Figure 1 A Typical TeamWork HC 404 System Application POWER 12V 2 0A MAX INPUTS OUTPUTS 1 TP HDMI L R AUDIO HDMI CEC SIG LINK IN COM IR DIGITAL I O 1 2 S G Tx Rx G G 3 4 G HCR 102 LAN AUDIO IN HDMI IN AUDIO IN VGA IN Extron Ethernet PC with GlobalViewer Enterprise ShareLink 200 N AUD...

Страница 3: ...des a Brief Summary on page 17 I Reset and power LED This green LED indicates either the power status of the HCT 102 D transmitter or the HCR 102 receiver or the reset mode of the receiver LED indications are as follows HCT 102 D Transmitter HCR 102 Receiver Off The unit is not powered on On lit amber The unit is powered on but there is no active signal at that input On lit green The unit is power...

Страница 4: ... 13 H Analog audio output connector page 13 I Remote control contact input ports page 13 J Remote control tally output ports page 13 K COM RS 232 control port page 14 L IR output control port page 14 M Digital I O digital input output control ports page 14 N LAN Ethernet connector and LEDs page 14 O MAC address on side of receiver page 14 P Reset button HCT 102 D If the transmitter powers on but i...

Страница 5: ...2 LAN IP address Gateway IP address Passwords 4 Write down the MAC address of each HCR 102 see figure 4 O on the previous page or other IP Link Pro device to be used 5 Obtain model names and setup information for devices the HCR 102 will control Step 2 Mount the Half Rack Units Prepare the Installation Site for the HCT 102 D Turn off or disconnect all equipment power sources and mount the transmit...

Страница 6: ... see sections 307 Protruding Objects and 308 Reach Ranges of the 2010 ADA Standards for Accessible Design available at http www ada gov regs2010 2010ADAStandards 2010 ADAStandards pdf Site preparation Mud rings optional UL Listed junction boxes external junction boxes and surface mounting boxes are available for use with the HCT 102 D 1 Read any installation instructions and UL guidelines that com...

Страница 7: ... and down arrow buttons to change the value in the selected octet Default 192 168 254 250 From the Communication menu NOTE Press and hold the Enter button for 10 seconds to edit settings in the Communication submenu DHCP Select and enter the DHCP Mode submenu and press the arrow buttons to turn DHCP on or off default off IP address Select and enter the IP Address submenu Press the left or right ar...

Страница 8: ... the MAC address to locate the desired device the HCR 102 in the list and select it 5 Use the Set IP feature in Toolbelt or use the Toolbelt Manage Network Settings tab feature to enter the IP address and subnet address then configure other network settings as needed NOTE When setting up DHCP during network configuration or if using a host name instead of an IP address the user must enter a qualif...

Страница 9: ...set the audio input format see table below for the selected input set program audio volume and set audio output format stereo mono Audio Input Format Details None Mutes all audio for selected input Sets No Audio EDID Analog Sets the selected input to analog default for input 1 Sets No Audio EDID LPCM 2Ch Sets the selected input to LPCM 2Ch digital audio default for input 2 Sets 2Ch audio EDID Mult...

Страница 10: ...its control ports function what to monitor how to control other products when to do things which touchpanels to interact with whom to notify how and under what circumstances a Configure the control ports on the receiver Select device drivers and link them to each serial IR or Ethernet port Select settings serial protocol or digital I O settings as needed Configure CEC controls if desired b Set up ...

Страница 11: ...oles in the box or mud ring b Using a Phillips screwdriver lightly tighten the screws until snug 4 Attach the wallplate to the transmitter a Align the wallplate openings with the faceplates of the transmitter and place the wallplate against the unit b Insert screws through the wallplate mounting holes 3 and lightly tighten the screws until snug Do not over tighten 5 Reconnect power to all devices ...

Страница 12: ... remove any excess length Complete details on LockIt installation are available in the LockIt HDMI Cable Lacing Bracket Installation Guide Transmitter Receiver Interconnection Connect the Out port of the transmitter figure 4 E to the In port of the receiver F using a shielded twisted pair CAT x cable of up to up to 230 feet 70 m as shown in figure 1 on page 2 Terminate the cable with shielded RJ 4...

Страница 13: ... selected the corresponding tally port is set to logic low allowing voltage to pass through that tally output pin providing power for an indicator LED If the tally port is connected to an Extron Show Me cable the LED in the cable lights Show Me cables are available only as part of an Extron TeamWork kit Follow the wiring instructions for either an Extron HDMI Show Me cable see below or an external...

Страница 14: ...events and functions toggle relays issue commands send e mail once configured Trigger LEDs incandescent lights or other devices that accept a TTL signal HCR 102 Rear Panel Switch Sensor Switches sensors LEDs relays or similar items Ground Share the same ground among I O connections Device 4 Device 3 Device 2 Device 1 Wire Nut Indicator LED LAN Connect the receiver to a network via the LAN port N f...

Страница 15: ...E The receiver can provide power remotely to the transmitter using a 50 watt power supply Remote power mode requires at least 2 5 A The transmitter can receive power from but cannot provide power to the receiver The remote power feature is enabled by default but can be disabled by using a control in the PCS software Alternatively you can connect an optional 12 VDC 1 5 A power supply Extron PS 1215...

Страница 16: ...orresponding input An unencrypted TMDS signal is detected at the corresponding input or no active TMDS signal is detected Audio input signal LEDs LPCM 2Ch and Multi Ch These two LEDs E on the receiver indicate the presence or absence of the specific types of audio signal on the selected active input Audio Input LED State and Indication LED Type On Lit Steadily Off Unlit LPCM 2Ch An embedded LPCM 2...

Страница 17: ...atic IP address When you disable the DHCP client the unit reverts to using the previously set static IP address Reset All IP Settings Press and hold the HCR 102 front panel Reset button for 6 seconds After the Power LED flashes twice release and momentarily press the Reset button Use this mode to reset all network settings to factory default values without affecting user loaded files This reset mo...

Страница 18: ...nload Center page Click on the Download tab at the top of any page within www extron com Via links from search results NOTES To obtain Global Configurator software you must have an Extron Insider account Extron provides training to our customers on how to use the software Access to the full features of Global Configurator Professional is available to those who successfully complete Extron Control ...

Отзывы: