


FPC 6000 • Operation
27
Create a Tie
1.
Press the desired input button. The selected input button lights.
Any outputs that are already tied to that input also light.
TIES
I/O INFO
STATUS
DISCONNECT
CUSTOMIZE
REFRESH
OUTPUTS
PRESETS
SELECT ALL
CLEAR
SELECTION
M AT R I X T I E S
INPUTS
Viewing Mode:
Grid (Standard)
Grid (Internal Audio) Numpad
Viewing Mode:
Grid (Standard)
Grid (Internal Audio) Numpad
Input 183
183
Input 181
181
Input 182
182
Input 184
184
Input 187
187
Input 188
188
Input 185
185
Input 186
186
Input 191
191
Input 192
192
Input 189
189
Input 190
190
Input 194
194
Input 196
196
Input 193
193
Input 195
195
Input 198
198
Input 200
200
Input 197
197
Input 199
199
Output 111
111
Output 109
109
Output 112
112
Output 115
115
Output 116
116
Output 113
113
Output 114
114
Output 119
119
Output 120
120
Output 117
117
Output 118
118
Output 123
123
Output 124
124
Output 126
126
Output 128
128
Output 125
125
Output 127
127
Output 110
110
Output 122
122
Output 121
121
TAKE
MUTE/
UNMUTE
VIDEO
AUDIO
VIDEO
AUDIO
USB
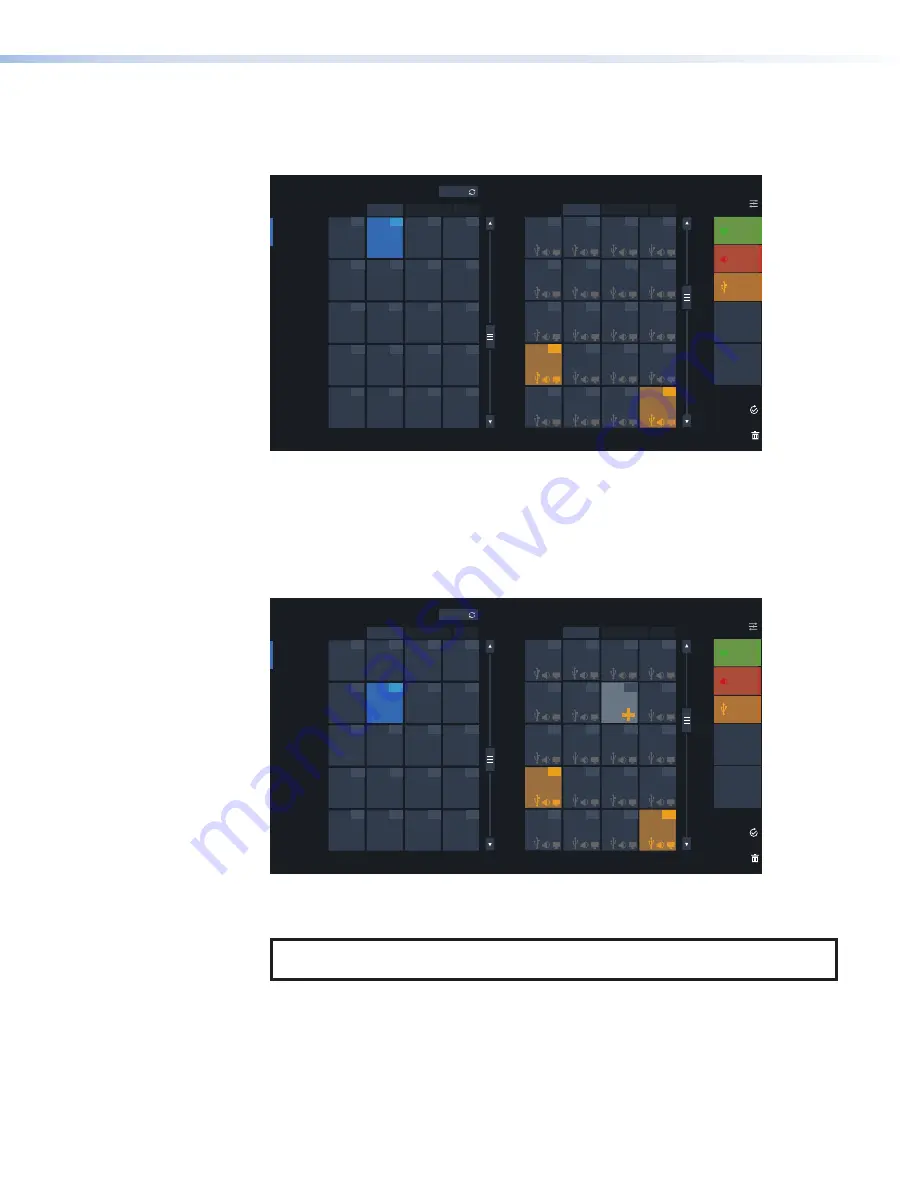
Figure 27.
Creating a Tie: Select Input
In figure 27,
Input
182
is already tied to
Outputs
121
and
128
.
2.
Press one or more output buttons.
The selected output buttons light and a plus sign appears in the bottom right corner.
The
Take
button on the right of the screen becomes active, as indicated by the orange band
along the right edge of the button.
TIES
I/O INFO
STATUS
DISCONNECT
CUSTOMIZE
REFRESH
OUTPUTS
PRESETS
SELECT ALL
CLEAR
SELECTION
M AT R I X T I E S
INPUTS
Viewing Mode:
Grid (Standard)
Grid (Internal Audio) Numpad
Viewing Mode:
Grid (Standard)
Grid (Internal Audio) Numpad
Input 183
183
Input 181
181
Input 182
182
Input 184
184
Input 187
187
Input 188
188
Input 185
185
Input 186
186
Input 191
191
Input 192
192
Input 189
189
Input 190
190
Input 194
194
Input 196
196
Input 193
193
Input 195
195
Input 198
198
Input 200
200
Input 197
197
Input 199
199
Output 111
111
Output 109
109
Output 112
112
Output 115
115
Output 116
116
Output 113
113
Output 114
114
Output 119
119
Output 120
120
Output 117
117
Output 118
118
Output 123
123
Output 124
124
Output 126
126
Output 128
128
Output 125
125
Output 127
127
Output 110
110
Output 122
122
Output 121
121
TAKE
MUTE/
UNMUTE
VIDEO
AUDIO
VIDEO
AUDIO
USB
Figure 28.
Creating a Tie: Select One or More Outputs
In figure 28 a potential tie has been created between
Input
186
and
Output
115
.
NOTE:
You can also tie an input to all outputs by pressing the
button (see
page 29).
figure 27
figure 28
Содержание FPC 6000
Страница 6: ......
Страница 8: ...FPC 6000 Contents viii ...


