background image

Contents

Introduction

............................................................ 1

About the DP DA2 .............................................. 1
DP DA2 Features ................................................ 1
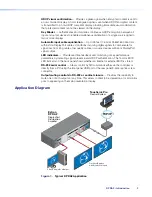
Application Diagram ........................................... 2

Panel Features

 ........................................................ 3

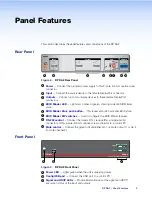
Rear Panel .......................................................... 3
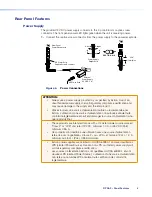
Front Panel ......................................................... 3
Rear Panel Features ........................................... 4

Power Supply ................................................. 4
Display Port Connectors ................................. 6
Dual Mode DisplayPort ................................... 7
EDID Minder ................................................... 7
RS-232 Control .............................................. 9
Mute Control................................................... 9

Front Panel Features ......................................... 10

Power LED ................................................... 10
Config USB Port ........................................... 10
Signal and HDCP LEDs ................................ 12

Setup

 ...................................................................... 13

SIS Commands

 ..................................................... 14

Introduction to SIS  ........................................... 14
Symbols Used in this Guide .............................. 15
Error Messages ................................................ 15
Command and Response Table for SIS 

Commands ..................................................... 16

Updating Firmware

 ............................................. 18

Downloading and Installing Firmware Loader .... 18
Downloading DP DA2 Firmware ........................ 19
Loading the Firmware to the DP DA2 ................ 20
Resetting Firmware to the  

Factory Default Version .................................... 23

Mounting

 .............................................................. 24

Desktop Placement .......................................... 24
Rack Mounting ................................................. 24

UL Guidelines for Rack Mounting .................. 24
Rack Mounting Procedure ............................ 24

DP DA2 • Contents

v

Содержание DP DA2

Страница 1: ...68 2154 01 Rev C 07 14 DP DA2 User Guide DisplayPort Distribution Amplifier ...

Страница 2: ...oltaje peligroso sin aislar dentro del producto lo que puede representar un riesgo de descarga eléctrica ATENCIÓN Este símbolo I cuando se utiliza en el producto avisa al usuario de la presencia de importantes instrucciones de uso y mantenimiento recogidas en la documentación proporcionada con el equipo Para obtener información sobre directrices de seguridad cumplimiento de normativas compatibilid...

Страница 3: ...nics All rights reserved Trademarks All trademarks mentioned in this guide are the properties of their respective owners The following registered trademarks registered service marks SM and trademarks TM are the property of RGB Systems Inc or Extron Electronics Registered Trademarks AVTrac Cable Cubby CrossPoint eBUS EDID Manager EDID Minder Extron Flat Field GlobalViewer Hideaway Inline IP Interco...

Страница 4: ...X X1 X2 X2 X2 CE NOTE For commands and examples of computer or device responses mentioned in this guide the character 0 is used for the number zero and O represents the capital letter o Computer responses and directory paths that do not have variables are written in the font shown here Reply from 208 132 180 48 bytes 32 times 2ms TTL 32 C Program Files Extron Variables are written in slanted form ...

Страница 5: ...fig USB Port 10 Signal and HDCP LEDs 12 Setup 13 SIS Commands 14 Introduction to SIS 14 Symbols Used in this Guide 15 Error Messages 15 Command and Response Table for SIS Commands 16 Updating Firmware 18 Downloading and Installing Firmware Loader 18 Downloading DP DA2 Firmware 19 Loading the Firmware to the DP DA2 20 Resetting Firmware to the Factory Default Version 23 Mounting 24 Desktop Placemen...

Страница 6: ...DP DA2 Contents vi ...

Страница 7: ...Port In normal mode provides two identical outputs with PC resolutions up to 2560x1600 60 Hz with multi channel audio and HDTV up to 1080p 60 Hz distributed with embedded multi channel digital audio signals Thunderbolt source support input Thunderbolt sources are backward compatible with the DP DA2 input with respect to both audio and video Thunderbolt devices are not supported on the DP DA2 outpu...

Страница 8: ...g signal presence and HDCP authentication The tri color EDID LED indicator on the back panel shows whether an internal or external EDID is stored RS 232 serial control Allows control by SIS commands either via the controller or directly from a PC using the front panel USB port or the rear panel 3 pole captive screw connector Output muting control via RS 232 or contact closure Provides the capabili...

Страница 9: ... EDID Minder state E EDID Minder Store push button This recessed button activates EDID store F EDID Minder DIP switches Used to configure the EDID Minder features G RS 232 control Connect the transmit Tx receive Rx and ground G connectors of this 5 pole 3 5 mm captive screw connector to a control PC H Mute control Connect the ground G and either pin 1 to mute output 1 or pin 2 to mute channel 2 Fr...

Страница 10: ...fournie ou recommandée par Extron L utilisation d une source d alimentation non autorisée annule toute conformité réglementaire et peut endommager la source d alimentation ainsi que le produit final These products are intended for use with a UL Listed power source marked Class 2 or LPS and rated 12 VDC minimum 1 0 A or 48 VDC PoE minimum 0 35 A Ces produits sont destiné à une utilisation avec une ...

Страница 11: ...tage polarity is critical Incorrect voltage polarity can damage the power supply and the unit Identify the power cord negative lead by the ridges on the side of the cord figure 4 La polarité de la source d alimentation est primordiale Une polarité incorrecte pourrait endommager la source d alimentation et l unité Repérez le pôle négatif du cordon d alimentation grâce aux stries sur le côté du cord...

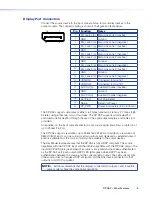
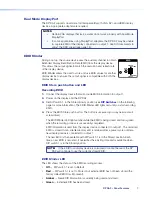
Страница 12: ...P DA2 supports mini DisplayPort and dual mode DisplayPort through the use of the appropriate adapters and cables not provided An equalizer on the input compensates for a poor source signal and allows a cable run of up to 25 feet 7 62 m The DP DA2 supports resolutions up to 2560x1600 60 Hz In addition a resolution of 3840x1080 60 Hz can be carried over two outputs and displayed as extended view If ...

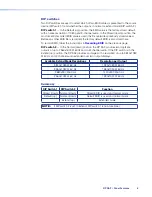
Страница 13: ...ollowing page for more information The EDID Minder LED lights red until you start recording EDID 4 Press the EDID Store push button The button is recessed you may need a small screw driver The EDID Minder LED lights amber while the EDID is being stored and turns green when the recording process is successfully completed EDID information is read from the display device connected to output 1 The rec...

Страница 14: ...on the previous page DIP switch 2 In the Normal down position the DP DA2 provides two duplicate outputs of up to 2560x1600 60Hz and multi channel audio If the DIP switch is in the Extend up position the DP DA2 provides an image with a resolution of up to 3840x1080 60 Hz and 2 channel audio extended over two output displays Available Extend Mode Resolutions Resolution per Output 3840x1080 60 Hz 192...

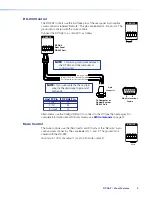
Страница 15: ...he DP DA2 and the computer or control system wire tie the drain wire to ground at both ends Rx Receive Pin to Transmit Tx Pin 3 G Ground Pin 5 Tx Transmit Pin to Receive Rx Pin 2 Alternatively use the Config USB port to connect to the PC see the next page For complete information about SIS commands see SIS Commands on page 14 Mute Control The mute controls use the third fourth and fifth pins of th...

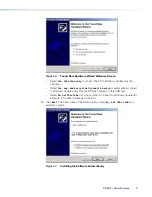
Страница 16: ... Connect a USB A to mini B cable between the USB Config port on the front panel of the DP DA2 and the USB port of the PC USB Cable Type A USB Mini Type B USB USB 1 USB Ports Computer DP DA2 Front Panel DP DA2 DISPLAYPORT DISTRIBUTION AMPLIFIER CONFIG INPUT OUTPUTS SIGNAL HDCP 1 2 Figure 5 Connecting a PC to the DP DA2 Front Panel USB Port 2 If this is the first time a DP DA2 has been connected to ...

Страница 17: ...e to automatically connect to Windows Update every time the DP DA2 connects to this USB port Select No not this time if you do not want to connect to Windows Update for example if the driver is already on the PC 3 Click Next The next screen of the Wizard opens unless No not this time was selected in step 2 Figure 7 Installing the Software Automatically DP DA2 Panel Features 11 ...

Страница 18: ...river to the same USB port 6 Configure the DP DA2 as required Signal and HDCP LEDs Signal LEDs Input Signal LED Lights green when main link activity is detected from the source device connected to the input Output Signal LED Lights green when a main link signal is being transmitted to at least one of the display devices connected to the outputs HDCP LEDs Input HDCP LED Lights green when the source...

Страница 19: ...e rear panel output connectors see page 6 To record EDID see page 7 the display with the lowest resolution should be connected to output 1 NOTES Both display devices must have resolution equal to or higher than the EDID values being used Extron recommends that the displays connected to outputs 1 and 2 are the same model or have the same native resolution 5 Power on the display devices 6 If necessa...

Страница 20: ...l device Rx and vice versa Only one serial port can be used at a time If the config port is in use the rear captive screw connector must be disconnected from the computer or other control device Likewise if the captive screw port is in use the config port on the front panel must be disconnected from the computer or other control device SIS commands consist of a string one or more characters per co...

Страница 21: ...ed 3 extend X 256 bytes of raw hex data X Native resolution and refresh rate translated from HEX X Controller software version to the second decimal place X Unit name This is a text string up to 24 characters drawn from the alphabet A Z digits 0 9 minus sign hyphen No blank or space characters are permitted as part of a name No distinction is made between upper and lower case The first character m...

Страница 22: ...vice off EE0HDCP HdcpE0 HDCP authorized device is off Request HDCP authorized device status EEHDCP X HDCP status 1 on 0 off EDID Minder View EDID assignment EA EDID X View Read EDID in HEX ER EDID X Read up to 256 bytes of HEX as text from currently selected EDID View EDID native resolution EN EDID X From current EDID selection for example 1600x1200 60Hz Video Bit Depth Set video bit depth EVX BIT...

Страница 23: ...it to host Additional Description Other Request part number N 60 1221 01 Query firmware version Q X Firmware version with 2 decimals Reset EZXXX Zpx Upload firmware EUpload go Upl During upload process When upload is complete DP DA2 SIS Commands 17 ...

Страница 24: ...er installed on your computer download it as follows 1 Go to the Extron website at www extron com and click the Download tab 2 On the Download Center screen click the Software link on the left sidebar menu 3 On the next Download Center screen locate Firmware Loader and click its Download link Figure 8 Firmware Loader Download Link 4 On the next screen enter the requested information then click Dow...

Страница 25: ...u may decide not to upgrade the firmware 4 Click the DP DA2 Download link 5 On the next screen enter the requested user information then click Download 6 Follow the instructions on the rest of the download screens to save the executable firmware file to your computer Note the folder in which the file was saved 7 Use a file browser to locate the downloaded executable file Double click it to open it...

Страница 26: ...rograms Extron Electronics Firmware Loader Firmware Loader The Firmware Loader dialog opens with the Add Device window displayed in front of it Figure 10 Opening Firmware Loader 4 On the Add Device window select DP DA2 from the Device Names drop down list 5 From the Connection Method drop down list select either RS 232 or USB 6 Depending on the connection method that you selected additional option...

Страница 27: ...enir l extension fichier S19 Un fichier avec n importe quelle autre extension n est pas une mise à jour de firmware pour cet appareil et l appareil pourrait arrêter de fonctionner NOTES The original factory installed firmware is permanently available on the DP DA2 If the attempted firmware upload fails for any reason the DP DA2 reverts to the factory version When downloaded from the Extron website...

Страница 28: ... the Add Device dialog closes If you will be uploading the firmware to multiple DP DA2 units that are connected to your computer do the following a Click Add Next Your first device is added to the Devices section of Firmware Loader and the Add Device dialog remains open b For each additional device you want to add to Firmware Loader repeat steps 5 through 9 then click Add Next c For the last devic...

Страница 29: ...ther progress bar The Status column displays Uploading 14 The upload is complete when the Remaining Time field shows 00 00 00 the Progress column shows 100 and Completed is displayed above the progress bar and in the Status column Close the Firmware Loader window Resetting Firmware to the Factory Default Version Occasionally the newly installed firmware may conflict with the system If that occurs ...

Страница 30: ...that the equipment gets adequate air flow for safe operation 3 Mechanical loading Mount the equipment in the rack so that uneven mechanical loading does not create a hazardous condition 4 Circuit overloading Connect the equipment to the supply circuit and consider the effect that circuit overloading might have on overcurrent protection and supply wiring Consider the equipment nameplate ratings whe...

Страница 31: ...tron and ask for an Application Engineer to receive an RA Return Authorization number This will begin the repair process USA 714 491 1500 or 800 633 9876 Europe 31 33 453 4040 Asia 65 6383 4400 Japan 81 3 3511 7655 Units must be returned insured with shipping charges prepaid If not insured you assume the risk of loss or damage during shipment Returned units must include the serial number and a des...

Отзывы: