background image

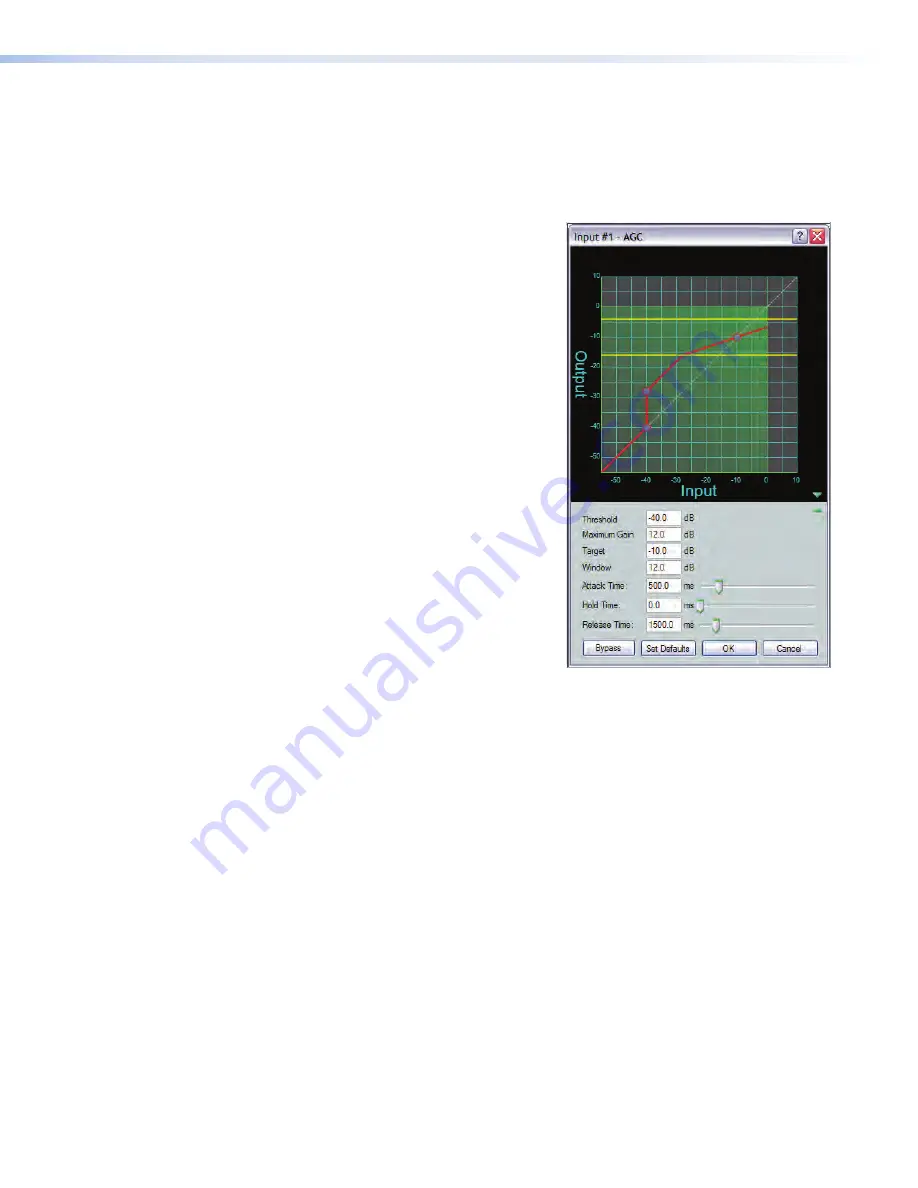
AGC (Automatic gain control)

AGC adjusts the gain level of a signal based upon the input strength to achieve a more 
consistent volume.  Above a set threshold, weaker signals receive more gain to reach a 
user-defined target level.  Signals stronger than the target receive gain reduction to reduce 
the signal towards the target. 

Threshold —

 is the input level where maximum 

gain will be applied (after the attack time is 
exceeded).  From the graph follow the input 
level (on the X-axis) at -40 dB up to where 
the red circle is.  Signal levels less than -40 dB 
remain at their original levels.  All signal levels 
at or exceeding -40 dB will have up to 12 dB of 
gain applied (Maximum Gain).   
Threshold level can be adjusted from -80.0 to 
0.0 dB in 0.1 dB increments.   
Default is -40.0 dB. 

Maximum Gain —

 is the highest amplification 

applied to a signal exceeding the threshold 
and up to the lower limit of the Window (see 
below).   
Maximum Gain can be set from 0.0 dB to +60 
dB in 0.1 dB increments. 
Default is 12.0 dB.

Target —

 is the desired average signal level 

of the output when AGC is applied.  AGC can 
vary the gain according to the input signal level, 
specified target level and maximum gain.  As 
the signal approaches the target level of -10 dB, 
gain is reduced until at -10 dB, gain is no longer 
applied.  
Target level can be adjusted from -40 dB to 0.0 dB in 0.1 dB increments. 
Default is -10.0 dB.

Window — 

is a specified range above and below the target level.  When the signal 

reaches the lower limit of the window, gain control begins scaling in a linear fashion 
toward the target level to achieve smoother results.  The window range can be set in 
0.1 dB increments from 0.0 dB to 20.0 dB.

Attack Time —

 adjusts the time delay for AGC to engage after the input signal level 

reaches or exceeds the threshold level.   
Attack time can be adjusted from 0.0 to 3000.0 ms in 0.1 ms increments. 
Default is 500.0 ms.

Hold Time —

 adjusts how long AGC continues after the input signal drops below the 

threshold and before release time begins.   
Hold time can be adjusted from 0.0 to 3000.0 ms in 0.1 ms increments. 
Default is 0.0 ms.

Release Time —

 adjusts the time it takes to return the signal to normal (unprocessed) 

levels after the signal no longer exceeds the threshold level setting.  Release time begins 
only after hold time is reached.   
Release time can be adjusted from 10.0 to 10000.0 ms in 0.1 ms increments. 
Default is 1500.0 ms.  


DMP 64 • Operation

30

Содержание DMP 64

Страница 1: ...68 1790 01 Rev B 04 10 Digital Matrix Processor DMP 64 User Manual Audio Products Mixers and Processors ...

Страница 2: ... verwenden sollten Sie alle Sicherheits und Bedienungsanleitungen genau durchlesen und verstehen Aufbewahren der Anleitungen Die Hinweise zur elektrischen Sicherheit des Produktes sollten Sie aufbewahren damit Sie im Bedarfsfall darauf zurückgreifen können Befolgen der Warnhinweise Befolgen Sie alle Warnhinweise und Anleitungen auf dem Gerät oder in der Benutzerdokumentation Keine Zusatzgeräte Ver...

Страница 3: ...ial environment This equipment generates uses and can radiate radio frequency energy and if not installed and used in accordance with the instruction manual may cause harmful interference to radio commu nications Operation of this equipment in a residential area is likely to cause harmful interference in which case the user will be required to correct the interference at his own expense NOTE This ...

Страница 4: ......

Страница 5: ...g and Control 49 Connection Options 49 RS 232 Ports 50 USB Port front panel 50 Ethernet LAN Port 51 Verbose Mode 52 Host to device communications 52 DMP 64 initiated Messages 52 Password Information 52 Using the Command Response Tables 53 Error Responses 53 Simple Control Port Commands 54 Basic SIS Commands 55 DSP SIS Commands 61 Special Characters 62 DMP Software 78 Software Control 78 Embedded W...

Страница 6: ...ystem Status Page 126 Configuration Tab 127 System Settings Page 127 Passwords Page 130 Firmware Upgrade Page 131 File Management Tab 135 File Management Page 135 Control Tab 136 Audio Settings Page 136 Group Controls Page 138 Special Characters 139 Reference Information 140 Specifications 140 Part Numbers and Accessories 142 Included Parts 142 Accessories 142 Firmware Loader 143 DMP 64 Hardware R...

Страница 7: ...io processor In this manual the DMP 64 may also be referred to as the mixer or device Notes Cautions Tips and Warnings NOTE Notes call attention to information that may be of special importance CAUTION Indicates a potential hazard to equipment or data exists and is included to help prevent damage TIP Tech Tips provide technical information that may be helpful during installation in performing a pr...

Страница 8: ...te presets and group controls as needed before placing the configuration in the DSP 64 DSP Configurator settings developed offline can be saved to disk as a job file to be uploaded to the device at a later time or can be transferred directly to the device by switching to Live mode Up to 32 full or partial presets and up to 32 group master controls can be created loaded into and stored in the DMP 6...

Страница 9: ... of the six inputs can first be directed into a secondary matrix which routes the inputs to four virtual buses before being mixed back to the outputs via the primary matrix Virtual buses allow for inputs to be grouped together and then processed with the same DSP settings and parameters simplifying system setup and control Group masters The DMP 64 provides the capability to consolidate gain or mut...

Страница 10: ...STA ND BY LIM ITE R PR OT EC T SIG NA L STANDBY TIMER DISABLE IN PU TS OU TP UT S CL AS S 2 WI RI NG XP A 20 03 C 70 V HP F 1 0 2 0 3 0 RS 232 Ethernet Laptop Extron IN1508 Scaling Presentation Switcher Extron DMP 64 Digital Matrix Processor Extron XPA 2003C 70V Combo Power Amplifier 100 240 V 50 6 0Hz I N P U T VID VID YC Y B Y R Y RG B DV I 8 1 2 4 5 3 L 2 1 3 4 5 6 7 R AU DI O IN PU T L A B RS ...

Страница 11: ...rack environment may be greater than room ambient temperature Therefore install the unit in an environment compatible with the maximum ambient temperature Tma 122 F 50 C specified by Extron 2 Reduced air flow Install the equipment in a rack so that the amount of air flow required for safe operation of the equipment is not compromised 3 Mechanical loading Mount the equipment in the rack so that a h...

Страница 12: ... DMP 64 on the rack shelf using two 4 40 x 3 16 inch screws in opposite diagonal corners to secure the unit to the shelf Use 2 mounting holes on opposite corners 2 4 40 x 3 16 Screws NOTE Using screws longer than 3 16 will damage the unit and void the warranty 1U Universal Rack Shelf Front false faceplate uses 2 screws HalfRackStandardShelf 1 2 Rack Width Front False Faceplate Figure 1 Mounting th...

Страница 13: ...4 as follows 1 Hold the unit with the attached brackets against the underside of the table or other furniture or against the wall Mark the location of the screw holes of the bracket on the mounting surface 2 Drill 3 32 inch 2 mm diameter pilot holes 1 4 inch 6 4 mm deep in the mounting surface at the marked screw locations 3 Insert 8 wood screws into the four pilot holes Tighten each screw into th...

Страница 14: ...e or other furniture Mark the location of the screw holes of the bracket on the mounting surface 3 Drill 3 32 inch 2 mm diameter pilot holes 1 4 inch 6 3 mm deep in the mounting surface at the marked screw locations 4 Insert four 8 wood screws through the bracket and into the four pilot holes Tighten all four screws to secure the unit in place Figure 3 MBD 129 Through desk Mounting DMP 64 Installa...

Страница 15: ... connecting the power supply voltage polarity is extremely important Applying power with incorrect voltage polarity could damage the power supply and the DMP 64 Identify the power cord negative ground lead by the ridges on the side of the cord or a black heat shrink wrapping around it WARNING The two power cord wires must be kept separate while the power supply is plugged in Remove power before wi...

Страница 16: ...g instructions Balanced Input Unbalanced Input Tip Ring Sleeve Tip Sleeve Figure 6 Wiring Balanced or Unbalanced Mic and Line Inputs c Phantom Power indicators These green LED indicators light when 48 V phantom power is placed on the corresponding mic line input Phantom power is not adjustable Note Condenser microphones require phantom power Dynamic microphones do not require power Caution Never s...

Страница 17: ...ng Figure 8 Digital I O Wiring f RS 232 connector Two stacked 3 pole 3 5 mm captive screw connectors labeled RS 232 1 and RS 232 2 are available for bi directional RS 232 5 V serial control Default baud rate is 38400 Receive Rx Transmit Tx Ground Bidirectional RS 232 Device Ground Receive Rx Transmit Tx Rx Tx Do not tin the wires Figure 9 RS 232 Wiring g LAN RJ 45 connector A standard RJ 45 jack a...

Страница 18: ...nnels DMP 64 Operation The DMP 64 does not have physical controls Configuration and operation are accomplished using a PC running Windows XP or better and the DSP Configurator software available on the included disc or at www extron com an embedded web page using Windows Internet Explorer or the Extron SIS Simple Instruction Set using hyper terminal or DataViewer There are several front and rear p...

Страница 19: ...l time input signal level It begins to light at 60 dBFS increasing in fifteen steps to full intensity as the signal level increases When the signal reaches 3 dBFS or above the red clipping LED lights and remains lit as long as the signal remains above 3 dBFS When it falls below that level the red LED remains lit for 200 milliseconds after which the display resumes real time monitoring of the signa...

Страница 20: ...eset LED The green LED indicator adjacent to the reset button duplicates the front panel LED operation See Reset Actuator and LED later in this chapter for additional information Power Cycle Current mixing and audio processor settings the current state of the device are saved in nonvolatile memory When the unit is powered off all settings are retained When the unit is powered back on it recalls se...

Страница 21: ...DMP 64 Press and hold the reset button while applying power to return the firmware to the version shipped with the unit from the factory Event scripting will not start when powered on in this mode This allows recovering a unit with incorrect or corrupt firmware All user files and settings are maintained Some user web pages may not work correctly if returning the unit to an earlier firmware release...

Страница 22: ...he reset button to return the DMP 64 to factory default conditions If the second momentary press does not occur within 1 second the reset is exited The default reset state of the device is All mix points are set to 0 dB gain and muted All outputs active unmuted 100 volume No inserted or active DSP processing All audio inputs are set to 0 dB gain and muted All preset and group master memory is clea...

Страница 23: ...P Configurator program provides complete control while the internal web pages and SIS commands provide more limited control This chapter describes the signal processing including parameter ranges and how to mix inputs and outputs using the DSP Configurator control program Detailed information for configuring the processor blocks mix points and level controls are found in DMP Software Mic Line Inpu...

Страница 24: ...two matrixes Dual matrix features are as follows Primary Matrix a mic line input section and a virtual bus return section feed the primary matrix which routes incoming signals to the line outputs Secondary Matrix a mic line input section and a virtual bus return section feed the secondary matrix which routes to the virtual bus sends Line Outputs Line Output elements from left to right are as follo...

Страница 25: ...ass When bypass is active signal flow passes through the block without processing regardless of the settings When bypass is removed the signal will be processed according to the parameter settings A red mark appears in the lower left of the block shown below to indicate it has been inserted but is currently bypassed Mic Line Input Channel There are six 6 mono mic line input channels Channel contro...

Страница 26: ...ll filter parameters are modified via the Filter block dialog box Each filter loads with all applicable default parameters displayed to the right of each drop down filter selection list Figure 15 Filter Dialog Box Filters Added Within the dialog box a filter is focused when a filter type is inserted or is focused by clicking the filter number to the left of the filter selection drop down list Note...

Страница 27: ... that filter Click hold dragging the handle horizontally changes the cutoff or center frequency to a new position on the x axis The table below shows each filter type with default parameter settings The table immediately following shows the possible range for each parameter Type Frequency Parameter 1 Parameter 2 Parametric 1000 0 Hz Boost Cut 0 0 dB Q 1 0 High Pass 100 0 Hz Slope 6 dB N A Low Pass...

Страница 28: ...lters centered at different frequencies but with the same Q of 1 0 The filter in focus c has a center frequency of 1000 Hz boosting that frequency 12 dB over a Q of 1 0 Note the markers on either side of the peak frequency are at 200 Hz on the left and 5000 Hz on the right a bandwidth of about 4800 Hz Figure 17 Parametric Filter Dialog Box 1000 Hz The above dialog box shows the frequency curve for...

Страница 29: ... regardless of the slope setting Only the steepness of the frequency attenuation curve will change Low Pass The low pass filter is the opposite of the High Pass filter All frequencies above the specified frequency are attenuated allowing lower frequencies to pass Figure 19 Low Pass Filter Response Curve Here the frequencies higher than the specified frequency 10 kHz are attenuated leaving the lowe...

Страница 30: ...og box If only a bass or only a treble filter is required either bypass the unneeded control or set it to unused in the selection box Figure 20 Bass and Treble Shelving The corner frequency of the controls may be selected to 0 1 Hz accuracy Two slopes 6 and 12 dB octave are available along with the ability to boost or cut the signal up to 24 dB DMP 64 Operation 24 ...

Страница 31: ... feedback frequency can only be overwritten by the user manually writing a new frequency to the filter The FBS dialog box has 3 tabs Settings Dynamic Filters and Fixed Filters Global settings and view options are controlled from the settings tab Dynamic to fixed filter allocations are handled from the dynamic filters tab Filter parameters can be modified from the Fixed Filters tab The FBS dialog b...

Страница 32: ...d values for specific applications are Q 7 Voice with considerable feedback potential Q 30 Voice with less feedback potential Q 65 Music with minimal feedback potential Attack Time sets the time at which dynamic filters are generated after feedback detection A longer attack time greater than 200 ms reduces the chance that music or audio content will trigger the dynamic filters to respond A shorter...

Страница 33: ...hen Bypass FBS is off If testing reaches a point where no further changes are desired the lock button may be engaged The lock mode of operation is temporary and is intended to be used during setup of the FBS When the FBS dialog window is closed lock mode is automatically disengaged If there are specific dynamic filters the operator wants to assure are not overwritten press the Move to Fixed button...

Страница 34: ... from a dynamic filter the filter becomes active and will display Notch as the filter type and display the parameters copied from the dynamic filter Once a filter is active as a fixed filter settings can be modified or adjusted if needed Fixed filters can also be individually bypassed using the Bypass button FBS Settings Ranges and Fixed Filter Defaults FBS Parameter Settings Range Default Setting...

Страница 35: ...xisting text then pressing Enter or tabbing clicking to another area Threshold gain attenuation target and ratio parameters have adjustment points on the graph display Use the mouse to click drag the graph point to the desired destination value All time values have a horizontal slider allowing adjustment in 1 ms increments by either a click drag of the slider handle or focusing on the slider then ...

Страница 36: ... the input signal level specified target level and maximum gain As the signal approaches the target level of 10 dB gain is reduced until at 10 dB gain is no longer applied Target level can be adjusted from 40 dB to 0 0 dB in 0 1 dB increments Default is 10 0 dB Window is a specified range above and below the target level When the signal reaches the lower limit of the window gain control begins sca...

Страница 37: ... Threshold is the input signal level above which compression begins subject to attack time and below which compression stops subject to hold and release time Threshold level can be adjusted from 80 0 to 0 0 dB in 0 1 dB increments Default is 30 0 dB Ratio is the input signal level reduction when compression is engaged Ratio can be adjusted from 1 0 to 100 0 in 0 1 increments Default is 2 0 1 Attac...

Страница 38: ...for limiting to engage after the input signal level reaches or exceeds the threshold level Attack time can be adjusted from 0 0 to 200 0 ms in 0 1 ms increments Default is 2 0 ms Hold Time adjusts how long limiting continues after the input signal drops below the threshold and before release time begins Hold time can be adjusted from 0 0 to 500 0 ms in 0 1 ms increments Default is 50 0 ms Release ...

Страница 39: ... when it drops below the threshold Maximum attenuation can be adjusted from 0 0 to 80 0 dB in 0 1 dB increments Default is 25 0 dB Ratio is the input signal level reduction when gating is engaged Ratio can be adjusted from 1 0 to 100 0 in 0 1 increments Default is 20 0 1 Attack Time adjusts the time delay for gating to engage after the input signal level drops below the threshold level Attack time...

Страница 40: ...elay Dialog Slider adjustments made in feet or meters correspond incrementally to the distance required to make 1 ms or 5 ms adjustments detailed in the table below If more precision is required enter the time in 0 1 ms increments into the readout field Method Time Feet Meters Click drag 1 ms 1 1 feet 0 3 m Focus arrow 1 ms 1 1 feet 0 3 m Focus Page Up Down 5 ms 5 6 feet 1 7 m When distance feet o...

Страница 41: ...cessor blocks are individually inserted from a context menu as shown below Only a ducking source needs to be inserted Ducking targets are enabled from the Ducker Configuration dialog Ducking is configured in a window which opens when an active ducking processor block is double clicked see figure 26 below Ducking can be globally set up from a single configuration window which opens when any of the ...

Страница 42: ...ts Default is 30 dB Attack Time Adjusts the time to duck the targets once the threshold is exceeded The range is 0 to 3000 milliseconds in 1 millisecond increments Default is 1 millisecond Hold Time Determines the time in milliseconds after a ducking source signal drops below the threshold before ducking ceases The range is 0 to 10000 milliseconds in 1 millisecond increments Default is 1000 millis...

Страница 43: ... tree on the right The inputs are arranged by their priority status Input 1 has all other ducked inputs under it therefore if a signal is detected it will trigger Inputs 2 6 to duck If Input 2 detects a signal and there is no signal on Input 1 Input 2 will trigger inputs 5 6 to duck However if the Input 1 signal exceeds the threshold it will then duck all inputs including Input 2 Ducking attenuati...

Страница 44: ...n Dynamics DYN There is one dynamics processor block available on each virtual path Dynamics function and interface is identical to the mic line input channel Dynamics block described in the previous Dynamics section See Dynamics for additional information Loudness LOUD There is one loudness processor available on each virtual path Loudness function and interface is identical to the Output channel...

Страница 45: ...ic Line Input 2 Mic Line Input 3 Mic Line Input 4 Mic Line Input 5 Mic Line Input 6 A B C D 1 2 3 4 5 6 A B C D 1 2 3 4 Outputs Virtual Bus Send Virtual Bus Return FLT DLY LOUD DYN VOL TRIM FLT DLY LOUD DYN VOL TRIM FLT DLY LOUD DYN VOL TRIM FLT DLY LOUD DYN VOL TRIM GAIN GAIN FLT FBS DYN DYN DLY DUCK GAIN GAIN FLT FBS DYN DYN DLY DUCK GAIN GAIN FLT FBS DYN DYN DLY DUCK GAIN GAIN FLT FBS DYN DYN D...

Страница 46: ...r the ball or bubble depending on mix status Double click double click to open the mix point dialog box The focus circle turns light green in color to indicate the open dialog box If the mix point is muted the mix point bubble will be gray If unmuted the bubble will be teal Multiple open dialog boxes when multiple mix point dialog boxes are open the mix point for the most recently opened dialog bo...

Страница 47: ...GAIN GAIN FLT FBS DYN DYN DLY DUCK GAIN GAIN FLT FBS DYN DYN DLY DUCK GAIN GAIN FLT FBS DYN DYN DLY DUCK Inputs FLT DYN GAIN LOUD FLT DYN GAIN LOUD FLT DYN GAIN LOUD FLT DYN GAIN LOUD GAIN GAIN FLT FBS DYN DYN DLY DUCK FLT DLY LOUD DYN VOL TRIM Figure 29 Input 1 to Output 1 In the first example figure 29 input audio from Mic Line Input 1 is processed and arrives at the primary mix point A double c...

Страница 48: ...l mix point mute buttons are released the primary mix point junctions turn teal to indicate the routing and all six signals are routed to output 1 Open the individual mix point dialog boxes to adjust signal levels to the output Mic Line Input 1 Mic Line Input 2 Mic Line Input 3 Mic Line Input 4 Mic Line Input 5 Mic Line Input 6 A B C D 1 2 3 4 5 6 A B C D 1 2 3 4 Outputs Virtual Bus Send Virtual B...

Страница 49: ...vent feedback loops a virtual channel is prevented from being routed back to itself by eliminating the mix point that would allow that to occur In situations requiring extra processing the virtual bus return output is routed back to the secondary mix matrix virtual bus send which then routes the signal back to a processing signal chain other than the one it was routed from Mic Line Input 1 Mic Lin...

Страница 50: ...e microphone inputs are being mixed with program material only the program material might require loudness contouring So the microphones could be routed directly to the output but the program material input could be routed to the virtual bus return where loudness contouring could be applied The program material could then be routed to the same output as the microphones Mic Line Input 1 Mic Line In...

Страница 51: ...must be disengaged for the loudness processor to function The bypass button is red when engaged loudness control defeated gray when disengaged loudness control active When bypassed the graph displays the current filter curve as a dotted line When bypass is disengaged the current filter curve is displayed as a solid line Figure 34 Loudness Dialog Window The Loudness dialog window contains the follo...

Страница 52: ...ks safely below 0 dBFS Unmute the mix point from the pink noise source to the output connected to the room amplifier being calibrated With the basic gain structure previously set up loudness can be calibrated using an SPL meter or by ear Loudness can also be set using an SPL meter then fine tuned by ear To calibrate loudness use a sound pressure level meter set to C weighting 1 Set the Loudness pr...

Страница 53: ...tively 4 To experiment with less loudness compensation move the loudness compensation slider to the left less For more loudness compensation move the slider to the right more 5 Any adjustment made to the loudness compensation slider will carry through to all listening levels Set the output volume fader in the DSP Configurator to a relatively loud listening level 6 Engage and disengage the Bypass s...

Страница 54: ... arrow buttons on the keyboard provides 1 dB increments An individual Mute button provides control of channel muting Output polarity switching is also provided with a button that toggles between plus and minus polarity The default setting is unmuted at 0 dB attenuation A peak meter displays the real time audio level from 60 to 0 dBFS The OK button accepts settings and closes the dialog with a sing...

Страница 55: ...nd details on the configuration and control port connections For information on DSP Configurator see DMP Software and for the embedded Web pages see HTML Operation SIS commands may be executed using the Extron Electronics DataViewer program which may be found on the Software Products DVD included with the product DMP 64 RS 232 protocol 38400 baud no parity 8 data bits no flow contro 1 stop bit NOT...

Страница 56: ...rts make serial control of the switcher possible Use the protocol information listed above to make the connection Once the connection is made see Host to device communications later in this section for SIS programming details USB Port front panel The DMP 64 has a front panel USB port that can be connected to a host device such as a computer running the HyperTerminal utility or the DataViewer utili...

Страница 57: ...Green White orange Blue White blue Orange White brown Brown Wire color T568A T568B End 1 End 2 End 1 End 2 White orange Orange White green Blue White blue Green White brown Brown Pin 1 2 3 4 5 6 7 8 Wire color White green White orange Blue White blue White brown Brown Wire color T568B T568B White orange Orange Orange White green Blue White blue Green Green White brown Brown Figure 35 RJ 45 Etherne...

Страница 58: ...tions No response is required from the host The DMP 64 initiated messages are listed here underlined Copyright 2009 Extron Electronics DMP 64 Vn nn 60 1054 01 Day DD MMM YYYY HH MM SS Vn nn is the firmware version number The DMP 64 sends the boot and copyright messages under the following circumstances If the DMP 64 is off and an RS 232 connection is already set up the PC is cabled to the DMP 64 a...

Страница 59: ...rn no line feed hex 0D for URL encoded commands use the pipe character instead Space character 20 for web browser Pipe vertical bar character Asterisk character which is a command character not a variable E Escape key hex 1B use W instead of Esc for Web browsers NOTE For Web encoding only data will be directed to the specified port and must be encoded URL encoding if it is non alphanumeric Change ...

Страница 60: ... the hex byte that needs to be sent i e a comma would be represented as 2C Characters such as percent plus and space should also be encoded in Hex Telnet Web Browser Escape Hex 1B W must not be encoded Carriage Return Hex 0D Pipe Character must not be encoded When describing the use of SIS commands via a web browser the URL reference is used to shorten the examples URL would be the full URL of the...

Страница 61: ... build version Q Q X1 Kernel firmware and build Q Q X1 Verbose version info 0Q 0Q Sum of 2Q 3Q 4Q Firmware version 1Q 1Q X1 Bootstrap Version 2Q 2Q X1 Factory Firmware Version 3Q 3Q X1 plus web ver desc UL date time Updated firmware version 4Q 4Q X1 plus web ver desc UL date time NOTE An asterisk after the version number indicates the currently running version Question marks indicate that only fac...

Страница 62: ...CC number of connections NOTE X Greenwich Mean Time offset GMT offset value 12 00 to 14 00 representing hours and minutes HH MM local time is offset from GMT time X On Off status 0 off disable 1 on enable X1 Unit name Alpha numeric up to 24 characters No special characters except hyphen No upper lower case distinction no blanks or spaces first character must be alpha last character cannot be hyphe...

Страница 63: ...lename Erase current directory E EF Ddl Also deletes files inside directory Erase current directory and sub directories E EF Ddl filename x date time length List files from current directory EDF filename x date time length filename x date time length filename x date time length space_remaining Bytes Left List files from current directory and below ELF filename x date time length filename x date ti...

Страница 64: ...be encoded as follows when used within the data section Space Hex 20 would be encoded as 20 and Plus sign Hex 2B would be encoded as 2B X1 Command string wait time 0 32767 in tens of milliseconds X2 Character wait time 0 32767 in tens of milliseconds X2 Length of stream or delimiter L Byte Count 00 32767 D decimal value for ASCII character 0 00255 X2 Priority status for receiving timeouts Default ...

Страница 65: ... suppressed Command ASCII command host to device Response device to host Additional description Event Control Read event buffer memory EX3 X3 X3 X3 E X5 Write event buffer memory EX3 X3 X3 X3 E EvtX3 X3 X3 X3 NOTE Response to Write Event is padded with leading zeros for X3 X3 Read string from event buffer EX3 X3 X3 X4 FE string Write string to event buffer E string X3 X3 X3 FE NOTE F must be capit...

Страница 66: ...1 ZG ZpgX1 Clear preset X1 Reset a group EZX2 GRPM GrpmZX2 Delete all members from group X2 reset parameters and soft limits NOTE See Group Masters for more information about audio group masters Reset flash EZFFF Zpf Reset flash memory erase user supplied files System Reset factory defaults EZXXX Zpx Resets all processors level controls and mixers to default Reset all device settings and delete fi...

Страница 67: ...o signal flow is helpful to understanding the commands Figure 37 shows the specific DSP processors available for SIS commands NOTE The entire signal flow is described in more detail in the section Windows based Program Control a b c e d Figure 37 DSP Processors Addressable via SIS Commands a Mic line input gain block including gain and mute b Pre mixer gain block including gain and mute c Mix poin...

Страница 68: ...increments using negative numbers but not decimal places The valid range depends on the type of gain block that is assigned to the group number X6 specified in the command a 180 to 800 18 0 dB to 80 0 dB b 1000 to 120 100 0 dB to 12 0 dB c 350 to 250 35 0 dB to 25 0 dB d 120 to 120 12 0 dB to 12 0 dB e 1000 to 000 100 0 dB to 0 0 dB NOTE Leading zeros are ignored X6 Group fader increment dB value ...

Страница 69: ...of X6 dB Example EG40001 2288AU DsG40001 2288 Set the mic line input 2 gain to a level of 24 0 dB Read a trim or mix excluding mic line inputs EGX6 AU DsGX6 X6 DSP trim or mix control X6 is set to a value of X6 dB Example 1 post mixer gain control EG60101AU DsG60101 2103 Output 2 post mixer trim is set to a value of 5 5 dB Example 2 mix control EG20203AU DsG20203 2140 9 2 dB of mic 3 is mixed into...

Страница 70: ...oup mute control EDX6 1GRPM GrpmDX6 00001 Mute all blocks in group X6 Clear unmute a group mute control EDX6 0GRPM GrpmDX6 00000 Umute all blocks in group X6 View a group mute control EDX6 GRPM GrpmDX6 X6 For group masters X6 is always expressed as a positive or negative 5 digit value Set soft limits ELX6 X6 upper X6 lower GRPM Set the groups soft limits to X6 and X6 GrpmLX6 X6 X6 Example EL2 60 6...

Страница 71: ...ng tool or as a baseline configuration Save the configuration ESX7 PCFG PcfgS Save the configuration to the protected memory location Recall the configuration ERPCFG PcfgR Recall the protected configuration Change the PIN EPX7 old X7 new PCFG PcfgP X7 new Overwrite the old PIN X7 old with the new one X7 new Query configuration saved status EQPCFG X7 NOTE X7 Personal Identification Number PIN Four ...

Страница 72: ...put 2 to Output 3 20102 Input 1 to Output 4 20003 Input 2 to Output 4 20103 Input 3 to Output 1 20200 Input 4 to Output 1 20300 Input 3 to Output 2 20201 Input 4 to Output 2 20301 Input 3 to Output 3 20202 Input 4 to Output 3 20302 Input 3 to Output 4 20203 Input 4 to Output 4 20303 Input 5 to Output 1 20400 Input 6 to Output 1 20500 Input 5 to Output 2 20401 Input 6 to Output 2 20501 Input 5 to O...

Страница 73: ...89 25 8 1790 25 7 1791 25 6 1792 25 5 1793 25 4 1794 25 3 1795 25 2 1796 25 1 1797 25 0 1798 24 9 1799 24 8 1800 24 7 1801 24 6 1802 24 5 1803 24 4 1804 24 3 1805 24 2 1806 24 1 1807 24 0 1808 23 9 1809 23 8 1810 23 7 1811 23 6 1812 23 5 1813 23 4 1814 23 3 1815 23 2 1816 23 1 1817 23 0 1818 22 9 1819 22 8 1820 22 7 1821 22 6 1822 22 5 1823 22 4 1824 22 3 1825 22 2 1826 22 1 1827 22 0 1828 21 9 18...

Страница 74: ...26 2 1 2027 2 0 2028 1 9 2029 1 8 2030 1 7 2031 1 6 2032 1 5 2033 1 4 2034 1 3 2035 1 2 2036 1 1 2037 1 0 2038 0 9 2039 0 8 2040 0 7 2041 0 6 2042 0 5 2043 0 4 2044 0 3 2045 0 2 2046 0 1 2047 0 0 2048 0 1 2049 0 2 2050 0 3 2051 0 4 2052 0 5 2053 0 6 2054 0 7 2055 0 8 2056 0 9 2057 1 0 2058 1 1 2059 1 2 2060 1 3 2061 1 4 2062 1 5 2063 1 6 2064 1 7 2065 1 8 2066 1 9 2067 2 0 2068 2 1 2069 2 2 2070 2...

Страница 75: ...7 3 2221 17 4 2222 17 5 2223 17 6 2224 17 7 2225 17 8 2226 17 9 2227 18 0 2228 18 1 2229 18 2 2230 18 3 2231 18 4 2232 18 5 2233 18 6 2234 18 7 2235 18 8 2236 18 9 2237 19 0 2238 19 1 2239 19 2 2240 19 3 2241 19 4 2242 19 5 2243 19 6 2244 19 7 2245 19 8 2246 19 9 2247 20 0 2248 20 1 2249 20 2 2250 20 3 2251 20 4 2252 20 5 2253 20 6 2254 20 7 2255 20 8 2256 20 9 2257 21 0 2258 21 1 2259 21 2 2260 2...

Страница 76: ...000 4 7 2001 4 6 2002 4 5 2003 4 4 2004 4 3 2005 4 2 2006 4 1 2007 4 0 2008 3 9 2009 3 8 2010 3 7 2011 3 6 2012 3 5 2013 3 4 2014 3 3 2015 3 2 2016 3 1 2017 3 0 2018 2 9 2019 2 8 2020 2 7 2021 2 6 2022 2 5 2023 2 4 2024 2 3 2025 2 2 2026 2 1 2027 2 0 2028 1 9 2029 1 8 2030 1 7 2031 1 6 2032 1 5 2033 1 4 2034 1 3 2035 1 2 2036 1 1 2037 1 0 2038 0 9 2039 0 8 2040 0 7 2041 0 6 2042 0 5 2043 0 4 2044 ...

Страница 77: ... 2311 26 4 2312 26 5 2313 26 6 2314 26 7 2315 26 8 2316 26 9 2317 27 0 2318 27 1 2319 27 2 2320 27 3 2321 27 4 2322 27 5 2323 27 6 2324 27 7 2325 27 8 2326 27 9 2327 28 0 2328 28 1 2329 28 2 2330 28 3 2331 28 4 2332 28 5 2333 28 6 2334 28 7 2335 28 8 2336 28 9 2337 29 0 2338 29 1 2339 29 2 2340 29 3 2341 29 4 2342 29 5 2343 29 6 2344 29 7 2345 29 8 2346 29 9 2347 30 0 2348 30 1 2349 30 2 2350 30 3...

Страница 78: ... 2616 56 9 2617 57 0 2618 57 1 2619 57 2 2620 57 3 2621 57 4 2622 57 5 2623 57 6 2624 57 7 2625 57 8 2626 57 9 2627 58 0 2628 58 1 2629 58 2 2630 58 3 2631 58 4 2632 58 5 2633 58 6 2634 58 7 2635 58 8 2636 58 9 2637 59 0 2638 59 1 2639 59 2 2640 59 3 2641 59 4 2642 59 5 2643 59 6 2644 59 7 2645 59 8 2646 59 9 2647 60 0 2648 60 1 2649 60 2 2650 60 3 2651 60 4 2652 60 5 2653 60 6 2654 60 7 2655 60 8...

Страница 79: ... 2801 75 4 2802 75 5 2803 75 6 2804 75 7 2805 75 8 2806 75 9 2807 76 0 2808 76 1 2809 76 2 2810 76 3 2811 76 4 2812 76 5 2813 76 6 2814 76 7 2815 76 8 2816 76 9 2817 77 0 2818 77 1 2819 77 2 2820 77 3 2821 77 4 2822 77 5 2823 77 6 2824 77 7 2825 77 8 2826 77 9 2827 78 0 2828 78 1 2829 78 2 2830 78 3 2831 78 4 2832 78 5 2833 78 6 2834 78 7 2835 78 8 2836 78 9 2837 79 0 2838 79 1 2839 79 2 2840 79 3...

Страница 80: ...185 86 2 1186 86 1 1187 86 0 1188 85 9 1189 85 8 1190 85 7 1191 85 6 1192 85 5 1193 85 4 1194 85 3 1195 85 2 1196 85 1 1197 85 0 1198 84 9 1199 84 8 1200 84 7 1201 84 6 1202 84 5 1203 84 4 1204 84 3 1205 84 2 1206 84 1 1207 84 0 1208 83 9 1209 83 8 1210 83 7 1211 83 6 1212 83 5 1213 83 4 1214 83 3 1215 83 2 1216 83 1 1217 83 0 1218 82 9 1219 82 8 1220 82 7 1221 82 6 1222 82 5 1223 82 4 1224 82 3 1...

Страница 81: ...1 1477 57 0 1478 56 9 1479 56 8 1480 56 7 1481 56 6 1482 56 5 1483 56 4 1484 56 3 1485 56 2 1486 56 1 1487 56 0 1488 55 9 1489 55 8 1490 55 7 1491 55 6 1492 55 5 1493 55 4 1494 55 3 1495 55 2 1496 55 1 1497 55 0 1498 54 9 1499 54 8 1500 54 7 1501 54 6 1502 54 5 1503 54 4 1504 54 3 1505 54 2 1506 54 1 1507 54 0 1508 53 9 1509 53 8 1510 53 7 1511 53 6 1512 53 5 1513 53 4 1514 53 3 1515 53 2 1516 53 ...

Страница 82: ...1 1777 27 0 1778 26 9 1779 26 8 1780 26 7 1781 26 6 1782 26 5 1783 26 4 1784 26 3 1785 26 2 1786 26 1 1787 26 0 1788 25 9 1789 25 8 1790 25 7 1791 25 6 1792 25 5 1793 25 4 1794 25 3 1795 25 2 1796 25 1 1797 25 0 1798 24 9 1799 24 8 1800 24 7 1801 24 6 1802 24 5 1803 24 4 1804 24 3 1805 24 2 1806 24 1 1807 24 0 1808 23 9 1809 23 8 1810 23 7 1811 23 6 1812 23 5 1813 23 4 1814 23 3 1815 23 2 1816 23 ...

Страница 83: ...42 0 5 2043 0 4 2044 0 3 2045 0 2 2046 0 1 2047 0 0 2048 Pre mixer gain only 0 1 2049 0 2 2050 0 3 2051 0 4 2052 0 5 2053 0 6 2054 0 7 2055 0 8 2056 0 9 2057 1 0 2058 1 1 2059 1 2 2060 1 3 2061 1 4 2062 1 5 2063 1 6 2064 1 7 2065 1 8 2066 1 9 2067 2 0 2068 2 1 2069 2 2 2070 2 3 2071 2 4 2072 2 5 2073 2 6 2074 2 7 2075 2 8 2076 2 9 2077 3 0 2078 3 1 2079 3 2 2080 3 3 2081 3 4 2082 3 5 2083 3 6 2084...

Страница 84: ...nection options RS 232 One single stack 3 pole 3 5 mm captive screw connector is used for bi directional RS 232 5 V serial control See Rear Panel Features and Cabling for additional details on connecting the RS 232 port LAN 10 Mbps 100 Mbps half duplex full duplex connections are supported Two LEDs indicate connection and activity status The device has the following default Ethernet configurations...

Страница 85: ...nly to the group controls о о Presets Used to save new presets created on Audio Settings page See HTML Operation for further details Windows based Program Control The DSP Configurator Control Program is compatible with Windows 2000 Windows XP and Vista and provides remote control of the input gain attenuation output volume output adjustment and other features DSP Configurator can control the DMP 6...

Страница 86: ...and click the Install text to its right Figure 39 DVD Control Software Menu 4 Follow the on screen instructions By default the Windows installation creates a C Program Files Extron DSP_Configurator folder for the DSP Configurator program files DMP 64 Software Control 80 ...

Страница 87: ... Install the USB Driver To install the USB driver follow these instructions Figure 40 USB Installer Splash Screen 1 After the DMP Configurator program installation is complete click Next to proceed Figure 41 USB Installation 2 The USB driver installer is launched When the installer has completed the installation of the USB drivers the following screen appears DMP 64 Software Control 81 ...

Страница 88: ...onfigurator DSP Configurator The DSP Configurator program starts in Emulate mode figure 44 Refer to Emulate Mode vs Live Mode Using the program In the DSP Configurator window Emulate mode audio parameters may be selected then transferred to the DMP 64 by going to Live mode while connected to a DMP 64 Audio settings can also be tailored while connected to the DMP 64 which allows real time auditioni...

Страница 89: ...mixers and an output signal processing chain a Mic Line Input Gain control b Mic line input signal processor chain c Mic Line input pre mixer gain d Primary Mix points e Output trim control post mixer trim f Output signal processor chain g Output volume control h Virtual Bus signal processor chain i Virtual Bus Return primary mix points j Virtual Bus Send secondary mix points DMP 64 Software Contr...

Страница 90: ...e with the desired paste blocks A highlighted group of elements can be cut or copied to a clipboard The clipboard contents may then be pasted but will only succeed if there is an exact one to one relationship between the clipboard contents and the area to be pasted to In the following example the Mic 1 input signal path is copied to Mic 5 First the mouse is clicked and dragged across the entire si...

Страница 91: ...ction will be overwritten Upon clicking Yes the entire Mic 5 input path is now identical to the Mic 1 input path including signal levels parameters settings and mute bypass selections Any single processor block may be copied then pasted to a similar processor block in the same or different input virtual or output signal path Mix point gains can be copied from to another however input gain pre mixe...

Страница 92: ...click A double click will open a dialog window from either the focused or unfocused state of a GUI element DSP Configurator Toolbar Menus The DSP Configurator contains the following structural menus arranged horizontally below the title bar File Edit View Tools Window Help File NOTE New Open and Recent Files are unavailable in Live mode New Discards the current DSP configuration after prompting to...

Страница 93: ...delay block Copy Copies all of the parameters of a selected processor block gain block or set of selected blocks to the clipboard Paste Inserts processor blocks and their parameters from the clipboard into the DSP Configurator program at the location selected View Meter Bridge Opens a Meters dialog box with real time meters that monitor signal levels at each input and output NOTE Meter Bridge is a...

Страница 94: ...assword protected configuration The DSP Configurator program prompts for a PIN to save о о Recall Recall the protected configuration о о Change PIN Change the PIN associated with the protected configuration Configure Digital I O Ports Live mode only Opens a utility to configure digital I O ports The DMP 64 provides six digital I O ports that may be used to trigger external events from DMP 64 actio...

Страница 95: ...t Device о о Processor Defaults Reset All Defaults Returns the DMP 64 processor and level control blocks to factory default settings Each processor and gain volume trim block also has an individual default reset о о Processor Defaults Defaults Individually selects the default parameters for the various processor trim and gain blocks Each row item contains default settings customized for the proces...

Страница 96: ... preset from the list to display it in the window and either activate it Recall abort the selection without either recalling or deleting it Cancel or delete it Delete NOTE An asterisk in the drop down list indicates a partial preset exists only in the DMP 64 and has not been uploaded to the DSP Configurator Mode buttons Allows selection between Live mode and Emulate mode See Emulate Mode vs Live M...

Страница 97: ...control Each virtual bus chain has a filter a dynamic processing block loudness and output trim control All mix points have a gain control Each of the three signal processing chains Input a b c Output e f g and Virtual h shown in figure 45 above consist of a series of control blocks of two basic types specific to that chain level control gain trim and volume control blocks and signal processors fr...

Страница 98: ...inserted into the audio stream For blocks that provide more than one processor only one can be selected Each block can be inserted by a double click or right click Insert then selecting the desired processor figure 48 Once a block is inserted the selected processor is displayed in the block and the block changes color Processor blocks default to bypassed To have them default to not bypassed see To...

Страница 99: ...is bypassed By default each processor block is bypassed when inserted the Bypass button in the processor dialog box is red This can be changed for each processor block type see Tools Options and the specific defaults for the processor types NOTE Figure 49 is a sample of one type of dialog box Contents and appearance of each dialog box are unique to the processor type The block can be removed from ...

Страница 100: ...he desired filter in a new row using the drop down boxes The following filters are available High pass filter A high pass filter passes a band of frequencies extending from a specified cutoff frequency greater than zero up toward the high end of the frequency spectrum All frequencies above the specified cutoff frequency are allowed to pass while all frequencies below are attenuated The default cut...

Страница 101: ...nce the signal level reaches the target level all gain is removed A window range indicated by the two yellow lines is also applied above and below the target level Below the lower line maximum gain is always applied to the signal When the signal reaches the window gain control begins scaling in a linear fashion to achieve smoother results as the signal reaches the target level The default threshol...

Страница 102: ...miter regulates the level of the input signal by severely restricting its dynamic range above a specified threshold Doing so prevents clipping protecting a system against component or speaker damage The limiter is closely related to the compressor but applies a much higher compression ratio expressed as 1 at a much higher signal level default is 10 dB The ratio cannot be changed Noise gate The noi...

Страница 103: ...nd or program material A paging mic needs to attenuate all other signals All ducking processor blocks are controlled via a common dialog box that opens when any of the ducking blocks are selected All empty ducking processor blocks have no ducking source or target settings by default When the first ducking source is inserted shown above no ducking targets are selected The teal buttons next to the v...

Страница 104: ...Ducker Tutorials The examples below are based on different input configurations Insert a ducker from a ducker processor block using one of the following methods Double click the block then left click Insert Ducking Right click the box to open context menu then left click Insert Ducking or Once inserted double click on the ducker block to open the ducker configuration dialog box The Enable Mic Line...

Страница 105: ...ss compensation Delay Block The delay processor block when inserted provides a means to delay the audio signal to compensate for loudspeaker placement in situations where speakers delivering the same signal are much farther away than others The delay processor block is identical to the delay processor available on the input and described in Delay Typically the near speakers would be delayed so tha...

Страница 106: ...ain 0 0 dB The Polarity button accessible in the dialog box allows the polarity of the wires connected to the audio connectors tip and ring to be flipped in order to easily correct for miswired connectors The Mute button accessible in the dialog box allows the audio output to be silenced This control is identical to the input audio mute control When the audio output is muted red indicators in the ...

Страница 107: ...between group members to be fine tuned Group Member levels can also be set by a preset recall Grouped Controls Grouping is convenient when multiple controls require muting at the same time or when multiple signal levels need to be increased or decreased simultaneously For example in a system with several audio outputs dedicated to a single room the operator may want all outputs to change at the sa...

Страница 108: ...ure 50 Sample Fader Group Master and Associated Gain Controls Mute controls within the blocks can also be grouped figure 51 Figure 51 Sample Mute Group Master and Muted Outputs DMP 64 Software Control 102 ...

Страница 109: ...trol Type section expand the tree for the type of control Gain or Mute then select the desired control type When a selection is made in the Select Control Types section the Available Group Members section populates with all possible members for the selected control type NOTE Potential group members in step 4 that are already assigned to a different group are displayed in blue 4 In the Available Gr...

Страница 110: ...ence The group controls dialog contains two menu items Add a Group Tools Figure 53 Group Controls Dialog Box Slide a group fader up and down to adjust all gain controls in the group Click and drag a soft limit to set the ceiling and or floor for the group NOTE The soft limits cannot be dragged beyond the current setting of the group fader Add a Group To launch the configure groups dialog from the ...

Страница 111: ...he Increment Decrement Simulator 1 Select Tools Increment Decrement Simulator from the Tools menu 2 Select the group to be controlled from the Select Group drop down list The following dialog box appears Figure 54 Increment Decrement Simulator Dialog Box NOTE The Number of Group Members readout indicates the number of controls to be affected 3 Enter an increment value and a decrement value The def...

Страница 112: ... upper limit or going below a lower limit They are easily adjustable and provide the ability to set a ceiling and floor for the group When a group master is created the soft limits default to the hard limits maximum and minimum of that group of controls Soft Limits can be defined using the mouse by clicking on then dragging the soft limit icon The resolution is 0 1 dB For more precise setting use ...

Страница 113: ...es a DO two versions are available to provide either a Logic Hi or a Logic Lo response to any action The alternate script is designated as Reverse DO To build a script and place it into the DMP 64 File Management system 1 From the tools menu click Configure Digital I O then select Build Digital I O Configuration 2 This brings up a dialog that allows selection from a list of pre configured scripts ...

Страница 114: ... DSP Configurator program always starts in Emulate mode In emulate mode all functions of the DSP Configurator program are available without connecting to the DMP 64 The user can build a configuration from the blank screen or open an existing file that contains the last configuration displayed plus saved presets Settings and adjustments are saved to a configuration file on the PC When the saved fil...

Страница 115: ...rts proceed to step 5 USB tab for connection via the front panel configuration port proceed to step 6 4 If TCP IP was selected in step 3 a Observe the IP address field in the IP connection window The field displays the last IP address entered If the IP Address field is correct proceed to step 4b If the address is not correct either click in the IP Address field and enter the IP address or click on...

Страница 116: ...n window If the baud rate does not match the device s rate click the Baud Rate drop down menu and select the desired baud rate The default is 38400 c Click OK The Synchronize with Device dialog box figure 57 appears Proceed to step 7 6 If USB was selected in step 3 a Click the USB Device drop down menu and select DMP 64 or Extron USB device if DMP 64 is not available b Click OK The Synchronize wit...

Страница 117: ...figurator program to match the device proceed to step 9 or b Push radio button to configure the device to match the DSP Configurator program proceed to step 8 9 9 8 8a 10 8c 8e 8f 8d 7a 7b or 8b 8d Figure 57 Selecting Live Mode continued DMP 64 Software Control 111 ...

Страница 118: ...ck OK and proceed to step 8d If All was clicked equivalent to a standard push click OK and proceed to step 9 d If Selected was clicked in step 8c the Synchronize with Device dialog box 7b reappears Click OK The presets dialog box appears e Select the desired partial presets to push by clicking the appropriate checkbox es f Click OK Proceed to step 10 9 Click OK The DSP Configurator program is conn...

Страница 119: ...of the device as a result of switching from Live to Emulate mode Presets may be created in Live or Emulate modes In emulate mode the preset or presets are created saved to a file then pushed to the DMP 64 when connecting in live mode When a pull data synchronization method is performed preset data remains in the DMP 64 with only the list of preset names pulled from the device Presets in this state...

Страница 120: ... Configurator elements gain processor blocks mix points using standard Windows keyboard and mouse actions as follows 1 Left click on the desired block to select a single block 2 Ctrl left click to select multiple blocks that are not adjacent 3 Shift hold click on the first block and click on the last block in either a vertical column or horizontal row to select multiple blocks and 4 Click and drag...

Страница 121: ...displayed preset elements marked elements from the stored preset and overwrite that portion of the current state then switch the drop down list to read Current State In emulate mode the Recall action button will apply the currently displayed preset elements marked elements from the file and overwrite the information contained in the DSP Configurator as the current emulation then switch the drop do...

Страница 122: ... assigned up to 4 digit PIN Utilities for save recall change PIN separate from preset save are accessed from the tools menu as three sub menus under a protected configuration menu item Protected configuration menu items are only available in live mode from the Tools Protected Configuration menu These functions can only be performed in Live mode and are unavailable in Emulate mode Save Recall Chang...

Страница 123: ...d boxes in figure 62 At any time the navigation arrows may be used to move one block right left up or down with no boundaries NOTE The callout numbers for figure 60 are not the same as figure 43 a b c d e f g Figure 60 DSP Configurator Program Window Standard Windows Navigation The keyboard keys navigate and function as follows Tab key Sequentially jump among major segments of the DSP Configurator...

Страница 124: ...rrow keys to move up and down in the menu or submenu use the right key to open a submenu if applicable and use the Esc key to back out of an active menu or submenu DSP Configurator unique Navigation Highlighting and marking items cutting or copying saving a preset When an item within the program is selected it is highlighted by a green boundary box One or more highlighted items can be cut copied p...

Страница 125: ...er element or group of elements repeat steps 2 and 3 as required 5 To cut or copy press the Ctrl x Ctrl X or Ctrl c Ctrl C key combination 6 To save a preset press Alt Alt t T right arrow down arrow Enter Enter figure 61 7 The Save a Preset dialog box appears a Tab Tab to the preset number field and type a specific preset number b Tab Tab to the preset name field and type a preset name NOTE Unless...

Страница 126: ...FS or 1 dB below actual clipping 0 dBFS Setting the clipping meter below actual clipping provides a safety net allowing the user to reduce input gain before clipping actually occurs This safety net may be increased or decreased by selecting Tools Options Processor Defaults Defaults Meter Clipping and setting the Clip Threshold to a number between 0 dB and 20 dB NOTE When the Clip Threshold is set ...

Страница 127: ...ks at approximately 5 to 3 dBFS This setting provides enough headroom to accommodate transients or unanticipated loud events in the program material to avoid possible clipping When using pink noise it should be recorded at 20 dBFS If the player has an output level setting control set the output of the player to its maximum or 0 dB of attenuation If the maximum output setting provides gain then bac...

Страница 128: ...inputs When using the pre mixer gain for output volume control the procedure may be reversed Set pre mixer gain to 0 dB With program material or pink noise present at the input adjust the output volume until the meter level in the output volume dialog box is below clipping or ideally matches the level at the input gain meter Setting Output Gain Structure Add all desired processors into the output ...

Страница 129: ...am material or pink noise present at the input adjust the post matrix trim until the meter level in the output volume dialog is below clipping or ideally matches the level at the input gain meter This maintains the audio at an optimal level in the output signal chain while preventing clipping at the output Setting Volume Control for the Amplifier Stage The maximum output of the DMP 64 is 21 dBu As...

Страница 130: ... try turning off the proxy server in the Web browser In Microsoft Internet Explorer click Tools Internet Options Connections LAN Settings uncheck the Use a proxy server box and then click OK Download the Startup Page Access the device using HTML pages as follows 1 Start the Web browser program 2 Click in the browser Address field 3 Enter the device IP address directly into the address field NOTE I...

Страница 131: ...e OK button NOTE A User Name entry is not required 7 The device checks several possibilities in the following order and then responds accordingly a Does the address include a specific file name such as 10 13 156 10 file_name HTML If true the device downloads that HTML page b Is there a file in the device memory named index HTML If true the device downloads index HTML as the default startup page c ...

Страница 132: ...of the device including system information power supply status and serial port settings The System Status page is the default page when establishing a connection to the device Access the System Status page from other pages by clicking the Status tab Figure 64 System Status Page DMP 64 HTML Operation 126 ...

Страница 133: ...mware Upgrades pages Users have view only access Ethernet connection to the device either entering SIS commands see SIS Programming and Control or using the Extron DSP Configurator Program see DMP Software is password protected Connection via any RS 232 port is not password protected IP Settings Fields The IP settings fields provide a location for viewing and editing settings unique to the Etherne...

Страница 134: ...the installation site change the IP address to any valid value NOTE IP address changes can cause conflicts with other equipment Only local system administrators should change IP addresses Gateway IP Address Field The Gateway IP Address field identifies the address of the gateway to the mail server to be used if the device and the mail server are not on the same subnet The gateway IP address has th...

Страница 135: ...set the local time The Zone variable allows you to then select the offset from Greenwich Mean Time GMT The Zone field identifies the standard time zone selected and displays the amount of time in hours and minutes the local time varies from GMT international time reference 4 Repeat steps 1 through 3 for other variables that need to be changed 5 If appropriate click in the Daylight Savings radio bu...

Страница 136: ...Characters in these fields are masked by asterisks If password protection is not desired leave the password field and the Re Enter password field blank After entering the desired password in both fields click the Submit button NOTE An administrator password must be created before a user password can be created Change a Password To change a password type the new password in the password and re ente...

Страница 137: ... for reference Figure 68 Firmware Upgrade Page Update the device firmware as follows NOTE The Firmware Upgrade page is only for replacing the firmware that controls device operation To insert custom HTML pages see File Management Page 1 Visit the Extron Web site www extron com and click the Download Center tab 2 Click the Firmware link figure 69 on the next page 3 Select the appropriate firmware f...

Страница 138: ...example values only Download DMP64_FW1x02 exe DMP 64 Digital Matrix Processor Firmware for DMP 64 19 2247 50 V1 02 November 10 2009 2 4 MB DMP 64 FW1x02 exe Download Firmware Figure 69 Location of Firmware Upgrade Files on the Web Site DMP 64 HTML Operation 132 ...

Страница 139: ...www extron com Name FirmwareInstall DMP64_Upgrade Publisher Extron Electronics 6 6 7 8 Welcome to the Extron Installation Program for the DMP64 Firmware Upgrade v1 02 The Extron Installation Program will install the updated firmware on your computer To continue click Next The InstallShield Wizard has successfully installed the Firmware Update The release notes can be found at C Program Files Extro...

Страница 140: ...b 12 Click the Firmware Upgrade link 13 Click the Browse button An open file window appears 14 Navigate to the folder where the firmware upgrade file was saved Select the file NOTE Valid firmware files must have the file extension S19 Any other file extension is not a firmware upgrade The original factory installed firmware is permanently available on the device If the attempted firmware upload fa...

Страница 141: ...e 71 are shown for example only To delete a file click the Delete button at the right of that file Upload your own files as follows NOTE The following characters are invalid in file names space and 1 Click the Browse button 2 Browse through the system and select the desired file s NOTE If you want one of the pages that you create and upload to be the default startup page name that file index HTML ...

Страница 142: ...or attenuation 18 dB to 80 dB from the audio settings page Audio levels can be adjusted so there are no noticeable volume differences between sources Change an input audio level setting as follows 1 Next to the desired input number click the input level drop box A drop down scroll box appears right 2 Click and drag the slider or click the scroll up button or scroll down button until the desired au...

Страница 143: ...ows 1 Click the desired input output combination The selected mix point turns green Mic 1 to Output 4 is shown in figure 73 Figure 73 Output Selection Drop Box 2 Click the Mute button to either toggle mute on or off 3 Repeat steps 1 and 2 for each I O combination Change the Mic Mix Audio Level To change the mix point audio input level 1 Click the desired input output combination The selected mix p...

Страница 144: ...vel up or down one step 3 Click the desired attenuation value The range is 100 to 0 dB 4 Repeat steps 1 3 for each output Group Controls Page If group controls have been set using SIS commands or DSP Configurator the group controls page provides access to those controls Group controls cannot be set using the HTML pages Access the group controls page by clicking the Group Controls link on the left ...

Страница 145: ...desired preset NOTE When presets are recalled via the HTML page any signal processing adjustments that were saved as part of the preset under DSP Configurator control only are recalled and overwrite the current audio settings When a partial preset is recalled it overwrites that portion of the current configuration addressed by the preset leaving the rest unchanged Special Characters The HTML langu...

Страница 146: ...captive screw connectors 3 pole Impedance 10k ohms unbalanced balanced Nominal level 4 dBu when level is set to 0 dB gain adjustable from 60 dBu to 4 dBu Maximum level 24 dBu balanced when input gain is set to 3 dB Noise level 120 dBV 1 µVrms at 40 dB gain Volume range 18 dB to 80 dB mic line input adjustable per input Mic phantom power 48 VDC which can be switched on or off NOTE 0 dBu 0 775 Vrms ...

Страница 147: ...ower supply 100 VAC to 240 VAC 50 60 Hz to 12 VDC 2 A regulated Power input requirements 12 VDC 1 5 A Temperature humidity Storage 40 to 158 F 40 to 70 C 10 to 90 noncondensing Operating 32 to 122 F 0 to 50 C 10 to 90 noncondensing Cooling Convection no vents Mounting Rack mount Yes with optional 1U rack shelf Furniture mount Yes with optional under desk mounting kit Enclosure type Metal Enclosure...

Страница 148: ... 125 VAC 7 5 Rubber Feet 4 Nylon tie wraps 12 Tweeker DMP 64 Set up Guide Accessories These items can be ordered separately Adapters power supplies labels Part number USB A Male to USB Mini B Male Configuration Cable 26 654 06 PS 124 Multiple Output 12 Volt DC Power Supply 60 1022 01 CSR 6 Captive Screw to RCA Female Audio Adapter 26 575 01 MBU 125 Under Desk Mount Kit 70 077 01 MBD 129 Through De...

Страница 149: ...ware Loader The DSP Configurator program includes a firmware loader program which allows replacing the firmware without taking the DMP 64 out of service Download the desired firmware file from the Extron website see Firmware Upgrade Page for instructions To access the firmware uploader 1 Select Tools then Firmware Loader 2 The Add Device dialog box appears Type the IP address of the DMP 64 then pr...

Страница 150: ...ators blink twice to indicate events has toggled on or three times to indicate event logging has toggled off Useful for troubleshooting Reset all IP Settings 4 Press and hold the Reset button for about 6 sec until the Power LED blinks twice once at 3 sec again at 6 sec then release and within 1 second press Reset momentarily 1 sec NOTE Nothing happens if the momentary press does not occur within 1...

Страница 151: ...66 United Arab Emirates Dubai This Limited Warranty does not apply if the fault has been caused by misuse improper handling care electrical or mechanical abuse abnormal operating conditions or modification were made to the product that were not authorized by Extron NOTE If a product is defective please call Extron and ask for an Application Engineer to receive an RA Return Authorization number Thi...

Страница 152: ...USA Canada Only 1 919 863 1794 1 919 863 1797 FAX Extron Europe 800 3987 6673 Inside Europe Only 31 33 453 4040 31 33 453 4050 FAX Extron Asia 800 7339 8766 Inside Asia Only 65 6383 4400 65 6383 4664 FAX Extron Japan 81 3 3511 7655 81 3 3511 7656 FAX Extron China 400 883 1568 Inside China Only 86 21 3760 1568 86 21 3760 1566 FAX Extron Middle East 971 4 2991800 971 4 2991880 FAX ...

Отзывы: