Quick Start — CrossPoint Plus Matrix Switchers, cont’d
Front Panel Controls
Input and output buttons and LEDs
select and identify inputs and outputs. Input buttons also select
presets. On HVA models, the output LEDs also display the audio level of the selected input.
Enter button
saves changes when you change the configuration.
Preset button
saves a configuration as a preset or recalls a previously-defined preset.
View button
selects a view-only mode that prevents inadvertent configuration changes. On HVA
models, the View button decrements the audio level of the selected input. The View LED indicates
a negative (-) attenuation value.
Esc button
cancels selections in progress and resets the front panel LEDs. The Esc button does not
reset the current configuration, the RGBHV and Audio LEDs, any presets, or any audio gain/
attenuation settings. On HVA models, the Esc button increments the audio level of the selected
input. The Esc LED indicates a positive (+) gain value.
RGBHV and Audio buttons
select/deselect video and/or audio. The Audio LED blinks to indicate
audio breakaway. The Audio button also selects the audio level/adjust mode.
Input and output label windows
hold labels that can be created easily with Extron’s label software or
with any Brother
®
P-Touch
™
labeler.
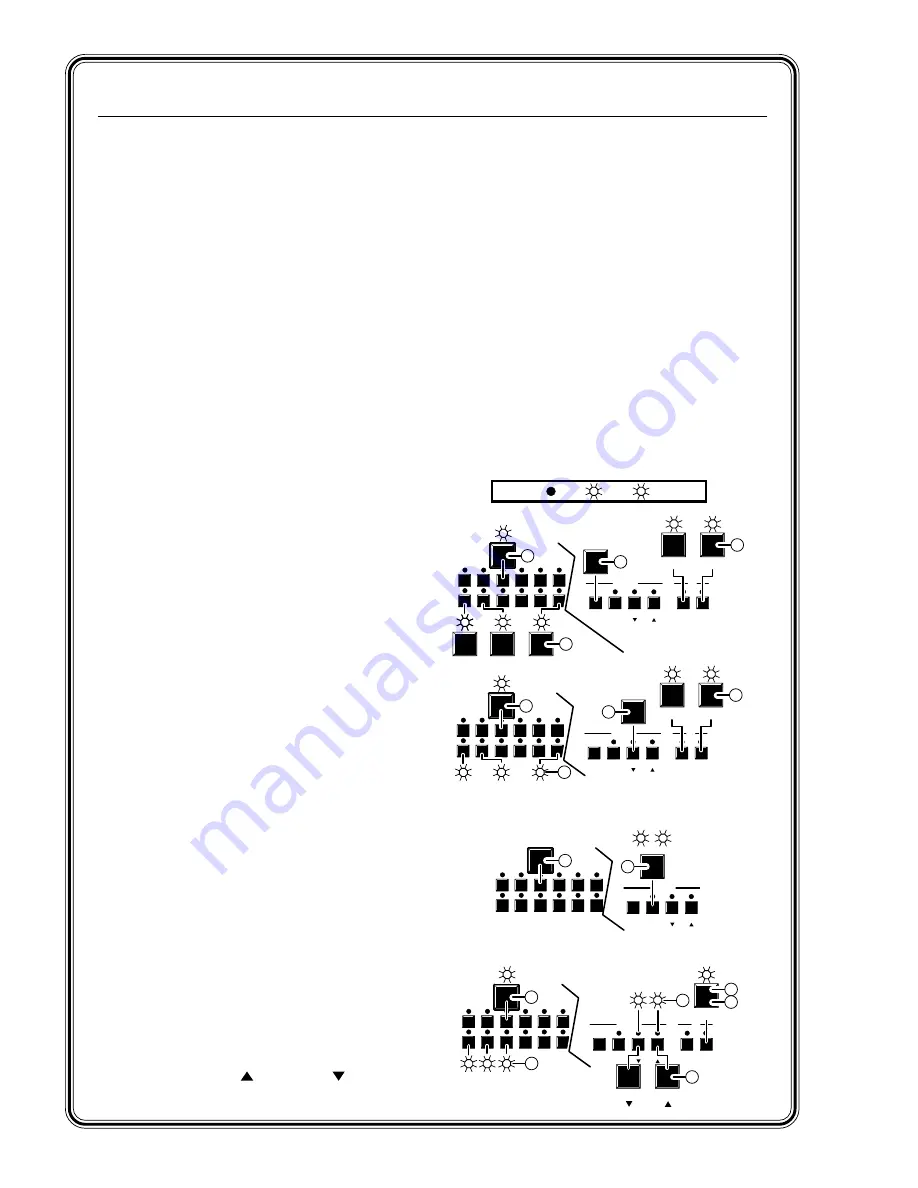
Create a tie
A. Press and release the RGBHV and/or Audio
button(s) to select audio and/or video.
B. Press and release the desired input button.
C. Press and release the desired output button(s).
D. Press and release the Enter button.
View ties
A. Press and release the View button.
B. Press and release the RGBHV and/or Audio
button(s) to select audio and/or video.
C. Press and release the desired input button.
The selected input and tied output LEDs light.
Save or recall a preset
A. To save a preset, press and hold the Preset
button until the Preset LED begins to blink.
To recall a preset, press and release the Preset
button. The Preset LED turns on steadily.
B. Press and release the input button associated
with the desired preset number.
View and adjust audio level
A. Press and hold the Audio button until the
Audio LED begins to blink.
B. Press and release the desired input button.
The level is displayed by the output LEDs, (+)
by the Esc LED, and (-) by the View LED.
C. Increment and decrement the level by
pressing the Esc (
) and View (
) buttons.
D. Press and release the Audio button to exit.
3
3
4
4
5
6
ENTER
6
7
7
8
PRESET VIEW
ESC
RGBHV AUDIO
RGBHV
AUDIO
8
CONTROL
I/O
A
C
B
D
B
B
B
B
C
3
3
4
4
5
6
ENTER
6
7
7
8
PRESET VIEW
ESC
RGBHV AUDIO
RGBHV
AUDIO
8
CONTROL
I/O
B
A
C
3
4
6
ENTER
7
8
PRESET VIEW
ESC
CONTROL
A
Save
Recall
B
B
B
B
1
1
2
2
3
4
ENTER
4
5
5
6
PRESET VIEW
ESC
RGBHV AUDIO
AUDIO
6
CONTROL
I/O
A
D
B
4
5
VIEW
ESC
C
B
B
B
B
LED key: = off, = on, = blinking,
Содержание CrossPoint 124
Страница 20: ...Installation cont d CrossPoint Plus Matrix Switchers Installation 2 8...
Страница 40: ...Operation cont d CrossPoint Plus Matrix Switchers Operation 3 20...
Страница 48: ...Programmer s Guide cont d CrossPoint Plus Matrix Switchers Programmer s Guide 4 8...
Страница 55: ...CrossPoint Plus Matrix Switchers A Appendix A Specifications Specifications Part Numbers...
Страница 61: ...CrossPoint Plus Matrix Switchers B Appendix B Reference Information Hardware Upgrades Button Labels...
Страница 67: ...B 7 CrossPoint Plus Matrix Switchers Reference Information Figure 49 Button label blanks 16 button strip...
Страница 68: ...Reference Information cont d CrossPoint Plus Matrix Switchers Reference Information B 8...


