background image

12 

English


EX

-

6084


© Copyright 2018 by EXSYS Vertriebs GmbH. All Rights Reserved


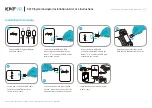
 5. Hardware Installation 


Because there are large differences between PC’s, we can give you only a general in-
stallation guide. Please refer your computer’s reference manual whenever in doubt.


1.


Turn off the power to your computer and any other connected peripherals. 


2.


Remove the mounting screws located at the rear and/or sides panels of your Comput-
er and gently slide the cover off.


3.


Set the DIP

-

Switches 2, 3 & 4 to disabled and only the DIP

-

Switch 1 to enabled.


4.


Locate  an  available  PCI

-

Express  expansion  slot  and  then  gently  but  firmly  insert  the 

card. Make sure that the card is seated and oriented correctly.


5.


Now continue with the "Driver Installation" and return to step 6 when you have com-
pleted the Driver Installation. 


6.


After you have completely installed the drivers, then connect the card with a screw to 
the rear panel of the computer. 


7.


Gently replace your computer’s cover and the mounting screws.


 6. Driver Installation 


All Operating Systems


After completion of the hardware installation, the DIP

-

Switch 1 should be set to enabled 

and  DIP

-

Switches  2,  3  &  4  to  disabled  and  the  EX

-

1329  should  be  connected  to  the 

PC. The position of the DIP

-

Switches is therefore important because the operating sys-

tem does not install the ports in the correct order when all DIP

-

Switches are set to ac-

tive  at  the  same  time.  If  you  do  not  care  about  the  order  of  the  ports,  you  can  set  all 
DIP

-

Switches to Active and start the PC and install the driver (see step 4

-

6 at page 13).


Содержание EX-6084

Страница 1: ...Anleitung Vers 1 0 21 08 18 EX 6084 PCIe 4 Port Gigabit Ethernet Karte Manual PCIe 4 Port Gigabit Ethernet Card...

Страница 2: ...tallation 6 6 Treiber Installation 6 8 7 Technische Daten 8 1 Description 9 2 Extent of Delivery 9 3 Layout Connectors LED s 10 3 1 Layout 10 3 2 Connectors LED s 10 4 DIP Switch Jumper Setting 11 3 1...

Страница 3: ...6084 gew hrleistet so eine sichere Daten bertra gung und exzellente Performance von bis zu 1000Mbit s Die EX 6084 bietet Ihnen die M glichkeit jeden Ethernet Port einzeln ab oder anzuschalten mittels...

Страница 4: ...Signal Pin Signal 1 BI_DA 4 BI_DC 7 BI_DD 2 BI_DA 5 BI_DC 8 BI_DD 3 BI_DB 6 BI_DB RJ45 Anschluss Status LED s LED Name Farbe LED Funktion Link Act Gr n St ndig an Die Verbindung des Netzwerk Anschluss...

Страница 5: ...FF Inaktiv ON Aktiv Werkseinstellung Hinweis DIP Schalter 1 steuert auch die OnBoard Windows Treiber Wenn DIP Schalter 1 aktiv ist ist auch der Treiber aktiv Andernfalls wenn der DIP Schalter auf inak...

Страница 6: ...s Steckplatz ein Beachten Sie das die Karte korrekt eingesteckt wird und das kein Kurzschluss entsteht 5 Fahren Sie jetzt mit dem Punkt Treiber Installation fort und kehren Sie zu Punkt 6 zur ck wenn...

Страница 7: ...r Installation wird der Netzwerk Anschluss 1 im Ger temanager als Ethernet Port 1 angezeigt 7 Nun schalten Sie Ihr System aus und setzen Sie den DIP Schalter 2 auf die Position ON w hrend DIP Schalter...

Страница 8: ...tur 0 bis 55 Celsius Lagertemperatur 40 bis 75 Celsius Rel Luftfeuchtigkeit 5 bis 95 Stromversorgung 3 3V vom PCI Express Slot Abmessung 115 00 x 67 00 mm Gewicht 200g Copyright 2018 by EXSYS Vertrieb...

Страница 9: ...peed network interface technology It provide a secure and very high data transfer rate It supports all PCI Express slots x1 to x16 and almost every operating system The EX 6084 allows you to turn Off...

Страница 10: ...in Signal Pin Signal 1 BI_DA 4 BI_DC 7 BI_DD 2 BI_DA 5 BI_DC 8 BI_DD 3 BI_DB 6 BI_DB RJ45 Port Status LED s LED Name Color LED Function Link Act Green Steady on The Connection on the Ethernet port is...

Страница 11: ...wer 3 3V AUX when the system is in sleep mode or is powered off DIS JP1 ENA DIP Switch Ethernet Port DIP Switch Position Description 1 Port 1 OFF Disabled ON Enabled Factory Setting 2 Port 2 OFF Disab...

Страница 12: ...iented correctly 5 Now continue with the Driver Installation and return to step 6 when you have com pleted the Driver Installation 6 After you have completely installed the drivers then connect the ca...

Страница 13: ...he installation manager 6 After successful installation the Ethernet Port 1 will be listed as Ethernet Port 1 in the device manager 7 Now turn off the system and set the DIP Switch 2 to ON while the D...

Страница 14: ...indows XP Vista 7 8 x 10 Server 20xx Linux 2 6 x MAC OS 10 x Operating Temperature 32 F to 131 Fahrenheit Storage Temperature 40 F to 167 Fahrenheit Rel Humidity 5 to 95 Power 3 3V from PCI Express Sl...

Отзывы: