background image

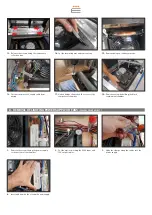
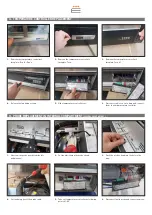
13.  Release the screws fixing the condensate 

collection tray.

14.  Cut the insulating mat and remove tray.

15.  Remove fixing on condenser probe.

16.  Cut the compressor’s supply cable from 

wiring.

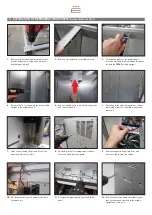
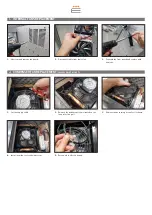
1.  Remove the screws fixing the power supply 

to the bottom of the chamber.

4.  Insert and fix with the screws the new supply.

17.  Undo 4 fixings situated on the corner of the 

compressor chamber.

2.  Cut the zipties blocking the 220V input and 

12V output cables.

18.  Remove system by holding the black 

containment chamber.

3.  Undo the clamps fixing the cables into the 

power supply.

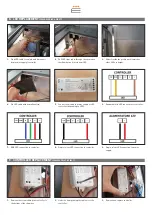
D.  REMOVAL OF LIGHTING POWER SUPPLY OR FANS 

(FOLLOW POINT A FIRST)

Содержание Teca

Страница 1: ...Teca SERVICE MANUAL EXPO SRL Torino ITALY Rev 03 2021...

Страница 2: ...tment External bottlenecks take out the plastic clips and slide rods out 2 Lift right door by bringing it against the upper rail 3 Remove fittings in the lower part of the cabinet s compartment Other...

Страница 3: ...in the right compartment release remaining screws on the middle panel and remove it 4 Release the 10 screws fixing the front middle upright to the middle panels 9 Remove fan guard by pulling it out a...

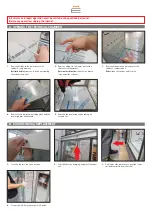
Страница 4: ...xing the power supply to the bottom of the chamber 4 Insert and fix with the screws the new supply 17 Undo 4 fixings situated on the corner of the compressor chamber 2 Cut the zipties blocking the 220...

Страница 5: ...r and insert new LED 2 Undo the clamps fixing the cables into the controller 5 Connect new cable to power supply or LED controller depending on LED 8 Single colour LED connection to controller 3 Slide...

Страница 6: ...e fixing the probe s head 5 Slide temperature controller out 5 Take out temperature controller by following points G1 G5 3 Remove the temperature controller s faceplate Teca M 3 Push the probe s head...

Страница 7: ...onnect cable from faulty fan 2 Release the dedicated screw situated on the fan protection grill 5 Reconnect to electric wiring 3 Separate fan from guard and replace with new one 3 Remove fan by turnin...

Страница 8: ...lock K DOOR LOCK REPLACEMENT FOLLOW POINT B FIRST L CONDENSER COMPRESSOR COOLING COIL REPLACEMENT FOLLOW POINTS A B C FIRST Recover refrigerating gas from the system according to current regulations...

Отзывы: