background image

58

Operation Manual

Copyright © 2006

Marquee WEB Pages

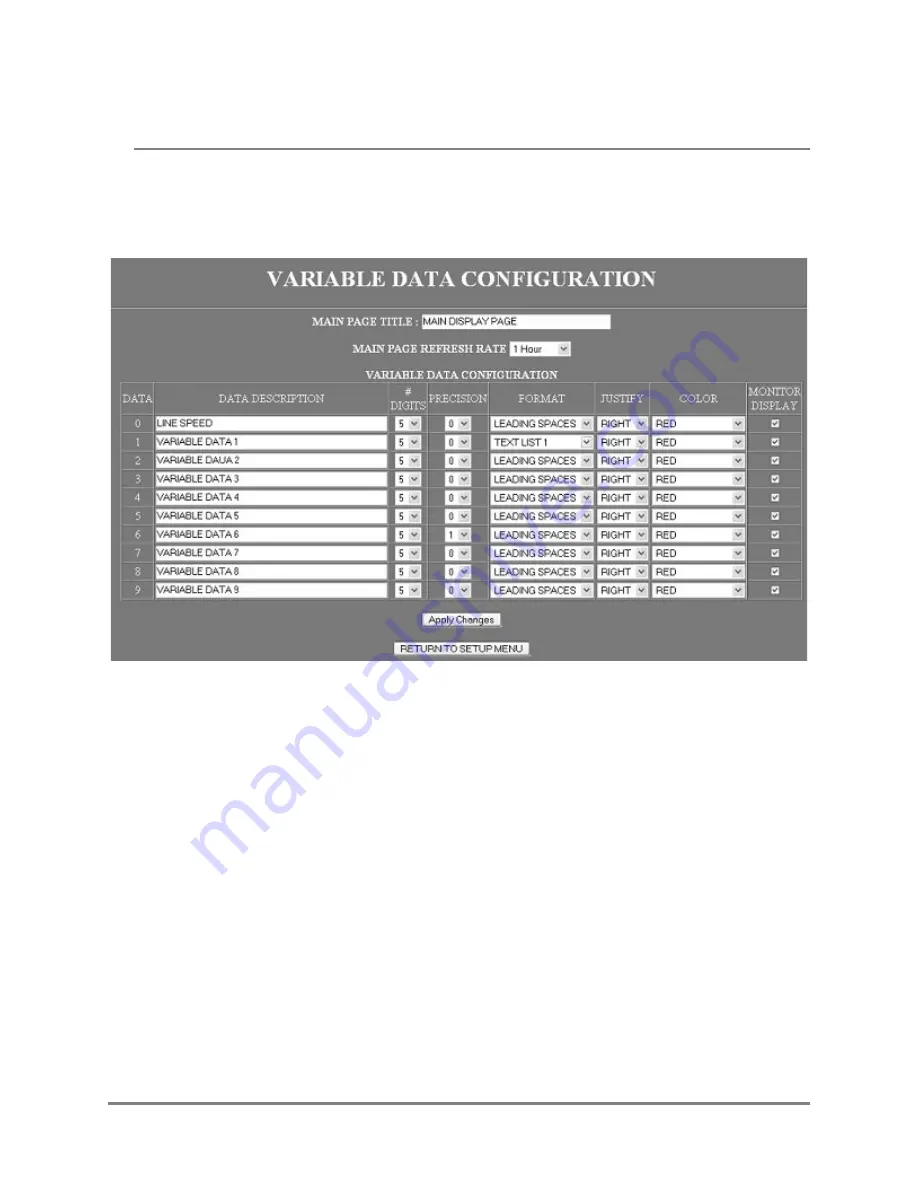
VARIABLE DATA SETTINGS

This page is used to configure how the values within the variable data registers will be displayed.

MAIN PAGE TITLE

This field allows the user to specify the text for the title on the MAIN PAGE of the Marquee.

MAIN PAGE REFRESH RATE

This selection allows the suer to specify how often the MAIN PAGE will be automatically 
refreshed on the WEB browser.

VARIABLE DATA CONFIGURATION

This section of the page is used to configure how each variable data registers value will be used 
and/or displayed.

DATA

This column contains the index of each of the corresponding variable data registers. The 
row data to the right is the configuration for the given variable data register.

Содержание IP-0-T Series

Страница 1: ...Your Corporate Logo Here Ethernet IP Marquee Operation Manual Model Number IP 0XXX T V1 1...

Страница 2: ...thernet Setup 20 Configuring the PC 20 Using IPCONFIG To Verify Ethernet Settings 24 Connecting The PC To The Marquee 26 Verifying Ethernet Communications 28 Connecting To the Marquee s WEB Server 31...

Страница 3: ...4 Operation Manual Copyright 2008 Installing Mount Attachment Bolts 62 Mounting Method Examples 63 Specifications 67...

Страница 4: ...e remote is used to initially set the Network Parameters Time and Date It can also be used during operation to allow for resetting of process variables CPW PROG PREV NEXT SPE PAU SYM CAP GRA PHR BEEP...

Страница 5: ...following lists the keys that have operation capability with the marquee KEY USAGE PROG Enter Program Mode PREV Go To Previous Program Screen NEXT Go To Next Program Screen Move Cursor To Left Move C...

Страница 6: ...f the Marquee Allows the user to set the Ethernet DEFAULT GATEWAY for the built in plant Ethernet port of the Marquee Not present on 1 line units Allows the user to set the Ethernet IP address for the...

Страница 7: ...h the following tasks Set the Ethernet parameters of the Marquee Set the Time and Date on the Marquee display Entering Into Program Mode In order to access the setup menus the user must put the Marque...

Страница 8: ...f the user is on the last menu and presses the NEXT key the first menu item will be displayed If the user is on the first menu item and presses the PREV key the last menu item will be displayed Note O...

Страница 9: ...ee to indicate current cursor position Example 192 168 1 200 Press 192 168 1 200 Press 5 Pressing any of the numeric keys will change the value of the current position to that value and move the curso...

Страница 10: ...e will move across the Marquee to indicate current cursor position Example 255 255 255 0 Press 255 255 255 0 Press 6 Pressing any of the numeric keys will change the value of the current position to t...

Страница 11: ...the enlarged value will move across the Marquee to indicate current cursor position Example 255 255 255 0 Press 255 255 255 0 Press 6 Pressing any of the numeric keys will change the value of the curr...

Страница 12: ...rsor the enlarged value will move across the Marquee to indicate current cursor position Example 255 255 255 0 Press 255 255 255 0 Press 6 Pressing any of the numeric keys will change the value of the...

Страница 13: ...e E IP Address larger than the rest This indicates the cursor position 5 The cursor position can be moved by pressing the or the key of the remote As you move the cursor the enlarged value will move a...

Страница 14: ...rsor position 5 The cursor position can be moved by pressing the or the key of the remote As you move the cursor the enlarged value will move across the Marquee to indicate current cursor position Exa...

Страница 15: ...sor position 5 The cursor position can be moved by pressing the or the key of the remote As you move the cursor the enlarged value will move across the Marquee to indicate current cursor position Exam...

Страница 16: ...essage In most cases the first step in configuring the Marquee is physically connecting the Marquee to what is known as a configuration PC A configuration PC can be a laptop or desk top PC that is equ...

Страница 17: ...t is highly recommended to go to the section Detailed Ethernet Setup section Required Equipment DataVisor Marquee PC with Ethernet port and a Web browser installed Note The user must have administrato...

Страница 18: ...he address bar type http 192 168 1 200 then preset the ENTER key Note On many browsers the http is automatically added to the address so the user does not need to type it in 6 At this point the MONITO...

Страница 19: ...This section is for connecting the Marquee directly to the PC If the user wishes to connect the Marquee to the facility network it is highly advised that the network administrator or IT department is...

Страница 20: ...eters to the PCs that are connected to the network When connecting directly from the PC to another ethernet device such as the Marquee the user must assign the Ethernet parameters of the PC manually S...

Страница 21: ...s allows the user to configuration the PC s ethernet port Step 4 One of two screens will be displayed If the screen 1 is displayed click the PROPERTIES button and screen 2 will be displayed STEP 5 Sel...

Страница 22: ...twork In order to make a direct connection to the Marquee the user must manually enter the Ethernet parameters To accomplish this first select the item USE THE FOLLOWING IP ADDRESS At this point the u...

Страница 23: ...the PC is configured properly In this section a detail description of the use of the IPCONFIG utility is demonstrated STEP1 From the START menu click on the RUN operation STEP 2 The RUN command entry...

Страница 24: ...e displayed Verify that the IP address and Subnet mask match the entries previously entered If the parameters do not match type Verify that the parameters were entered correctly in the Network Propert...

Страница 25: ...used when connecting an Ethernet device to a Switch or HUB A Cross Over cable is used when connecting one Ethernet Device such as a PC to another Ethernet Device such as the Marquee without a HUB or S...

Страница 26: ...h the PC and Marquee After the PC has booted the user should check that the LINK light of the PC s Ethernet port is lit The LINK light is lit when a physical connection is made between the PC s ethern...

Страница 27: ...verify a communication connection exists between the Marquee and the PC In order to communicate to the Marquee a communication connection must be established The physical connection indicates that com...

Страница 28: ...point the command line entry is displayed At the Command Prompt type PING 192 168 1 200 and then press the ENTER key of the keyboard This operation sends a low level command to verify that communicat...

Страница 29: ...e established Verify the IP address and Subnet Mask are correct on the Marquee Verify cabling and LINK light is lit Verify Ethernet settings of PC Destination Host Unreachable This is an indication th...

Страница 30: ...ttings are configured within a given WEB browser Note In most cases no setting changes are required to the WEB browser Only in specific cases is this required Step 1 Start the WEB Browser on the PC St...

Страница 31: ...ections to verify Ethernet communication to the Marquee If not please refer to these sections to verify that the Ethernet settings of the PC are correct WEB browser using wrong Ethernet Connection In...

Страница 32: ...y networks the WEB browser does not make a direct connection to the Internet In these cases a PROXY server is connected to the network and the WEB server connects to this PROXY server to access WEB pa...

Страница 33: ...Detailed Ethernet Setup STEP 3 The following screen will be displayed Select the CONNECTIONS TAB Followed by clicking on LAN SETTINGS STEP 4 IF selected deselect PROXY SERVER Click OK on all windows a...

Страница 34: ...and message numbers to the Marquee The Client master must support Ethernet IP Class 1 I O Messaging in order to control the Marquee If the controlling device supports Ethernet IP I O control then the...

Страница 35: ...s may be purchased separately from Exor or your preferred sensor network cordset provider Ethernet IP Specification The following table lists the specifications on the IP 0XXX T Ethernet IP implementa...

Страница 36: ...r 3 Message number to display or if the marquee is in BIT MESSAGE CALL UP then controls messages 33 48 4 Message Register 4 Message number to display or if the marquee is in BIT MESSAGE CALL UP then c...

Страница 37: ...e Rockwell Automation CompaqLogix and ControlLogix family of controllers STEP 1 Open the controller programing software and start a new application The user must complete the mandatory operation such...

Страница 38: ...fault TAG names MODULE PROPERTIES The following are the properties that must be set in the software in order for the Marquee to operate correctly Table 5 Module Properties Field Value Name Any valid n...

Страница 39: ...tored within the Marquee has a corresponding Message number Example to display the first message the user moves a value of 1 into one of the 4 message number registers If more than one message is bein...

Страница 40: ...th information about each configuration page The next chapter gives the user sample setups that a user can use in order to accomplish some standard tasks MAIN PAGE The Main page is the initial page th...

Страница 41: ...e configuration pages click the MARQUEE CONFIGURATION button A password entry screen will be displayed Note The default user name is admin and the default password is admin This may be changed in the...

Страница 42: ...return button Figure 3 Setup Menu Page Note A common operation within all configuration pages is that the APPLY button must be clicked prior to leaving the page in order for any changes that have bee...

Страница 43: ...ind the file to restore load into the Marquee RESTORE After a configuration file has been specified this button initiates the transfer of the file to the Marquee SAVE CURRENT MARQUEE CONFIGURATION TO...

Страница 44: ...Marquee Message numbers range from 1 100 which in turn allows the user to program up to 100 messages that can be displayed on the Marquee MSG TEXT This field allows the user to specify the text of th...

Страница 45: ...ll be displayed in the color red G or g Characters following this will be displayed in the color green Y or y Characters following this will be displayed in the color yellow N or n Forces the text aft...

Страница 46: ...ge will only flash if the color section for the variable data has been selected to flash Line Operation ALL LINES The message will clear the display then start on the first line and wrap to consecutiv...

Страница 47: ...sent to the display is to big to display at one time then the display will display one portion of the message followed by the second portion The time that the first portion is displayed before display...

Страница 48: ...he condition column is used to specify the value at which the corresponding text will be used Any condition value that is set to 0 will be ignored 9 condition values can be used along with a default t...

Страница 49: ...e is to be connected to the plant network the IT department or network administrator of your facility should be consulted prior to assigning ethernet network parameters Figure 5 Ethernet Configuration...

Страница 50: ...de to this field and then the APPLY button is clicked the user will be disconnected from the Marquee The user must then restart the browser and log back into the Marquee with the new WEB USER NAME and...

Страница 51: ...ng called up by the PLC ETHERNET IP NETWORK SETTINGS IP ADDRESS This field is used to specify the Ethernet IP address of the Marquee This is the IP address used within the PLC when configuring the Mar...

Страница 52: ...ssage Register 2 Message 33 48 Message Register 3 Messages 49 64 In this manner the user only needs to turn on a bit within a message register and the corresponding message will be displayed DEFAULT M...

Страница 53: ...f the user does not supply the correct format the setting will be ignored After the user has entered the correct time and date pressing the SET TIME DATE button will initiate the time update to the Ma...

Страница 54: ...HH MM SS Displays time in 24 hour format including hour minute and seconds 12 HOUR HH MM AM PM Displays time in 12 hour format AM PM with hour and minute only 12 HOUR HH MM SS AM PM Displays time in...

Страница 55: ...master clock on the network In turn the Marquee will broadcast the current time and date to all other Marquees that are defined to receive the network time sync BROADCAST TIME EVERY If the Marquee is...

Страница 56: ...alues that will dictate a color change The DEFAULT COLOR is used if the value of the variable data register is 0 or no setpoints have been configured COLOR The color column allows the user to specify...

Страница 57: ...f the Marquee MAIN PAGE REFRESH RATE This selection allows the suer to specify how often the MAIN PAGE will be automatically refreshed on the WEB browser VARIABLE DATA CONFIGURATION This section of th...

Страница 58: ...rs positions to set aside for variable data within the message PRECISION This selection allows the user to specify if any of the digits should be placed behind a decimal point Example Value of variabl...

Страница 59: ...ariable data on the MAIN PAGE If selected an entry on the MAIN PAGE will display the DATA DESCRIPTION along with the value of the variable data Time Value of variable data register is displayed with 2...

Страница 60: ...possibilities available Mounting hardware is included with each Marquee Mounting Hardware Included Mount Attachment Slide In Mount Attachment Bolt 5 16 custom Qty 4 Mount Interconnect Bolt 6mm Qty 4...

Страница 61: ...when looking at front of Marquee must be removed WARNING DO NOT REMOVE THE END CAP ON THE RIGHT HAND SIDE Figure 1 Installing Mount Bolts Note The number of bolts will be determined by desired mountin...

Страница 62: ...e By no means are these the only ways to mount the Marquee but are examples of how some customers have mounted the Marquee Chain Mount Marquee mounting components needed 4 mount attachment bolts 4 mou...

Страница 63: ...ng components needed 4 mount attachment bolts 4 mount attachment nuts 2 hanger mounts 2 swivel mounts 4 mount interconnect bolts 4 mount interconnect nuts Figure 3 Wall Mount Mount Attachment Bolts Mo...

Страница 64: ...020 Front Mount Marquee mounting components needed 4 mount attachment bolts 4 mount attachment nuts 2 hanger mounts Figure 4 Bottom Mount Hanger Mounts Mount Attachment Nuts Bottom of Marquee MAREQUEE...

Страница 65: ...ructions Bottom Mount 8020 top mount Marquee mounting components needed 4 mount attachment bolts 4 mount attachment nuts 2 Swivel Mounts Figure 5 Bottom Mount Mount Attachment Nuts Top of Marquee Moun...

Страница 66: ...Environment 5mm RED GREEN AMBER 100 000 Hours 160 Deg Temp 0 55 C Humdity 15 95 Table 2 Model Specific Model Dimensions Weight Voltage Current max IP 0113 T 26 x4 5 x1 75 2 8 24 VDC 2 0 Amps IP 0213 T...

Страница 67: ...68 Operation Manual Copyright 2006 Specifications...

Отзывы: