


Operation
8. Remove the key to prevent children or other
unauthorized persons from starting engine.
9. Close the fuel shut-off valve when the machine
will not be in use for a few days, when
transporting, or when the unit is parked inside
a building.
Driving the Machine
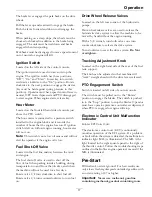
Drive Lever/Neutral Lock Latch Operation
To lock the drive levers in “neutral lock”, squeeze the
drive levers to the “neutral” position (Do Not squeeze
the drive levers all the way back as this will cause the
drive wheels to go into full reverse direction). See
Figure 5 position 1. Place thumbs on the inner lobe
of the neutral lock latches and rotate them under
the drive levers into the “neutral lock” position. See
Figure 5 position 2. Release the drive levers.
CAUTION
If the neutral lock latches are not completely
engaged the drive levers could unexpectedly slip
into the forward drive position. If the drive levers
slip into the drive position the unit could lurch
forward and cause injury or property damage.
Be sure the drive levers are past the roller and
securely seated at the bottom of the neutral lock
latches.
To place the drive levers in the “forward” position,
slightly squeeze the drive levers while placing thumbs
on the outer thumb lobe of the neutral lock latches
(or the index finger on the front lobe) and rotate them
from under the drive levers. Slowly and carefully
release the drive levers. See Figure 5 position 3.
To place the drive levers in the “reverse” position,
squeeze the drive levers past the neutral position. See
Figure 5 position 4.
Figure 5
1.
Drive Lever in neutral
position
3.
Drive Lever in forward
position
2.
Drive Lever locked in
neutral position
4.
Drive Lever in reverse
position
Driving Forward
1. Release the parking brake.
2. With drive levers locked in “neutral”, shift speed
control lever to desired forward speed.
3. Slowly squeeze and hold both drive levers in
the neutral position and rotate both neutral lock
latches from the neutral lock position to the
forward position.
Note:
Do Not
squeeze both drive levers all the
way back. This will cause the drive wheels to
engage in the reverse direction.
4. To move forward in a straight line, smoothly
release both drive levers to engage drive wheels.
To turn left or right, squeeze the right hand drive
lever to turn right and the left hand drive lever
to turn left.
To make a “zero turn”, squeeze either the left
hand or the right hand drive lever back into the
reverse position while the opposite drive lever is in
a forward position at an equal but opposite speed.
Note:
For smooth operation of this machine,
avoid quick, jerky movements of the drive levers.
Move the drive levers smoothly and deliberately.
To stop, squeeze drive levers back to the “neutral”
position. Move the neutral lock latches into the
“neutral lock” position and release drive levers.
Move the speed control lever to the neutral
position.
19
Содержание TURF TRACER X-SERIES
Страница 1: ...TURF TRACER X SERIES For Serial Nos 920 000 Higher Part No 4500 699 Rev A ...
Страница 11: ...Safety 103 2242 103 2243 103 4935 103 2432 116 0404 11 ...
Страница 12: ...Safety 116 4296 EFI Units Only 1 Fast 2 Slow 117 2718 12 ...
Страница 38: ...Schematics Schematics Electrical Diagram All units except Kohler EFI 38 ...
Страница 39: ...Schematics Electrical Diagram Kohler EFI 39 ...
Страница 40: ...Schematics Electrical Logic Schematic All units except Kohler EFI 40 ...
Страница 41: ...Schematics Electrical Logic Schematic Kohler EFI 41 ...
Страница 42: ...Schematics Hydraulic Diagram 42 ...
Страница 44: ...Notes 44 ...
Страница 45: ...Service Record Date Description of Work Done Service Done By 45 ...
Страница 46: ...46 ...


