Page | 8
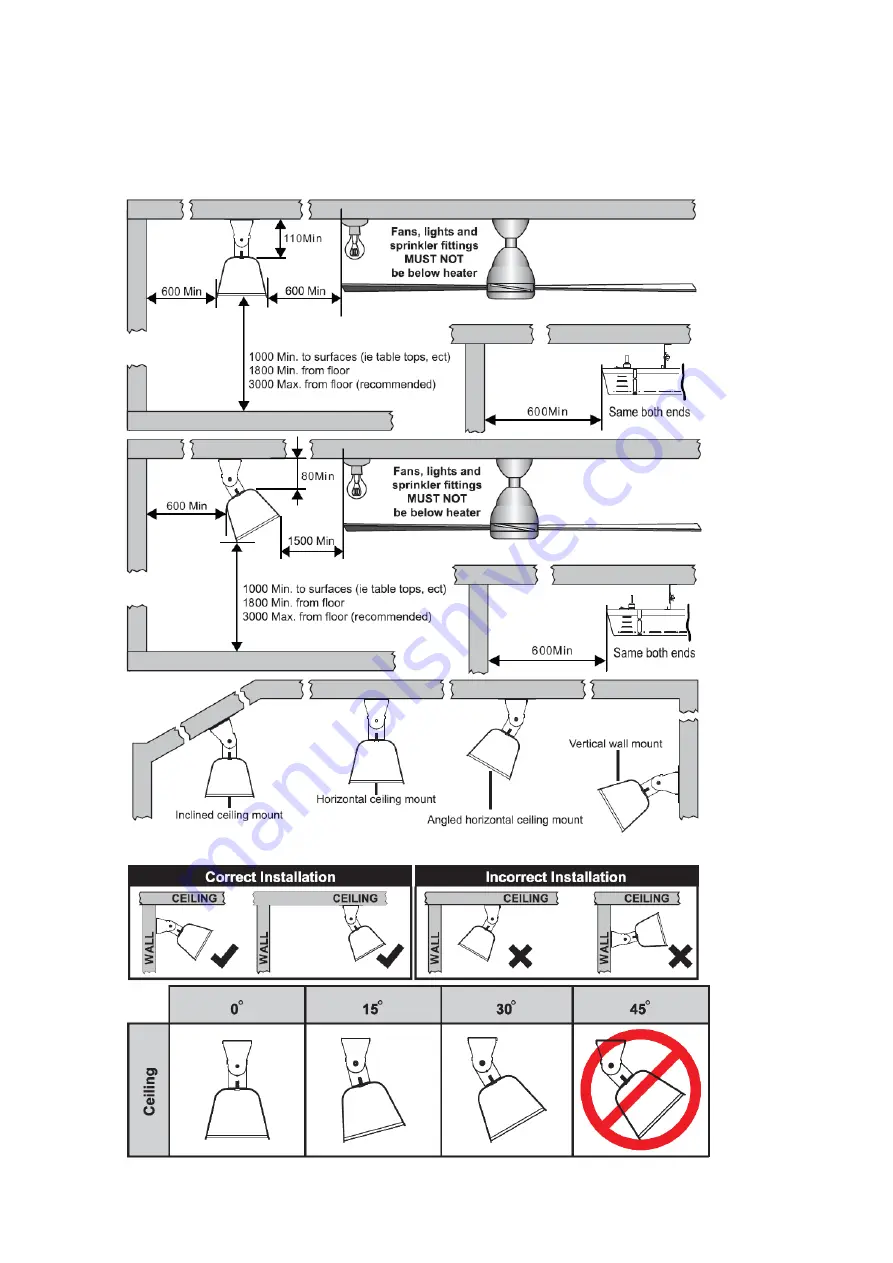
2.2 Safe distances required for Ceiling suspension installation.
Страница 1: ... EOHA20AR IMPORTANT Please carefully read the Operation Manual before using the infrared heater This Operation Manual contains the important information on your safety as well as some recommendations on proper use of the appliance and its maintenance ...
Страница 2: ...NTENTS PAGE 3 SAFETY INSTRUCTIONS PAGE 3 5 HEATER COMPONENTS PAGE 6 TECHNICAL SPECIFICATIONS PAGE 7 OPERATING THE HEATER PAGE 7 10 INSTALLATION CEILING OR WALL MOUNT PAGE 11 16 TROUBLESHOOTING PAGE 17 WARRANTY INFORMATION PAGE 18 ...
Страница 3: ...ect the appliance to a properly installed socket outlet with earth contact The heater should be connected to the electric mains equipped with an automatic circuit breaker The unit must be handled with care and avoid vibration or hitting WARNING FIRE RISK EXISTS IF THE HEATER IS COVERED BY OR POSITIONED CLOSE TO CURTAINS OR OTHER COMBUSTIBLE MATERIALS Do not use the appliance areas where gasoline p...
Страница 4: ...e electric shock or injury Do not use abrasive cleaning products on this appliance If the body becomes dirty wipe off dust with a cloth and the radiating boards should be wiped when they are cold with a damp soft cloth Always remove plug from the mains supply before cleaning The heater must be installed at least 2 4 m above the floor The heater must not be located immediately below a socket outlet...
Страница 5: ...e out of the intended use to avoid risk The use of attachments which are not recommended or sold by the appliance manufacturer may cause a risk of injury to persons CAUTION some parts of this product can become very hot and cause burns Particular attention has to be given where children and vulnerable people are present Install and operate the heater in strictly horizontal position on the ceiling ...
Страница 6: ...or the purpose described in user manual Do not use appliance or any part of the appliance out of the intended use to avoid risk The use of attachments which are not recommended or sold by the appliance manufacturer may cause a risk of injury TECHNICAL SPECIFICATIONS MODEL EOHA20GR EOHA20AR Voltage 230 240V 50 60Hz 230 240V 50 60Hz Power W 2000W 2000W Installation Wall or Ceiling mounted Wall or Ce...
Страница 7: ...ance must only be operated in a horizontal position with max 5 slope l Never install the appliance on a combustible surface plastics nylon carton etc l Install the device at a minimum distance of 2 2 m above the ground 0 6 m from walls 0 24 m from the ceiling 1 5 m from the combustibles like curtains 1 m from persons or animals Unit mm ...
Страница 8: ...Page 8 2 2 Safe distances required for Ceiling suspension installation ...
Страница 9: ...the wall or the ceiling by 4 screws ST5 x 35mm not supplied and 4 plastic anchors not supplied 2 3 2 Select the desired angle Insert the slot of the adjustable bracket on the stop of the fixing bracket 2 3 3 Lock the fixing bracket and the adjustable bracket by 2pcs M6x16 Philips Bolt and wing nut ...
Страница 10: ...c mains should be equipped with an automatic circuit breaker with rated current not less than 16A The heater must not be located immediately below a power point Power point should not be located at the back of the heater The power point needs to be located outside the physical footprint of the heater to minimize heat build up behind the heater 3 How to operate Operation instruction Ceramic glass p...
Страница 11: ... wall or ceiling mounting Remote control ü The distance between the heater and the remote control should be less than 3 metres and the remote control must be directly pointed to the receiver ü ATTENTION The receiver is locating close to the display area and cannot see by eye DISPLAY ...
Страница 12: ... heater start will run at the high power P3 Press the LOW MED and HIGH on the remote control the heater will work at LOW MED and HIGH power setting and symbol P1 P2 P3 will be indicated on the display zone P1 33 of the rated power P2 66 of the rated power P3 100 of the rated power l TIMER FUNCTION l THE heater comes with a programmable timer that will automatically place the heater in Standby mode...
Страница 13: ...will reprogram or disable the timer Example 1 After activating the 13 hours timer by press the button 1 2 4 6 pressing the button 1 afterwards will reprogram the timer to 13 1 12 hours Pressing the button 2 button afterwards the timer will be reprogrammed to 13 2 11 hours Pressing several other keys in sequence the timer can be reset to 0 the heater goes into Standby mode and the symbol will be fl...
Страница 14: ...intenance or repairs including replacing the bulb element should only be carried out by a qualified electrician Correct Disposal of this product This marking indicates that this product should not be disposed with other household wastes throughout the EU To prevent possible harm to the environment or human health from uncontrolled waste disposal recycle it responsibly to promote the sustainable re...
Страница 15: ... ambient conditions such as high winds excessively cold temperatures can lower the heating performance of an outdoor installation Unit is not installed in correct position possibly too high or heater is too small for recommended area There is a burning smell and or strange sounds other than normal expansion and contraction noises coming from the unit Turn off the heater and return to place of purc...
Страница 16: ...anufacture fault please return to place of purchase for a replacement For any queries or assistance call Customer Service Australia Only 1300 174 876 Hours of operation Monday to Friday 8am 5pm EST IMPORTANT RETAIN THESE INSTRUCTIONS FOR FUTURE USE ExcelDLUTM is a trademark of Sitro Group Australia www excelsiorproducts com au 04322 11 21 ...