background image

Design and function 

MIG/MAG welding 


30 

099-005613-EW501 

23.04.2019


A prerequisite for the automatic inching process is the correct preparation of the wire guide, 
especially in the capillary and wire guide tube area > see 5.3.2 
chapter

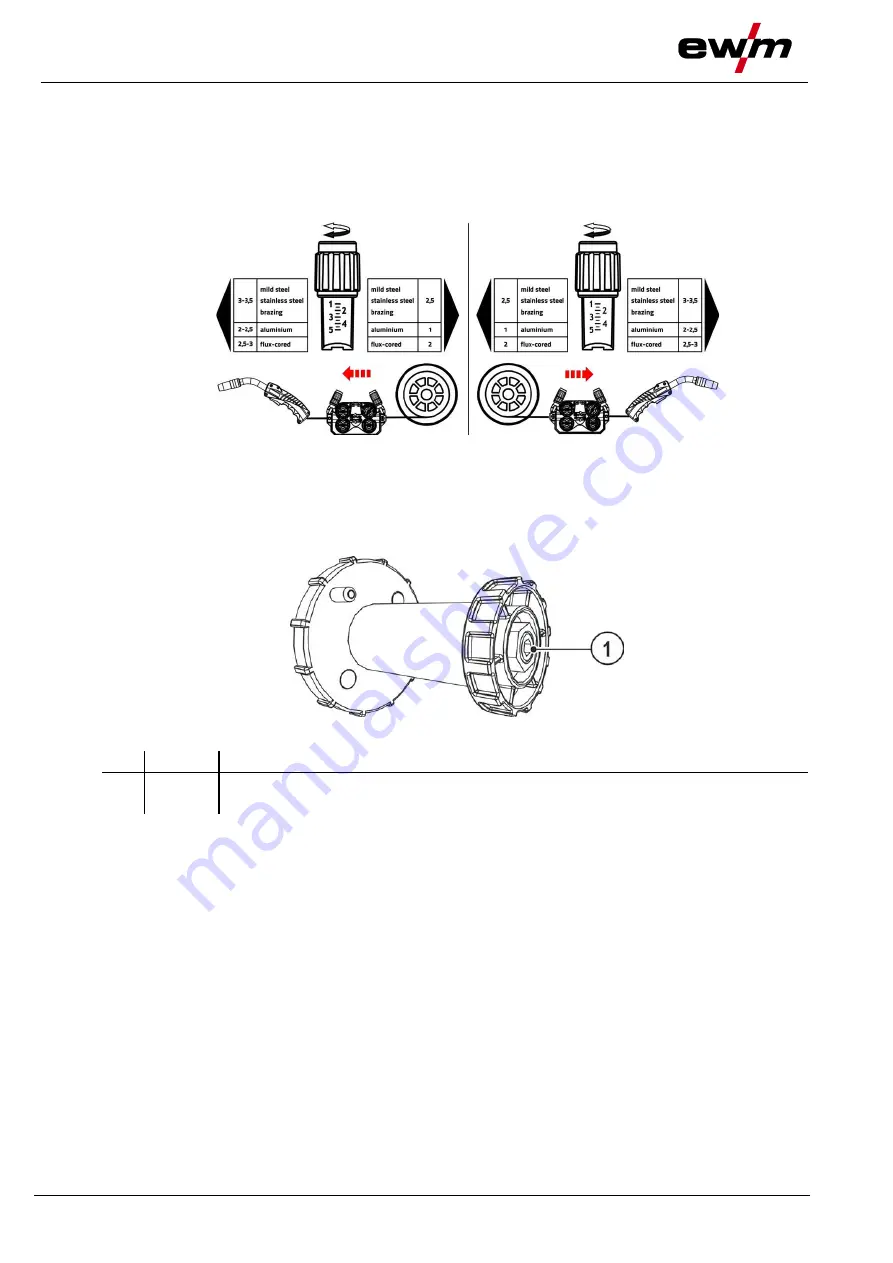
  The contact pressure has to be adjusted separately for each side (wire inlet/outlet) at the feed roll ten-

sioner setting nuts depending on the welding consumable used. A table with the setting values can be 
found on a sticker near the wire drive. 

Version 1: left hand mounting 

Version 2: right hand mounting 


Figure 5-15 

Automatic inching stop

Touch the welding torch against the workpiece during inching. Inching of the welding wire will stop as 
soon it touches the workpiece. 


5.3.3.4  Spool brake setting 


Figure 5-16 


Item  Symbol 

Description

 0


Allen screw 

Securing the wire spool retainer and adjustment of the spool brake 


  Tighten the Allen screw (8 mm) in the clockwise direction to increase the braking effect. 

Tighten the spool brake until the wire spool no longer turns when the wire feed motor stops but 
without it jamming during operation! 


Содержание Drive XQ AC

Страница 1: ...Operating instructions EN Wire feed unit Drive XQ AC 099 005613 EW501 Observe additional system documents 23 04 2019...

Страница 2: ...authorised sales partners can be found at www ewm group com en specialist dealers Liability relating to the operation of this equipment is restricted solely to the function of the equipment No other f...

Страница 3: ...welding current leads 17 5 1 4 Stray welding currents 18 5 2 Intermediate hose package connection 19 5 2 1 Intermediate hose package strain relief 20 5 2 2 Locking the strain relief 20 5 2 3 Shieldin...

Страница 4: ...circuit 43 7 4 Checklist for rectifying faults 43 8 Technical data 45 8 1 Drive XQ AC 45 9 Accessories 46 9 1 Welding torch electrode holder and workpiece lead 46 9 2 General accessories 46 9 3 7 pol...

Страница 5: ...erious and even fatal injuries Safety notes include the WARNING keyword in the heading with a general warning sym bol The hazard is also highlighted using a symbol in the page margin CAUTION Working o...

Страница 6: ...tch off machine Release Switch on machine Press and hold Switch Incorrect Invalid Turn Correct Valid Numerical value adjustable Input Signal light lights up in green Navigation Signal light flashes gr...

Страница 7: ...ion with all other parts of these instructions Read and observe the operating instructions for all system components especially the safety instructions The illustration shows a general example of a we...

Страница 8: ...machines for arc welding covering the following welding proce dures Machine series Main procedure for MIG MAG welding Secondary process Standard arc Pulsed arc TIG welding lift arc MMA welding Gougin...

Страница 9: ...and void in the event of unauthorised interference Appoint only skilled persons for repair work trained service personnel Original copies of the circuit diagrams are enclosed with the unit Spare part...

Страница 10: ...Machine description quick overview Front view side view from the right 10 099 005613 EW501 23 04 2019 4 Machine description quick overview 4 1 Front view side view from the right Figure 4 1...

Страница 11: ...drel using this support to enable horizontal pivoting of the machine 5 Sliding rails 6 Intermediate hose package strain relief see 5 2 1 chapter 7 Slide latch lock for the protective cap 8 Welding cur...

Страница 12: ...Machine description quick overview Rear view side view from left 12 099 005613 EW501 23 04 2019 4 2 Rear view side view from left Figure 4 2...

Страница 13: ...Wire spool holder 9 Wire feed unit 10 Lighting inside In power saving mode and with MMA or TIG welding the lighting is switched off 11 Push button gas test rinse hose package see 5 2 3 chapter 12 Wir...

Страница 14: ...Risk of accident due to improper transport of machines that must not be lifted Do not lift or suspend the machine The machine can drop and cause injuries The handles straps or brackets are suitable fo...

Страница 15: ...rly to ensure that the frost protection is adequate to prevent damage to the machine or the accessory components The coolant must be checked for adequate frost protection with the TYP 1 frost protecti...

Страница 16: ...on is to be ensured taking into account the max delivery height Pump Pmax 3 5 bar 0 35 MPa Power source Hose package Wire feeder miniDrive Welding torch Max Compact 25 m 82 ft 5 m 16 ft 30 m 98 ft 20...

Страница 17: ...ith HF igniter TIG for as long as pos sible in parallel with a distance of 20 cm to avoid HF sparkover Always keep a distance of at least 20 cm to leads of other power sources to avoid interferences A...

Страница 18: ...heck that all welding current connections are firmly secured and electrical connections are in perfect condition Set up attach or suspend all conductive power source components such as casing trans po...

Страница 19: ...lant supply 8 Safety belt Intermediate hose package strain relief Secure hose package end with the strain relief see 5 2 1 chapter Push the welding current cable socket onto the welding current connec...

Страница 20: ...ielding gas cylinder for welding machine WARNING Risk of injury due to improper handling of shielding gas cylinders Improper handling and insufficient securing of shielding gas cylinders can cause ser...

Страница 21: ...re regulator Switch on the power source at the main switch Trigger gas test see 5 2 5 chapter function welding voltage and wire feed motor remain switched off no accidental arc ignition Set the releva...

Страница 22: ...g process the entire wire feed system of the Titan AC series is equipped ex works with components for aluminium welding consumables Recommended system components Power source of type Titan XQ 400 AC p...

Страница 23: ...be for welding torches with steel liner Conversi on is necessary if a welding torch with a steel liner is used Operate welding torches with a liner with a guide tube Operate welding torches with a ste...

Страница 24: ...ere Insert the liner guide tube from the Euro torch connector side Carefully insert the welding torch connector with as yet too long a liner into the Euro torch connector and secure with a crown nut C...

Страница 25: ...et analogue For connecting analogue accessory components remote control welding torch control lead etc Insert the central plug for the welding torch into the central connector and screw together with...

Страница 26: ...vals Keep all casing covers or protective caps closed during operation 5 3 3 1 Inserting the wire spool CAUTION Risk of injury due to incorrectly secured wire spool If the wire spool is not secured pr...

Страница 27: ...xing the clamping unit and setting the pressure 4 Clamping unit 5 Wire feed roller see the Wire feed roller overview table Rotate the tommy by 90 clockwise or anti clockwise tommy locks into place Fol...

Страница 28: ...Wire feed roll overview table Material Diameter Colour code Groove form mm inch Steel Stainless steel Brazing 0 6 023 monochrome light pink V groove 0 8 030 white 0 8 0 9 1 0 030 035 040 bicolour whit...

Страница 29: ...he contact pressure of the front rollers in wire feed direction to a higher value The inching speed is infinitely adjustable by simultaneously pressing the wire inching push button and turning the wir...

Страница 30: ...be found on a sticker near the wire drive Version 1 left hand mounting Version 2 right hand mounting Figure 5 15 Automatic inching stop Touch the welding torch against the workpiece during inching Inc...

Страница 31: ...becomes null and void in the event of unauthorised interference Appoint only skilled persons for repair work trained service personnel Dangers resulting from failure to perform test after conversion B...

Страница 32: ...ch 7 Power source Insert the central plug for the welding torch into the central connector and screw together with crown nut Insert the welding current plug of the combi welding torch into the welding...

Страница 33: ...ontrol operating instructions 5 6 Remote control The manufacturer s warranty becomes void if non genuine parts are used Only use system components and options power sources welding torches electrode h...

Страница 34: ...witching JOB block operation P16 possible No change of special parameters except P10 Restart required 5 8 Interfaces for automation WARNING Do not carry out any unauthorised repairs or modifications T...

Страница 35: ...ification 0 V 10 V wire feed speed E Output Reference potential 0 V F S Input Welding power start stop S1 G Input Control voltage specification 0 V 10 V arc length correction P Input Activation of con...

Страница 36: ...ight to claim under warranty is void In all service matters always consult the dealer who supplied the machine Return deliveries of defective equipment subject to warranty may only be made through you...

Страница 37: ...rollers on a regular basis depending on the degree of soiling 6 2 2 Monthly maintenance tasks Visual inspection Casing damage front rear and side walls Wheels and their securing elements Transport el...

Страница 38: ...r on wheels indicates that the equipment must be collected separately This machine has to be disposed of or recycled in accordance with the waste separation systems in use According to German law law...

Страница 39: ...sh button c The error message can only be reset by switching the machine off and on again Category Error Possible cause Remedy a b c 3 Tacho error Error of wire feeder Check connections connec tions p...

Страница 40: ...ith automated machines Check the wire feeding check the connections of the load cables in the welding circuit clean corroded surfaces on the workpiece before welding if applicable 49 Arc interruption...

Страница 41: ...e deposi ting 59 Incompatible machine A machine connected to the system is not compatible Please disconnect the incom patible machine from the sys tem 60 Incompatible software A machine s software is...

Страница 42: ...re feed motor reset triggered machine by pressing 8 Welding circuit The welding circuit inductance is too high for the selected welding task 10 Partial inverter One of several partial inverters is not...

Страница 43: ...ctional errors Mains fuse triggers unsuitable mains fuse Set up recommended mains fuse see 8 chapter Machine does not start up after switching on device fan and possibly coolant pump have no function...

Страница 44: ...wing Insufficient coolant flow Check coolant level and refill if necessary Air in the coolant circuit Vent coolant circuit see 7 3 chapter Wire feed problems Wire feed roll holder is worn wire feed ro...

Страница 45: ...alled roll equipment 1 2 mm Aluminium wire Drive 4 rollers 37 mm Wire spool diameter Standardised wire spools up to 300 mm Welding torch connection Euro torch connector protection classification IP 23...

Страница 46: ...Item no RC XQ Expert 2 0 2 m Expert XQ 2 0 remote control 090 008824 00002 RC XQ Expert 2 0 5 m Expert XQ 2 0 remote control 090 008824 00005 RC XQ Expert 2 0 10 m Expert XQ 2 0 remote control 090 00...

Страница 47: ...kit ON WAK D01 092 002871 00000 ON FLOWMETER Option analogue gas flow control with gas flow me ter 092 003374 00000 ON TS D01 D02 Torch holder 092 002836 00000 ON WAK D01 Wheel assembly kit 092 00284...

Страница 48: ...tainless steel and brazing 092 002770 00020 FE 4R 2 4 MM 0 095 INCH BROWN Drive roll set 37 mm 4 rolls V groove for steel stainless steel and brazing 092 002770 00024 FE 4R 2 8 MM 0 11 INCH LIGHT GREE...

Страница 49: ...00014 FUEL 4R 1 6 MM 0 06 INCH BLACK ORANGE Drive roll set 37 mm 4 rolls V groove knurled for flux cored wire 092 002848 00016 FUEL 4R 2 0 MM 0 08 INCH GREY ORANGE Drive roll set 37 mm 4 rolls V groov...

Страница 50: ...ndix Searching for a dealer 50 099 005613 EW501 23 04 2019 11 Appendix 11 1 Searching for a dealer Sales service partners www ewm group com en specialist dealers More than 400 EWM sales partners world...

Отзывы: