background image

Intended use 

Applications 


14 

099-005402-EW501 

24.11.2016


Intended use 


 WARNING 


Hazards due to improper usage! 
The machine has been constructed to the state of the art and any regulations and 
standards applicable for use in industry and trade. It may only be used for the welding 
procedures indicated at the rating plate. Hazards may arise for persons, animals and 
material objects if the equipment is not used correctly. No liability is accepted for any 
damages arising from improper usage! 

•  The equipment must only be used in line with its designated purpose and by trained or 

expert personnel! 

•  Do not improperly modify or convert the equipment! 


Arc welding machine for standard and pulsed gas-shielded metal-arc welding with TIG welding and lift arc 
(touch starting) or MMA welding as secondary process. It may be possible to expand the functionality by 
using accessories (see the documentation in the relevant chapter). 

3.1 

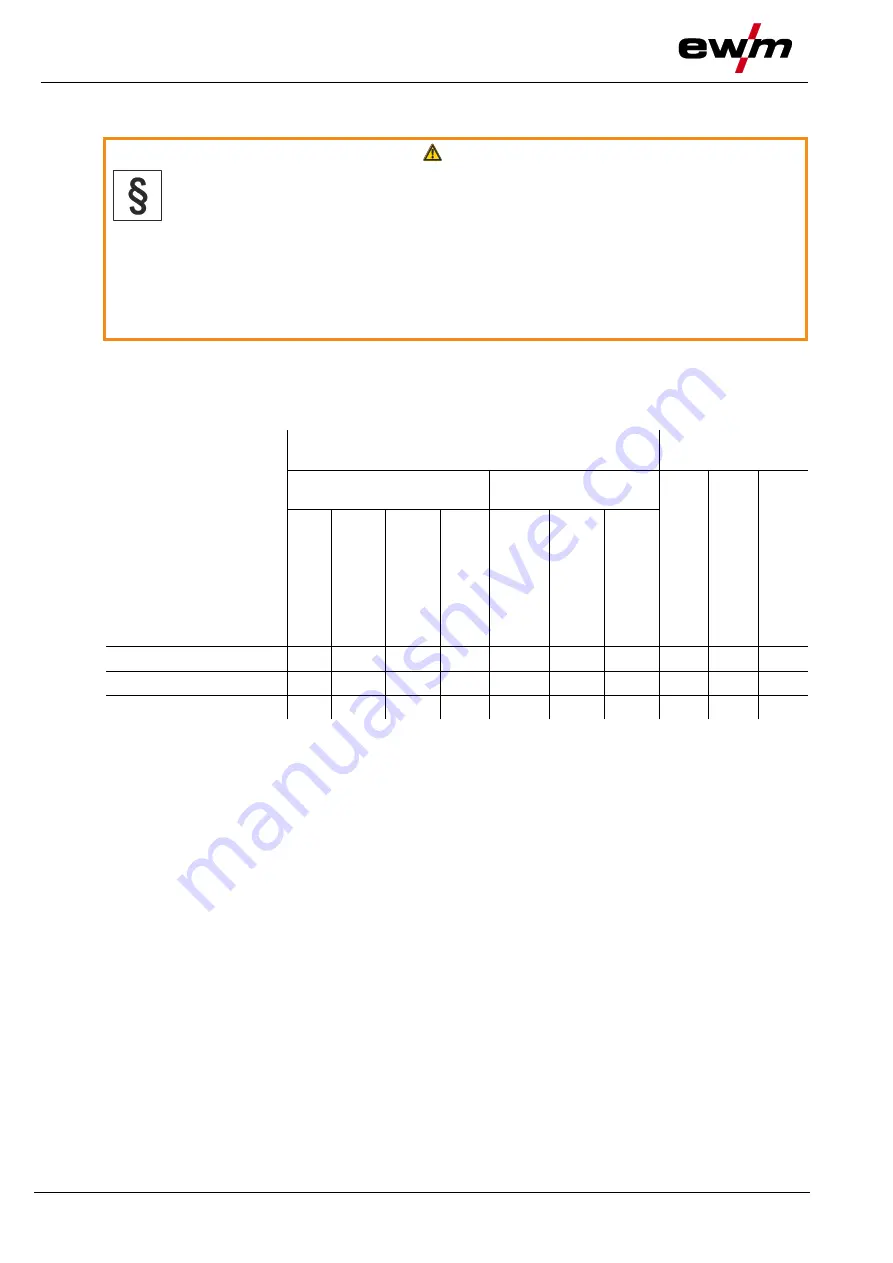
Applications 


Machine series 

Main process 

Secondary 
process 

Standard MIG/MAG 
welding 

Pulsed MIG/MAG 
welding 

TIG 

we

ldin

g (

lif

ar

c)


MMA

 weldin

g


Goug

ing


forc

eA

rc


ro

otA

rc


co

ldA

rc


pipeSolutio

n


forc

eA

rc puls


ro

otA

rc pul

s


co

ldA

rc

 p

uls


alpha Q puls MM 


Phoenix puls MM 


Taurus Synergic S MM 


 possible 

 not possible 

Содержание alpha Q 330 Progress puls MM TKM

Страница 1: ...lding machine alpha Q 330 Progress puls HP MM TKM 099 005402 EW501 Observe additional system documents 24 11 2016 Register now and benefit Jetzt Registrieren und Profitieren www ewm group com For deta...

Страница 2: ...ervice department on 49 2680 181 0 A list of authorised sales partners can be found at www ewm group com Liability relating to the operation of this equipment is restricted solely to the function of t...

Страница 3: ...ransport and storage 25 5 1 2 Machine cooling 26 5 1 3 Workpiece lead general 26 5 1 4 Welding torch cooling system 26 5 1 4 1 Cooling module connection 26 5 1 5 Notes on the installation of welding c...

Страница 4: ...tomatic cut out 72 5 3 12 Standard MIG MAG torch 73 5 3 13 MIG MAG special torches 73 5 3 13 1 Program and up down operation 73 5 3 13 2 Switching between Push Pull and intermediate drive 74 5 3 14 Ex...

Страница 5: ...ents of RoHS 109 7 Rectifying faults 110 7 1 Checklist for rectifying faults 110 7 2 Error messages power source 111 7 3 Resetting JOBs welding tasks to the factory settings 113 7 3 1 Resetting a sing...

Страница 6: ...erved to prevent serious and even fatal injuries Safety notes include the WARNING keyword in the heading with a general warning symbol The hazard is also highlighted using a symbol in the page margin...

Страница 7: ...off machine Release Switch on machine Press and keep pressed Switch Wrong Turn Correct Numerical value adjustable Menu entry Signal light lights up in green Navigating the menu Signal light flashes gr...

Страница 8: ...and valid only in combination with all other parts of these instructions Read and observe the operating instructions for all system components especially the safety instructions The illustration show...

Страница 9: ...equipment depending on the application The machine may only be opened by qualified personnel Hazard when interconnecting multiple power sources If a number of power sources are to be connected in par...

Страница 10: ...arks results in burns Use welding shield or welding helmet with the appropriate safety level depending on the application Wear dry protective clothing e g welding shield gloves etc according to the re...

Страница 11: ...workers at work The regulations applicable to occupational safety and accident prevention in the country concerned Setting up and operating the machine as per IEC 60974 9 Brief the user on safety cons...

Страница 12: ...reas connected to the low voltage public mains network Setting up and operating When operating arc welding systems in some cases electro magnetic interference can occur although all of the welding mac...

Страница 13: ...amaged itself during movement and set up Tilt resistance is guaranteed up to an angle of 10 according to IEC 60974 1 Set up and transport the machine on level solid ground Secure add on parts using su...

Страница 14: ...ly be used in line with its designated purpose and by trained or expert personnel Do not improperly modify or convert the equipment Arc welding machine for standard and pulsed gas shielded metal arc w...

Страница 15: ...ecific declaration of conformity is included with every product 3 2 3 Welding in environments with increased electrical hazards In compliance with IEC DIN EN 60974 VDE 0544 the machines can be used in...

Страница 16: ...Machine description quick overview Front view 16 099 005402 EW501 24 11 2016 4 Machine description quick overview 4 1 Front view Figure 4 1...

Страница 17: ...on socket welding current TIG welding Workpiece connection MMA welding Workpiece connection 7 welding current connection socket MIG MAG welding Workpiece connection TIG welding Welding current connect...

Страница 18: ...Machine description quick overview Rear view 18 099 005402 EW501 24 11 2016 4 2 Rear view Figure 4 2...

Страница 19: ...e spool inspection window Check wire supply 4 19 pole mechanised welding interface analogue see 5 9 chapter 5 8 pole connection socket Cooling unit control lead 6 Key button automatic cutout Wire feed...

Страница 20: ...Machine description quick overview Inside view 20 099 005402 EW501 24 11 2016 4 3 Inside view Figure 4 3...

Страница 21: ...ew 099 005402 EW501 24 11 2016 21 Item Symbol Description 0 1 Welding torch function changeover switch special welding torch required Changing over programs or JOBs Infinite adjustment of welding perf...

Страница 22: ...left Welding current material thickness wire speed hold values 4 Push button parameter selection left power saving mode AMP Welding current Material thickness see 5 3 6 1 chapter Wire feed speed Hold...

Страница 23: ...er 10 Arc length correction selection of welding program rotary dial Correction of the arc length from 9 9 V to 9 9 V Selection of welding programs 0 to 15 not possible if accessory components such as...

Страница 24: ...to WF max Correction of the arc length 9 9 V to 9 9 V 7 sec Signal light duration of main program PA Setting range 0 1 s to 20 0 s 0 1 s increments Used e g in connection with the super pulse function...

Страница 25: ...t by hand only The machine must not be suspended or lifted using a crane Depending on machine type equipment for lifting by crane or use while suspended is available as a retrofitting option see 9 cha...

Страница 26: ...and leads can heat up and cause burns when touched Check welding current connections on a daily basis and lock by turning to the right when necessary Clean workpiece connection thoroughly and secure...

Страница 27: ...and as close as possible in parallel Lay the workpiece lead and hose package of power sources with HF igniter TIG for as long as possible in parallel with a distance of 20 cm to avoid HF sparkover Alw...

Страница 28: ...ors damage machines and electronic devices and cause overheating of components leading to fire Check that all welding current connections are firmly secured and electrical connections are in perfect c...

Страница 29: ...hecked by an electrician on a regular basis When operating the generator always ensure it is earthed as stipulated in the operating instructions The network created must be suitable for operating mach...

Страница 30: ...supply from the shielding gas cylinder to the welding torch is a fundamental requirement for optimum welding results In addition a blocked shielding gas supply may result in the welding torch being d...

Страница 31: ...nstallation 099 005402 EW501 24 11 2016 31 5 1 7 2 Shielding gas hose connection Figure 5 8 Item Symbol Description 0 1 Connecting nipple G shielding gas connection Connect crown nut of the shielding...

Страница 32: ...pen the pressure regulator Switch on the power source at the main switch Trigger gas test see 5 1 8 1 chapter function welding voltage and wire feed motor remain switched off no accidental arc ignitio...

Страница 33: ...s again from the beginning Figure 5 11 The display shows Nominal values before welding Actual values during welding Hold values after welding MIG MAG Parameter Nominal values Actual values Hold values...

Страница 34: ...electrodes CrNi Use a plastic or teflon liner when welding or brazing soft wire electrodes high alloy wire electrodes or aluminium materials Preparation for connecting welding torches with a liner Pu...

Страница 35: ...ry components remote control welding torch control lead etc 4 Welding torch connection Euro or Dinse torch connector Welding current shielding gas and torch trigger integrated Insert the central plug...

Страница 36: ...11 2016 5 3 2 Connection for workpiece lead Figure 5 13 Item Symbol Description 0 1 Workpiece 2 welding current connection socket MIG MAG welding Workpiece connection Insert the plug on the workpiece...

Страница 37: ...in an unpredictable manner Welding wire can be conveyed at very high speeds and if conveyed incorrectly may escape in an uncontrolled manner and injure persons Before mains connection set up the comp...

Страница 38: ...ly fasten the wire spool to the wire spool support Before you start working always check the wire spool is securely fastened Standard D300 wire spool holder can be used Adapters see 9 chapter are requ...

Страница 39: ...xing the clamping unit and setting the pressure 4 Clamping unit 5 Wire feed roller see the Wire feed roller overview table Rotate the tommy by 90 clockwise or anti clockwise tommy locks into place Fol...

Страница 40: ...M EFEED see 10 chapter Wire feed roller overview table Material Diameter Colour code Groove form mm inch Steel Stainless steel Brazing 0 6 023 monochrome light pink V groove 0 8 030 white 0 9 1 0 035...

Страница 41: ...till slip through if the wire spool jams Set the contact pressure of the front rollers in wire feed direction to a higher value The inching speed is infinitely adjustable by simultaneously pressing th...

Страница 42: ...e found on a sticker near the wire drive Version 1 left hand mounting Version 2 right hand mounting Figure 5 17 Automatic inching stop Touch the welding torch against the workpiece during inching Inch...

Страница 43: ...ftware if required 5 3 5 Welding task selection 5 3 5 1 Basic welding parameters You can only change the JOB number when no welding current is flowing 1 2 3 4 Figure 5 19 Item Symbol Description 0 1 J...

Страница 44: ...01 24 11 2016 5 3 5 2 Choke effect dynamics Setting range 40 Arc hard and narrow deeper fusion penetration 40 Arc soft and wide ENTER EXIT 3s Figure 5 20 5 3 5 3 Burn back ENTER EXIT 3s Figure 5 21 Di...

Страница 45: ...the Christmas tree technique when selecting program 1 see 5 3 10 chapter the relevant superPuls variant depending on the material is activated as well The required superPuls parameters are defined ex...

Страница 46: ...aterial thickness The required wire feed speed is not known and is to be determined Select welding task JOB 76 see 5 3 5 chapter material AlMg gas Ar 100 wire diameter 1 2 mm Switch the display to mat...

Страница 47: ...int setting The operating point can be set at various accessory components as well such as remote control special welding torches or robot and industrial bus interfaces optional interface for automate...

Страница 48: ...tomated applications coldArc welding to Wire mm 0 8 0 9 1 1 2 1 6 Material Gas JOB JOB JOB JOB JOB CrNi Ar 91 99 51 7 0 52 6 0 AlMg Ar 100 55 8 0 56 8 0 ALSi Ar 100 59 8 0 60 6 0 AL99 Ar 100 63 8 0 64...

Страница 49: ...0 255 9 5 256 7 0 Ar 80 90 189 17 0 179 12 0 180 9 5 181 6 0 CrNi Ar 91 99 251 12 0 252 12 0 253 6 0 You can make use of these properties after selecting the forceArc process see 5 3 5 chapter As wit...

Страница 50: ...les that are not fully unrolled can cause faults in the arc flickering Fully unroll welding current cables torch hose packages and if applicable intermediate hose packages Avoid loops 5 3 6 7 pipeSolu...

Страница 51: ...so be changed if required 5 3 7 1 Explanation of signs and functions Symbol Meaning Press torch trigger Release torch trigger Tap torch trigger press briefly and release Shielding gas flowing I Weldin...

Страница 52: ...g gas is expelled gas pre flows Wire feed motor runs at creep speed Arc ignites after the wire electrode makes contact with the workpiece welding current flows Change over to pre selected wire speed S...

Страница 53: ...c ignites after the wire electrode makes contact with the workpiece welding current flows Start the super pulse function beginning with main program PA The welding parameters change at the specified t...

Страница 54: ...feed motor runs at creep speed Arc ignites after the wire electrode makes contact with the workpiece welding current is flowing start program PSTART for the time tstart Slope to main program PA Step...

Страница 55: ...e electrode makes contact with the workpiece welding current is flowing start program PSTART spot time starts Slope to main program PA After the set spot time elapses slope goes to end program PEND Wi...

Страница 56: ...orkpiece welding current is flowing start program PSTART for the time tstart Slope on main program PA Start the super pulse function beginning with main program PA The welding parameters change at the...

Страница 57: ...runs at creep speed Arc ignites after the wire electrode makes contact with the workpiece welding current flows Change over to pre selected WF speed main program PA Step 2 Release torch trigger no ef...

Страница 58: ...ntact with the workpiece welding current flows Start the super pulse function beginning with main program PA The welding parameters change at the specified times between main program PA and the reduce...

Страница 59: ...the process PA stored in the JOB and the opposite process PB at the specified times t2 and t3 If a standard process is stored in the JOB this means that there is a permanent alternation between the p...

Страница 60: ...time tSTART elapses and at the latest when the torch trigger is released Tapping1 can be used to change over to the reduced main program PB Repeated tapping will switch back to the main program PA St...

Страница 61: ...slope on main program PA is given at the earliest after the set time tSTART elapses and at the latest when the torch trigger is released Tapping pressing the torch trigger for less than 0 3 sec change...

Страница 62: ...with process PA The welding processes alternate between the process PA stored in the JOB and the opposite process PB at the specified times t2 and t3 If a standard process is stored in the JOB this m...

Страница 63: ...g start program PSTART for the time tstart Step 2 Release torch trigger Slope on main program PA Start the super pulse function beginning with main program PA The welding parameters change at the spec...

Страница 64: ...ion End program PEND minimisation of end craters via targeted heat reduction The programs include the parameters wire speed operating point arc length correction slope times program duration etc Figur...

Страница 65: ...re flow time 0 0s to 20 0s 2 2 PSTART Wire speed relative Arc length correction 1 to 200 9 9V to 9 9V 3 3 Duration 0 0s to 20 0s 4 4 Slope duration from PSTART to PA 0 0s to 20 0s 5 5 PA Wire speed ab...

Страница 66: ...cial Figure 5 45 Basic parameters Welding parameter Meaning explanation Setting range GASstr Gas pre flow time 0 0s to 20 0s GASend Gas post flow time 0 0s to 20 0s RUECK Wire burn back length 2 to 50...

Страница 67: ...tion Setting range DVstart Wire speed 0 to 200 ustart Arc length correction 9 9V to 9 9V tstart Duration 0 0s to 20s PA main program Welding parameter Meaning explanation Setting range Setting the wir...

Страница 68: ...tion 0 0s to 20s PA main program Welding parameter Meaning explanation Setting range tS1 Slope duration from PSTART to PA 0 0s to 20s DV3 Setting the wire speed 0 to 200 t2 Duration 0 1s to 20s tS3 Sl...

Страница 69: ...ange the JOB number when no welding current is flowing Wire feed speed and welding voltage can be configured independently in two performance ranges For wire feed speeds below 8 m min select JOB 188 F...

Страница 70: ...ponents Program switching JOB switching Program Operating mode Welding process superPuls Wire speed Voltage correction Dynamics M3 7x Wire feeder control Yes Yes P0 Yes Yes Yes P1 15 Yes R20 Remote co...

Страница 71: ...igure 5 51 Example 3 Aluminium welding of different sheet metal thicknesses non latched or latched special Figure 5 52 Up to 16 programs PA0 to PA15 can be defined An operating point wire speed arc le...

Страница 72: ...eters can only be made when the key switch is in position 1 Figure 5 53 Select program number 5 3 11 MIG MAG automatic cut out The welding machine ends the ignition process or the welding process with...

Страница 73: ...etween welding programs P8 Program selection before starting welding P17 Change over between pulse and standard welding in the special latched operating mode Switching between wire feed units in dual...

Страница 74: ...ed interference Appoint only skilled persons for repair work trained service personnel Test Before re commissioning it is essential that an inspection and test during operation is carried out conformi...

Страница 75: ...1 Selection ENTER Enter the menu Keep the welding parameters push button pressed for 3 s NAVIGATION Navigate the menu Select parameters by pressing the welding parameters push button Set or change th...

Страница 76: ...special parameters description 1 No JOB dependent program limit 2 9 JOB dependent program limit for max selectable programs For machine versions with pulsed arc welding procedures only Change welding...

Страница 77: ...ding current shielding gas and torch trigger integrated 5 Workpiece 6 Connection socket welding current TIG welding Workpiece connection Insert the central plug for the welding torch into the central...

Страница 78: ...found inside the protective cap on the wire feeder and in the appendix to these operating instructions 2 Welding parameter setting dial For setting the welding performance for selecting the JOB weldi...

Страница 79: ...ng current is increased depending on the operating mode set to the ignition or main current set c Lift off the torch and swivel to the normal position Ending the welding process Release or press the t...

Страница 80: ...cial non latched Figure 5 61 Selection Select non latched special mode Step 1 Press and hold torch trigger Shielding gas is expelled gas pre flows The arc is ignited using liftarc Welding gas flows wi...

Страница 81: ...ting mode Step 1 Press and hold torch trigger Shielding gas is expelled gas pre flows The arc is ignited using liftarc Welding current flows with pre selected setting Step 2 Release torch trigger no e...

Страница 82: ...n at the earliest after the set time tSTART elapses and at the latest when the torch trigger is released Tapping can be used to switch to the reduced main program PB Repeated tapping will switch back...

Страница 83: ...A 0 s to 20 s 5 PA main program Welding current absolute 5 A to 550 A 6 Duration PA 0 01 s to 20 0 s 7 PB reduced main program Welding current 1 to 100 8 Duration reduced main program 0 01 s to 20 0 s...

Страница 84: ...ctrode holder and workpiece lead Figure 5 65 Item Symbol Description 0 1 Electrode holder 2 welding current connection socket MMA welding electrode holder connection 3 Workpiece 4 Connection socket we...

Страница 85: ...JOB LIST Welding task push button JOB Select the welding task from the welding task list JOB LIST The list can be found inside the protective cap on the wire feeder and in the appendix to these opera...

Страница 86: ...es using an increased ignition current a Hotstart time b Hotstart current I Welding current t Time Figure 5 69 For hotstart parameter settings see 5 5 3 chapter 5 5 2 4 Antistick Anti stick prevents t...

Страница 87: ...3 Parameter overview Figure 5 71 Basic parameters Item Meaning explanation Setting range 1 Welding current 5 A to maximum welding current 2 Hotstart time 0 to 20 s 3 Hotstart current 0 to 200 The hots...

Страница 88: ...g JOB block operation P16 possible No change of special parameters except P10 Restart required 5 7 Remote control The remote controls are operated via the 19 pole remote control connection socket anal...

Страница 89: ...Output open collector IGRO Current flows signal I 0 maximum load 20 mA 15 V 0 V welding current flows E R Input Not Aus Emergency stop for higher level shut down of the power source To use this funct...

Страница 90: ...ification 0 V 10 V wire feed speed E Output Reference potential 0 V F S Input Welding power start stop S1 G Input Control voltage specification 0 V 10 V arc length correction P Input Activation of con...

Страница 91: ...nents into the relevant connection socket when the machine is switched off Equipment damage or faults may occur if the PC is connected incorrectly Not using the SECINT X10USB interface results in equi...

Страница 92: ...ing changing and saving parameters ENTER Enter the menu Switch off machine at the main switch Press and hold the left parameter selection button and switch the machine on again at the same time NAVIGA...

Страница 93: ...operation 0 single operation Ex works 1 dual operation this unit is the master 2 dual operation this unit is the slave Special latched tapping time 0 tapping function switched off 1 300ms Ex works 2 6...

Страница 94: ...m PSTART down slope program PB and end program PEND can be set relative to the main program PA or in an absolute manner as desired 0 Relative parameter setting ex factory 1 Absolute parameter setting...

Страница 95: ...led Up down operation Welding power 0 minimum current 9 maximum current and symbol for up down operation are toggled Program limit P4 Program selection can be limited with the special parameter P4 The...

Страница 96: ...10 0 m min This corresponds to a welding voltage U of 21 9 V When the key switch is set to 0 position welding in this program can only be carried out with these values To allow the welder also to per...

Страница 97: ...99 005402 EW501 24 11 2016 97 Setting the correction range Activate the correction operation special parameter P7 1 and save see 5 12 1 chapter Key switch to position 1 Set the correction range as fol...

Страница 98: ...time has elapsed The program then switches automatically to absolute program 4 Accessory components such as remote controls or special torches may not be connected Program switching at the wire feed...

Страница 99: ...latest when the torch trigger is released Tapping pressing briefly and releasing within 0 3 sec can switch to other programs Programs PA1 to PA9 are possible 3rd cycle Press and hold torch trigger Slo...

Страница 100: ...can be set in three levels 0 no tapping 1 320ms factory setting 2 640ms JOB list switching P12 Value Designation Explanation 0 Task oriented JOB list The JOB numbers are sorted by welding wires and s...

Страница 101: ...vity for longer than 5 seconds the parameter display is shown once more and the copy process is complete Lower and upper limits of the remote JOB changeover process P13 P14 The highest and lowest JOB...

Страница 102: ...the welding parameters manually Selection of JOB 0 can be prevented via the key switch or with the block program 0 parameter P2 Key switch position 0 or special parameter P2 0 JOB 0 is blocked Key sw...

Страница 103: ...Relative parameter setting ex factory Electronic gas flow control type P22 Active only in machines with integrated gas flow control option ex works Adjustment may only be carried out by authorised se...

Страница 104: ...60 m 8 m ex works Lead resistance 2 Lead resistance for the second welding circuit 0 m 60 m 8 m ex works Only qualified service personnel may change the parameters Only qualified service personnel ma...

Страница 105: ...welding torch With other hose package lengths it is necessary to carry out a voltage correction to optimise welding properties The voltage correction value can be set close to zero by means of realig...

Страница 106: ...ameter rL1 must be aligned for all machine combinations In case of welding systems with a second power circuit if two wire feeders are to be operated from a single power source for example a second al...

Страница 107: ...who is able to implement the required safety procedures In the event of failure of any one of the following tests the machine must not be operated again until it has been repaired and a new test has b...

Страница 108: ...Wheels and their securing elements Transport elements strap lifting lugs handle Other general condition 6 3 1 2 Functional test Operating message safety and adjustment devices Functional test Welding...

Страница 109: ...4th 2021 used electric and electronic equipment may no longer be placed in unsorted municipal waste It must be collected separately The symbol depicting a waste container on wheels indicates that the...

Страница 110: ...replace if necessary Setting the spool brake see 5 3 3 5 chapter Check settings and correct if necessary Setting pressure units see 5 3 3 4 chapter Check settings and correct if necessary Worn wire r...

Страница 111: ...ror Check shielding gas supply for machines with shielding gas monitoring 7 x Secondary overvoltage Inverter error inform Service 8 x Earth fault between welding wire and earth line Separate the conne...

Страница 112: ...message can be reset by pressing a push button Welding machine control Push button RC1 RC2 Expert Expert 2 0 CarExpert Progress M3 11 alpha Q Concept Basic Basic S Synergic Synergic S Progress M3 71 P...

Страница 113: ...ks to the factory settings All customised welding parameters that are stored will be replaced by the factory settings 7 3 1 Resetting a single JOB EXIT 3s 3s 3s Figure 7 1 Display Setting selection RE...

Страница 114: ...ended when no changes are done after 3 sec 7 4 General operating problems 7 4 1 Automation interface WARNING No function of the external interrupt equipment emergency stop switch If the emergency sto...

Страница 115: ...nt circuit Coolant tank and quick connect coupling of coolant supply and return are only fitted in machines with water cooling To vent the cooling system always use the blue coolant connection which i...

Страница 116: ...pause Open circuit voltage 79 V Mains voltage tolerances 3 x 400 V 25 to 20 Frequency 50 60 Hz Mains fuse safety fuse slow blow 3 x 16 A Mains connection lead H07RN F4G2 5 Maximum connected load 12 7...

Страница 117: ...001 G1 G1 4 R 3M Gas hose 094 000010 00003 5POLE CEE 16A M Machine plug 094 000712 00000 HOSE BRIDGE UNI Tube bridge 092 007843 00000 SPL Sharpener for plastic liners 094 010427 00000 HC PL Hose cutte...

Страница 118: ...ble 092 000201 00001 FRV 7POL 25M Extension connecting cable 092 000201 00007 9 4 2 19 pole connection Type Designation Item no R10 19POL Remote control 090 008087 00000 RG10 19POL 5M Remote control t...

Страница 119: ...4R 1 0 MM 0 04 INCH BLUE Drive roll set 37 mm 4 rolls V groove for steel stainless steel and brazing 092 002770 00010 FE 4R 1 2 MM 0 045 INCH RED Drive roll set 37 mm 4 rolls V groove for steel stain...

Страница 120: ...nurled for flux cored wire 092 002848 00008 FUEL 4R 1 0 MM 0 04 INCH BLUE ORANGE Drive roll set 37 mm 4 rolls V groove knurled for flux cored wire 092 002848 00010 FUEL 4R 1 2 MM 0 045 INCH RED ORANGE...

Страница 121: ...1 Standard GMAW puls CrNi 18 8 1 4370 Ar 97 5 CO2 2 5 M12 1 0 32 Standard GMAW puls CrNi 18 8 1 4370 Ar 97 5 CO2 2 5 M12 1 2 33 Standard GMAW puls CrNi 18 8 1 4370 Ar 97 5 CO2 2 5 M12 1 6 34 Standard...

Страница 122: ...GMAW puls AlSi Ar 100 I1 0 8 83 Standard GMAW puls AlSi Ar 100 I1 1 0 84 Standard GMAW puls AlSi Ar 100 I1 1 2 85 Standard GMAW puls AlSi Ar 100 I1 1 6 86 Standard GMAW puls AlSi Ar 70 He 30 I3 0 8 87...

Страница 123: ...23 Brazing CuAl Ar 100 I1 1 0 124 Brazing CuAl Ar 100 I1 1 2 125 Brazing CuAl Ar 100 I1 1 6 126 Gouging 127 TIG Liftarc 128 MMA 129 Special JOB 1 Free JOB 130 Special JOB 2 Free JOB 131 Special JOB 3...

Страница 124: ...Ar 82 CO2 18 M21 188 Standard GMAW puls G3Si1 G4Si1 Ar 82 CO2 18 M21 189 forceArc forceArc puls G3Si1 G4Si1 Ar 82 CO2 18 M21 0 8 190 forceArc forceArc puls G3Si1 G4Si1 Ar 82 CO2 18 M21 0 8 191 coldArc...

Страница 125: ...18 M21 1 2 239 Metal flux cored wire G3Si1 G4Si1 Ar 82 CO2 18 M21 1 6 240 Rutile basic flux cored wire G3Si1 G4Si1 Ar 82 CO2 18 M21 0 8 242 Rutile basic flux cored wire G3Si1 G4Si1 Ar 82 CO2 18 M21 1...

Страница 126: ...O2 18 M21 0 8 295 forceArc pulse G3Si1 G4Si1 Ar 82 CO2 18 M21 1 0 296 forceArc pulse G3Si1 G4Si1 Ar 82 CO2 18 M21 1 2 297 forceArc pulse G3Si1 G4Si1 Ar 82 CO2 18 M21 1 6 298 forceArc pulse G3Si1 G4Si1...

Страница 127: ...0 Ar 97 5 CO2 2 5 M12 0 8 331 coldArc coldArc puls CrNi 18 8 Mn 1 4370 Ar 97 5 CO2 2 5 M12 1 0 332 coldArc coldArc puls CrNi 18 8 Mn 1 4370 Ar 97 5 CO2 2 5 M12 1 2 333 coldArc coldArc puls CrNi 18 8 M...

Страница 128: ...Appendix B Overview of EWM branches 128 099 005402 EW501 24 11 2016 12 Appendix B 12 1 Overview of EWM branches...

Отзывы: