EVOnet C-FB310 Скачать руководство пользователя страница 14

Quick Reference Guide 


10 


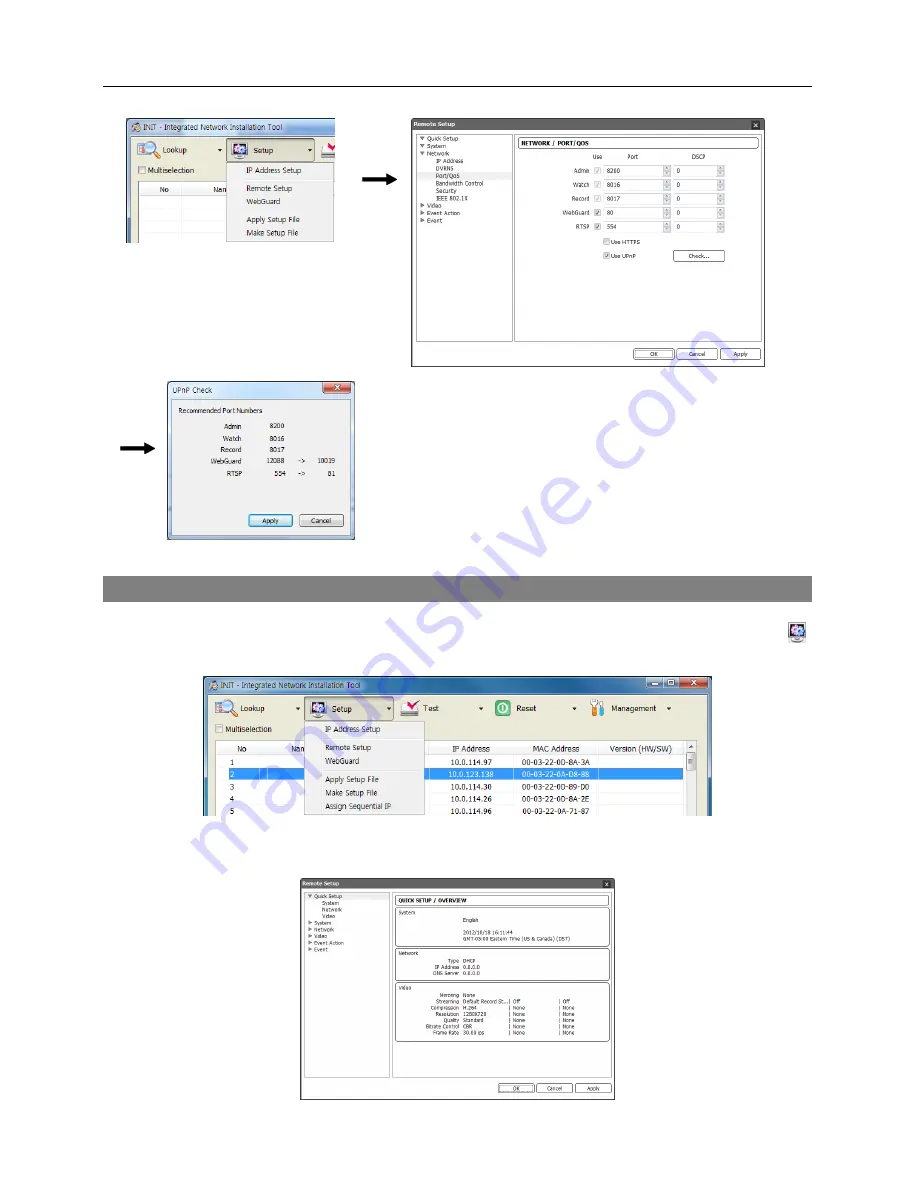
A success message is displayed if all the current port numbers 
are available, and recommended port numbers are displayed 
if any of the current port numbers are not available.  Clicking 
the 

Apply

 button applies the recommended port numbers.


Configuring Network Camera 

 
Run the INIT program 

 Click a network camera from the device list 

 Click the 

Setup

 icon   

on the Main screen 

 Select 

Remote Setup

 from the Setup menu. 


The 

Remote Setup

 screen appears, and you can change the settings of the network camera.  See 

the User’s Manual on the CD for details about the configuring each settings. 


Содержание C-FB310

Страница 1: ......

Страница 2: ......

Страница 3: ...cation We are not responsible for any problems resulting from the use thereof The information contained herein is subject to change without notice Revisions or new editions to this publication may be...

Страница 4: ...rotection device 10 Overloading Do not overload wall outlets and extension cords as this can result in the risk of fire or electric shock 11 Objects and Liquids Never push objects of any kind through...

Страница 5: ...ents Network Camera C Mount Ring DC Type Auto Iris Lens Connector Socket Protective cover attached to the unit Installation CD INIT SiRiS Lite software and User s Manuals Quick Reference Guide This Do...

Страница 6: ...age sensor C Mount Ring Attach the ring provided with the camera to the camera when using the C Mount lens Back Focus Adjustment Ring Loose screws and adjust the back focus by turning the ring clockwi...

Страница 7: ...Network LED Auto Iris Lens Connector Connect the auto iris jack if the lens is a DC type auto iris lens Use the lens of which the auto iris jack is long Video Out Connect to a monitor This is intende...

Страница 8: ...be connected directly with cable or wire intended for outdoor use WARNING ROUTE POWER CORDS SO THAT THEY ARE NOT A TRIPPING HAZARD MAKE CERTAIN THE POWER CORD WILL NOT BE PINCHED OR ABRADED BY FURNIT...

Страница 9: ...for soldering the lens control wires Connector Socket Cover IRIS Control Cable Connector Socket Heat Shrink Tubing PIN Name 1 Damp Coil 2 Damp Coil 3 Drive Coil 4 Drive Coil 2 Remove the protective co...

Страница 10: ...ble clicking the INIT exe file in the INIT folder 3 Set the language option You can change the language option after running the program 4 The following Main screen appears and you can connect to the...

Страница 11: ...e MAC address in the sticker adhered to the network camera 4 Check the IP address of the network camera to connect in the list of network cameras 5 Run a remote program on the local PC and register th...

Страница 12: ...elow for details about setting the in the network camera NOTE If the NAT device does not support the UPnP function you have to set up port forwarding manually Also if more than one network camera is c...

Страница 13: ...RNS function to work properly the camera should be registered on the DVRNS server You will need to get the IP address or domain name and the port number of the DVRNS server from your network administr...

Страница 14: ...licking the Apply button applies the recommended port numbers Configuring Network Camera Run the INIT program Click a network camera from the device list Click the Setup icon on the Main screen Select...

Страница 15: ...This program uses large amounts of data and you are responsible for all data charges Please contact your service provider s customer service to confirm or add an unlimited data plan Android Based Mobi...

Страница 16: ...DVRNS option is enabled and enter the device name registered on the DVRNS server instead of the IP address The name you enter should match the name set during the DVRNS setup on the device User ID Pa...

Страница 17: ...rer on your PC 2 Enter in the address field the network camera s IP address and WebGuard port number or DVRNS server address and camera name registered on the DVRNS server e g http 10 0 127 1 80 in th...

Страница 18: ...is admin and password is 12345678 4 Register the device to record as follows Go to the Device menu Click All Devices in the Site panel and then the button at the bottom Select the scan mode and find t...

Страница 19: ...m Allocate storage 7 Configure recording schedule as follows Go to the Schedule menu Click the Schedule Setup button at the bottom Schedule windows are displayed with the current settings for each Pre...

Страница 20: ...on the PC Click SiRiS Lite and then SiRiS Lite Client Enter login information Default user ID Admin Default password 12345678 Click the Live or Play tab on the screen Click a device in the Site panel...

Отзывы: