Evolution Fury 3-XL Скачать руководство пользователя страница 3

3

www.evolutionfury.com

All documentation is held on file at 
the above address and is available, on 
request for review.

IMPORTANT

Please read these operating and safety 
instructions carefully and completely. For your 
own safety, before using this equipment check 
that the voltage is correct and that all handles 
and parts are firmly secured. If you are uncertain 
about any aspect of using this equipment, 
please contact our Technical Helpline.  

Helpline. 

Technical Helpline UK   

0870 609 2297

Technical Helpline USA    1-866-EVO-TOOL

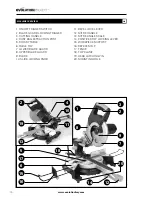
EVOLUTION 255mm FURY 3XL 
Multipurpose Sliding Compound Mitre Saw

Congratulations on your purchase of an 
Evolution Power Tool’s 255mm Multi Purpose 
Compound Mitre Saw. Please complete your 
product registration on line to validate your 
machine’s warranty period and ensure prompt 
service if needed. We sincerely thank you for 
selecting a product from Evolution Power Tools.

12 MONTH LIMITED WARRANTY

Evolution Power Tools reserves the right to 
make improvements and modifications to 
design without prior notice.

Evolution Power Tools will, within twelve (12) 
months from the original date of purchase, 
repair or replace any goods found to be 
defective in materials or workmanship. This 
warranty is void if the tool being returned 
has been used to cut materials beyond 
the recommendations in the Instruction 
Manual or if the saw has been damaged by 
accident, neglect, or improper service. This 
warranty does not apply to machines and 
/ or components which have been altered, 
changed, or modified in any way, or subjected 
to use beyond recommended capacities 
and specifications. Electrical components 
are subject to respective manufacturers’ 
warranties. All goods returned defective shall 
be returned prepaid freight to Evolution Power 

Tools. Evolution Power Tools reserves the 
right to optionally repair or replace it with the 
same or equivalent item.  There is no warranty 
– written or verbal – for saw blades.  In no 
event shall Evolution Power Tools be liable for 
loss or damage resulting directly or indirectly 
from the use of our merchandise or from any 
other cause.  Evolution Power Tools is not 
liable for any costs incurred on such goods or 
consequential damages. No officer, employee 
or agent of Evolution Power Tools is authorised 
to make oral representations of fitness or to 
waive any of the foregoing terms of sale and 
none shall be binding on Evolution Power Tools. 
Questions relating to this limited warranty 
should be directed to the company’s head 
office, or call the appropriate Helpline number.

IMPORTANT SAFETY INSTRUCTIONS

To reduce the risk of electric shock, this 
equipment is fitted with an approved cord 
and plug for its intended country of use.  
Do not change the cord or plug in any way.

GENERAL SAFETY RULES 

WARNING! 

When using electric tools, basic safety 
precautions should always be followed to 
reduce the risk of fire, electric shock and 
personal injury. 
Please read all of these instructions before 
attempting to operate this machine. Save 
this manual for future reference. 

1. Keep work area clear. Cluttered work 
areas invite accidents. 
2. Consider work area environment. Do 
not expose tools to rain. Do not use tools 
in damp or wet locations. Keep work area 
well lit. Never use tools near flammable 
liquids or gases. 
3. Protect yourself against electric shock. 
Avoid body contact with earthed or 
grounded surfaces. 
4. Keep other people away. Do not let others, 
especially children, come close to the work, 
and touch the tool or the extension lead. 
Keep them away from the work area. 

IMPORTANT INFORMATION

GB

12 MONTH LIMITED WARRANTY

GB

GENERAL SAFETY RULES

GB

Содержание Fury 3-XL

Страница 1: ...255 mm TCT Multi Purpose Sliding Compound Mitre Saw Original Instructions Read instructions before operating this tool www evolutionfury com 21 10 10_V2...

Страница 2: ...e that the product Part numbers Part numbers FURY32552 FURY32552EU Evolution FURY 3 XL Multi Purpose Sliding Compound Mitre Saw Complies with the essential requirements of the following European Direc...

Страница 3: ...tive shall be returned prepaid freight to Evolution Power Tools Evolution Power Tools reserves the right to optionally repair or replace it with the same or equivalent item There is no warranty writte...

Страница 4: ...rised service centre Inspect extension cables regularly and replace immediately if damaged Keep handles dry clean and free from oil and grease at all times 15 Disconnect tools Disconnect tools from th...

Страница 5: ...rect size and shape diamond versus round of arbor holes Blades that do not match the mounting hardware of the saw will run eccentrically causing loss of control h Never use damaged or incorrect blade...

Страница 6: ...uard by retracting handle and as soon as blade enters the material the lower guard must be released For all other sawing the lower guard should operate automatically d Always observe that the lower gu...

Страница 7: ...ade to stop before moving workpiece or changing settings u Disconnect power before changing blade servicing or cleaning v To reduce the risk of injury return carriage to the full rear position after e...

Страница 8: ...de should be replaced immediately Beware of ejecting chips as they may be HOT Always make provision for the safe handling of excess material Keep machine base and rotary table free from dirt and other...

Страница 9: ...nt of all parts of the operating cycle such as the times the tool is switched off when it is running idle in addition to trigger time Additional Accessories In addition to the standard accessories sup...

Страница 10: ...6 TABLE TOP 7 LOWER BLADE GUARD 8 UPPER BLADE GUARD 9 BLADE 10 SLIDE LOCKING KNOB 11 BEVEL LOCK LEVER 12 MITRE HANDLE 13 MITRE ANGLE SCALE 14 POSITIVE STOP LOCKING LEVER 15 WORKPIECE SUPPORT 16 REPEAT...

Страница 11: ...enty of room for handling and properly supporting the workpiece 4 Support the saw so that the table is level and the saw does not rock 5 Bolt or clamp the saw to its support 2 Installing or removing t...

Страница 12: ...to the outlet of the extraction port ensuring that it is firmly connected 2 To release the bag slide the frame in the opposite direction Note To ensure optimal dust collection empty the dust bag when...

Страница 13: ...ds the workpiece to the saw bed Ensure that the clamp does not foul the blade OPERATING INSTRUCTIONS Caution The Mitre Saw should be inspected particularly for the correct functioning of the safety gu...

Страница 14: ...wer off so you can see the path of the blade 4 Keep hands in position until the ON OFF trigger has been released and the blade has completely stopped 1 Releasing the saw head a Gently press down on th...

Страница 15: ...n and cut through the leading edge of the workpiece 7 Gently push the saw handle towards the fence completing the cut 8 Push the cutting head to the full rear position after each cut 9 Release the tri...

Страница 16: ...aid setting This is found just behind the bevel lock lever 4 Tighten the bevel lock 5 Unlatch the cutting head 6 Release the slide if necessary to cut wide workpieces 7 Stand to the left side of the h...

Страница 17: ...F by releasing the trigger switch 2 Allow the blade to come to a complete halt 3 Unplug the mitre saw from the mains supply 4 Remove any jammed material from the unit 12 Transporting When transporting...

Страница 18: ...table and the base Use a vacuum cleaner to remove this sawdust Use a clean slightly damp cloth to clean the plastic parts of the machine Do not use solvents or similar products which could damage the...

Страница 19: ...19 www evolutionfury com Service Parts Lists GB...

Страница 20: ...Y32552 FURY32552EU Evolution Scie onglet combin coulisse multi fonctions FURY 3 XL est conforme aux prescriptions essentielles des directives europ ennes suivantes 2006 42 CE Directive relative aux ma...

Страница 21: ...t r e s remplac e s ou modifi e s d une quelconque mani re ou qui ont t utilis e s sans respecter les capacit s et les sp cifications recommand es Les composants lectriques sont couverts par les garan...

Страница 22: ...ur Si vous avez des cheveux longs attachez les et couvrez les 9 Portez un quipement de protection Portez des lunettes de s curit Portez un masque facial ou un masque poussi re si le travail pr vu va f...

Страница 23: ...piques CONSIGNES DE S CURIT POUR a DANGER Tenez vos mains loign es de la zone de coupe et de la lame Placez votre seconde main sur la poign e auxiliaire ou sur le bloc moteur En tenant la scie avec vo...

Страница 24: ...e la scie d Soutenez les grands panneaux de fa on r duire le risque de pincement et de recul de la lame au minimum Les grands panneaux ont tendance s arquer sous leur propre poids Placez des supports...

Страница 25: ...i se traduira par une perte de puissance et une surchauffe de votre outil h Portez une tenue adapt e Ne portez pas de v tements flottants de gants de foulards de bagues de bracelets ou autres bijoux s...

Страница 26: ...votre corps pour le soulever Pliez les genoux pour pouvoir soulever l outil avec vos jambes au lieu de votre dos Soulevez l outil en le prenant par les zones de prise qui se trouvent sur le dessous d...

Страница 27: ...emment l tat et le degr d usure des lames Les lames endommag es ou us es doivent tre remplac es imm diatement Faites attention aux copeaux qui sont ject s Ils sont peut tre CHAUDS Manipulez toujours l...

Страница 28: ...te de toutes les tapes du cycle d exploitation par exemple lorsque l outil est mis l arr t lorsqu il tourne au ralenti en plus du d clenchement Accessoires suppl mentaires En plus des accessoires stan...

Страница 29: ...SUS DE TABLE 7 CARTER DE LAME INF RIEUR 8 CARTER DE LAME SUP RIEUR 9 LAME 10 BOUTON DE BLOCAGE DE LA COULISSE 11 LEVIER DE BLOCAGE DU BISEAU 12 POIGN E D ONGLET 13 RAPPORTEUR D ONGLET 14 LEVIER DE BLO...

Страница 30: ...e Les projections de d bris peuvent causer des blessures 3 Posez la scie sur une surface ferme et plane o vous aurez largement la place de manipuler la pi ce d couper et o cette derni re sera correcte...

Страница 31: ...pas d entretoises ni de bagues de broche avec la machine et ou la lame 3 Sac de r cup ration de d bris Le sac de r cup ration de d bris devrait tre fix sur l orifice d vacuation des d bris 1 Faites g...

Страница 32: ...ez la pince dans le logement le plus appropri au travail pr vu en veillant ce qu elle soit compl tement enfonc e 2 Serrez la vis de serrage main du guide pour bloquer le pilier dans le logement 3 Plac...

Страница 33: ...ser doivent tre confi es Evolution Power Tools ou son repr sentant agr uniquement Position du corps et des mains 1 Ne placez jamais vos mains pr s de la zone de coupe et tenez les loign es du parcours...

Страница 34: ...rez le bouton de blocage de la coulisse pour d bloquer la coulisse et permettre la t te de coupe d avancer et de reculer La lame de la scie est ensuite abaiss e dans la pi ce et pouss e vers l arri re...

Страница 35: ...mains ou de retirer la pi ce AVERTISSEMENT par souci de commodit la scie est quip e d un frein de lame Il ne doit en aucun cas remplacer un bon usage du carter de la scie 6 Coupe d onglet Fig 8 Cet o...

Страница 36: ...ermet de r aliser des rainures dans la pi ce Vous pouvez r gler la course vers le bas de la t te de la scie de fa on ce que la scie ne fasse pas une coupe compl te dans la pi ce Remarque il est consei...

Страница 37: ...ise murale 4 Retirez le mat riau bloqu 12 Transport Lorsque vous transportez la scie d un endroit un autre tenez compte de ce qui suit 1 La t te de la scie doit tre bloqu e sur la position inf rieure...

Страница 38: ...e travail et le socle Retirez la avec un aspirateur Utilisez un chiffon propre l g rement humide pour nettoyer les parties en plastique de la machine N utilisez pas de solvants ou de produits similair...

Страница 39: ...39 www evolutionfury com Listes de pi ces de rechange FR...

Страница 40: ...ution FURY 3 XL Mehrzweck Zug Kapp Gehrungss ge mit den grundlegenden Anforderungen folgender EG Richtlinien bereinstimmt 2006 42 EG Maschinenrichtlinie 2006 95 EG Niederspannungsrichtlinie 2004 108 E...

Страница 41: ...iese Garantie gilt nicht f r Ger te und oder Bauteile die in irgendeiner Weise ge ndert oder modifiziert oder in einer Weise verwendet wurden die ber die empfohlenen Kapazit ten und Spezifikationen hi...

Страница 42: ...e die Haare abdeckt 9 Verwenden Sie pers nliche Schutzausr stung Tragen Sie eine Schutzbrille Tragen Sie eine Gesichts oder Staubschutzmaske wenn der Schneidvorgang sehr staubig ist 10 Schlie en Sie e...

Страница 43: ...it den Gefahren in Bezug der zu bearbeitenden Materialien vertraut machen um sie m glichst gering zu halten Sie m ssen daher in gut bel fteten Bereichen arbeiten zugelassene Schutzausr stung verwenden...

Страница 44: ...g still stehen wenn sich die S gebl tter verkanten oder der Schneidvorgang aus irgendeinem Grund unterbrochen wird Ziehen Sie die S ge nie aus dem Werkst ck oder nach hinten solange die S gebl tter no...

Страница 45: ...immer funktionsf hig sein b Entfernen Sie Einstellwerkzeuge und Schraubenschl ssel Machen Sie es sich zur Gewohnheit aktiv sicherzustellen dass Einstellwerkzeuge und Schraubenschl ssel vor dem Einscha...

Страница 46: ...Arbeitsbereich des S geblatts s Greifen Sie nie um das S geblatt herum t Schalten Sie das Werkzeug immer aus und warten Sie bis das S geblatt v llig still steht bevor Sie das Werkst ck bewegen oder E...

Страница 47: ...lieren Sie die S geblattflansche auf Fremdk rper bevor Sie ein neues S geblatt einsetzen Verwenden Sie keine stumpfen oder gebrochenen S gebl tter Kontrollieren Sie das S geblatt regelm ig auf seinen...

Страница 48: ...rkzeug ausgeschaltet ist wenn es im Leerlauf l uft sowie die Ausl sezeit Weiteres Zubeh r Zus tzlich zu dem mit diesem Ger t gelieferten Standard Zubeh r steht weiteres Zubeh r zur Verbesserung der Le...

Страница 49: ...ERFL CHE 7 UNTERE SCHUTZABDECKUNG 8 OBERE SCHUTZABDECKUNG 9 S GEBLATT 10 GLEITARRETIERKNOPF 11 NEIGUNGSWINKELARRETIERHEBEL 12 GEHRUNGSGRGIFF 13 GEHRUNGSWINKELSKALA 14 FESTANSCHLAG ARRETIERHEBEL 15 WER...

Страница 50: ...en k nnen 3 Stellen Sie die S ge auf einer festen geraden Oberfl che mit ausreichendem Platz f r das Handhaben und sichere Halten des Werkst cks auf 4 Der Arbeitstisch muss gerade sein und die S ge da...

Страница 51: ...ie vor Inbetriebnahme sicher dass der Innensechskantschl ssel entfernt und die Spindelsperre gel st wurde 11 Stellen Sie sicher dass die Schutzabdeckung voll funktionsf hig ist bevor das Ger t in Betr...

Страница 52: ...be der Werkst ckhalterung die sie oben an der Vorderseite des Ger tesockels befindet 2 F hren Sie die Werkst ckhalterung in die Haltel cher im Ger tesockel ein Stellen Sie eine formschl ssige Aufnahme...

Страница 53: ...berpr fen Sie die Spindelschraube auf festen Sitz Laserf hrung Diese S ge ist mit einer Laserschnittf hrung ausgestattet Damit k nnen Sie den Weg des S geblatts durch das Werkst ck im Voraus sehen De...

Страница 54: ...unteren Position arretiert wird Stecken Sie dazu den Arretierstift vollst ndig in die daf r vorgesehene Buchse 2 Anschalten der Maschine Schlie en Sie die Maschine an das Stromnetz an Sorgen Sie daf r...

Страница 55: ...en Schnitt zu beenden 8 Schieben Sie den S gekopf nach jedem Schnitt vollst ndig zur hinteren Position 9 Lassen Sie den Ausl ser los um die S ge auszuschalten Warten Sie bis das S geblatt vollst ndig...

Страница 56: ...erlich ist 7 Schalten Sie die S ge ein und warten Sie bis sie ihre volle Drehzahl erreicht hat bevor Sie mit dem Schnitt beginnen 7 Neigungsschnitt nach links Abb 9 1 Arretieren Sie den S gekopf mit d...

Страница 57: ...ist Ein gebogenes Werkst ck muss der Abbildung entsprechend positioniert und geschnitten werden Siehe Abb 11 und 12 Achten Sie darauf dass das Werkst ck richtig positioniert ist und schneiden Sie das...

Страница 58: ...em Ger tesockel ansammeln Entfernen Sie S gemehl mit einem Staubsauger Reinigen Sie alle Kunststoffteile des Ger ts mit einem sauberen und angefeuchteten Tuch Verwenden Sie keine L sungsmittel oder hn...

Страница 59: ...59 www evolutionfury com Liste der Wartungsteile FR...

Страница 60: ......

Отзывы: