Installation Instructions
· 8 ·
EC3-1813CLD2NA(CHENGDU)
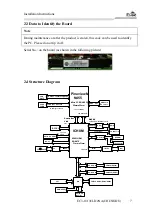
Tip: How to identify the first pin of the jumpers and connectors
1.
Observe the letter beside the socket: the first pin is usually marked with “1” or
bold lines or triangular symbols;
2.
Observe the solder pad on the back: usually the square pad is the first pin.
2.5 Jumper Setting
1. JCC1: Clear/Keep CMOS Setting (Pitch: 2.0mm)
CMOS is powered by the button battery on board. Clearing CMOS will restore
original settings (factory default). The steps are listed as follows: (1) Turn off the
computer and unplug the power cable; (2) Instantly short circuit JCC1; (3) Turn on
the computer; (4) Follow the prompt on screen to enter BIOS setup when booting the
computer, load optimized defaults; (5) Save and exit. Please set as follows:
Setup
Function
1-2 Open
Normal ((Default)
JCC1
1-2 Short
Clear the contents of CMOS and all BIOS
settings will restore to factory default values.
2. JP1: SATA2 Pin7 Used for SATA/DOM Function Selection (Pitch: 2.0mm)
Setup
Function
1-2 Short
SATA2 used for SATA data interface (Default)
JP1
2-3 Short
SATA2 used for DOM disk port
3. JP2: CF Card Master/Slave Selection (Pitch: 2.0mm)
Setup
Function
1-2 Short
Master (Default)
JP2
1-2 Open
Slave
Содержание ec3-1813cld2na
Страница 13: ...安装说明 6 EC3 1813CLD2NA CHENGDU 2 2 接口位置示意图 ...
Страница 45: ...驱动程序安装说明 38 EC3 1813CLD2NA CHENGDU 4 驱动程序安装说明 本产品的驱动程序可依据配套光盘内容安装 在此不做介绍 ...
Страница 61: ......
Страница 73: ...Installation Instructions 6 EC3 1813CLD2NA CHENGDU 2 2 Port Location ...


