background image

Troubleshooting 

The  troubleshooting  table  lists  some  possible  causes  and  solutions.  Please 
contact  your  original  retailer  or  nearest  service  center  if  the  below  solutions 
cannot solve your problem. 

Symptom 

Possible Cause 

Recommendation 

SA801 LED indicator not 
displaying 

No battery is inserted or 
battery is flat 

Check if 3 batteries are 
inserted properly 

SA801 failure 

Send the unit to the service 
center and do not open it 

The LEDs on the keypad 
are operating properly, but 
the keypad cannot arm or 
disarm the system. 

Check if the keypad has 
completed binding with 
Gateway . 

Proceed with 

“Manual 

binding” 

Distance out of 
operating range 

Change the mounting 
location of SA801 closer to 
the gateway.   

Reset to factory default 

Resetting  the  keypad  to  factory  default  settings  will  remove  all  binding  with 

HomeSys and resets the administrator PIN code to factory default.   

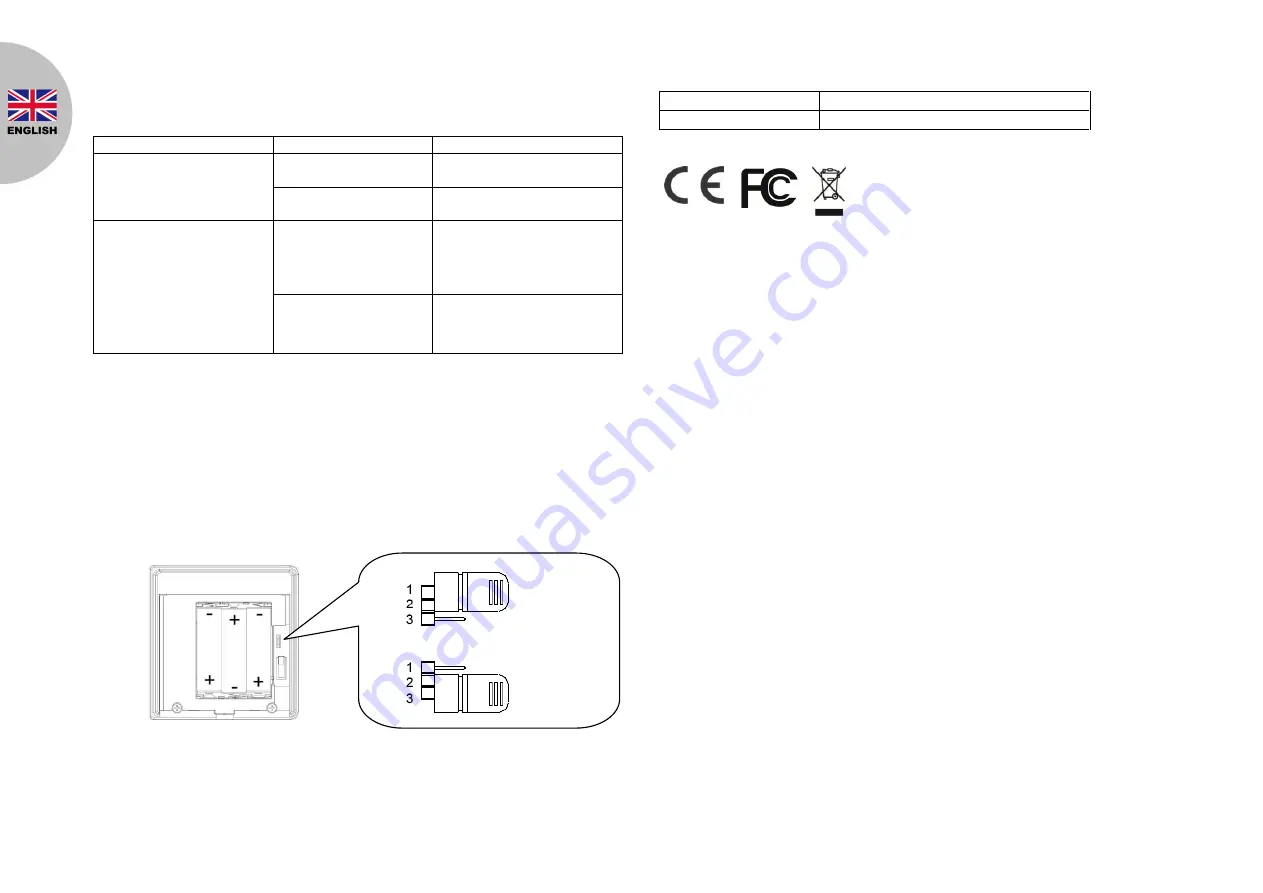
To reset to factory default: 

1.

Remove the batteries.

2.

Set the Jumper link J1 to Off position as shown below:

3.

Refit the batteries. The Keypad numbers 0-9 will flash three times.

4.

Set the Jumper link J1 back to the ON position as shown above.

Specifications 

** Specifications are subject to change and improvement without notice.


Federal Communication Commission Interference Statement 

This equipment has been tested and found to comply with the limits for a Class 

B digital device, pursuant to Part 15 of the FCC Rules.    These limits are 

designed to provide reasonable protection against harmful interference in a 

residential installation.    This equipment generates, uses and can radiate radio 

frequency energy and, if not installed and used in accordance with the 

instructions, may cause harmful interference to radio communications.   

However, there is no guarantee that interference will not occur in a particular 

installation.    If this equipment does cause harmful interference to radio or 

television reception, which can be determined by turning the equipment off and 

on, the user is encouraged to try to correct the interference by one of the 

following measures: 

-

Reorient or relocate the receiving antenna.

-

Increase the separation between the equipment and receiver.

-

Connect the equipment into an outlet on a circuit different from that to

which the receiver is connected.

-

Consult the dealer or an experienced radio/TV technician for help.

This device complies with Part 15 of the FCC Rules. Operation is subject to the 

following two conditions: (1) This device may not cause harmful interference, 

Battery Type 

AA 1.5V Alkaline battery x 3 

Operating Frequency 

868MHz (EU)/ 923MHz (America) 

OFF position 

ON position 

A501112398R01 

Содержание SA801

Страница 1: ...SA801 User manual Manuale utente Gu a de usuario...

Страница 2: ...te a Full Alarm condition when anyone attempts to open its casing Its great compatibility with our U Net family security products makes it suitable for smart home cloud based platforms such as HomeSys...

Страница 3: ...me out will occur if the binding process was unsuccessful Please refer to the Manual Binding procedure below Manual Binding 1 Repeat steps 5 to 8 of the Binding with HomeSys section 2 Press buttons 1...

Страница 4: ...the system and a full alarm condition will occur 3 Keypad self lock a When an incorrect code is entered once the back light of digits 0 9 will start to flash 3 times b If incorrect codes are entered...

Страница 5: ...s recommended that you change this to another four digit number See the next section on how to do this a Panic Disable Press administrator PIN code followed by 0 e g 1 2 3 4 0 b Panic Enable Press adm...

Страница 6: ...ice Federal Communication Commission Interference Statement This equipment has been tested and found to comply with the limits for a Class B digital device pursuant to Part 15 of the FCC Rules These l...

Страница 7: ...ispose of electrical appliances as unsorted municipal waste use separate collection facilities Contact your local government for information regarding the collection systems available If electrical ap...

Страница 8: ...ergenze o di tentata manomissione La tastiera SA801 funziona nel sistema smart home basato su cloud Homesys Descrizione Tasto Significato 0 9 Codice d accesso Armare Arm parz 1 Arm parz 2 Disarmare Ag...

Страница 9: ...o ha successo entro 10 secondi appare la seguente schermata 10 Se la ricerca non d esito dopo 3 min il conteggio scade Leggere Ricerca manuale per aggiungere il dispositivo Ricerca manuale 1 Ripetere...

Страница 10: ...o Disarmare della tastiera b Inserire uno dei codici a 4 cifre configurato in precedenza c Se il codice corretto la luce dei tasti 0 9 sulla tastiera si spegne Se invece i tasti lampeggiano 3 volte si...

Страница 11: ...Il codice PIN amministratore di default 1 2 3 4 Si consiglia di cambiare questo codice con un altro sempre di 4 cifre Nella prossima sezione viene spiegato il processo a Disattivare funzione anti pani...

Страница 12: ...a al proprio problema contattare il proprio fornitore o il servizio asistenza piu vicino Sintomi Possibili Cause Soluzioni Il LED non si accende e il dispositivo non risponde Batterie non inserite o s...

Страница 13: ...mponentes de la familia El teclado tambien tiene un bot n anti manipulaci n en caso alguien intente abrir la caja del teclado Gracias a la compatibilidad de todos los productos Homesys es f cil a adir...

Страница 14: ...ntalla significa que la gateway est buscando dispositivos 8 Poner las bater as con polaridad correcta 9 Si dentro de 10 segundos el operaci n tiene xito aparece la siguiente pantalla 10 Si el operaci...

Страница 15: ...odigo 3 etc Nota Utilizar una contrase a diferente por cada usuario Los codigos de acceso no estan guardados en el teclado sino en la gateway y en la nube De este modo se pueden a adir mas teclados si...

Страница 16: ...accesorio Cualquier intento de quitar el teclado de su cobertura posterior va a disparar un alarma en el sistema Posicionar el teclado Se deberia posicionar el teclado en un lugar cerca del entrada de...

Страница 17: ...ja demasiado el LED parpadea 4 veces cada vez se presiona un bot n Se recomienda remplazar las bater as en seguida siguiendo este procedimiento Nota Quitar el teclado de su pantalla posterior tener ce...

Страница 18: ...be Para resetear el teclado 1 Quitar las baterias 2 Mover el pin J1 color negro en la posici n Off como indicado en la imagen 3 Poner otra vez las baterias Los botones 0 9 deberian parpadear 4 Poner e...

Отзывы: