background image

31

Part

Description

Qty

Part

Description

Qty

101

Computer

1

503 Transportation Wheel

2

102

Console Housing - Upper

1

504 Fold Holder 

1

103

Console Housing - Bottom

1

505 Fold Holder Wheel

1

104

Water Bottle Holder

2

506 10mm Foot Cushion

4

105

Safety Key Base

1

507 Upright Cover - LL

1

106

Safety Key

1

508 Upright Cover - LR

1

509 Upright Cover - RL

1

201

Handle Bar

1

510 Upright Cover - RR

1

202

Upright - Left

1

203

Upright - Right 

1

601 Running Belt

1

204

Hand Pulse Sensor

2

602 Side Rail

2

205

Power Switch Plate

1

603 End Cap - Left

1

206

Power Switch

1

604 End Cap - Right

1

207

Power Breaker

1

605 Running Deck

1

208

Electric Outlet

1

606 Cushion Pad

8

209

Hand Pulse Sensor Cover - Upper

2

210

Hand Pulse Sensor Cover - Bottom

2

701 ø4x15mm Screw

40

211

Power Switch Plate Base

1

702 Rail  Guide

8

212

5 Pin Wire 2500mm

1

703 M8x10mm Bolt

2

213

2 Pin Wire 1900mm

1

704 M8x18mm Bolt

2

214

Handle Bar Cover - Left 1

1

705 M8x42mm Bolt

4

215

Handle Bar Cover - Left 2

1

706 ø4x19mm Screw

2

216

Handle Bar Cover - Right 1

1

707 M8x39mm Bolt

2

217

Handle Bar Cover - Right 2

1

708 M12x85mm Bolt

2

216

Handle Bar Cover - Right 1

1

709 M4x12mm Screw

3

217

Handle Bar Cover - Right 2

1

710 M10x59mm Bolt

2

711 M6x45mm Bolt

3

301

Main Frame

1

712 ø4x19mm Screw

16

302

Front Roller

1

713 M8x25mm Bolt

8

303

Front Roller Shaft

1

714 M5x14mm Bolt

4

304

Rear Roller

1

715 M8x47mm Bolt

1

305

Rear Roller Shaft

1

716 Motor Bolt

1

306

Control Board

1

717 Motor Cushion

1

307

Rear Foot Frame

1

718 Washer

2

308

Rear Foot Frame End Cap

4

719 M10x116mm Bolt

1

309

ø22 x ø10 End Cap

2

720 M8x12mm Bolt

2

721 ø8 Washer

13

401

Motor

1

722 ø10 Washer

3

402

Motor Holder

1

723 M10 Nut

3

403

Belt

1

724 M8 Nut

4

404

Motor Hood - Upper

1

725 M8x35mm Bolt

1

405

Motor Hood - Bottom

4

726 M8x50mm Bolt

1

727 ø3.5x15mm Screw

9

501

Base Frame

1

728 M8x45mm Bolt

2

502

Transportation Wheel Cover

2

Exploded Diagram Parts List

Содержание EV7000

Страница 1: ...important information which will help you get the best from your equipment and ensure safe and correct assembly use and maintenance If you need help or have damaged or missing parts call the Customer...

Страница 2: ...19 Belt adjustment 18 Cleaning 19 Deck lubrication 19 Exercising Information 20 23 Before starting to exercise 20 Muscle chart 21 Warming up and cooling down exercises 22 Exploded Parts Diagram 24 30...

Страница 3: ...persons should not use the equipment without a quali ed person or doctor in attendance This product is suitable for user s weight of 100kgs This product conforms to BS EN957 PARTS 1 6 class H Home Use...

Страница 4: ...Handle Bar Cover Right 2 x 1 216 Handle Bar Cover Right 1 x 1 103 Water Bottle Holder x 2 Components Parts Note Some of the smaller components may be pre tted to larger components Please check carefu...

Страница 5: ...1 F Safety Key x 1 G Deck Lube x 1 Components Fixings Note Some of the xings are pre tted to the larger components Please check carefully before contacting Argos regarding any missing xings Please che...

Страница 6: ...6...

Страница 7: ...ve treadmill from carton and place it on the floor in an open area Step 1 b Attach the Upright Left 202 and Upright Right 203 to the Base Frame and secure in place using one M8 Bolt 705 and two 8 Wash...

Страница 8: ...8 Assembly Instructions Rotate the console upwards until it stops as shown in the drawing Fix to handlebar using 2 x Bolts 728 Step 2...

Страница 9: ...9 Assembly Instructions Step 3 Attach the Upright Cover 507 508 509 510 onto the bottom of upright by 4 x 15mm Bolt 701 as shown in the drawing...

Страница 10: ...10 Assembly Instructions Attach Handlebar Covers 214 215 216 217 to top of uprights using 2 x Screws 701 per cover Step 4...

Страница 11: ...11 Assembly Instructions Insert bottle holders 103 into the computer housing Step 5...

Страница 12: ...ON OFF SWITCH 12 Assembly Instructions Connecting to mains Step 6...

Страница 13: ...ION 1 Press to increase decrease exercise speed by 0 1km ml 2 Hold the button to increase decrease rapid speed by 0 5km ml per second and release the button to stop the function 3 Press to select prog...

Страница 14: ...end of program TIME Accumulates and displays workout time from start of exercise CALORIES Accumulates and displays calories consume during workout time SPEED Displays current speed PROGRAM 3 DISTANCE...

Страница 15: ...linking TIME Accumulates and displays workout time from start of exercise DISTANCE Accumulates and displays workout distance from start of exercise PULSE Detect and displays current heart rate CALORIE...

Страница 16: ...gned with two level incline adjustment To adjust the incline simply lift up the rear of the treadmill then rotate the elevation stabiliser to the desired level Incline Adjustment Position for maximum...

Страница 17: ...old up the treadmill Your treadmill can be folded up for space saving storage To do this follow the instructions here How to unfold the treadmill To unfold the treadmill for use follow the instruction...

Страница 18: ...t the above procedure until the walking belt is centered It may be necessary to set walking belt tension once you have completed this procedure if the belt feels like it is slipping while walking Refe...

Страница 19: ...is recommended that it is checked periodically for lubrication to ensure optimal treadmill performance Your treadmill should not have to be lubricated usually within the first 400 hours of use Every...

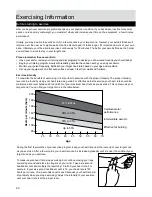
Страница 20: ...exercising it is important to exercise with the proper intensity The proper intensity level can be found by using your heart rate as a guide For effective aerobic exercise your heart rate should be m...

Страница 21: ...ing is an essential part of the exercise routine process Weight training helps tone build and strengthen muscle If you are working above your target zone you may want to do a lesser amount of reps As...

Страница 22: ...ree workouts each week with at least one day of rest between workouts After a few months of regular exercise you may complete up to ve workouts each week if desired Remember the key to success is make...

Страница 23: ...your back leg as well Stretches Calves achilles tendons and ankles With one hand against the wall for balance reach back and grasp one foot with your other hand Keeping your bent knee pointing direct...

Страница 24: ...24 Exploded Parts Diagram Console...

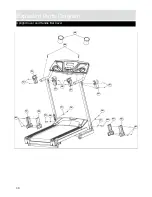
Страница 25: ...25 Exploded Parts Diagram Upright Frame and Handle Bar...

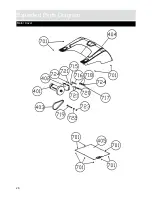
Страница 26: ...26 Exploded Parts Diagram Motor Cover...

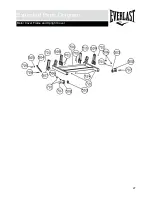
Страница 27: ...27 Exploded Parts Diagram Motor Cover Frame and Upright Cover...

Страница 28: ...28 Exploded Parts Diagram Walking Belt...

Страница 29: ...29 Exploded Parts Diagram Main Frame...

Страница 30: ...30 Exploded Parts Diagram Upright Cover and Handle Bar Cover...

Страница 31: ...3 2 Pin Wire 1900mm 1 704 M8x18mm Bolt 2 214 Handle Bar Cover Left 1 1 705 M8x42mm Bolt 4 215 Handle Bar Cover Left 2 1 706 4x19mm Screw 2 216 Handle Bar Cover Right 1 1 707 M8x39mm Bolt 2 217 Handle...

Страница 32: ...AN AUTHORISED LICENCEE OF EVERLAST WORLD WIDE INC FCSI LTD CUSTOMER HELPLINE 0845 6000 464...

Отзывы: