background image

8

ASSEMBLY INSTRUCTIONS

For queries or additional product information, please call our Service Centre on: 

087 997 0865

Please have your model name on hand.

www.everlastsa.co.za

 Everlast/SA    

 everlast_sa

16

15

3

6

5

6
5

3

4

IMPORTANT - ASSEMBLE WITH ALL NUTS AND BOLTS LOOSE AT FIRST, ONLY TIGHTEN AFTER 

COMPLETING ALL ASSEMBLY STEPS. UNPACK THE BOX AND PLACE ALL PARTS ON THE FLOOR.

CAREFULLY REMOVE ALL PACKING MATERIAL AND CHECK EACH PART AGAINST THE MANUAL FIRST.

REMEMBER SOME PARTS ARE PRE-ASSEMBLED TO LARGER COMPONENTS.

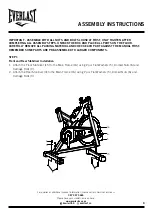
STEP 1
Front and Rear Stabiliser Installation

1.  Attach the Front Stabiliser (15) to the Main Frame (16) using 2 pcs Flat Washers (5), Domed Nuts (6) and  

Carriage Bolts (3).

2.  Attach the Rear Stabiliser (4) to the Main Frame (16) using 2 pcs Flat Washers (5), Domed Nuts (6) and 

Carriage Bolts (3).

Содержание EPIC SPINNER

Страница 1: ...you get the best from your equipment and ensure safe and correct assembly use and maintenance If you need help or have damaged or missing parts call the service centre on 087 997 0865 Please keep this manual for future reference MODEL NO EPIC SPINNER RONS CODE 12867 www everlastsa co za Everlast SA everlast_sa EPIC SPINNER USER MANUAL ...

Страница 2: ......

Страница 3: ......

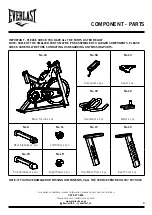
Страница 4: ... SMALLER PARTS MAY BE PRE ASSEMBLED TO LARGER COMPONENTS PLEASE CHECK CAREFULLY BEFORE CONTACTING US REGARDING ANY MISSING PARTS No 16 Main Frame x 1pc No 56 Computer x 1pc No 13 Seat x 1pc No 18 Handlebar x 1pc No 12 Slider x 1pc No 4 Rear Stabiliser x 1pc No 1L Left Pedal x 1pc No 17 Handlebar Post x 1pc No 10 Seat Post x 1pc No 15 Front Stabiliser x 1pc No 1R Right Pedal x 1pc NOTE IF YOU HAVE ...

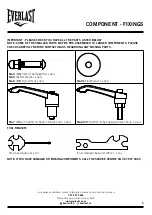
Страница 5: ...PARTS MAY BE PRE ASSEMBLED TO LARGER COMPONENTS PLEASE CHECK CAREFULLY BEFORE CONTACTING US REGARDING ANY MISSING PARTS No 3 M8 52mm Carriage Bolt x 4pcs No 5 8 Flat Washer x 4pcs No 6 M8 Domed Nut x 4pcs No 21 Flat Washer 1x 2pcs No 7 M16 1 5 20mm Short L Elastic Latch x 2pcs No 22 M10 25mm Spring Adjustment Knob x 2pcs TOOL REQUEST Crosshead Spanner x 1pc Inner Hexagon Spanner 5 x 1 x 1pc NOTE I...

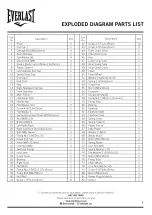
Страница 6: ...lastsa co za Everlast SA everlast_sa 56 55 18 13 12 79 21 22 20 24 26 10 11 25 7 2 2 42 42 42 50 42 42 41 49 4 47 48 46 35 3 39 38 31 36 51 28 29 45 41 44 43 27 1R 19 6 5 6 5 8 73 73 79 21 30 33 38 19 40 58 59 60 62 77 78 60 58 76 61 63 3 15 9 14 6 5 39 34 23 35 7 16 82 32 68 37 52 53 52 52 57 64 65 66 67 69 70 74 71 72 73 75 54 29 28 1L 22 17 8 80 42 81 42 42 ...

Страница 7: ......

Страница 8: ...R COMPLETING ALL ASSEMBLY STEPS UNPACK THE BOX AND PLACE ALL PARTS ON THE FLOOR CAREFULLY REMOVE ALL PACKING MATERIAL AND CHECK EACH PART AGAINST THE MANUAL FIRST REMEMBER SOME PARTS ARE PRE ASSEMBLED TO LARGER COMPONENTS STEP 1 Front and Rear Stabiliser Installation 1 Attach the Front Stabiliser 15 to the Main Frame 16 using 2 pcs Flat Washers 5 Domed Nuts 6 and Carriage Bolts 3 2 Attach the Rear...

Страница 9: ...tallation 1 Slide the Handlebar Post 17 into the handlebar post housing on the Main Frame 16 Slacken the knurled section of the L Shape Knob 7 and pull the knob back select the desired height Release the knob and retighten the knurled portion 2 Fix the Handlebar 18 using Flat Washer 21 and L Shape Knob 22 ATTENTION SECURE THE HANDLEBAR TIGHTLY 3 Fix the Computer 56 onto the support tube of the Han...

Страница 10: ... Seat Installation 1 Slide the Vertical Seat Post 10 into the seat post housing on the Main Frame 16 2 Slide the Seat Post 12 into the Vertical Seat Post 10 secure using flat washer 21 and knob 22 Slacken the knurled section of the Knob 7 pull the knob back and select the desired height Release the knob and retighten the knurled portion 3 Fix the Seat 13 to the Seat Post 12 tighten the bolts aroun...

Страница 11: ...w everlastsa co za Everlast SA everlast_sa 1L 1R 16 STEP 4 Right and Left Foot Pedals Installation 1 Pedals 1L and 1R are marked L and R Left and Right 2 Connect them to their appropriate crank arms The right crank arm is on the right hand side of the cycle when sitting on it NOTE Right pedal should be threaded on clockwise and the Left pedal anticlockwise ...

Страница 12: ...and increase resistance requiring more strength to pedal turn the Emergency Brake Tension Control Knob 30 to the right To decrease tension and decrease resistance requiring less strength to pedal turn the Emergency Brake Tension Control Knob 30 the left The same knob that allows you to adjust the tension of the bike also doubles as the Emergency Brake Use this safety feature in any situation where...

Страница 13: ... Press SET button to set target calories between 0 to 9990 for count down function PULSE Displays user s pulse User may set the target pulse When pulse value reaches target the computer will alarm with beeping sound OPERATION PROCEDURE 1 Install 1 x CR2032 3V battery Screen will display Drawing A and user will hear a beeping sound Computer will move to next step the main menu as Drawing B 2 When i...

Страница 14: ... C 5 Press MODE button to select function display except RPM SPEED functions The RPM SPEED function will switch display NOTE 1 After 4 minutes of inactivity the computer will enter Sleep mode Press any button to restart computer the original value will retain If changing batteries the original value will be removed 2 If the computer displays abnormally please re install battery and try again 3 Bat...

Страница 15: ...A everlast_sa Battery installation instruction 1 Remove the cover from the under side of the computer consol 2 Install a new CR2032 battery by tilting the battery slightly to its side and sliding it in positive at upper side and negative at down side 3 To change the battery hold the clip down on the side and the battery will pop up 4 Place the battery cover back Positive Negative ...

Страница 16: ... different exercises Select exercises for every major muscle group emphasising the areas that you want to develop most To give balance and variety to your workouts vary the exercises from session to session EXERCISE INTENSITY To maximise the benefits of exercising it is important to exercise with the proper intensity The proper intensity level can be found by using your heart rate as a guide For e...

Страница 17: ...he exertion stage of each repetition and inhale during the return stroke Never hold your breath Rest for a short period of time after each set The ideal resting periods are Rest for three minutes after each set for a muscle building workout Rest for one minute after each set for a toning workout Rest for 30 seconds after each set for a weight loss workout Plan to spend the first couple of weeks fa...

Страница 18: ... Do NOT attempt to repair the equipment yourself should you have any difficulty with assembly operation or use of the equipment contact the service centre 087 997 0865 Inspect and tighten all parts before using the equipment and replace any defective parts immediately Do NOT use the equipment again until it is in perfect working condition Periodically lubricate any moving parts with light oil to p...

Страница 19: ...made will be to repair treadmills This limited warranty is void if a product has removed damaged or tampered labels and or any alterations including the unauthorised removal of any component or external cover Only consumers purchasing this product from an authorised retailer or Everlast SA may obtain coverage under this limited warranty TERMS This warranty will only be granted on the presentation ...

Страница 20: ... Refer to Service Warranty section in this manual The only call outs that will be made will be to repair treadmills Any items that need to be repaired that are not covered in this warranty will be for the consumers expense A quote for the repair replacement of these items will be provided OUT OF WARRANTY Any items that need to be repaired once the warranty has expired will be for the consumer s ex...

Отзывы: