background image

                                            EMV401/801/1601


3.


Basic Connection 

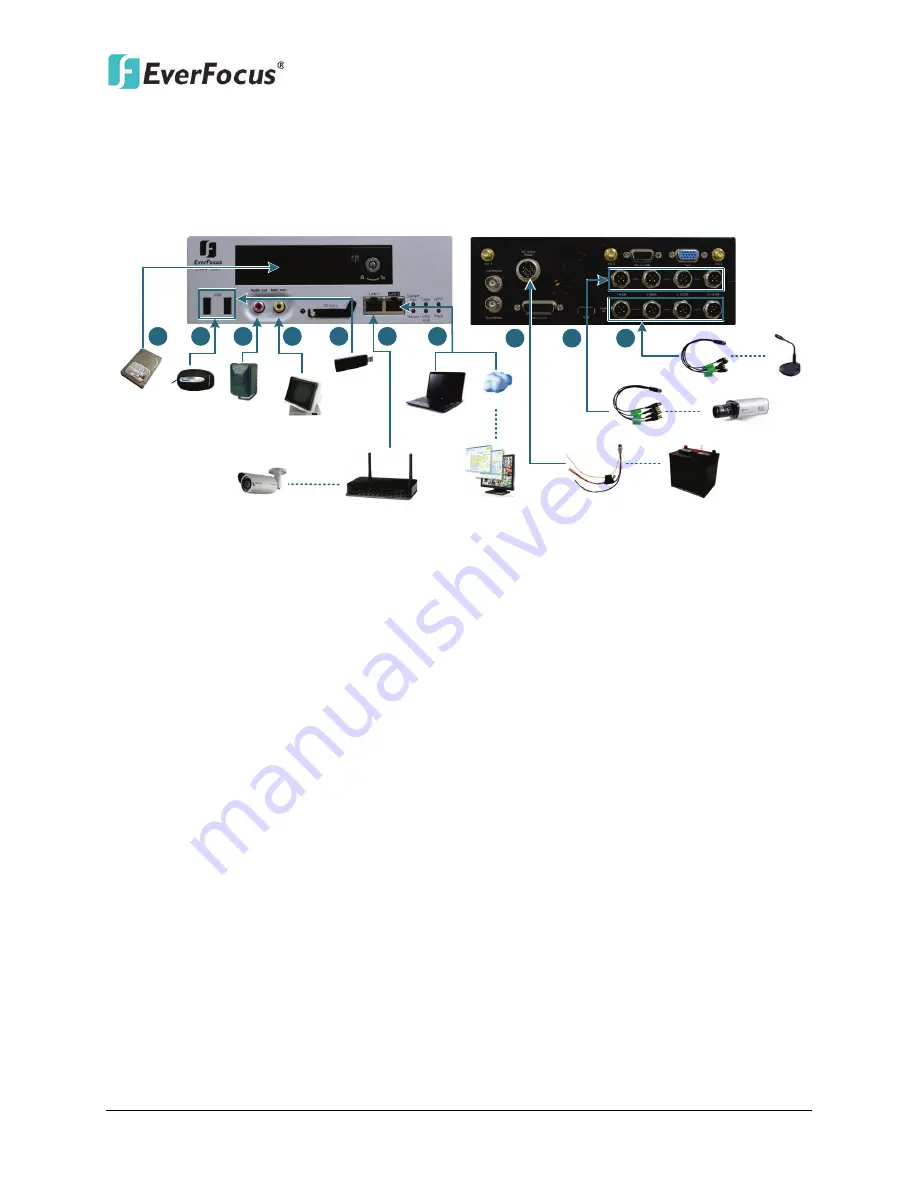
After installing the EMV401 / 801 / 1601 in the vehicle, you can start connecting the hybrid 
mobile DVR to the external devices. The instructions below describe the basic connection to the 
EMV401 / 801 / 1601. For details on cable connections, please refer to the following sections. 

Front View

Rear View

Mouse

Speaker

Main Monitor

Notebook / PC

Power Supply

Analog Camera 

Audio Input 

2.5"or 

3.5" HDD

WAN

CMS (Client PC)

1

2

3

4

7

8

9

5

3G USB 

Dongle

5

6

(PoE) Hub / Switch

IP Cameras

Audio Cable

Video Cable

Power Harness Cable


1.


To record videos, insert a 2.5” or 3.5” HDD to the HDD tray. Remember to lock the HDD Key 
Lock after inserting the HDD or the recording will not start (see 

2.2 Hard Disk Installation

). 

2.


To control the system, connect a mouse to the hybrid mobile DVR or use the supplied IR 
Remote Control.   

3.


To listen to audio of video source, connect a speaker to the Audio-out RCA socket. Note 
that the speaker with a (built-in) amplifier and external power is required. 

4.


To view videos, connect a monitor to the RCA port using the RCA cable supplied by the 
monitor manufacturer. You can also connect other video out ports, please refer to 

2.5 

Monitor Connection 

of the User’s Manual. 

5.


To manage the hybrid mobile DVR over network: 
a. Use a standard RJ-45 cable to connect the hybrid mobile DVR to the network. 
b. Connect a 3G USB dongle to the USB port on the hybrid mobile DVR. For details on 3G 

wireless network settings, please refer to 

6.6.3 Mobile 

of the User’s Manual. 

6.


You can optionally connect a (PoE) switch / hub to the LAN1 port of the hybrid mobile DVR 
using a standard RJ-45 Ethernet cable for connecting the IP cameras.   

7.


Connect the supplied Power Harness Cable to the power supply in the vehicle for powering 
the hybrid mobile DVR and the connected cameras. For details on vehicle connection, 
please refer to 

2.3 Vehicle Connection

 of the User’s Manual. 

8.


Connect the cameras to the hybrid mobile DVR using the supplied Video Cable. 

9.


Connect the audio input devices to t

he hybrid mobile DVR u

sing the supplied Audio Cable


Содержание EMV1601

Страница 1: ...1601 Hybrid Mobile DVR 4 8 16CH H 264 Real Time at D1 WD1 1080P Quick Installation Guide Copyright EverFocus Electronics Corp Release Date October 2014 Notice This content is subject to be changed wi...

Страница 2: ...485 RS 232 Panic Button CAN bus GPS 3G 4G and Wi Fi Antenna The design of RCA video audio outputs at front panel makes your installation easy The User Interface has been specially designed to fit mob...

Страница 3: ...rk function 4G Receiver For using 4G LTE network function GPS Receiver For using GPS function Wi Fi Antenna For using Wi Fi function Note 1 Equipment configurations and supplied accessories vary by co...

Страница 4: ...nfrared remote control 5 SD Card TBD Insert a SD card for data storage It is currently reserved 6 HDD Drive Tray Installs a 3 5 or 2 5 HDD for recording 7 HDD Key Lock Locks and unlocks the HDD tray 8...

Страница 5: ...Fi function 7 Main Monitor BNC BNC video output for connecting to the main monitor for live view playback and displaying OSD Note this mobile DVR has 3 Main Monitor outputs one on the front panel and...

Страница 6: ...he rain Where passengers can interfere with the hybrid mobile DVR Next to a heater duct The following table lists the recommended location options in the vehicle Location Convenient Operation Easy to...

Страница 7: ...nstall the L type brackets to the hybrid mobile DVR for mounting 1 Attach the supplied two L Type Brackets to the Fixing Bracket on the hybrid mobile DVR Use the supplied four short screws with washer...

Страница 8: ...e EMV401 801 1601 does not support hot swap for the hard disk Ensure to power off the hybrid mobile DVR before removing the hard disk Also ensure to remove the hard disk only after the power was compl...

Страница 9: ...h to fasten it to the HDD tray 5 Lock the HDD tray using the supplied key Locked Unlocked 6 To remove the HDD tray slightly push the Lock Clip to loosen the Latch of the HDD tray Lock Clip Latch 7 Pul...

Страница 10: ...he speaker with a built in amplifier and external power is required 4 To view videos connect a monitor to the RCA port using the RCA cable supplied by the monitor manufacturer You can also connect oth...

Страница 11: ...same LAN of your computer 1 Save IP Utility Setup AutoRun exe in your computer Double click the exe file and follow the on screen instructions Check Run IPUtility exe and click the Finish button the I...

Страница 12: ...eral hybrid mobile DVRs at once c Right click the column to configure the setting Click Apply Changes button to apply and save the settings Note Most networks uses DHCP to assign IP address if you are...

Страница 13: ...l off if you still can t see the Remote Live View 7 On the computer click Start Control Panel System and Security Action Center click Change User Account Control Settings the User Account Control Sett...

Страница 14: ...date to go to the JAVA website http www java com en and download the latest version of the JAVA software 3 Please go to the Control Panel JAVA Control Panel to change settings 4 If you can t find the...

Страница 15: ...rtificate Status Protocol OCSP Also check Place JAVA icon in system tray in Miscellaneous option 7 Scroll to Default JAVA for Browser and check Mozilla family 8 Connect the NVR s IP address again and...

Страница 16: ...security settings may be too high If so go to Section 6 2 Enabling ActiveX Controls 1 You may also prompt to install the MSXML file Please right click the yellow bar and select Run Add on 2 Install th...

Страница 17: ...ou DO NOT see the image in step 1 of the 6 1 Installing ActiveX Controls popping up when you first connect to the NVR 1 At the top of the Internet Explorer Window click on Tools and then select Intern...

Страница 18: ...X controls Binary and script behaviors Display video and animation on a webpage that does not use external media player IE7 only Run ActiveX controls and plug ins Script ActiveX controls marked safe f...

Страница 19: ...oad the page 7 You may need to run the EverFocusViewer application when prompted to do so 8 The login page will show up Type in the user name and password and click Login to view the cameras The defau...

Страница 20: ...p info everfocus co jp EverFocus India UBS 629 1243 1st Floor G Block Behind Teacher s Colony Bandra Kurla Complex Bandra E Mumbai 400 051 India TEL 91 22 6726 4500 FAX 91 22 6726 4518 www everfocus i...

Отзывы: