background image


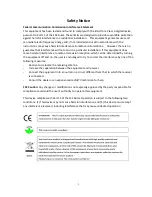
Precautions 

1.


Do not install the camera near electric or magnetic fields.

 Install the camera away from 

TV/radio transmitters, magnets, electric motors, transformers and audio speakers since the 

electromagnetic fields generated from these devices may distort the video image or 

otherwise interfere with camera operation. 

2.


Never disassemble the camera beyond the recommendations in this manual nor introduce 

materials other than those recommended herein. 

Improper disassembly or introduction of 

corrosive materials may result in equipment failure or other damage. 

3.


Try to avoid facing the camera toward the sun

. In some circumstances, direct sunlight may 

cause permanent damage to the sensor and/or internal circuits, as well as creating 

unbalanced illumination beyond the capability of the camera to compensate. 

4.


Keep the power cable away from water and other liquids and never touch the power cord 

with wet hands. 

Touching a wet power cord with your hands or touching the power cord 

with wet hands may result in electric shock.


5.


Never install the camera in areas exposed to oil, gas or solvents. 

Oil, gas or solvents may 

result in equipment failure, electric shock or, in extreme cases, fire.


6.


Cleaning. 

For cameras with interchangeable lenses, do not touch the surface of the sensor 

directly with the hands. Use lens tissue or a cotton tipped applicator and ethanol to clean 

the sensor and the camera lens. Use a damp soft cloth to remove any dirt from the camera 

body. Please do not use complex solvents, corrosive or abrasive agents for cleaning of any 

part of the camera. 

7.


Do not operate the camera beyond the specified temperature, humidity or power source 

ratings.

 This camera is suitable for indoor operation only. Use the camera at temperatures 

within -10°C~50°C (14°F~122°F) and humidity less than 80%; this device is not rated as 

submersible. The input power source is 12VDC. Be sure to connect the  / - polarity 

and voltage, as incorrect polarity or too high a voltage will likely cause the camera to fail, 

and such damage is not covered by the warranty. 

8.


Mounting.

 Use care in selecting a solid mounting surface which will support the weight of 

the camera plus any wind, snow, ice or other loading, and securely attach the camera to the 

mounting surface using screws and anchors which will properly support the camera. If 

necessary (e.g. when mounting to drop ceilings) use a safety wire to provide additional 

support for the camera. 


Содержание EBD930 eZ.HD Series

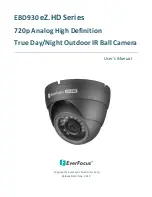
Страница 1: ...EBD930 eZ HD Series 720p Analog High Definition True Day Night Outdoor IR Ball Camera User s Manual Copyright EverFocus Electronics Corp Release Date Nov 2014...

Страница 2: ...ts may result in equipment failure electric shock or in extreme cases fire 6 Cleaning For cameras with interchangeable lenses do not touch the surface of the sensor directly with the hands Use lens ti...

Страница 3: ...evision reception which can be determined by turning the equipment off and on the user is encouraged to try to correct the interference by one of the following measures Reorient or relocate the receiv...

Страница 4: ...4 Contents 1 Introduction 5 1 1 Packing List 5 1 2 Features 5 2 Cable Description 6 3 Installation 7 3 1 Installation and Adjustment 7 4 Configuration in the OSD Menu 11 5 Specifications 15...

Страница 5: ...e The EBD930 supports both NTSC and PAL scanning systems which can be switched via OSD 1 1 Packing List 1 2 Features 720p with high flexibility and performance for astounding image 1 2 8 SONY 1 37M pi...

Страница 6: ...o Name Descriptions 1 Power Cable Connect to a 12VDC power source 2 Dual Video Output 720p and 960H output using a 75 Ohm BNC type coaxial cable 3 DC Power Pigtail Cable Optional power pigtail cable T...

Страница 7: ...For Ceiling Mount Wall Mount users Stick the Template Plate on the position where you want to attach the camera 2 Drill four holes and insert the supplied Plastic Anchors into the holes If you wish t...

Страница 8: ...sing from the camera base 4 Screw the base plate to the wall or ceiling with supplied four Screws and Hexagon Wrench a If you want to wire the cables from the side cut of the camera base attach the ca...

Страница 9: ...supplied DC Power Pigtail Cable or power adapter 6 Connect the camera to an AHD DVR or a portable monitor using the video output cable for viewing the video image while adjusting camera angles To con...

Страница 10: ...ick down button key over 5 seconds to switch video format from PAL to NTSC Push the joystick left button key over 5 seconds to switch video output from 720p to 960H 720p is the default Push the joysti...

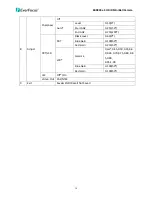
Страница 11: ...X6 X8 X10 X15 X20 X25 X30 Auto PAL 1 25 1 50 FLK 1 200 1 400 1 1000 1 2000 1 5000 1 10000 1 50000 X2 X4 X6 X8 X10 X15 X20 X25 X30 Auto AGC 0 15 15 Sens up Off Auto Sens up X2 X4 X6 X8 X10 X15 X20 X25...

Страница 12: ...a Position Size IR PWM Off 0 100 100 6 NR 2DNR Middle Low Off High 3DNR Middle Low Off High 7 Special Cam Title Off On 0123456789ABCDEFGHIJKLMNOPQRSTUVWXYZ _ D effect Freeze Off On Mirror Off Mirror V...

Страница 13: ...Default Language ENG CHN1 CHN2 GER FRA ITA SPA POL RUS POR NED TUR Defect Live DPC Off On AGC level 0 255 65 Level 0 100 100 White DPC Off On Pos Size Position Size Start Close the iris then press DP...

Страница 14: ...art AGC 0 255 50 End AGC 0 255 200 CRT LCD CRT Black Level 0 60 0 Blue Gain 0 100 50 Red Gain 0 255 50 LCD Gamma User 0 45 0 50 0 55 0 6 0 0 65 0 70 0 75 0 80 0 8 5 0 90 0 95 1 00 Blue Gain 0 100 50 R...

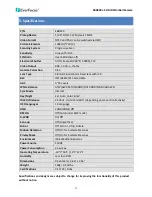
Страница 15: ...6mm 6mm Fixed lens with ICR BLC OFF HSBLC BLC Selectable AGC 0 15 Levels White Balance ATW AWC SET INDOOR OUTDOOR MANUAL AWB Sync Mode Internal Day Night Ext Auto Color B W IR LED Distance 24 Units U...

Страница 16: ...25 8189 www everfocus co jp info everfocus co jp EverFocus China Shanghai Room 403 Ruijin Business Center No 96 Zhaojiabang Road Luwan district Shanghai 200020 China TEL 86 21 6471 2229 6471 2291 FAX...

Отзывы: