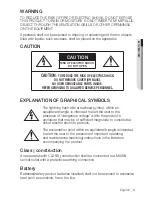
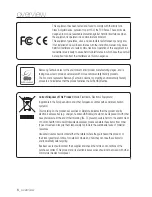
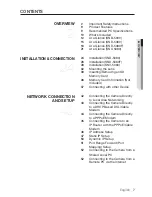
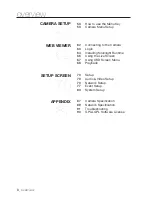
background image

Network Camera

SNB-5000/SND-5080/SND-5080F/SNV-5080

User Manual

Before installing and operating this product, please read this manual thoroughly.

English

Содержание SND-5080

Страница 1: ...Network Camera SNB 5000 SND 5080 SND 5080F SNV 5080 User Manual Before installing and operating this product please read this manual thoroughly English...

Страница 2: ...sult an electrician for replacement of the obsolete outlet Protect the power cord from being walked on or pinched particularly at plugs conve nience receptacles and the point where they exit from the...

Страница 3: ...ONNEL EXPLANATION OF GRAPHICAL SYMBOLS The lightning flash with arrowhead symbol within an equilateral triangle is intended to alert the user to the presence of dangerous voltage within the product s...

Страница 4: ...employed CAUTION These servicing instructions are for use by qualified service personnel only To reduce the risk of electric shock do not perform any servicing other than that contained in the operat...

Страница 5: ...human caused by not following the instruction Please read this manual for the safety before using of goods and keep it in the safe place y y Do not Place this apparatus on an uneven surface Do not in...

Страница 6: ...omote the sustainable reuse of material resources Household users should contact either the retailer where they purchased this product or their local government office for details of where and how the...

Страница 7: ...ng an SD Memory Card 36 Memory Card Information Not Included 37 Connecting with other Device NETWORK CONNECTION AND SETUP 42 42 Connecting the Camera Directly to Local Area Networking 43 Connecting th...

Страница 8: ...he Live Screen 67 Using OSD Screen Menu 68 Playback SETUP SCREEN 70 70 Setup 70 Audio Video Setup 73 Network Setup 77 Event Setup 83 System Setup APPENDIX 87 87 Camera Speci cation 89 Network Speci ca...

Страница 9: ...image in a local network environment Alarm If an event occurs the event related video will be transferred to the FTP email speci ed by the user or saved to the SD memory or the event signal will be se...

Страница 10: ...80 User Manual 1 Power Adapter 1 Used for connecting to the power source Jack Modular 1 LAN cable gender SND 5080 5080F SNV 5080 Cable for the testing monitor 1 Used to test the camera connection to a...

Страница 11: ...4 Used for installation on the wall or ceiling SNV 5080 L Wrench 1 Used to remove fix the dome cover Plastic Anchor 4 For fixing a screw Inserted in a hole reinforced anchoring force Tapping Screw SN...

Страница 12: ...by fixing the camera holder mount adaptor with the bracket Auto Iris Lens Optional Installed on the lens adaptor Auto Iris Lens Connector Used to supply power and output signal to control the iris of...

Страница 13: ...space or inserted abnormally OFF Camera is off camera is restarting or memory card is not in place SYSTEM ON The camera is turned on and connected to the network properly Blinking During DDNS setup o...

Страница 14: ...et mask gateway address etc using the IP Installer software application Power Port Used to plug the power cable GND Used for earth grounding Network Port Used to connect a PoE or LAN cable I O Port AL...

Страница 15: ...ction Main unit Main unit includes the lens switch board PCB boards and screws Power Port Used to plug the power cable Video Out Port Video signal output port connected to the monitor Network Port Use...

Страница 16: ...gnal is connected GND Used for earth grounding SD Memory Card Compartment Compartment for the SD memory card Reset Button Resets the camera settings to the default Press and hold it for about 5 second...

Страница 17: ...ard Compartment Compartment for the SD memory card 6 Monitor Out Using the test monitor cable you can connect to a mobile display for camera test 7 Wiring Cover If you drill a hole in the wiring cover...

Страница 18: ...tion Main unit Main unit includes the lens switch board PCB boards and screws Power Port Used to plug the power cable Video Out Port Video signal output port connected to the monitor Network Port Used...

Страница 19: ...gnal is connected GND Used for earth grounding SD Memory Card Compartment Compartment for the SD memory card Reset Button Resets the camera settings to the default Press and hold it for about 5 second...

Страница 20: ...both ends you can separate the inner cover ZOOM lever Turn the barrel left or right to adjust the zoom and turn the knob clockwise to lock the zoom Focus lever Turn the barrel left or right to adjust...

Страница 21: ...ction Main unit Main unit includes the lens switch board PCB boards and screws Power Port Used to plug the power cable Video Out Port Video signal output port connected to the monitor Network Port Use...

Страница 22: ...gnal is connected GND Used for earth grounding SD Memory Card Compartment Compartment for the SD memory card Reset Button Resets the camera settings to the default Press and hold it for about 5 second...

Страница 23: ...both ends you can separate the inner cover ZOOM lever Turn the barrel left or right to adjust the zoom and turn the knob clockwise to lock the zoom Focus lever Turn the barrel left or right to adjust...

Страница 24: ...ast 5 times of the camera weight Stuck in or peeled off cables can cause damage to the product or a fire For safety purposes keep anyone else away from the installation site And put aside personal bel...

Страница 25: ...t proof plate to it and arrange the cables through the plate If you intend to arrange the cables without drilling a hole use the empty area opposite to the CAMERA FRONT label side for the wiring purpo...

Страница 26: ...cover To x the camera position hold down both hooks of the inner cover while lifting it up Ceiling Mount Use the provided template to drill one hole for the camera and one for the screw 5 mm in diamet...

Страница 27: ...add an alarm cable For this rst you should remove the dome cover from the housing Pull out the protruding rubber bar as shown This will reveal a hole in the place of the rubber bar through which you...

Страница 28: ...bling To connect the alarm in out the dome cover and lens cover are to be separated Using the L wrench provided loosen 3 screws by turning them counterclockwise and separate the dome cover Lift up the...

Страница 29: ...PTOR SCX 300WM HANGING MOUNT SCX 300HM This adaptor is used when installing the dome camera onto a wall CEILING MOUNT ADAPTOR SCX 300CM HANGING MOUNT SCX 300HM This adaptor is used when installing the...

Страница 30: ...the corner of wall joint Installing on the ceiling directly Using the L wrench provided loosen 3 screws by turning them counterclockwise and separate the dome cover Loosen 3 screws by turning them cou...

Страница 31: ...Cover For waterproof purpose x and secure the bolt using L wrench provided For the wall mounting installation and how to connect the alarm cables refer to the installation instructions of SND 5080F p...

Страница 32: ...re not included in the product package You must use the mega lens only for this purpose Mounting the CS lens Turn the optional CS lens clockwise to insert it Mounting the C lens Turn the C mount adapt...

Страница 33: ...of the camera Focusing Turn the lens left or right to control the zoom and focus the lens so that you can view a clear sharp object INSERTING REMOVING AN SD MEMORY CARD Inserting an SD Memory Card Pu...

Страница 34: ...e SD memory card while it s upside down by force Otherwise it may damage the SD memory card Removing an SD Memory Card Gently press down on the exposed end of the memory card as shown in the diagram t...

Страница 35: ...e the SD memory card set Record to OFF from SD Record and press Apply page 78 If you saved data in the SD memory card removing the SD memory card will cause damage to the data stored in the card If th...

Страница 36: ...from the following manufacturers SDHC SD Memory Card Sandisk Transcend Kingston Your camera supports 2GMB to 32GB of memory card capacity Playback performance can be affected depending on the speed of...

Страница 37: ...TION CONNECTING WITH OTHER DEVICE SD CARD AUDIO OUT VIDEO 1 2 3 4 5 SD SYSTEM POWER RESET NETWORK ACT LINK GND 1 ALARM IN 4 2 ALARM OUT 5 GND 3 ALARM COM AC 24V DC 12V AUDIO IN Monitor Network Power M...

Страница 38: ...n be activated page 72 Connect the monitor test cable to the output port of the monitor Ethernet Connection Connect the Ethernet cable to the local network or to the Internet Power Supply Use the scre...

Страница 39: ...English _39 M INSTALLATION CONNECTION Connecting to Audio Input Output www samsungcctv com SNB 5000 Speaker Amp Microphone PC Amp Network Speaker Microphone Microphone Amp Amp Microphone...

Страница 40: ...ort of the ampli er that the microphone is connected to Connect the AUDIO OUT port of the camera with the LINE IN port of the speaker Check the speci cations for audio input Audio Codec G 711 PCM law...

Страница 41: ...ect the alarm output signal ALARM COM Common port where the alarm output signal is connected GND Used for earth grounding y y y y 5 4 3 2 1 1 ALARM IN 4 2 ALARM OUT 5 GND 3 ALARM COM SND 5080 SND 5080...

Страница 42: ...a in the address bar of the browser A remote PC in an external Internet out of the LAN network may not be able to connect to the camera installed in the intranet if the port forwarding is not properly...

Страница 43: ...ect to the camera Move to Setup page Move to Network DDNS and con gure the DDNS settings Move to Network Interface and set the network type to DHCP Connect the camera which was removed from your PC di...

Страница 44: ...onnect to the camera Move to Setup page Move to Network DDNS and con gure the DDNS settings Move to Network Interface and set the network type to PPPoE Connect the camera which was removed from your P...

Страница 45: ...w the instructions below if you select Use the following IP address ex1 If the address LAN IP of the IP router is 192 168 1 1 IP address 192 168 1 100 Subnet Mask 255 255 255 0 Default Gateway 192 168...

Страница 46: ...namic for the current network connection status MAC Ethernet Address Ethernet address for the connected camera Click the column to sort the list by Ethernet address However search will be stopped if c...

Страница 47: ...ork settings for you Manual Set You should configure the network settings manually Exit Exits the IP Installer program STATIC IP SETUP Manual Network Setup Run IP Installer exe to display the camera s...

Страница 48: ...e camera The settings may differ depending on the connected IP router model For more information refer to the user manual of the applicable router If not using an IP router For setting IP Address Subn...

Страница 49: ...1 201 10000 Auto Network Setup Run IP Installer exe to display the camera search list At the initial startup both Auto Set and Manual Set will be grayed out For cameras found with the IPv6 setting the...

Страница 50: ...by the DHCP server If connecting the camera directly to modem using the DHCP protocols If IPs are assigned by the internal DHCP server via the LAN Checking the dynamic IP From a local PC run IP Instal...

Страница 51: ...pplications Gaming Port Range Forward For setting the port range forward for a third party IP router refer to the user guide of that IP router Select TCP and UDP Port for each connected camera to the...

Страница 52: ...d camera in the address bar of the Internet browser CONNECTING TO THE CAMERA FROM A REMOTE PC VIA THE INTERNET As a remote PC can not directly access IP Installer you should access the camera in the I...

Страница 53: ...the selected item This arrow appears next to a menu that contains sub items If IV analysis function is enabled camera s OSD menu operation can be set as an event CAMERA MENU SETUP You can change the c...

Страница 54: ...rs of the camera video to be optimized to the current lighting condition and screen mode You may need readjustment if the lighting condition is changed Put the focus of the camera to a white paper and...

Страница 55: ...LIGHT Select BLC Set the BLC LEVEL You can change the level to adjust the brightness of the monitoring area Set the TOP BOTTOM LEFT RIGHT levels to specify the target area When completed select RETURN...

Страница 56: ...evel so as to remove the incoming highlight from a speci c condition MASK TONE Adjust the mask tone of the highlighted area When completed select RETURN to return to the previous screen At night opera...

Страница 57: ...HUTTER Adjust the electronic shutter of the camera MANUAL Adjust the shutter speed of the camera manually A FLK This will prevent the screen from ickering AGC Specify how to adjust the level according...

Страница 58: ...screen is but the afterimage of a moving object grows accordingly AUTO Set the work condition to Auto mode in a low contrast scene When completed select RETURN to return to the previous screen Screen...

Страница 59: ...CLR When completed select RETURN to return to the previous screen OSD Color You can set the OSD color on the screen to your preference ENTER ENTER Select SPECIAL Move to OSD COLOR and select a desire...

Страница 60: ...from EXPOSURE the AUTO DAY NIGHT mode will be disabled accordingly DWELL TIME This is the time while each applicable lighting condition is kept in order to enable the switch between day and night mod...

Страница 61: ...NESS Adjust the overall sharp ness of the image The higher the level is the sharper and clearer the outline of the image becomes GAMMA Adjust the contrast of the image COLOR LEVEL Adjust the color lev...

Страница 62: ...http 2001 230 abcd ffff 0000 0000 ffff 1111 If the HTTP port is other than 80 Launch the Internet browser Type the IP address and HTTP port number of the camera in the address bar ex IP address 192 16...

Страница 63: ...password for the DDNS server LOGIN The default user ID is admin and the default password is 4321 Enter admin in the User Name input box Enter 4321 in the Password input box If the password is changed...

Страница 64: ...e or has just installed an old runtime version you will be redirected to the Silverlight Runtime installation page automatically when accessing the web viewer Click Click Here When the le download dia...

Страница 65: ...browser and try to access the Web Viewer When Siverlight Runtime is properly installed you will see the Live screen For normal installation set the Block Popup setting as follows Internet Explorer l...

Страница 66: ...ut Activate the Alarm Out port Audio Display the audio Listen and Talk toggle button on the screen Reset Alarm Reset the alarm output settings Camera Menu Used to retrieve and customize the Camera Set...

Страница 67: ...played in the Viewer Click the button to listen to mute the sound as you wish This button operates as a toggle button To toggle the microphone sound Click the Mic button The corresponding button will...

Страница 68: ...play in the search list Click the Play button To stop playing the video click Stop To return to the search screen click Exit To capture the snapshot Click on the scene to capture The Capture dialog sh...

Страница 69: ...ld appear Click Save The screenshot will be backed up to the specified path To download SlimPlayer You can download SlimPlayer that is designed to play videos stored in your PC Click SlimPlayer You wi...

Страница 70: ...t a Video Pro le number Click the input box of each item and enter select a desired value The context menu may differ depending on the selected codec type Default Pro le This is the default video pro...

Страница 71: ...size between 1 and 15 Pro le The H 264 pro ling method is xed to HIGH Entropy coding Reduce the possible compression loss due to encoding Multicast VNP Specify the use of the VNP protocol IPv4 Enter...

Страница 72: ...on and enter select a desired value You can set up to 12 privacy zones Set the Video Output If you select OFF the video signal will not be output via the VIDEO OUT port When done click Apply To set th...

Страница 73: ...ype Select an IP connection type Manual Specify the IP address Subnet Mask Gateway DNS1 and DNS2 PPPoE Specify the DNS1 DNS2 ID and password DHCP Specify the DNS1 and DNS2 If you set it to Manual you...

Страница 74: ...nge of the Web Viewer is between 4502 and 4532 If the VNP port is with this effective range the Web Viewer port should be speci ed the same as the VNP port When done click Apply DDNS DDNS is an abbrev...

Страница 75: ...e IP that you want to grant or deny access from When done click Apply SSL You can select a secure connection system or install the public certificate for this purpose From the Setup menu select the Ne...

Страница 76: ...From the top menu bar select DDNS SERVICE MY DDNS Click PRODUCT REGISTRATION Enter the product domain You must perform the duplicate check for the domain that you entered Select a CLASSIFICATION and...

Страница 77: ...e Event tab Click FTP Email Select FTP Con guration or Email Con guration and enter select a desired value FTP Con guration Server Address Enter the IP ad dress of the FTP server that you transfer the...

Страница 78: ...rver settings Recipient Enter the address of the email recipient Sender Enter the address of the email sender If the sender address is incor rect the email from the sender may be classi ed as SPAM by...

Страница 79: ...re new data in replacement Pre alarm duration Specify the time point before the occurrence of the alarm starting from the time point the images will be transferred You can specify up to 5 seconds befo...

Страница 80: ...elligent Video Analysis Specify the use of overlay If you set it to Enable the event rules will be shown on the screen Specify the object size Select a sensitivity level at which the camera detects th...

Страница 81: ...To use the IV analysis function according to the defined area based rule Set IV analysis function to Enable Set the event rule to De ned area based rules Select the vertex of a desired area and right...

Страница 82: ...is changed at more than a certain time interval will be detected You can set the Scene Change rule along with rules Appearing and Disappearing Click OK When done click Apply Time Schedule You can conf...

Страница 83: ...ormation about the camera location Memo Provide an explanation about the camera for better understanding Language Select a preferred language for the camera menus and the Web Viewer OSD When done clic...

Страница 84: ...istrator Guest setup If Guest access is permitted any guest can access the Web Viewer screen but can view only the Live viewer screen Current Users You can change the user information and adjust the p...

Страница 85: ...forming the restoration process Restart Restarts the system When done click Apply To perform the upgrade Click Upgrade Click Browse and specify a le to upgrade Click Send The UPGRADE dialog appears wh...

Страница 86: ...If you select All in the top left dropdown list all logs for the applicable log type will be displayed If one page can not display all the logs available use the bottom buttons to move to the previou...

Страница 87: ...vacy Mask Off On 12 Programmble Zones Day Night Color BW AUTO IR Cut Filter Backlight Compensation BLC HLC SSDR Off Electronic Shutter Speed Auto 1 30 30 000sec A FLK Manual Gain Control Off Low Mediu...

Страница 88: ...Type Environmental Conditions Operating Temperature 10 C 50 C 40 C 50 C Fan Heater Built in Humidity 0 90 0 90 Waterproof Power Power Requirement AC24V DC12V PoE Power Consumption 6 W 7 W 7 W Heater O...

Страница 89: ...0P SVGA 800x600 VGA 640x480 QVGA 320x240 Max Frame Rate SXGA 22ips HD SVGA VGA QVGA 30ips H 264 MPEG4 Quality Compression 1 20 20 steps Target Bitrate CBR mode only 1280x1024 1024 10240 kbps 1280x720...

Страница 90: ...idually Event Management Alarm Input Pre Post Alarm Image Buffering Image Recording SD memory Event Notification E mail Notification Alarm Out Activation Intelligent Motion Detection Schedule JPEG Ima...

Страница 91: ...nnected over an PPPoE network it s possible for Viewer to disconnect under poor network conditions y y y I cannot connect to the system using a tab browser of Internet Explorer 7 0 When you try to con...

Страница 92: ...igent video analysis event is generated Check alarm output port settings y Cannot record into the SD memory card Check if the memory card is defective Check if the write protection tab of the memory c...

Страница 93: ...g it Some other Free Software Foundation software is covered by the GNU Lesser General Public License instead You can apply it to your programs too When we speak of free software we are referring to f...

Страница 94: ...the Program s source code as you receive it in any medium provided that you conspicuously and appropriately publish on each copy an appropriate copyright notice and disclaimer of warranty keep intact...

Страница 95: ...ally performing source distribution a complete machinereadable copy of the corresponding source code to be distributed under the terms of Sections 1 and 2 above on a medium customarily used for softwa...

Страница 96: ...efrain entirely from distribution of the Program If any portion of this section is held invalid or unenforceable under any particular circumstance the balance of the section is intended to apply and t...

Страница 97: ...OR AGREED TO IN WRITING WILL ANY COPYRIGHT HOLDER OR ANY OTHER PARTY WHO MAY MODIFY AND OR REDISTRIBUTE DAMAGES INCLUDING ANY GENERAL SPECIAL INCIDENTAL OR CONSEQUENTIAL DAMAGES ARISING OUT OF THE USE...

Страница 98: ...library you may consider it more useful to permit linking proprietary applications with the library If this is what you want to do use the GNU Lesser General Public License instead of this License GN...

Страница 99: ...Combined Work under terms of your choice that taken together effectively do not restrict modi cation of the portions of the Library contained in the Combined Work and reverse engineering for debuggin...

Страница 100: ...Versions of the GNU Lesser General Public License The Free Software Foundation may publish revised and or new versions of the GNU Lesser General Public License from time to time Such new versions will...

Страница 101: ...WIN AMERICA Inc 1480 Charles Willard St Carson CA 90746 UNITED STATES Tol Free 1 877 213 1222 FAX 1 310 632 2195 www samsungcctvusa com SAMSUNG TECHWIN EUROPE LTD Samsung House 1000 Hillswood Drive Hi...

Отзывы: