background image

46

Características del asiento infantil para el automóvil

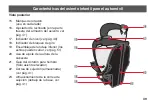
Portavasos

Los portavasos son desmontables y se pueden 

lavar en el lavavajillas (sólo la parte superior). 

Para retirar, gire el portavasos hacia el interior 

del armazón del asiento y tire hacia arriba para 

soltarlo. 
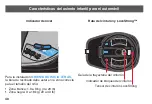
Para reinstalar:
1.  Alinee las lengüetas de la base del 

portavasos con las ranuras del armazón del 

asiento y empuje hacia abajo en las ranuras.

2.  Gire el portavasos hacia el exterior del 

armazón del asiento hasta que se bloquee.

3.  Tire hacia arriba verticalmente para 

asegurase de haber hecho una instalación 

apropiada.

NOTA:

 La parte inferior de cada portavasos está 

marcada con una "L" o una "R" para su uso en el 

lado izquierdo o derecho.

Содержание 35322405A

Страница 1: ...erious injury or death read this owner s manual prior to installing and using this car seat ADVERTENCIA Para reducir el riesgo de lesiones graves o la muerte lea este manual del propietario antes de instalar y usar este asiento infantil Asiento infantil giratorio todo en uno para el automóvil Manual del propietario Guarde para uso futuro ...

Страница 2: ......

Страница 3: ... of serious injury or death to your child from a crash Do not be misled by the commonly used term safety seat no restraint system can prevent all injuries in all crashes Many properly restrained adults and children are injured in motor vehicle crashes including relatively minor crashes A properly used Car Seat is the best way to minimize injuries to your child and to increase the chances for your ...

Страница 4: ...at Features 38 Seat Rotation 42 Adjustable Buckle Strap 44 Height Adjustable Headrest 45 Cup Holders 46 Body Pillow 47 Head Pillow 48 Tether Strap 49 Harness Strap Pads and Harness Covers 50 Lower Anchor Connectors 51 USING THE REVOLVE360 Installing and Removing the Seat Shell from the Base 53 Installing the Seat Shell to the Base 53 Removing the Seat Shell from the Base 54 Table of Contents ...

Страница 5: ... UAS 75 Removing LATCH UAS 83 Booster Mode Forward Facing Only 85 Converting to Booster Mode 85 Installing the Booster 90 GENERAL INFORMATION Securing the Child with Harness 95 Securing the Child in Booster Mode 103 How is a Booster Seat Used 103 Securing with the Booster 104 Removing Replacing the Seat Cover 105 Care and Cleaning 114 Proper Disposal 115 Replacement Parts 116 Recording Model Infor...

Страница 6: ...mation about air bag safety LATCH UAS Symbol Alerts you to important information about LATCH UAS safety Tether Anchor Symbol Alerts you to important information about Tether Anchor safety Aircraft Symbol Alerts you to important information about aircraft safety ...

Страница 7: ...erican Academy of Pediatrics AAP recommends keeping children REAR FACING for as long as possible until they reach the maximum height or weight for their Car Seat in REAR FACING orientation Additionally some states laws require children to be REAR FACING until age 2 Accordingly you will see this guidance reflected in the Child Requirements on the following pages Please review any applicable local s...

Страница 8: ...ure that preterm and low birth weight infants are transported safely the guidelines published by the American Academy of Pediatrics AAP in Pediatrics 2009 123 1424 1429 reaffirmed June 2018 must be followed Preterm and low birth weight infants are at additional risk of breathing difficulties and heart problems when placed in a Child Restraint Evenflo requires that the evaluation recommended by the...

Страница 9: ...hospital staff will check for any breathing difficulties or heart rate problems Your child s pediatrician will let you know if there are any special considerations for travel The number of trips and the duration of time the infant is seated in the Child Restraint should be minimized A caregiver should ride in the back seat to monitor the infant during travel You can learn more about the AAP s reco...

Страница 10: ...Academy of Pediatrics AAP recommends keeping children REAR FACING for as long as possible until they reach the maximum height or weight for their Car Seat in REAR FACING orientation see pg 7 Once your child exceeds any of the size requirements above they MUST use this Car Seat in the FORWARD FACING orientation if possible If your child exceeds any of the size requirements above and is less than 2 ...

Страница 11: ...ether strap in rear fa cin g installation Ba ll must be in prop er zone for child siz e Ve hicle MUS T be on level grou nd 258 090 42 10 2 0 9 18 kg 20 40 lbs Do not install by this method for a child we ighing more than 15 9 kg 35 lbs LE VEL INDICATO R REA R FACING ONLY 1 9 18 kg 4 40 lbs 44 10 1 cm 17 40 in REAR FACING For REAR FACING installation Recline Ball should be in correct zone for child...

Страница 12: ...be adjusted to be AT or JUST ABOVE child s shoulders IMPORTANT Once your child exceeds any of the size requirements for FORWARD FACING use above you MUST discontinue use of this Car Seat with its internal harness and begin using it in BOOSTER mode if possible If your child exceeds any of the size requirements for FORWARD FACING use above and is less than 4 years old however you MUST DISCONTINUE us...

Страница 13: ...13 Child Requirements Forward Facing Mode When used FORWARD FACING make sure the Car Seat is in the UPRIGHT position as shown ...

Страница 14: ...belt provide excellent restraint of the upper and lower torso It is important for the child to sit properly within the vehicle seat belts When the vehicle belt is buckled the lap belt should be low on the hips just touching the thighs and the shoulder belt should lie across the middle of the shoulder If the child leans out moves the belt behind the back or places it under the arm it will not provi...

Страница 15: ...of the vehicle belt system only at this time Child Requirements Booster Mode The child is mature enough to sit in the Booster Seat with the vehicle belts in proper position and not put the belts under their arm or behind their back If your child meets the requirements for both forward facing harnessed use and booster use and your vehicle does not have a Tether Anchorage but does have lap and shoul...

Страница 16: ...r Seat and air bags may cause serious injury or death Air bags may cause serious injury or death to children 12 years of age and under If your vehicle has an air bag refer to your vehicle owner s manual for Car Seat installation The back seat is the safest place for children 12 and under DO NOT place any objects between the Car Seat and the side air bag as an expanding air bag may cause the items ...

Страница 17: ... 2002 model year DO NOT use this Car Seat in a vehicle seating position equipped with a side air bag unless authorized by the vehicle manufacturer Model year 2002 and newer vehicles Refer to your vehicle owner s manual before placing this Car Seat in a seating position equipped with a side air bag Air bag Warnings The FORWARD FACING back seat is the safest place for children 12 and under ...

Страница 18: ...r serious injury or can occur These instructions and the instructions in your vehicle owner s manual must be followed carefully If there is a conflict between the two the vehicle owner s manual regarding Car Seat installation must be followed Children have STRANGLED in loose or partially buckled Harness Straps NEVER leave child unattended DO NOT use Car Seat if it is damaged broken or missing part...

Страница 19: ...all seating locations There are many thousands of combinations of vehicle makes models Car Seat configurations vehicle seat belt designs and seat cushion shapes The easiest way to determine whether your Car Seat is suitable for a particular seating position is to check for a tight installation If the Car Seat cannot be properly installed DO NOT use the Car Seat Consult vehicle owner s manual try a...

Страница 20: ...r or side ONLY use this Car Seat on vehicle seats with backs that lock into place VEHICLE TYPES IN WHICH THE CAR SEAT SYSTEM CANNOT BE USED This Car Seat is not to be used in vehicles that do not have vehicle seat belts or LATCH UAS lower anchorages NEVER use this Car Seat on boats low speed vehicles LSV all terrain vehicles ATV golf carts or any other non certified application ...

Страница 21: ...ficulty breathing when in an upright seated position Make sure they recline enough for their head to lie back comfortably and safely DO NOT USE this Car Seat if the top of your child s head is less than 2 5 cm 1 in from the top of the Headrest or Shell whichever is higher when used REAR FACING The Revolve360 MUST BE LOCKED for proper use when the vehicle is moving This car seat is not designed to ...

Страница 22: ...owest position The vehicle seat back that the child faces must be fully padded and free of any hard objects DO NOT USE the optional Body Pillow or Head Pillow with this Car Seat in FORWARD FACING mode The Revolve360 MUST BE LOCKED for proper use when the vehicle is moving This car seat is not designed to protect your child in a crash when the seat is not locked THE ROTATED POSITION IS FOR LOADING ...

Страница 23: ...the top of the Booster Seat headrest The shoulder belt MUST cross midway between the child s shoulder and neck The shoulder belt MUST NOT cross the child s neck or fall off the child s shoulder If you cannot adjust the shoulder belt to properly lay midway between the child s shoulder and neck AND at or above the shoulder try another seating location or do not use the Booster Seat ALWAYS secure the...

Страница 24: ... harness modes Check your vehicle owner s manual to determine how to lock your seat belt for Car Seat installation DO NOT use this Car Seat if it moves more than 2 5 cm 1 in side to side or front to back at the belt path in use Serious injury or death may result from loose installation If you cannot tightly secure the Car Seat try again or move it to another location DO NOT use this Car Seat in a ...

Страница 25: ...OT use this Car Seat in a vehicle equipped with lap belts that only lock during a sudden stop or crash Emergency Locking Retractor ELR You must use a seating location with a lap shoulder belt or a locking lap belt Check your vehicle owner s manual to see if you have lap belts with ELRs DO NOT use on vehicle seats when both portions of the vehicle belts are positioned forward of the seat crease ...

Страница 26: ...lease button to touch the Car Seat Accidental contact may cause the seat belt to release If necessary turn the seat belt release button away from the Car Seat or move the Car Seat to a different location Failure to adjust the harness or vehicle seat belts snugly around the child may result in the child striking the vehicle s interior during a sudden stop or crash This Child Restraint must be secur...

Страница 27: ... on Car Seat installation Lap Belt with Locking Latch Plate Not for use in Booster mode Once buckled the vehicle belt is tightened by pulling on the free end of the strap until the belt is tight Lap Belt with Automatic Locking Retractor ALR Not for use in Booster mode The automatic locking retractor does not allow the lap belt to get longer once it is buckled The vehicle belt is tightened by feedi...

Страница 28: ...actor The latch plate slides freely along the lap shoulder belt Vehicle belts with sliding latch plates are typically locked at the shoulder belt retractor by buckling the belt and pulling all of the webbing out slowly to switch the retractor Check vehicle owner s manual for specific instructions The vehicle belt is tightened after switching the retractor by pulling up on shoulder belt and feeding...

Страница 29: ...model year 1996 or newer it likely has a vehicle belt system that can be locked when tightened and will not require use of a Locking Clip Consult your vehicle owner s manual before installing a locking clip If your vehicle requires a Locking Clip please call ParentLink at 1 800 233 5921 to obtain a Locking Clip and instructions on how to install and use it Remove Locking Clip from vehicle seat bel...

Страница 30: ...d Lower Anchors or bars and a Top Tether Anchor that are built into your vehicle in vehicles built after September 1 2002 Your vehicle owner s manual may also refer to this system as ISOFIX or Lower Universal Anchorage System LUAS The lower LATCH UAS anchors are located in the crease or bight between the vehicle seat back and seat cushion and if not visible will typically be indicated by the symbo...

Страница 31: ... and meets the requirements of Federal Safety Standard FMVSS 213 and Canadian Safety Standard CMVSS 213 with either installation method Either method is safe for your child when installed correctly When using either method with harness ALWAYS USE Tether DO NOT install this Car Seat with LATCH UAS and the vehicle s seat belts at the same time However in Booster Mode you may install the Car Seat wit...

Страница 32: ...nual regarding installation of the Child Restraint and LATCH UAS If there is a discrepancy follow your vehicle owner s manual ONLY use for securing Car Seat to vehicle lower anchor bars NEVER attach two Lower Anchor Connectors to one vehicle lower anchor bar NEVER use the vehicle seat belts when using the Lower Anchor Connector assembly Using both together can cause slack in a sudden stop or crash...

Страница 33: ...nnot tightly secure the Car Seat try again or move it to another location Tether Strap Warnings ALWAYS USE A Tether Strap FOR HARNESS INSTALLATION To avoid a strangulation hazard you MUST tightly roll or fold excess of unused Tether Strap and secure with a rubber band Attach the Tether hook to the storage clip on the underside of the base when not in use This will keep an unused Tether or Tether h...

Страница 34: ... head falls forward increasing the risk of serious injury or death In hot or sunny weather ALWAYS check the areas of the Car Seat that may contact your child e g Buckle Buckle Tongues etc for hot areas before placing him her into the Car Seat The child could be burned Cover the Car Seat with a light colored blanket when you leave the vehicle In cold weather DO NOT dress the child in bulky clothing...

Страница 35: ...nstructions this restraint is certified for use only in passenger and multi purpose passenger motor vehicles buses and trucks equipped with either lap belts only or lap shoulder belt systems When used WITHOUT the internal harness system in BOOSTER mode and properly installed pursuant to these instructions this car seat is certified for use only in passenger and multi purpose passenger motor vehicl...

Страница 36: ...Evenflo Company Inc 1801 Commerce Dr Piqua OH 45356 or call 1 800 233 5921 or register online at www evenflo com registercarseat For recall information call the U S Government s Vehicle Safety Hotline at 1 888 327 4236 TTY 1 800 424 9153 or go to http www NHTSA gov Consumer Just fill in your name and address and e mail address Your Name CHILD RESTRAINT REGISTRATION CARD Your Street Address State Z...

Страница 37: ...37 Notes ...

Страница 38: ...REAR FACING Only 5 Buckle 6 Buckle Strap 7 Harness Release Button under flap 8 Harness Adjustment Strap 9 Seat Shell Removal Label under flap see pg 53 10 Harness Strap Pads and Harness Covers 11 Chest Clip 12 Harness Straps 13 Lap Belt Guide Booster Only 14 Cup Holders one each side i q w e r t y u a d s f o g ...

Страница 39: ... of Seat Shell see pg 41 17 Level Indicator see pg 40 18 Rotation Lock Indicator 19 Lower Anchor Assembly styles may vary see pg 51 20 Headrest Height Adjustment Handle 21 Shoulder Belt Guide Booster Only 22 Tether Strap stored see pg 41 23 Tether Storage under base see pg 41 2 1 1 1 2 1 2 1 2 ...

Страница 40: ...ro 25809059 10 20 Cierre y bloquear 1 9 9kg 4 20 lbs Lower Connectors UAS Lap Shoulder Belt Lap Belt Always use tether strap in rear facing installation Ball must be in proper zone for child size Vehicle MUST be on level ground 25809042 10 20 9 18kg 20 40 lbs Do not install by this method for a child weighing more than 15 9 kg 35 lbs LEVEL INDICATOR REAR FACING ONLY 1 9 18 kg 4 40 lbs 44 101 cm 17...

Страница 41: ...tures Tether Strap Unstored Tether Strap Unstored and Tether Storage Location and Tether Storage Location User Guide Storage and Recline Adjuster User Guide Storage Recline Adjuster Tether Storage Location under base ...

Страница 42: ...D UNLOADING YOUR CHILD IN FORWARD FACING OR REAR FACING MODE ONLY When properly installed the Revolve360 rotates in its base making it easy to safely load and unload your child To rotate the Revolve360 lift up on the Rotation Handle at either side of the headrest and turn the seat to the loading unloading position The Rotation Lock Indicator will be RED L Be ad mu wit hin ap pro p Ve hic le MU ST ...

Страница 43: ...d 258 090 42 10 2 0 9 18 kg 20 40 lbs Do not ins tall by this method for a child we igh ing more than 15 9 kg 35 lbs LE VE L INDICATO R REA R FACING ONLY 1 9 18 kg 4 40 lbs 44 10 1 cm 17 40 in REAR FACING When your child is securely harnessed rotate the seat either FORWARD FACING or REAR FACING based on their size pgs 10 and 12 and release the Rotation Handle The Rotation Lock Indicator will be GR...

Страница 44: ... bottom 1 Remove Body Pillow if used 2 Pull the Seat Cover forward and slide the Buckle Strap through the pad opening q 3 Grasp the bottom of the Buckle Strap and twist it to align with the lengthwise slot w 4 Move to slot position closest to but not underneath your child s bottom e 5 Twist Buckle Strap back into position r then slide through pad opening and replace Seat Cover q q w w e e r r ...

Страница 45: ... of the 14 locked positions For REAR FACING use adjust Headrest so the Harness Straps are AT OR JUST BELOW the child s shoulders For FORWARD FACING use adjust Headrest so the Harness Straps are AT OR JUST ABOVE the child s shoulders For BOOSTER use adjust Headrest so the belt guides are even with or just above the shoulders and the belt lies ACROSS THE MIDDLE OFTHE SHOULDER NOTE Regularly check fo...

Страница 46: ...or of the Seat Shell and pull up to release To re install 1 Align tabs on base of cup holder with slots on Seat Shell and push down into slots 2 Rotate cup holder toward the outside of the Seat Shell until locked 3 Pull up vertically to ensure proper installation NOTE The bottom of each cup holder is labeled L or R for left or right side use ...

Страница 47: ...e lower headrest harness positions make sure the bottom of the headrest flap is folded behind the body pillow flap as shown When used with a smaller child the body pillow side wings can be folded under and the rear flap can be folded forward to allow for better support of the child and to help with proper fit when securing the child with the harness see pgs 95 102 ...

Страница 48: ...eners to back of headrest IMPORTANT Infants may have difficulty breathing when in an upright seated position Make sure they recline enough for their head to lie back comfortably and safely Using additional padding or pillows other than the Head Pillow provided by Evenflo behind the infant s head or failing to properly recline the car seat could increase the child s risk of serious injury or death ...

Страница 49: ...r vehicle Owner s Manual for exact locations anchor identification and requirements Refer to the appropriate vehicle installation method for Tether installation and storage instructions REAR FA CING LEVEL INDICATO R Bead must be located within appropriate zone Vehicle MUST be on level ground Lower Connector s UAS Do not install by this method for a child weighing more than 15 9 kg 35 lbs Lap Shoul...

Страница 50: ...is Child Restaint are equipped with Harness Strap Pads that are permanently attached Harness Covers are optional for added comfort and removeable for cleaning To install Harness Cover secure hook and loop fastener to rear of Harness Strap Pad and wrap Harness Cover around pad as shown ...

Страница 51: ...onnector To remove the Lower Anchor Connector from storage or vehicle LATCH UAS anchors Standard Hook Squeeze push in and twist to remove the hook Mini Latch Pull the red Lower Anchor Connector Release Strap and pull the Connector out Standard Hook Mini Latch Follow the instructions in this section to properly install the Lower Anchor Connectors on your Car Seat ...

Страница 52: ... down on the Adjuster button and pull to lengthen the strap Storing the Lower Anchor Connector Lower Anchor Connectors MUST be stored when not in use To store the Lower Anchor Connector push UNTIL it clicks into position as shown NOTE Do not over tighten when storing Lower Anchor Connectors CLICK ...

Страница 53: ...98 10 20 Install Seat Onto Base Insert seat onto base Align arrows Alinee las flechas Inserte el asiento en la base Instale el asiento en la base Parentlink 1 800 233 2229 Scan for instructional videos Escanear para videos instruccionales evenflo com RevolveHow To Move strap Mueve la correa WARNING DEATH or SERIOUS INJURY can occur Strap can interfere with rotation lock Do not allow strap to get cau...

Страница 54: ...t Shell from the Base To remove the Seat Shell from the Base 1 Lift up on one of the two Rotation Levers at either side of the Headrest and rotate the Seat Shell until the arrow on the underside of the seat pad aligns with the arrow on the Base 2 Remove Seat Shell from Base ...

Страница 55: ... Facing Installing Lap Shoulder Belt Preferred Method ALWAYS USE A TETHER STRAP FOR HARNESS INSTALLATION 1 BEFORE installing Car Seat make sure vehicle is on level ground 2 Before placing Car Seat in vehicle remove Seat Shell from Base see pg 54 ...

Страница 56: ...move Tether from Tether Storage Location under the Base and place the Base in an approved rear vehicle seating location Make sure the Base lies flat on the vehicle seat and firmly up against the seat back 4 Locate the Tether Anchor in your vehicle and loosely attach the Tether Hook to the Tether Anchor ...

Страница 57: ...eze handle on LockStrong belt tensioner until lock indicator turns RED then lift up on belt tensioner to allow access to the belt path 6 Route lap shoulder belt through belt path opening on window side of base and feed through opposite belt path opening Push Base against vehicle seat back BUCKLE THE BELT ...

Страница 58: ...ly close the LockStrong The Belt Lock indicator will turn GREEN when fully closed NOTE If belt tensioner does not fully close Belt Lock indicator still RED open the LockStrong and try loosening the lap shoulder belt strap slightly 2 Tighten Aprete 1 4 Instalación con conectores inferiores Lower Connector Installation Open Abre Close Cierre Attach Acople 25809061 10 20 3 Open Abre Route Ruta Close ...

Страница 59: ...s will prevent proper operation of the Car Seat Some vehicle lap shoulder belts have a plastic button or extra fold of webbing on the belt Do not allow these to interfere with belt routing through LockStrong If they interfere a Shift the Base slightly to the left or right to eliminate the interference b Use LATCH if within the weight limit or c Move the Car Seat to a different location ...

Страница 60: ... back at the Belt Path on the Car Seat If Base moves more than 2 5 cm 1 in open LockStrong tension vehicle belt a little more and try again If Base still moves too much you may need to try a different vehicle seat location installation method or both 10 Lock the seat belt In most vehicles you can switch your shoulder belt retractor into locking mode by pulling out shoulder belt all the way and let...

Страница 61: ... Refer to your vehicle Owner s Manual for information 11 Pull the Tether Adjuster Strap to tighten 12 Install Seat Shell to Base pg 53 move Seat Shell to the appropriate REAR FACING or FORWARD FACING position based on the child s size see pgs 10 and 12 and lock into position 13 Confirm that the seat is in a locked position by checking that the Rotation Lock Indicator is GREEN ...

Страница 62: ...t Always use tether strap in rear facing installation Ball must be in proper zone for child size Vehicle MUST be on level ground 25809042 10 20 9 18kg 20 40 lbs Do not install by this method for a child weighing more than 15 9 kg 35 lbs LEVEL INDICATOR REAR FACING ONLY 1 9 18 kg 4 40 lbs 44 101 cm 17 40 in REAR FACING WARNING DEATH or SERIOUS INJURY can occur Failure to properly recline the Car Se...

Страница 63: ...63 Removing Lap Shoulder Belt Lap Shoulder Belt Rear Facing and Forward Facing 1 Remove Seat Shell from Base see pg 54 2 Unbuckle the lap shoulder belt and open the LockStrong ...

Страница 64: ...Lap Shoulder Belt 3 Remove lap shoulder belt from belt path and close LockStrong 4 Disconnect Tether a Press Adjuster Release Button b Lengthen the Tether Strap c Unhook the Tether Strap from the Tether Anchor d Store Tether in Tether Storage Location under Base ...

Страница 65: ...and Forward Facing Installing Lap Belt ALWAYS USE A TETHER STRAP FOR HARNESS INSTALLATION 1 BEFORE installing Car Seat make sure vehicle is on level ground 2 Before placing Car Seat in vehicle remove Seat Shell from Base see pg 54 ...

Страница 66: ...m Tether Storage Location under the Base and place the Base in an approved rear vehicle seating location Make sure the Base lies flat on the vehicle seat and firmly up against the seat back 4 Locate the Tether Anchor in your vehicle and loosely attach the Tether Hook to the Tether Anchor ...

Страница 67: ... on LockStrong belt tensioner until lock indicator turns RED then lift up on belt tensioner to allow access to the belt path 6 Route lap belt through belt path opening on window side of base and feed through opposite belt path opening Push Base against vehicle seat back BUCKLE THE BELT ...

Страница 68: ...acing Installing Lap Belt 7 Secure lap belt under tabs in blue belt path guide then pull up on free end of belt to remove slack making sure not to overtighten 8 After tightening Lap Belt secure the free end of the lap belt under the LockStrong ...

Страница 69: ...ard Facing Installing Lap Belt 9 Apply pressure to fully close the LockStrong The lock indicator will turn GREEN when fully closed NOTE If belt tensioner does not fully close lock indicator still RED open the LockStrong and try loosening the lap belt slightly NEVER place vehicle belt over LockStrong even in a vehicle with longer Buckle Stalks This will prevent proper operation of the Car Seat ...

Страница 70: ...ke sure Base is installed tightly Base should not move more than 2 5 cm 1 in side to side or front to back at the Belt Path on the Car Seat If Base moves more than 2 5 cm 1 in open LockStrong tension vehicle belt a little more and try again If Base still moves too much you may need to try a different vehicle seat location installation method or both ...

Страница 71: ... Strap to tighten 12 Install Seat Shell to Base pg 53 move Seat Shell to the appropriate REAR FACING or FORWARD FACING position based on the child s size see pgs 10 and 12 and lock into position 13 Confirm that the seat is in a locked position by checking that the Rotation Lock Indicator is GREEN ...

Страница 72: ...ether strap in rear facing installation Ball must be in proper zone for child size Vehicle MUST be on level ground 25809042 10 20 9 18kg 20 40 lbs Do not install by this method for a child weighing more than 15 9 kg 35 lbs LEVEL INDICATOR REAR FACING ONLY 1 9 18 kg 4 40 lbs 44 101 cm 17 40 in REAR FACING WARNING DEATH or SERIOUS INJURY can occur Failure to properly recline the Car Seat could incre...

Страница 73: ...73 Lap Belt Only Rear Facing and Forward Facing Removing Lap Belt 1 Remove Seat Shell from Base see pg 54 2 Unbuckle the lap belt and open the LockStrong ...

Страница 74: ...moving Lap Belt 3 Remove lap belt from belt path and close LockStrong 4 Disconnect Tether a Press Adjuster Release Button b Lengthen the Tether Strap c Unhook the Tether Strap from the Tether Anchor d Store Tether in Tether Storage Location under Base ...

Страница 75: ...ESS INSTALLATION 1 BEFORE installing Car Seat make sure vehicle is on level ground WARNING DEATH or SERIOUS INJURY can occur REAR FACING DO NOT install by this method for a child weighing more than 15 9 kg 35 lbs FORWARD FACING DO NOT install by this method for a child weighing more than 18 kg 40 lbs ...

Страница 76: ...d Forward Facing Installing LATCH UAS 2 Before placing Car Seat in vehicle remove Seat Shell from Base see pg 54 3 Remove LATCH UAS anchors from storage locations on back side of base Remove each connector as indicated on page 51 ...

Страница 77: ... Tether Storage Location under the Base and place the Base in an approved rear vehicle seating location Make sure the Base lies flat on the vehicle seat and firmly up against the seat back 5 Locate the Tether Anchor in your vehicle and loosely attach the Tether Hook to the Tether Anchor ...

Страница 78: ...RED then lift up on belt tensioner to allow access to the belt path 7 Attach LATCH UAS Connectors to vehicle Lower Anchor Bars Connectors will make an audible CLICK when attached Make sure they are attached by pulling firmly on connectors NOTE If your Revolve360 is equipped with Mini Latch connectors DO NOT pull on red Release Strap CLICK ...

Страница 79: ...LockStrong The lock indicator will turn GREEN when fully closed NOTE If belt tensioner does not fully close lock indicator still RED open the LockStrong and try loosening the LATCH UAS strap slightly 2 Tighten Aprete 1 4 Instalación con conectores inferiores Lower Connector Installation Open Abre Close Cierre Attach Acople 25809061 10 20 3 25809059 10 20 9 After tightening LATCH UAS secure excess ...

Страница 80: ...sure Base is installed tightly Base should not move more than 2 5 cm 1 in side to side or front to back at the Belt Path on the Car Seat If Base moves more than 2 5 cm 1 in open LockStrong tension LATCH UAS strap a little more and try again If Base still moves too much you may need to try a different vehicle seat location installation method or both ...

Страница 81: ...trap to tighten 13 Install Seat Shell to Base pg 54 move Seat Shell to the appropriate REAR FACING or FORWARD FACING position based on the child s size see pgs 10 and 12 and lock into position 14 Confirm that the seat is in a locked position by checking that the Rotation Lock Indicator is GREEN ...

Страница 82: ... strap in rear fa cin g installation Ba ll must be in prop er zone for child siz e Ve hicle MUS T be on level grou nd 258 090 42 10 20 9 18 kg 20 40 lbs Do not install by this method for a child we ighing more than 15 9 kg 35 lbs LE VEL INDICATO R REA R FACING ONLY 1 9 18 kg 4 40 lbs 44 10 1 cm 17 40 in REAR FACING WARNING DEATH or SERIOUS INJURY can occur Failure to properly recline the Car Seat ...

Страница 83: ...83 LATCH UAS Rear Facing and Forward Facing Removing LATCH UAS 1 Remove Seat Shell from Base see pg 54 2 Disengage LATCH UAS connectors on both sides of Car Seat as shown on pg 51 then open LockStrong ...

Страница 84: ... UAS 3 Store LATCH UAS anchors in storage locations on back side of base 4 Disconnect Tether a Press Adjuster Release Button b Lengthen the Tether Strap c Unhook the Tether Strap from the Tether Anchor d Store Tether in Tether Storage Location under Base CLICK ...

Страница 85: ...rd Facing Only 1 Loosen Harness Straps by pushing the harness release button on the front of the seat At the same time pull Harness Straps to extend completely 2 Unfasten the Chest Clip and Buckle Converting to Booster Mode ...

Страница 86: ...de Forward Facing Only Converting to Booster Mode 3 Lift up headrest pad and push the shoulder straps into the sidewings as shown 4 Disconnect hook and loop connectors attaching seat pad to back pad buc kle storag e ...

Страница 87: ...o Booster Mode 5 Remove Head and Body Pillow if installed then pull seat pad forward and remove Buckle through bottom of seat pad to access seat pan 6 Grasp the bottom of the Buckle Strap and twist it to align with the lengthwise slot in the seat pan ...

Страница 88: ...ward Facing Only Converting to Booster Mode Slide the Buckle Strap toward the front slot and push back on the strap to angle the Buckle Anchor up through the slot 7 Store Buckle Strap in pocket located behind legrest flap ...

Страница 89: ...89 Booster Mode Forward Facing Only Converting to Booster Mode 8 Replace Seat Pad and resecure hook and loop fasteners to Back Pad then continue with Installing the Booster on page 90 ...

Страница 90: ...r ALWAYS secure the Booster Seat with the vehicle seat belt or lower anchors when not occupied An unsecured Booster Seat can injure other occupants in the event of a crash NEVER use Top Tether in BOOSTER mode NOTE Evenflo recommends using the lower anchors of your LATCH UAS to secure the seat to the vehicle in BOOSTER mode Tether Storage Location under base ...

Страница 91: ...e LATCH UAS anchors from storage locations on back side of base as shown on pg 51 2 Before placing car seat in vehicle remove Seat Shell from Base see pg 54 then place the Base in an approved rear vehicle seating location and make sure it lies flat on the vehicle seat ...

Страница 92: ... then lift up on belt tensioner to allow access to the belt path 5 Attach LATCH UAS Connectors to vehicle Lower Anchor Bars Connectors will make an audible CLICK when attached Make sure they are attached by pulling firmly on connectors NOTE If your Revolve360 is equipped with Mini Latch connectors DO NOT pull on red Release Strap CLICK ...

Страница 93: ...ll RED open the LockStrong and try loosening the LATCH UAS strap slightly 6 Push Base against vehicle seat back Tension LATCH UAS Strap by pulling on loop until snug making sure not to overtighten 7 After tightening LATCH UAS secure excess strap under the LockStrong 2 Tighten Aprete 1 4 Instalación con conectores inferiores Lower Connector Installation Open Abre Close Cierre Attach Acople 25809061...

Страница 94: ...alling the Booster 9 Install Seat Shell to Base pg 53 move seat to most reclined position and rotate FORWARD FACING then lock into position 10 Confirm that the seat is in a locked position by checking that the Rotation Lock Indicator is GREEN ...

Страница 95: ...t Harness from being properly tightened around the child NEVER secure child in Car Seat with child wrapped in a blanket To keep child warm place a blanket over the child AFTER you have properly secured and tightened Harness around the child 1 Loosen harness by firmly pressing down on the Harness Release Button while pulling forward on both Harness Straps below Harness Strap Pads ...

Страница 96: ...t Pull Harness Straps over the child s shoulders and around the child s waist Straps must lie flat free of twists and in the center of the child s shoulders NOTE If Buckle Strap is under child it will need to be adjusted see pg 44 To ensure a better fit with smaller infants the Body Pillow may need to be used see pg 47 NEVER place extra padding under or behind the child ONLY USE the Body Pillow th...

Страница 97: ...ht see pg 45 so that the Harness Straps are positioned properly NOTE The Headrest Flap is designed with three fold lines to allow for partial or full storage If using the lower Headrest Harness positions make sure to tuck the excess Headrest Flap up behind itself ...

Страница 98: ...JUST BELOW the child s shoulders NOTE Child s Head MUST be 2 5 cm 1 in or more below the top of the Headrest or shell whichever is higher FORWARD FACING Position the Harness Straps AT or JUST ABOVE the child s shoulders NOTE Top of Child s ears MUST be below the top of the Headrest ...

Страница 99: ...n both Buckle Tongues to make sure they are securely latched CHECK that the Buckle functions properly and is kept free of dirt and debris Make sure Harness Straps are not twisted 6 Fasten Chest Clip by snapping both sides together Listen for a CLICK Securing the Child With Harness buc kle stor age PLACE AT ARMPIT CLICK CLICK ...

Страница 100: ...100 7 Push Chest Clip down away from the child s neck and towards the Harness Buckle Securing the Child With Harness 8 Pull up on both shoulder straps to remove all slack from the child s hips ...

Страница 101: ...n Harness Straps until Harness is snug on child A snug strap should not allow any slack It lies in a relatively straight line without sagging It does not press on the child s flesh or push the child s body into an unnatural position If you can pinch the Strap at the child s shoulders the Harness is too loose 10 Position Chest Clip at armpit level as shown ...

Страница 102: ...Harness 11 To loosen Harness firmly press down the Harness Release Button while pulling forward on both Harness Straps at shoulder level 12 To remove child press center buttons on Chest Clip and Harness Buckle and pull them apart ...

Страница 103: ... Booster Seat with only a lap belt as this could cause serious injuries Base of Booster should be flat on vehicle seat After the child is in the Booster pull the lap and shoulder belt across and buckle it In BOOSTER mode your child is being restrained by the vehicle s lap and shoulder belt so fit of the belts is important Check that the shoulder belt lies across the middle of the shoulder and that...

Страница 104: ...d low and snug across the child s hips within the lower belt guides and fastened into the Buckle Tops of the child s ears are at or below the top of the Booster Seat headrest The shoulder belt MUST pass through shoulder belt guide and the belt guide should be even with or just above the shoulders Securing with the Booster ...

Страница 105: ...Replacing the Seat Cover To Remove the Seat Cover 1 Push and hold the harness release button while pulling out on the Harness Straps 2 Raise headrest and remove elastic straps from around headrest adjustment handle ...

Страница 106: ...ng Replacing the Seat Cover 3 Remove elastic straps from vehicle belt guides and slide headrest pad over headrest 4 Pull the harness strap out of the opening in the headrest pad and remove headrest pad from seat ...

Страница 107: ...g the Seat Cover 5 Lower the headrest On the back of the car seat pull fabric at the top down to release plastic tabs 6 Locate flap on front side of the seatpad behind headrest and slide down to disconnect hooks from shell ...

Страница 108: ...r 7 Lift up on back pad from rear of seat and pull out from around rotation handles on top of Seat Shell 8 Disconnect the hook and loop connectors in the lower part of back pad and remove back pad from around top of shell PLACE AT ARMPIT ...

Страница 109: ...ve fabric binding from around Booster Lap Belt Guides 10 Push Buckle and harness adjustment strap throughs slot in seat Remove seat pad from seat NOTE It is not necessary to remove the cup holders in order to remove the seat pad PLA CE AT ARM PIT ...

Страница 110: ... Lower the headrest 2 Starting from the top of the seat place the back pad around the upper Seat Shell making sure to secure the two plastic tabs on the back of the seat 3 Secure the flap on the front side of the seat to the Seat Shell using the two hooks on the flap ...

Страница 111: ...ve the lower vehicle belt guides on either side of the seat into the channel around the perimeter of the seat Continue by tucking back pad into channel and around rotation handles until completely resecured 5 Secure elastic binding around lower vehicle belt guides buckle storage ...

Страница 112: ...pad then pull Buckle Strap through appropriate slot in seat pad see pg 44 NOTE It is not necessary to remove the cup holders in order to replace the seat pad 7 From the front of the seat make sure the Harness Straps are properly routed and secure the hook and loop fasteners connecting the back pad to the seat pad buc kle stor age ...

Страница 113: ...lt guide Removing Replacing the Seat Cover 9 Replace the elastic straps at the back of the headrest and around the shoulder belt guides NOTE Pull the elastic into the belt guide and up around the channel of the belt guide to snap the elastic into place 10 Pull Harness Straps through opening in headrest pad ...

Страница 114: ... NO CHLORINE BLEACH Tumble dry 10 15 minutes on low heat Remove immediately Soft goods include headrest pad seat pad head pillow body pillow harness covers and Buckle Cover Remove the foam inserts from the headrest pad prior to washing NEVER use this car seat without the seat pad To protect the car seat from damage caused by weather rodents and other elements common to garages the outdoors and oth...

Страница 115: ...screws and disassemble the Car Seat 3 Recycle all fabric padding plastic foam and metal parts if accepted by your local recycling center Responsibly discard the rest If your local recycling center won t accept the padding you may dispose of it in the landfill To prevent injury due to hidden damage lost instructions outdated technology etc discontinue use of this Car Seat after the expiration date ...

Страница 116: ...order online at www evenflo com or contact ParentLink at 1 800 233 5921 When you contact us please have the product model number and date of manufacture found on the back of the car seat Base Assembly Body Pillow and Head Pillow Buckle Cupholder Left or Right ...

Страница 117: ...117 Replacement Parts Harness Covers Headrest Pad LATCH Strap Seat Pad ...

Страница 118: ...ing and following these instructions store User Guide as shown in pocket on rear of car seat For future reference record the model number of your car seat AND the date of manufacture below Model Number Date of Manufacture _________________________ _________________________ ...

Страница 119: ...ed to obtain warranty service This express limited warranty is extended by Evenflo ONLY to the original Purchaser of the Product and is not assignable or transferable to subsequent purchasers or end users of the Product For warranty service contact Evenflo s ParentLink Consumer Resource Center at www evenflo com EXCEPT TO THE EXTENT PROHIBITED BY APPLICABLE LAW ANY IMPLIED WARRANTY OF MERCHANTABIL...

Страница 120: ......

Страница 121: ...cativamente el riesgo de lesiones graves o muerte del niño en un choque No se deje engañar por el término de uso común asiento de seguridad ningún sistema de sujeción puede evitar todas las lesiones en todos los choques Muchos adultos y niños sujetados correctamente se lesionan en choques de vehículos motorizados incluso en choques relativamente menores Un asiento infantil para el automóvil que se...

Страница 122: ...to infantil para el automóvil 38 Rotación del asiento 42 Correa con hebilla ajustable 44 Cabecera de altura ajustable 45 Portavasos 46 Acojinado para el cuerpo 47 Acojinado para la cabeza 48 Correa de sujeción 49 Almohadillas de la correa del arnés y cubiertas del arnés 50 Conectores del anclaje inferior 51 USO DEL REVOLVE360 Montaje y desmontaje del armazón del asiento de la base 53 Montaje del a...

Страница 123: ...stema LATCH SAU 75 Como retirar el sistema LATCH SAU 83 Modo de asiento elevador Solo orientado hacia adelante 85 Conversión al modo de asiento elevador 85 Instalación del asiento elevador 90 INFORMACIÓN GENERAL Como asegurar al niño con el arnés 95 Como asegurar al niño en el modo de asiento elevador 103 Cómo usar el asiento elevador 103 Como asegurar con el asiento elevador 104 Como retirar y vo...

Страница 124: ...a LATCH SAU Le alerta sobre información importante acerca de la seguridad relacionada con LATCH SAU Símbolo del anclaje de la correa de sujeción Le alerta sobre información importante acerca de la seguridad relacionada con el anclaje de la correa de sujeción Símbolo de avión Le alerta sobre información importante acerca de la seguridad relacionada con los aviones ...

Страница 125: ... de pediatría AAP recomienda mantener a los niños ORIENTADOS HACIA ATRÁS tanto como sea posible hasta que alcancen la altura o el peso máximo para el asiento infantil para el automóvil ORIENTADO HACIA ATRÁS Además las leyes de algunos estados requieren que el niño esté ORIENTADO HACIA ATRÁS hasta los 2 años de edad Por lo tanto verá esta orientación en los requisitos del niño que se indican en las...

Страница 126: ...on bajo peso al nacer se transporten con seguridad deben seguirse las pautas publicadas por la Academia Estadounidense de Pediatría AAP en Pediatrics 2009 123 1424 1429 reiterado en junio del 2018 Los bebés prematuros y con bajo peso al nacer presentan el riesgo adicional de tener dificultades respiratorias y problemas cardiacos al colocarlos en un sistema de sujeción infantil Evenflo requiere que...

Страница 127: ...probará la existencia de dificultades respiratorias o problemas con el ritmo cardíaco El pediatra del niño le dirá si existen consideraciones especiales para viajar El número de viajes y la duración del tiempo que el bebé permanezca sentado en el sistema de sujeción infantil deberán minimizarse Una persona encargada de su cuidado deberá viajar con el bebé en el asiento posterior para vigilarlo dur...

Страница 128: ...a AAP recomienda mantener a los niños ORIENTADOS HACIA ATRÁS tanto como sea posible hasta que alcancen la altura o el peso máximo para el asiento infantil para el automóvil ORIENTADO HACIA ATRÁS ver pág 7 Una vez que el niño exceda cualquiera de los requisitos mencionados arriba DEBE usar el asiento infantil para el automóvil en la posición ORIENTADO HACIA ADELANTE si es posible Una vez que el niñ...

Страница 129: ...r en la zona correcta para el tamaño del niño Zona blanca 1 9 a 9 kg 4 a 20 lb Zona negra 9 a 18 kg 20 a 40 lb 1 9 9k g 4 20 lbs Lo wer Con ne ctors UAS La p Sh ou lder Belt La p Belt Alwa ys use tether strap in rear fa cin g installation Ba ll must be in prop er zone for child siz e Ve hicle MUS T be on level grou nd 258 090 42 10 2 0 9 18 kg 20 40 lbs Do not install by this method for a child we...

Страница 130: ...ue queden EN o APENAS ARRIBA de los hombros del niño IMPORTANTE Una vez que el niño exceda cualquiera de los requisitos para el uso ORIENTADO HACIA ADELANTE mencionados arriba usted DEBE dejar de usar este asiento infantil para el automóvil con su arnés interno y comenzar a usarlo como ASIENTO ELEVADOR si es posible Una vez que el niño exceda cualquiera de los requisitos para el uso ORIENTADO HACI...

Страница 131: ...13 Requisitos del niño Modo orientado hacia adelante Cuando se use ORIENTADO HACIA ADELANTE asegúrese de que el asiento esté en posición VERTICAL como se muestra ...

Страница 132: ...ujeción del torso superior e inferior Es importante que el niño quede correctamente sentado con los cinturones de seguridad del vehículo Cuando el cinturón de seguridad del vehículo está abrochado el cinturón para regazo deberá quedar en la parte baja de la cadera apenas tocando los muslos y el cinturón para el hombro deberá cruzar la parte media del hombro Si el niño se inclina fuera del cinturón...

Страница 133: ... cinturón del vehículo sólo en este momento Requisitos del niño Modo de asiento elevador El niño tiene la madurez suficiente para sentarse en un asiento elevador con los cinturones del vehículo en la posición correcta y no poner los cinturones bajo el brazo o detrás de la espalda Si su niño cumple con los requisitos tanto para el uso de arnés orientado hacia adelante como para el uso de un asiento...

Страница 134: ...pueden causar lesiones graves o la muerte a niños de 12 años de edad y menores Si el vehículo cuenta con bolsa de aire consulte el manual del propietario del vehículo para obtener información sobre la instalación del asiento infantil para el automóvil El asiento posterior es el lugar más seguro para los niños de 12 años de edad y menores NO coloque ningún objeto entre el asiento infantil para el a...

Страница 135: ...n bolsa de aire lateral a menos que lo autorice el fabricante del vehículo Modelo del año 2002 y más recientes Consulte el manual del propietario del vehículo antes de colocar este asiento infantil para el automóvil en el asiento de un vehículo equipado con bolsa de aire lateral Advertencias sobre las bolsas de aire El asiento posterior ORIENTADO HACIA ADELANTE es el lugar más seguro para niños de...

Страница 136: ...ritas en el manual del propietario del vehículo Si existe una discrepancia entre las dos se deberán seguir las instrucciones sobre la instalación del asiento infantil para el automóvil descritas en el manual del propietario del vehículo Algunos niños se han ESTRANGULADO con las correas del arnés parcialmente abrochadas o sueltas NUNCA deje al niño sin supervisión NO use el asiento infantil para el...

Страница 137: ...ientos infantiles para el automóvil diseños de cinturones de seguridad del vehículo y formas de cojines de asientos La manera más fácil de determinar si un asiento infantil para el automóvil es apropiado para un asiento específico del vehículo es comprobar que quede instalado firmemente Si el asiento infantil para el automóvil no se puede instalar adecuadamente NO use el asiento infantil para el a...

Страница 138: ...hículo con respaldos que queden bloqueados en su lugar TIPOS DE VEHÍCULOS EN LOS QUE NO SE PUEDE USAR EL ASIENTO INFANTIL PARA EL AUTOMÓVIL Este asiento infantil para el automóvil no se debe usar en vehículos que no tengan cinturones de seguridad del vehículo o anclajes inferiores LATCH SAU NUNCA use este asiento infantil para el automóvil en barcos vehículos de baja velocidad LSV vehículos todo t...

Страница 139: ... recline lo suficiente para mantener la cabeza descansando hacia atrás cómodamente y de manera segura NO USE este asiento infantil para el automóvil si la parte superior de la cabeza del niño queda a menos de 2 5 cm 1 in de la parte superior de la cabecera o armazón lo que sea más alto cuando se usa ORIENTADO HACIA ATRÁS El Revolve360 DEBE ESTAR BLOQUEADO para su uso correcto cuando el vehículo es...

Страница 140: ... está enfrente del niño debe estar totalmente acojinado y no debe tener objetos rígidos NO USE el acojinado para la cabeza o el cuerpo opcional con este asiento infantil para el automóvil en el modo ORIENTADO HACIA ADELANTE El Revolve360 DEBE ESTAR BLOQUEADO para su uso correcto cuando el vehículo esté en movimiento Este asiento infantil para el automóvil no está diseñado para proteger a su niño e...

Страница 141: ... del asiento elevador El cinturón para el hombro DEBE pasar entre el hombro y el cuello del niño El cinturón para el hombro NO DEBE cruzar el cuello del niño ni resbalar del hombro del niño Si no puede ajustar el cinturón para el hombro correctamente para que quede entre el hombro y el cuello del niño Y en o encima del hombro intente instalarlo en otro asiento o no use el asiento elevador Asegure ...

Страница 142: ...inturón de seguridad para instalar el asiento infantil para el automóvil NO use este asiento infantil para el automóvil si se mueve más de 2 5 cm 1 in de lado a lado o de atrás hacia adelante en la trayectoria del cinturón Una instalación floja puede ocasionar lesiones graves o la muerte Si no puede asegurar firmemente el asiento infantil para el automóvil intente de nuevo o muévalo a otro asiento...

Страница 143: ...l frenar súbitamente o en un choque Retractor de bloqueo de emergencia ELR Se debe usar una ubicación en el asiento del vehículo que tenga un cinturón para regazo y hombro o un cinturón para regazo con bloqueo Consulte el manual del propietario del vehículo para ver si su automóvil tiene cinturones para regazo con retractores de bloqueo de emergencia NO lo use en los asientos del vehículo cuando a...

Страница 144: ...usar que se libere el cinturón de seguridad del vehículo Si es necesario gire el botón de liberación del cinturón de seguridad lejos del asiento infantil para el automóvil o mueva el asiento infantil para el automóvil a un lugar diferente Si no se ajustan ceñidamente el arnés o los cinturones de seguridad del vehículo alrededor del niño el niño se podría golpear contra el interior del vehículo al ...

Страница 145: ...ra regazo con placa de sujeción de bloqueo No para usar en el modo de asiento elevador Una vez abrochado el cinturón del vehículo se aprieta jalando el extremo libre de la correa hasta que el cinturón quede apretado Cinturón para regazo con retractor de bloqueo automático ALR No para usar en el modo de asiento elevador El retractor de bloqueo automático no permite que el cinturón para regazo se al...

Страница 146: ... libremente a lo largo del cinturón para regazo y hombro Los cinturones de vehículo con placas de sujeción deslizantes normalmente se bloquean en el retractor del cinturón para el hombro abrochando el cinturón y jalando toda la correa lentamente para cambiar el retractor Consulte el manual del propietario del vehículo para obtener instrucciones específicas El cinturón del vehículo se aprieta despu...

Страница 147: ...que se puede bloquear al apretarlo y no requerirá el uso del clip de bloqueo Consulte el manual del propietario del vehículo antes de instalar el clip de bloqueo Si el vehículo requiere un clip de bloqueo llame a ParentLink al 1 800 233 5921 para obtener el clip de bloqueo y las instrucciones sobre como instalarlo y usarlo Retire el clip de bloqueo del cinturón de seguridad del vehículo cuando no ...

Страница 148: ...e de correa de sujeción superior integrados en vehículos fabricados después del 1 de septiembre del 2002 Es posible que el manual del propietario del vehículo se refiera a este sistema como ISOFIX o Lower Universal Anchorage System LUAS Sistema de anclaje inferior universal Los anclajes LATCH SAU inferiores están ubicados en el pliegue o unión entre el respaldo y el cojín del asiento del vehículo ...

Страница 149: ...dad Canadiense CMVSS 213 con cualquiera de los dos métodos de instalación Cualquiera de los métodos es seguro para el niño cuando el sistema se instala correctamente Al usar cualquiera de los dos métodos SIEMPRE USE la correa de sujeción NO instale este asiento infantil para el automóvil con el sistema LATCH SAU y los cinturones de seguridad del vehículo al mismo tiempo Sin embargo en el modo de a...

Страница 150: ... siga las instrucciones descritas en el manual del propietario del vehículo Use SOLO para asegurar el asiento infantil para el automóvil a las barras de anclaje inferior del vehículo NUNCA acople dos conectores del anclaje inferior a una misma barra de anclaje inferior del vehículo NUNCA use los cinturones de seguridad del vehículo cuando use el ensamblaje del conector del anclaje inferior Usar am...

Страница 151: ...o o muévalo a otro asiento del vehículo Advertencias de la correa de sujeción SIEMPRE USE UNA Correa de sujeción PARA LA INSTALACIÓN DEL ARNÉS Para evitar el peligro de estrangulación DEBE enrollar o plegar apretadamente el exceso de la correa de sujeción que no use y asegurarlo con una banda elástica Fije el gancho de sujeción al clip de almacenamiento en la parte inferior de la base cuando no se...

Страница 152: ...ruebe que las áreas del asiento infantil para el automóvil que podrían entrar en contacto con el niño por ejemplo la hebilla las lengüetas de la hebilla etc no tengan zonas calientes antes de colocar al niño en el asiento infantil para el automóvil El niño podría sufrir quemaduras Antes de salir del vehículo cubra el asiento infantil para el automóvil con un cobertor de color claro En climas fríos...

Страница 153: ...se solo en vehículos motorizados autobuses y camiones diseñados para pasajeros o para uso múltiple con pasajeros y equipados solamente con sistemas de cinturón para regazo o cinturón para regazo y hombro Cuando se usa SIN el sistema de arnés interno en modo de ASIENTO ELEVADOR e instalado adecuadamente de acuerdo con estas instrucciones este asiento infantil para el automóvil está certificado para...

Страница 154: ... 1801 Commerce Dr Piqua OH 45356 o llame al 1 800 233 5921 o registre el producto en línea en www evenflo com registercarseat Para obtener información sobre órdenes de retiro de producto del mercado llame a la línea directa para el consumidor del Departamento de seguridad vehicular del gobierno de los Estados Unidos al 1 888 327 4236 TTY 1 800 424 9153 o visite http www NHTSA gov Información sobre...

Страница 155: ...37 Notas ...

Страница 156: ... HACIA ATRÁS 5 Hebilla 6 Correa de hebilla 7 Botón de liberación del arnés debajo de la solapa 8 Correa de ajuste del arnés 9 Etiqueta para retirar el armazón del asiento debajo de la solapa ver pág 53 10 Almohadillas de la correa del arnés y cubiertas del arnés 11 Clip para el pecho 12 Correas del arnés 13 Guía de cinturón de regazo Solo asiento elevador 14 Portavasos uno de cada lado i q w e r t...

Страница 157: ...o ver pág 41 17 Indicador de nivel ver pág 40 18 Indicador de bloqueo de giro 19 Ensamblaje del anclaje inferior los estilos pueden variar ver pág 51 20 Asa de ajuste de la altura de la cabecera 21 Guía del cinturón para hombro Solo asiento elevador 22 Correa de sujeción almacenada ver pág 41 23 Almacenamiento de la correa de sujeción debajo de la base ver pág 41 2 1 1 1 2 1 2 1 2 ...

Страница 158: ...g Indicador de nivel Para la instalación ORIENTADO HACIA ATRÁS la bola de reclinado debe estar en la zona correcta para el tamaño del niño Zona blanca 1 9 a 9 kg 4 a 20 lb Zona negra 9 a 18 kg 20 a 40 lb Guía de la trayectoria del cinturón Indicador de bloqueo del cinturón Tensor de cinturón LockStrong 1 9 9kg 4 20 lbs Lower Connectors UAS Lap Shoulder Belt Lap Belt Always use tether strap in rear...

Страница 159: ...eción Sin almacenar y Lugar de almacenamiento de la y Lugar de almacenamiento de la correa de sujeción correa de sujeción Almacenamiento de la guía de usuario y el Ajustador de reclinación Almacenamiento de la guía de usuario Ajustador de reclinado Almacenamiento de la correa de sujeción debajo de la base ...

Страница 160: ...IÓN ES PARA SUBIR Y BAJAR AL NIÑO EN MODO ORIENTADO HACIA ADELANTE O HACIA ATRÁS SOLAMENTE Cuando se instala correctamente el Revolve360 gira en su base facilitando la colocación y retiro del niño de forma segura Para girar el Revolve360 levante la manija de rotación a cada lado del reposacabezas y gire el asiento a la posición de colocar sacar al niño El indicador de bloqueo de rotación estará en...

Страница 161: ...a zona correcta para el tamaño del niño Zona blanca 1 9 a 9 kg 4 a 20 lb Zona negra 9 a 18 kg 20 a 40 lb Co nec tor es anc laje inf er Cin tur ón par a reg azo y ho mb ro Cin tur ón par a reg azo Siem pre use la corr ea de suje ción con la inst alac ión orie ntad o hac ia atrá s 2580 9042 10 20 n má 15 9 35 lb 1 9 a 18 kg 4 a 40 lb 44 a 101 cm 17 a 40 in OR IEN TA DO HA CIA AT RÁ S 1 9 9k g 4 20 l...

Страница 162: ...cuerpo si se utiliza 2 Tire de la cubierta del asiento hacia adelante y deslice la correa de la hebilla a través de la apertura del acojinado q 3 Sostenga la parte inferior de la correa de la hebilla y gírela para alinearla con la ranura longitudinal w 4 Mueva a la posición de ranura más cercana pero no debajo del trasero del niño e 5 Gire la correa de la hebilla hasta la posición r luego deslícel...

Страница 163: ...a uso ORIENTADO HACIA ATRÁS ajuste la cabecera de manera que las correas del arnés estén EN O APENAS POR DEBAJO de los hombros del niño Para uso ORIENTADO HACIA ADELANTE ajuste la cabecera de manera que las correas del arnés estén EN O APENAS POR ARRIBA de los hombros del niño Para el uso del ASIENTO ELEVADOR ajuste el cabecera de manera que las guías del cinturón estén parejas o justo por encima ...

Страница 164: ...rriba para soltarlo Para reinstalar 1 Alinee las lengüetas de la base del portavasos con las ranuras del armazón del asiento y empuje hacia abajo en las ranuras 2 Gire el portavasos hacia el exterior del armazón del asiento hasta que se bloquee 3 Tire hacia arriba verticalmente para asegurase de haber hecho una instalación apropiada NOTA La parte inferior de cada portavasos está marcada con una L ...

Страница 165: ...las posiciones inferiores de la cabecera arnés asegúrese de que la parte inferior de la solapa doblada de la cabecera esté detrás de la solapa del acojinado para el cuerpo como se muestra Cuando se usa con un niño más pequeño las almohadillas laterales del acojinado para el cuerpo se pueden doblar por debajo y la solapa trasera se puede doblar hacia delante para permitir un mejor apoyo del niño y ...

Страница 166: ...r de la cabecera IMPORTANTE Los bebés pueden tener dificultad para respirar cuando están sentados en posición erguida Asegúrese de que el bebé se recline lo suficiente para mantener la cabeza descansando hacia atrás cómodamente y de manera segura Si se usan acolchado o acojinado adicional que no sea el acojinado para la cabeza suministrado por Evenflo detrás de la cabeza del bebé o no se reclina c...

Страница 167: ...uestran aquí Consulte el manual del propietario del vehículo para obtener información sobre las ubicaciones exactas la identificación del anclaje y los requisitos Consulte el método de instalación del vehículo apropiado para las instrucciones de instalación y almacenamiento de la correa de sujeción REAR FA CING LEVEL INDICATO R Bead must be located within appropriate zone Vehicle MUST be on level ...

Страница 168: ...das con almohadillas de correas de arnés que están permanentemente sujetas Las cubiertas de los arneses son opcionales para mayor comodidad y se pueden quitar para su limpieza Para instalar la cubierta del arnés asegure el cierre de velcro en la parte posterior de la almohadilla de la correa del arnés y envuelva la cubierta del arnés alrededor de la almohadilla como se muestra ...

Страница 169: ...nferior Para retirar el conector de anclaje inferior del almacenamiento o de los anclajes LATCH SAU del vehículo Gancho estándar Apriete empuje y gire para retirar el gancho Mini Latch Tire de la correa roja de liberación del conector del anclaje inferior y saque el conector Siga las instrucciones de esta sección para instalar correctamente los conectores del anclaje inferior en su asiento infanti...

Страница 170: ...ne el botón del ajustador y tire para alargar la correa Como guardar el conector del anclaje inferior Los conectores del anclaje inferior se DEBEN almacenar cuando no se usen Para almacenar el conector del anclaje inferior empuje HASTA que encaje en su posición como se muestra NOTA No lo apriete demasiado al guardar Conectores del anclaje inferior CLICK ...

Страница 171: ...CIA Pueden ocurrir LESIONES GRAVES o la MUERTE Remove Seat From Base Pull handle to rotate seat Align arrows Lift to remove Tire de la palanca para girar el asiento Alinee las flechas Levante para quitar Quitar el asiento de la base 25809098 10 20 Install Seat Onto Base Insert seat onto base Align arrows Alinee las flechas Inserte el asiento en la base Instale el asiento en la base Parentlink 1 800 ...

Страница 172: ...a base Para desmontar el armazón del asiento de la base 1 Levante una de las dos palancas de giro a cada lado de la cabecera y gire el armazón del asiento hasta que la flecha de la parte inferior del acojinado del asiento se alinee con la flecha de la base 2 Retire el armazón del asiento de la base ...

Страница 173: ...ACIÓN DEL ARNÉS 1 ANTES de instalar el asiento infantil para el automóvil asegúrese de que el vehículo esté en terreno plano 2 Antes de colocar el asiento infantil para el automóvil retire el armazón del asiento de la base ver pág 54 Cinturón para regazo y hombro Orientado hacia atrás y orientado hacia adelante ...

Страница 174: ...l lugar de almacenamiento de la correa debajo de la base y coloque la base en un lugar aprobado del asiento trasero del vehículo Asegúrese de que la base esté plana en el asiento del vehículo y firmemente contra el respaldo del asiento 4 Localice el anclaje de la correa de sujeción en su vehículo y fije el gancho de sujeción al anclaje de la correa de sujeción sin apretarlo ...

Страница 175: ...para permitir el acceso al recorrido del cinturón 6 Dirija el cinturón de regazo hombro a través de la abertura de la trayectoria del cinturón en el lado de la ventana de la base y pase a través de la abertura de la trayectoria del cinturón opuesta Empuje la base contra el respaldo del asiento del vehículo ABROCHE EL CINTURÓN Cinturón para regazo y hombro Orientado hacia atrás y orientado hacia ad...

Страница 176: ...pletamente cerrado NOTA Si el tensor del cinturón no se cierra completamente el indicador de bloqueo del cinturón sigue en ROJO abra el LockStrong e intente aflojar ligeramente la correa del cinturón para regazo y hombro 2 Tighten Aprete 1 4 Instalación con conectores inferiores Lower Connector Installation Open Abre Close Cierre Attach Acople 25809061 10 20 3 Open Abre Route Ruta Close and lock 3...

Страница 177: ...o pliegue adicional de correa en el cinturón No permita que interfieran con la trayectoria del cinturón a través de LockStrong Si interfieren a Desplace la base ligeramente a la izquierda o a la derecha para eliminar la interferencia b Use el sistema LATCH si está dentro del límite de peso o c Mueva el asiento infantil para el automóvil a un lugar diferente Instalación del cinturón de regazo hombr...

Страница 178: ... inténtelo de nuevo Si la base aún se mueve demasiado es posible que deba intentar otro asiento del vehículo un método de instalación diferente o ambas cosas 10 Bloque el cinturón de seguridad En la mayoría de los vehículos se puede cambiar su retractor del cinturón para el hombro al modo de bloqueo jalando hacia afuera por completo el cinturón para el hombro y dejando que se retraiga en el retrac...

Страница 179: ...e el armazón del asiento a la base pág 53 mueva el armazón del asiento a la posición apropiada ORIENTADO HACIA ATRÁS o ORIENTADO HACIA ADELANTE dependiendo del tamaño del niño ver págs 10 y 12 y bloquee en su posición 13 Confirme que el asiento está en posición de bloqueo comprobando que el indicador de bloqueo de rotación está en VERDE Instalación del cinturón de regazo hombro método preferido Ci...

Страница 180: ...ara respirar al estar sentados en posición erguida Asegúrese de que el bebé se recline lo suficiente para mantener la cabeza descansando hacia atrás cómodamente y de manera segura Cinturón para regazo y hombro Orientado hacia atrás y orientado hacia adelante Instalación del cinturón de regazo hombro método preferido ADVERTENCIA Pueden ocurrir LESIONES GRAVES o la MUERTE 1 9 9kg 4 20 lbs Lower Conn...

Страница 181: ...turón para regazo y hombro 1 Retire el armazón del asiento de la base ver pág 54 2 Desabroche el cinturón de regazo y hombro y abra el LockStrong Cinturón para regazo y hombro Orientado hacia atrás y orientado hacia adelante ...

Страница 182: ... Desconecte la correa de sujeción a Presione el botón de liberación del ajustador b Alargue la correa de sujeción c Desenganche la correa de sujeción del anclaje de sujeción d Almacene la correa de sujeción en el lugar de almacenamiento de la correa debajo de la base Cinturón para regazo y hombro Orientado hacia atrás y orientado hacia adelante ...

Страница 183: ...turón de regazo SIEMPRE USE UNA CORREA DE SUJECIÓN PARA LA INSTALACIÓN DEL ARNÉS 1 ANTES de instalar el asiento infantil para el automóvil asegúrese de que el vehículo esté en terreno plano 2 Antes de colocar el asiento infantil para el automóvil retire el armazón del asiento de la base ver pág 54 ...

Страница 184: ...culo Asegúrese de que la base esté plana en el asiento del vehículo y firmemente contra el respaldo del asiento 4 Localice el anclaje de la correa de sujeción en su vehículo y fije el gancho de sujeción al anclaje de la correa de sujeción sin apretarlo Solo cinturón para regazo Orientado hacia atrás y orientado hacia adelante Instalación del cinturón de regazo ...

Страница 185: ...inturón 6 Dirija el cinturón de regazo a través de la abertura de la trayectoria del cinturón en el lado de la ventana de la base y pase a través de la abertura de la trayectoria del cinturón opuesta Empuje la base contra el respaldo del asiento del vehículo ABROCHE EL CINTURÓN Solo cinturón para regazo Orientado hacia atrás y orientado hacia adelante Instalación del cinturón de regazo ...

Страница 186: ...cia arriba del extremo libre del cinturón para quitar la holgura asegurándose de no apretar demasiado 8 Después de apretar el cinturón de regazo asegure el extremo libre del cinturón de regazo bajo el LockStrong Solo cinturón para regazo Orientado hacia atrás y orientado hacia adelante Instalación del cinturón de regazo ...

Страница 187: ... cinturón de regazo NUNCA coloque el cinturón del vehículo sobre LockStrong ni siquiera en un vehículo con vástagos de hebilla más largos Esto impedirá el funcionamiento correcto del asiento infantil para el automóvil 2 Tighten Aprete 1 4 Instalación con conectores inferiores Lower Connector Installation Open Abre Close Cierre Attach Acople 25809061 10 20 3 25809059 10 20 Solo cinturón para regazo...

Страница 188: ...cia adelante en la trayectoria del cinturón en el asiento del vehículo Si la base se mueve más de 2 5 cm 1 in abra el LockStrong tense el cinturón del vehículo un poco más e inténtelo de nuevo Si la base aún se mueve demasiado es posible que deba intentar otro asiento del vehículo un método de instalación diferente o ambas cosas Solo cinturón para regazo Orientado hacia atrás y orientado hacia ade...

Страница 189: ...ión apropiada ORIENTADO HACIA ATRÁS o ORIENTADO HACIA ADELANTE dependiendo del tamaño del niño ver págs 10 y 12 y bloquee en su posición 13 Confirme que el asiento está en posición de bloqueo comprobando que el indicador de bloqueo de rotación está en VERDE Solo cinturón para regazo Orientado hacia atrás y orientado hacia adelante Instalación del cinturón de regazo ...

Страница 190: ...ner dificultad para respirar al estar sentados en posición erguida Asegúrese de que el bebé se recline lo suficiente para mantener la cabeza descansando hacia atrás cómodamente y de manera segura Solo cinturón para regazo Orientado hacia atrás y orientado hacia adelante Instalación del cinturón de regazo ADVERTENCIA Pueden ocurrir LESIONES GRAVES o la MUERTE 1 9 9kg 4 20 lbs Lower Connectors UAS L...

Страница 191: ...irar el cinturón para regazo 1 Retire el armazón del asiento de la base ver pág 54 2 Desabroche el cinturón de regazo y abra el LockStrong Solo cinturón para regazo Orientado hacia atrás y orientado hacia adelante ...

Страница 192: ... el botón de liberación del ajustador b Alargue la correa de sujeción c Desenganche la correa de sujeción del anclaje de sujeción d Almacene la correa de sujeción en el lugar de almacenamiento de la correa debajo de la base Como retirar el cinturón para regazo Solo cinturón para regazo Orientado hacia atrás y orientado hacia adelante ...

Страница 193: ...ARNÉS 1 ANTES de instalar el asiento infantil para el automóvil asegúrese de que el vehículo esté en terreno plano ORIENTADO HACIA ATRÁS NO instale usando este método con niños que pesan más de 15 9 kg 35 lb ORIENTADO HACIA ADELANTE NO instale usando este método con niños que pesan más de 18 kg 40 lb ADVERTENCIA Pueden ocurrir LESIONES GRAVES o la MUERTE ...

Страница 194: ...zón del asiento de la base ver pág 54 3 Retire los anclajes LATCH SAU de las ubicaciones de almacenamiento en la parte trasera de la base Remove each connector as indicated on page 51 LATCH SAU Orientado hacia atrás y orientado hacia adelante Instalación del sistema LATCH SAU ...

Страница 195: ...del vehículo Asegúrese de que la base esté plana en el asiento del vehículo y firmemente contra el respaldo del asiento 5 Localice el anclaje de la correa de sujeción en su vehículo y fije el gancho de sujeción al anclaje de la correa de sujeción sin apretarlo LATCH SAU Orientado hacia atrás y orientado hacia adelante Instalación del sistema LATCH SAU ...

Страница 196: ...rón 7 Conecte los conectores LATCH SAU a las barras de anclaje inferiores del vehículo Los conectores harán CLIC al acoplarlos Asegúrese de que estén acoplados jalando firmemente los conectores NOTA Si su Revolve360 está equipado con conectores Mini Latch NO tire de la correa roja de liberación CLIC LATCH SAU Orientado hacia atrás y orientado hacia adelante Instalación del sistema LATCH SAU ...

Страница 197: ...o NOTA Si el tensor del cinturón no se cierra completamente el indicador de bloqueo sigue en ROJO abra el LockStrong e intente aflojar ligeramente la correa del LATCH SAU 9 Después de apretar LATCH SAU asegure el exceso de la correa bajo el LockStrong LATCH SAU Orientado hacia atrás y orientado hacia adelante Instalación del sistema LATCH SAU 2 Tighten Aprete 1 4 Instalación con conectores inferio...

Страница 198: ... atrás hacia adelante en la trayectoria del cinturón en el asiento del vehículo Si la base se mueve más de 2 5 cm 1 in abra el LockStrong tense la correa del LATCH SAU un poco más e inténtelo de nuevo Si la base aún se mueve demasiado es posible que deba intentar otro asiento del vehículo un método de instalación diferente o ambas cosas LATCH SAU Orientado hacia atrás y orientado hacia adelante In...

Страница 199: ...la posición apropiada ORIENTADO HACIA ATRÁS o ORIENTADO HACIA ADELANTE dependiendo del tamaño del niño ver págs 10 y 12 y bloquee en su posición 14 Confirme que el asiento está en posición de bloqueo comprobando que el indicador de bloqueo de rotación está en VERDE LATCH SAU Orientado hacia atrás y orientado hacia adelante Instalación del sistema LATCH SAU ...

Страница 200: ...ficultad para respirar al estar sentados en posición erguida Asegúrese de que el bebé se recline lo suficiente para mantener la cabeza descansando hacia atrás cómodamente y de manera segura LATCH SAU Orientado hacia atrás y orientado hacia adelante Instalación del sistema LATCH SAU ADVERTENCIA Pueden ocurrir LESIONES GRAVES o la MUERTE 1 9 9k g 4 20 lbs Lo wer Con ne ctors UAS La p Sh ou lder Belt...

Страница 201: ...l armazón del asiento de la base ver pág 54 2 Desenganche los conectores LATCH SAU en ambos lados del asiento infantil para el automóvil como se muestra en la pág 51 luego abra el LockStrong LATCH SAU Orientado hacia atrás y orientado hacia adelante ...

Страница 202: ... ubicaciones de almacenamiento en la parte trasera de la base 4 Desconecte la correa de sujeción a Presione el botón de liberación del ajustador b Alargue la correa de sujeción c Desenganche la correa de sujeción del anclaje de sujeción d Almacene la correa de sujeción en el lugar de almacenamiento de la correa debajo de la base CLIC ...

Страница 203: ... correas del arnés al presionar el botón de liberación del arnés ubicado en la parte delantera del asiento Al mismo tiempo tire de las correas del arnés para que se extiendan completamente 2 Afloje el clip para el pecho y la hebilla Conversión al modo de asiento elevador ...

Страница 204: ...Conversión al modo de asiento elevador 3 Levante la almohadilla de la cabecera y empuje las correas de los hombros hacia los lados como se muestra 4 Desconecte los conectores del velcro que unen el acojinado del asiento al acojinado posterior buc kle storag e ...

Страница 205: ...ara la cabeza y el cuerpo si está instalado luego tire del acojinado del asiento hacia adelante y saque la hebilla a través de la parte inferior del acojinado del asiento para acceder a la placa del asiento 6 Agarre la parte inferior de la correa de la hebilla y gírela para alinearla con la ranura a lo largo del asiento ...

Страница 206: ...rea hacia atrás para inclinar el anclaje de la hebilla hacia arriba a través de la ranura 7 Guarde la correa de la hebilla en el bolsillo situado detrás de la solapa del reposapiernas Modo de asiento elevador Solo orientado hacia adelante Conversión al modo de asiento elevador ...

Страница 207: ...del asiento y vuelva a fijar los cierres de velcro al acojinado posterior y luego continúe con Instalación del asiento elevador en la página 90 Modo de asiento elevador Solo orientado hacia adelante Conversión al modo de asiento elevador ...

Страница 208: ...dad del vehículo o con los anclajes inferiores cuando no esté ocupado Un asiento elevador no asegurado puede herir a otros ocupantes en caso de accidente NUNCA use la correa de sujeción en el modo de ASIENTO ELEVADOR NOTA Evenflo recomienda utilizar los anclajes inferiores del LATCH SAU para asegurar el asiento al vehículo en modo de ASIENTO ELEVADOR ADVERTENCIA Pueden ocurrir LESIONES GRAVES o la...

Страница 209: ...ubicaciones de almacenamiento en la parte trasera de la base como se muestra en la pág 51 2 Antes de colocar el asiento de bebé para el automóvil retire el armazón del asiento de la base ver pág 54 luego coloque la base en un lugar aprobado del asiento trasero del vehículo y asegúrese de que quede plana en el asiento del vehículo ...

Страница 210: ...ROJO y luego levante el tensor del cinturón para permitir el acceso al recorrido del cinturón 5 Conecte los conectores LATCH SAU a las barras de anclaje inferiores del vehículo Los conectores harán CLIC al acoplarlos Asegúrese de que estén acoplados jalando firmemente los conectores NOTA Si su Revolve360 está equipado con conectores Mini Latch NO tire de la correa roja de liberación CLIC ...

Страница 211: ...ueo sigue en ROJO abra el LockStrong e intente aflojar ligeramente la correa del LATCH SAU 6 Empuje la base contra el respaldo del asiento del vehículo Apriete la correa LATCH SAU al tirar del bucle hasta que se ajuste asegurándose de no apretar demasiado 7 Después de apretar la correa LATCH SAU asegure el exceso de la correa bajo el LockStrong 2 Tighten Aprete 1 4 Instalación con conectores infer...

Страница 212: ...elevador 9 Instalar el armazón del asiento a la base pág 53 mueva el asiento a la posición más reclinada y gírelo ORIENTADO HACIA ADELANTE y bloquéelo en su lugar 10 Confirme que el asiento está en posición de bloqueo comprobando que el indicador de bloqueo de rotación está en VERDE ...

Страница 213: ... en el asiento infantil para el automóvil con el niño envuelto en una manta Para mantener al niño abrigado coloque una manta sobre el niño DESPUÉS de que haya afianzado y ceñido el arnés correctamente alrededor del niño 1 Afloje el arnés presionando firmemente el botón de liberación del arnés mientras tira hacia adelante de las dos correas del arnés debajo de las almohadillas de las correas del ar...

Страница 214: ... Coloque las correas del arnés sobre los hombros del niño y alrededor de la cintura del niño Las correas deben quedar planas sin torceduras y centradas entre los hombros del niño NOTA Si la correa de la hebilla está debajo del niño será necesario ajustarla ver pág 44 Para asegurar un mejor ajuste con los bebés más pequeños podría ser necesario utilizar el acojinado para el cuerpo ver pág 47 NUNCA ...

Страница 215: ...as correas del arnés estén colocadas correctamente NOTA La solapa de la cabecera está diseñada con tres líneas de pliegue para permitir el almacenamiento parcial o total Si usa las posiciones más bajas de la cabecera o el arnés asegúrese de insertar el exceso de la solapa de la cabecera detrás de si misma ...

Страница 216: ...A La cabeza del niño DEBE estar por lo menos 2 5 cm 1 in o más debajo de la parte superior de la cabecera o armazón lo que sea más alto ORIENTADO HACIA ADELANTE Coloque las correas del arnés EN o APENAS ARRIBA de los hombros del niño NOTA La parte superior de las orejas del niño DEBEN estar por debajo de la parte superior de la cabecera ...

Страница 217: ...la para asegurarse de que estén abrochadas de forma segura COMPRUEBE que la hebilla funcione correctamente y se mantenga libre de suciedad y residuos Asegúrese de que las correas del arnés no estén torcidas 6 Abroche el clip para el pecho abrochando juntos ambos lados Deberá escuchar un CLIC Como asegurar al niño con el arnés buc kle stor age PLACE AT ARMPIT CLIC CLIC ...

Страница 218: ...ra el pecho hacia abajo lejos del cuello del niño y en dirección a la hebilla del arnés Como asegurar al niño con el arnés 8 Jale hacia arriba ambas correas para el hombro para eliminar toda la holgura de las caderas del niño ...

Страница 219: ...s del arnés hasta que el arnés esté ajustado al niño Una correa ceñida no debe tener ninguna holgura Queda en una línea relativamente recta sin estar floja No presiona la piel del niño ni empuja el cuerpo del niño en una posición poco natural Si puede pellizcar la correa en los hombros del niño el arnés está demasiado flojo 10 Coloque el clip para el pecho al nivel de las axilas como se muestra ...

Страница 220: ... presione firmemente hacia abajo el botón de liberación del arnés mientras jala hacia adelante ambas correas del arnés al nivel del hombro 12 Para retirar al niño del asiento presione los botones centrales en el clip para el pecho y la hebilla del arnés y sepárelos ...

Страница 221: ...dría causar lesiones graves La base del asiento elevador debe estar plana en el asiento del vehículo Cuando el niño esté en el asiento elevador jale pase y cruce el cinturón para regazo y hombro y abróchelo En el modo de ASIENTO ELEVADOR su niño está siendo sujetado por el cinturón de regazo y hombro del vehículo por lo que el ajuste de los cinturones es importante Compruebe que el cinturón para e...

Страница 222: ... otro de la cadera del niño dentro de las guías inferiores del cinturón y abrochado en la hebilla La parte superior de las orejas del niño quedan en o por debajo de la parte superior de la cabecera del asiento elevador El cinturón de hombro DEBE pasar a través de la guía del cinturón para el hombro y la guía del cinturón debe estar pareja o apenas por arriba de los hombros Como asegurar con el asi...

Страница 223: ...a cubierta del asiento Para retirar la cubierta del asiento 1 Mantenga presionado el botón de liberación del arnés mientras tira de las correas del arnés 2 Levante la cabecera y retire las correas elásticas del asa de ajuste de la cabecera ...

Страница 224: ...bierta del asiento 3 Retire las correas elásticas de las guías de los cinturones del vehículo y deslice la almohadilla de la cabecera sobre el mismo 4 Tire de la correa del arnés por la abertura de la cabecera y retire la cabecera del asiento ...

Страница 225: ... parte trasera del asiento infantil para el automóvil tire de la tela superior hacia abajo para liberar las lengüetas de plástico 6 Localiza la solapa en la parte delantera del acolchado del asiento detrás de la cabecera y deslízala hacia abajo para desconectar los ganchos del armazón ...

Страница 226: ...o del respaldo de la parte trasera del asiento y saque las manijas de giro en la parte superior del armazón del asiento 8 Desconecte los conectores de velcro en la parte inferior del acojinado posterior y retire el acojinado posterior de la parte superior del armazón PLACE AT ARMPIT ...

Страница 227: ...ido de las guías de cinturón de regazo del asiento elevador 10 Empuje la hebilla y la correa de ajuste del arnés a través de la ranura del asiento Retire el acojinado del asiento NOTA No es necesario quitar los portavasos para quitar el acojinado del asiento PLA CE AT ARM PIT ...

Страница 228: ...ando por la parte superior del asiento coloque el acojinado posterior alrededor de la parte superior del armazón del asiento asegurándose de que las dos lengüetas de plástico del respaldo del asiento estén bien sujetas 3 Asegure la solapa de la parte delantera del asiento al armazón del asiento con los dos ganchos de la solapa ...

Страница 229: ... inferiores del cinturón del vehículo a ambos lados del asiento en el canal que rodea el perímetro del asiento Continúe metiendo el acojinado posterior en la ranura y alrededor de las manijas de giro hasta que esté completamente asegurada 5 Asegure el elástico alrededor de las guías inferiores del cinturón del vehículo buckle storage ...

Страница 230: ...siento luego tire la correa de la hebilla a través de la ranura apropiada en el acojinado del asiento ver pág 44 NOTA No es necesario quitar los portavasos para cambiar el acojinado del asiento 7 Desde la parte delantera del asiento asegúrese de que las correas del arnés estén bien colocadas y asegure los cierres de velcro que conectan el acojinado del respaldo con el acojinado del asiento buc kle...

Страница 231: ... la cubierta del asiento 9 Vuelva a colocar las correas elásticas en la parte posterior de la cabecera y alrededor de las guías del cinturón para hombro NOTA Tire del elástico dentro de la guía del cinturón y hacia arriba alrededor del canal de la guía del cinturón para fijar el elástico en su lugar 10 Tire de las correas del arnés a través de la abertura en el acojinado de la cabecera ...

Страница 232: ...culos blandos incluyen el acojinado de la cabecera acojinado del asiento acojinado para la cabeza acojinado para el cuerpo cubiertas de los arneses y la cubierta de la hebilla Retire los insertos de espuma del acojinado de la cabeceras antes de lavarla NUNCA use el asiento infantil para el automóvil sin el acojinado del asiento Para proteger el asiento infantil para el automóvil de daños causados ...

Страница 233: ...smonte el asiento infantil para el automóvil 3 Recicle todas las partes de metal espuma plástico acojinado y tela si su centro de reciclaje local lo acepta Elimine el resto de los componentes de manera responsable Si el centro local de reciclaje no acepta el acojinado puede eliminarlo en el basurero municipal Para evitar lesiones causadas por daños no visibles instrucciones perdidas tecnología ant...

Страница 234: ...n el 1 800 233 5921 Cuando se comunique con nosotros tenga a la mano el número de modelo y la fecha de fabricación del producto se encuentran en la parte posterior del asiento infantil para el automóvil Ensamblaje de la base Acojinado para el cuerpo y acojinado para la cabeza Hebilla Portavasos izquierdo o derecho ...

Страница 235: ...117 Partes de repuesto Cubiertas del arnés Acojinado de la cabecera Correa LATCH Acojinado del asiento ...

Страница 236: ...guarde la Guía del usuario como se muestra en el bolsillo de la parte trasera del asiento infantil para el automóvil Para referencia futura anote abajo el número de modelo Y la fecha de fabricación del asiento infantil para el automóvil Número de modelo Fecha de fabricación _________________________ _________________________ ...

Страница 237: ...antía Evenflo extiende esta garantía limitada expresa EXCLUSIVAMENTE al Comprador original del Producto y no se podrá asignar ni transferir a compradores o usuarios finales subsiguientes Para obtener servicio de garantía comuníquese con el centro de Recursos para el Consumidor ParentLink de Evenflo en www evenflo com EXCEPTO EN LA MEDIDA QUE LA LEY VIGENTE LO PROHÍBA POR MEDIO DE LA PRESENTE SE NI...

Страница 238: ...USA 1 800 233 5921 8 AM to 5 PM E T ...

Отзывы: