


- 19 -
9.4
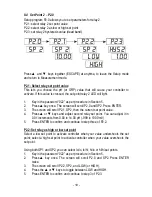
Set Point 2 – P2.0
Setup program P2.0 allows you to set parameters for relay 2.
P2.1: select relay 2 set point value
P2.2: select relay 2 as low or high set point
P2.3: set relay 2 hysteresis value (dead band)
P
2.0
P
2.1
P
2.2
P
2.3
10.00
1.00
HYS
2
SP 2
SP 2
SP 2
LOW
HIGH
Press
▲
and
▼
keys together (ESCAPE) at anytime, to leave the Setup mode
and return to Measurement mode.
P2.1: Select relay set point value
This lets you choose the pH (or ORP) value that will cause your controller to
activate. If this value is crossed, the set point relay 2 LED will light.
1.
Key in the password “022” as per procedure in Section 5.
2.
Press
▲
key once. The screen will scroll P2.0 and SP2. Press ENTER.
3.
The screen will scroll P2.1, SP2, then the current set point value.
4.
Press
▲
or
▼
keys and adjust second relay set point. You can adjust it in
0.01 increments from 0.00 to 14.00 pH (-999 to 1000 mV).
5.
Press ENTER to confirm and continue to step three of P2.2.
P2.2: Set relay as high or low set point
Select a low set point to activate controller when your value undershoots the set
point; select a high set point to activate controller when your value overshoots the
set point.
Using both SP1 and SP2, you can select lo/lo, lo/hi, hi/lo or hi/hi set points.
1.
Key in the password “022” as per procedure in Section 5.
2.
Press
▲
key once. The screen will scroll P2.0 and SP2. Press ENTER
twice.
3.
The screen will scroll P2.2, SP2, and LOW (or HIGH).
4.
Press the
▲
or
▼
keys to toggle between LOW and HIGH.
5.
Press ENTER to confirm and continue to step 3 of P2.3.
Содержание alpha pH 200
Страница 2: ......
Страница 13: ... 9 P P 000 P 000 P 0 10 P 020 P 0 11 P 022 P 011 P 022 ...
Страница 15: ... 11 7 0 0 7 0 0 10 0 1 10 0 1 10 0 3 6 9 7 bU f f bU f f d o n e ENTER ENTER ENTER ENTER ENTER ENTER d o n e ...
Страница 39: ......