background image


Document ID:06080001 

Rev: L 

Technical Support: 800-626-6912 

Page 18 of 24

C

RYSTAL 

C

LEAN


P

IPE

-F

REE

®


S

PA 

-


O

PERATING 

I

NSTRUCTIONS


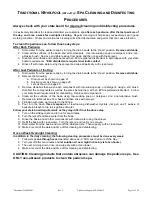
Preparing the Pedicure Spa for Operation:


After the pedicure spa is installed and the plumbing and electrical connections are made, clean and 
disinfect the basin before initial use.  Rinse the basin by using the attached water sprayer.  Wipe the 
basin dry with a clean towel. 

To Operate the Pedicure Spa, Follow These Easy Steps: 
Adding Water to the Pedicure Spa Basin: 

1.  Close the drain by turning the chrome drain handle counter-clockwise until it stops. 
2.  Add water to the basin by lifting upward on the water faucet fill handle.  Turn the handle in a 

counter-clockwise direction for cold water or clockwise for warm water as indicated by the red 
(hot) and blue (cold) markings around the handle (CAUTION:  hot water can burn skin).  Continue 
to add water until the fill line is reached.  The fill line is indicated by the wavy (~~~~) line in the 
basin. 

3.  Turn the off water by pushing the handle downward and center. 

Operating the Crystal Clean

 Pipe-Free

®

 System: 

The Crystal Clean

 Pipe-Free

®

 System eliminates pipes and jets that can harbor harmful bacteria while 

at the same time delivering a soothing, quality foot massage.  This unique system is driven by an 
impeller that pulls water through the inlet cover and then forces the water outward through key 
massage zones in the footplate.  The end result is a soothing massage delivered to all areas of the foot:  
front, back and bottom.   


To start or stop the whirlpool, depress the On/Off button labeled “Jets” (

NOTE:  An indicator light on 

the “Jets” button flashes when the footplate is improperly installed, or the basin contains no 
water.  As a result, the whirlpool will not function.  To fix, simply check that the footplate is 
securely fastened or add water to the basin

). 


Removing Water from the Pedicure Spa Basin: 

First, make certain the whirlpool jets are turned off by turning the On/Off switch counter-clockwise to the 
“Off” position. 


If the pedicure spa is hooked up directly to a floor drain, simply open the drain by turning the drain 
handle in a clockwise direction until it stops.  You should see the water level lowering as water exits the 
basin. 


If the pedicure spa is equipped with the optional Power Drain Pump (PDP) feature, open the drain by 
turning the drain handle in a clockwise direction until it stops.  Press the button marked “Drain” on the 
front panel.  The water level will lower as water is pumped out of the basin.  Turn the pump off by 
pressing the “Drain” button on the front panel once the basin is fully drained (

NOTE:  the PDP will 

automatically shut off after 2-1/2 minutes.  We recommend turning off the pump manually if all 
water has drained before automatic shut-off.  Drain pump may overheat if operated more than 
10 minutes in a 45 minutes period

). 

Warning: 
It is extremely important to follow the cleaning instructions located on the following page.  
Failure to clean the pedicure spa adequately can result in serious health issues for your clients 
as well as the nail technician.  Failing to clean your pedicure spa may also cause the pedicure 
spa to not work properly.  Always consult your local and state codes concerning pedicure chair 
cleaning for further requirements. 

Содержание ALTERA SPA

Страница 1: ...The World s Finest Pedicure Spas OWNER S MANUAL FORTE SPA ALTERA SPA CRYSTAL CLEAN PIPE FREE TRADITIONAL WHIRLPOOL...

Страница 2: ...ponents or part if altered or modified in any way To any expenses incurred by the Customer or any third party including labor or material during investigation removal or reinstallation of the Pedicure...

Страница 3: ...le for any other obligations or liabilities including but not limited to obligations or liabilities arising out of breach of contract or warranty negligence or other tort or any theory of strict liabi...

Страница 4: ...Rated 220 240VAC 50Hz 7 5A To the following standard s EN60335 1 2002 EN60335 2 32 2002 EN 55014 1 Generic 2001 EN 55014 2 Generic 2003 EN61000 4 2 Criteria C 2001 EN61000 4 3 2002 EN61000 4 4 1995 E...

Страница 5: ...6 6912 Page 5 of 24 OWNERS MANUAL For Whirlpool Pedicure Spa Models FORTE and ALTERA IMPORTANT INFORMATION Serial Number W O Number Installed by Installation Date Serial Number W O Number Note Vietnam...

Страница 6: ...AL WHIRLPOOL WITH JETS 10 CRYSTAL CLEAN PIPE FREE 11 TRADITIONAL WHIRLPOOL WITH JETS 12 SPECIFICATIONS 13 ATTACHING THE SEAT BACK 14 UNPACKING THE CUSHIONS 15 REMOTE CONTROL CONFIGURATIONS 15 ATTACHIN...

Страница 7: ...edures that need to be followed when having your pedicure spa installed Subsequent inspections and approvals that may be required are the responsibility of the purchaser See limited warranty regarding...

Страница 8: ...comply with all plumbing and electrical codes A licensed plumber and licensed electrician must complete the applicable connections of the pedicure spa LOCATION AND SUPPORT Select a level location The...

Страница 9: ...A112 18 1M and CSA B125 ANSI ASME A112 18 3M Performance Requirements for Backflow Protection Devices and Systems in Plumbing Fixture Fittings is applicable to plumbing fixture fittings with outlets...

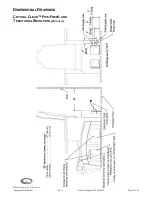
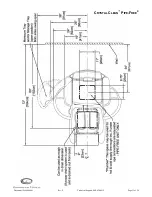
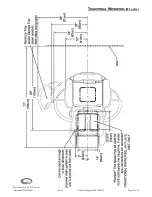
Страница 10: ...Document ID 06080001 Rev L Technical Support 800 626 6912 Page 10 of 24 DIMENSIONAL DRAWINGS CRYSTAL CLEAN PIPE FREE AND TRADITIONAL WHIRLPOOL WITH JETS...

Страница 11: ...Document ID 06080001 Rev L Technical Support 800 626 6912 Page 11 of 24 CRYSTAL CLEAN PIPE FREE...

Страница 12: ...Document ID 06080001 Rev L Technical Support 800 626 6912 Page 12 of 24 TRADITIONAL WHIRLPOOL WITH JETS...

Страница 13: ...rotected Caution Pedicure spa must be installed by a licensed electrician and a licensed plumber conforming to all local and national electrical codes Construction Linear Low Density Polyethylene LLDP...

Страница 14: ...on the back of the chair Step 1 Remove the hitch and clevis pins located on the seat back mounting bracket on the back of the chair Step 2 Slide the seat bracket into the black end on the linear actua...

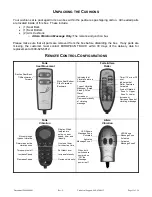
Страница 15: ...Move Seat Bottom Slide Forward or Backward Indicates that Vibrate Feature is Activated Type of Vibrating Massage Surge Steady Pulse Wave Increase or Decrease Intensity of vibrating massage Forte Alte...

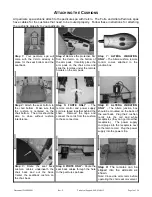
Страница 16: ...the chair bottom Make sure that the cushion is centered on the chair bottom The arms should be able to close without cushion interference Step 5 FORTE ONLY The remote control and power supply cord ar...

Страница 17: ...sive foam It has been determined that products containing non dissolving abrasives such as sand and sea salts will not harm the internal component structure of your pedicure spa as long as the entire...

Страница 18: ...ol depress the On Off button labeled Jets NOTE An indicator light on the Jets button flashes when the footplate is improperly installed or the basin contains no water As a result the whirlpool will no...

Страница 19: ...placing the footplate carefully align the mounting studs with the mounting holes Tighten each knob until snug Be careful not to over tighten as this can damage the Knobs After Last Pedicure of the Day...

Страница 20: ...e Jet heads should not be positioned directly at the suction cover Doing so will create a noisy gurgling sound as air is being forced directly into water pipes Turn off the whirlpool jets by turning t...

Страница 21: ...ponent with low sudsing soap or detergent using a soft brush Disinfect the components as well as the areas behind them with an EPA registered disinfectant Follow your state board requirements for disi...

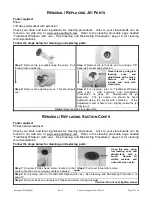
Страница 22: ...If the adjustment cover is hard to turn slightly loosen the jet nozzle nut Step 5 Reverse steps to reassemble REMOVAL REPLACING SUCTION COVER Tools required Philips head screwdriver Check your state...

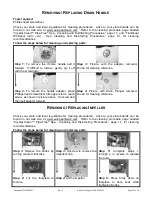
Страница 23: ...own for cleaning reference Step 2 To remove the handle adapter place Phillips head screwdriver into upper slot to reach screw as shown in picture above Unscrew and then pull adapter forward Step 4 Pic...

Страница 24: ...EUROPEAN TOUCH 8301 W Parkland Court Milwaukee WI 53223 Phone Number 414 357 7016 Toll Free 800 626 6912 Fax 414 357 6360 Web Site www europeantouch com Email info europeantouch com...

Отзывы: