background image

© 

EUROHEAT

 DISTRIBUTORS (H.B.S) LTD. April. 2011


 Instructions Part Number IN1176 Ed.B

19

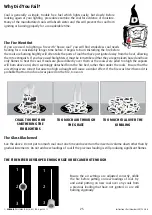
Always try to position new logs so that they are in  the path of existing flames by bridging the flames where 
possible. Do not over fill the insert with wood expecting it to burn for an extended time, it will produce little but 
smoke and tar. If the insert is running with a low air volume setting, turning up the volume for a few minutes 
whenever you load new logs will encourage them to ignite faster. Do not be afraid to put logs towards the front 
of the fire, the glass will stay clean and the visual interest will be increased.

Setting the Burning Rate

Setting the air volume rate on the Plexus should always be done with reference 
to the condition of the fire. You cannot expect to turn the air to maximum and 
the  insert  increase  its  heat  output  if  the  fire  in  the  insert  is  ash  with  a  few 
glowing embers.  Neither should the insert be expected to shut down a huge fire 
immediately the air supply was restricted, without producing copious amounts 
of smoke. Unlike driving a car that accelerates and brakes, wood burning should 
be regarded as something that gathers and losses momentum gracefully, and all 
adjustments to the burning rate should be made accordingly.

Putting a large quantity of wood into the insert and turning the air setting to low 
will inevitably result in smoke as the wood is heated with insufficient air to burn 
with. Always wait until the wood is producing flames before turning down the 
air volume in stages. If the fire has become very lethargic after a long period of 
slow burning, or has no flames, set the air controls to their lighting position and 
place a few pieces of dry kindling onto the fire bed to ensure rapid ignition. Once 
the kindling has ignited the air direction lever should be set to its uppermost 
position and the volume control set to maximum before adding one or two logs. 
Never allow wood to smoulder, it wastes heat and pollutes the atmosphere.  

If  you  have  fitted  a  remotely  controlled  burner  rate  adjustment,  please  read 
Technical Guides IN1203 Thermostatic Remote Control (pictured), for advice on 
making the most of its facilities.  

X

X

LOG ENDS TOO CLOSE

TO Insert WALLS. 

NO SPACE  BETWEEN THE 

LOGS

TOO MANY LOGS

 TOO LITTLE SPACE BETWEEN 

THE LOGS.

CORRECTLY LOADED

+

Содержание Nestor Martin IT33

Страница 1: ...PART NUMBER SERIAL NUMBER Operating Instructions Nestor Martin IT33 IN1180 Edition B April 2011 This Manual Must Always Be Available To The Stove Operator ...

Страница 2: ...action fan is proposed to be fitted to a connecting area of the house after the insert has been installed professional advice should sought from a qualified engineer If a flue blockage or adverse weather conditions cause the insert to emit smoke do not treat it as merely a nuisance this smoke will indicate that carbon monoxide is being emitted into the room Properly installed operated and maintain...

Страница 3: ...oducts which are market leading Our aims are to produce inserts with the latest innovations user friendly operation and highly efficient for lower cost operation When burning wood you will be greatly assisting with reducing Co2 to the environment when compared to coal oil or gas This operation manual offers user information for the Nestor Martin IT33 multifuel and wood stove Model Identification Y...

Страница 4: ...out These fumes may activate a smoke detector if fitted and during this period the room must be ventilated by leaving the windows open and it should not be occupied by people or pets The time taken for the paint to be fully cured will be dependant upon the temperature but you should allow at least six hours If you re paint or fit new parts to your insert another period of curing will be necessary ...

Страница 5: ...posits on the insert s glass even when the air supply is reduced to minimal setting Always put logs on to the fire before flames from previous logs have extinguished this will ensure that when the new logs begin releasing gases it will ignite Unburned gases will cause smoke and tar deposits and wastes potential heat Putting on too much wood at one time will both restrict the air supply and cool th...

Страница 6: ...within the stack and storing it under cover for between 18 months and 30 months depending on prevailing climatic conditions The use of a wood moisture content meter will confirm the amount of water remaining in the wood easily The practice of drying wood by the insert should be discouraged firstly because it should be unnecessary and secondly because stored wood will invariably become the home to ...

Страница 7: ...te more easily Similarly it also allows the volatile gases given off when the wood is heated in a insert to be emitted along its full length rather than at the log s ends This helps the gases to be distributed more evenly within the insert and improves not only the efficiency and emission reduction of wood burning but gives a more attractive fire Putting logs onto the fire bark side down and layin...

Страница 8: ... Insert Controls Riddle arm Air direction lever Ash pan door securing latch Minimum bypass lever Air volume lever Ash pan door Minimum bypass lever This lever should be set to maximum at all times unless advised otherwise by your heating engineer or the Euroheat Technical Department ...

Страница 9: ...tering the insert when the air volume lever is closed Air Direction Lever When the direction lever is in its uppermost position the air enters the insert above the fire and when set to its lower position air enters the insert from beneath the grate Positioning the lever at its mid position will supply air both over and under the fire and this position is used when lighting a fire or burning manufa...

Страница 10: ... in the mid range with slow burning being achieved when the control is set in the graduated end of the scale Do not expect the insert s performance to match any setting repeatedly because it will be affected by so many other factors such as fuel quality and weather conditions THIS CONTROL KNOB MAY BE HOT ALWAYS USE THE Insert TOOL TO MAKE AIR VOLUME ADJUSTMENTS Lighting and When the Flue is Cold O...

Страница 11: ...illing the ash pan can prevent under grate air reaching the fire which can cause poor operation and damage to the grate Available Accessories Euroheat offer a range of accessories which may assist with your day to day operation These include fire tool sets for cleaner operation log stores for storing wood and other items Ask your euroheat retailer for the Every Thing But The Stove Brochure or visi...

Страница 12: ...le end is used to engage the ash pan socket Care should be taken to ensure the tool is fully engaged before removing the ash pan The glove should always be worn on the hand not operating the insert tool so that the ash pan can be securely held Do not put the ash into or with anything combustible even seemingly cold ashes may contain small glowing embers capable of igniting items they come in conta...

Страница 13: ...be opened and the ash pan removed The ash pit door must be closed immediately the ash pan is removed and the insert door must also be closed securely When re installing the empty ash pan the insert door must again be slightly opened before opening the ash pit door Never open the ash pit door without the insert door being ajar and never leave either the insert door or the ash pit door open for long...

Страница 14: ...ight direction until it warms Do not expect it to be on auto pilot until it reaches its operating temperature ACME Ensure the ash pan is fitted and empty then securely close the ash pit door Set the Plexus control to maximum air volume and the air direction lever to mid position supplying air above and below the grate Lightly crumple two tabloid sized pieces of newspaper and lay them in the middle...

Страница 15: ...e cone of kindling burns it will collapse and the inner ends of the wood will begin to char and glow Wait until a substantial amount of the kindling is charring before moving onto the next stage Wearing the insert glove place a log to either side of the burning kindling and larger than kindling wood over but not smothering the kindling If your insert is a larger model it will be possible to put a ...

Страница 16: ...ire is established Never leave it in its lighting position continuously Putting new logs bark side down towards the front of the grate will give you both maximum efficiency and best visual effect as it begins to burn Never put more than a layer of wood on at a time as the logs will become unstable and may roll against the glass making it difficult to open the door If you lit your fire in the inser...

Страница 17: ...determine how much fuel can be loaded at one time but remember you are lighting the insert and wanting it to reach its operating temperature as quickly as possible all smoke is a pollutant and wasted fuel X X The Glass Blackened See the above The fire may not have extinguished but smoke and staining are unburned fuel gases from the wood Until the flue has warmed air supply to the insert will be li...

Страница 18: ...ly without staining the glass for many hours If only a low heat output or limited burning time is required the charcoal will be producing much of the heat with an occasional log being loaded for interest Letting the bed become too small or putting on a new log when all the flames from a previous loading have extinguished will cause smoke as the new loading struggles to ignite Always add wood to th...

Страница 19: ...like driving a car that accelerates and brakes wood burning should be regarded as something that gathers and losses momentum gracefully and all adjustments to the burning rate should be made accordingly Putting a large quantity of wood into the insert and turning the air setting to low will inevitably result in smoke as the wood is heated with insufficient air to burn with Always wait until the wo...

Страница 20: ... setting if flames are still visible reducing the air to a minimum will extinguish any flames and cause tar and smoke to be produced Always wait until no more flames are evident before you can safely turn the air volume to a minimum setting with no fear of staining the glass The actual setting needed will depend upon the performance of your flue setting and by raking the ashes through the grate in...

Страница 21: ...start it in the right direction until it warms Do not expect it to be on auto pilot until it reaches its operating temperature Lightly crumple two tabloid sized pieces of newspaper and lay them in the middle of the grate Resist the temptation to use more paper than this or to crumple it too tightly doing either will prevent the rapid development of flames and will cause smoke to be produced ACME E...

Страница 22: ...til the kindling fire core has lost its large flames and is glowing then wearing the glove lay several pieces of kindling on the top of them followed by pieces of coal Try to leave open spaces between pieces of coal with some bridging others rather than a single layer Putting on too much at this stage will only cause smoke and hinder the fire s development If you are burning Anthracite the air dir...

Страница 23: ...but is glowing brightly Fire lighters perform well only if the blocks are protected from fast air flow Setting the air volume to a position between maximum and the mid position will provide sufficient air for the firelighters to burn without causing the flames to be blown out The air direction lever should be set to its mid position Placing a layer of coal on the grate for the firelighters to sit ...

Страница 24: ... placed to cover only coals which are glowing It will delay the ignition of coal not already burning if further layers of coal are added to them Smoke production will be reduced if new coals are added only when the coal has stopped emitting flames but is glowing brightly If you lit your fire in the insert cleanly and you are now feeling it becoming hot congratulations you have passed the lighting ...

Страница 25: ...s to heat the coal If coals are placed directly over them or the coals were piled too high the vapours will burn above and often seemingly detached from the fire bed rather than under the coals Ensure that the air settings were correct because too high a draught will cause a similar effect If the fire was lit with wood it is probable that too much coal was placed on the fire too soon TOO MUCH AIR ...

Страница 26: ...the coals with insufficient air to burn and suddenly introducing air by riddling the grate may cause the accumulated gases to ignite suddenly and startlingly New coals should be loaded onto the fire as an even layer rather than a central mound so that it ignites rapidly and evenly Never load more coal than is contained by the log guard this is especially important if rounded formed coals are being...

Страница 27: ...eview your operating procedures to determine whether cleaner and more efficient combustion can be achieved The Insert Body Dusting the insert may be carried out when the insert is at its minimum heat output temperature using light strokes of a real bristle paint brush Thorough cleaning or any attempt to remove marks on the insert body must only be done when the insert is cold Inserts with a painte...

Страница 28: ...n become a serious health risk if the flue is not taking away all the products of combustion Do not use a vacuum cleaner unless it is fitted with an additional hot ash filter bin Removing Top Chamber Baffle Periodically the insert should be thoroughly cleared of all combustion deposits which will necessitate the removal of the vermiculite baffle and cast protection plates 1 2 3 The top mica baffle...

Страница 29: ...it the replacement reverse the procedure Removal of the Side protection plate To remove 1 lift up the plate so it is higher than the grate frame and then 2 twist the rear edge towards the front of the fire box It can then be angled within the fire box to withdraw it through the door To refit the replacement reverse the procedure Removal of the Rear protection plate To remove 1 lift up the plate so...

Страница 30: ...ts will cancel any warranty and may make it unsafe Warranty Registration Please ensure this is fully completed by your installing engineer with details of your approved Euroheat supplier and returned to Euroheat within 28 days of installation The free 10 year technical telephone help can only be authorized if the insert is registered fitted by an approved engineer and the registration form returne...

Страница 31: ... EUROHEAT DISTRIBUTORS H B S LTD April 2011 Instructions Part Number IN1176 Ed B 31 ...

Страница 32: ...hnical 01885 491117 Reception 01885 491100 Need more info with over 10 000 pages of technical information spare parts product shots news and 1001 other things you will not find a more comprehensive solution to your queries whatever time of the day www euroheat co uk ...

Отзывы: