background image

Replacement of batteries:

Service life of the alkali-type batteries of the sensor is up to 3 years.
You have to replace them as soon as the symbol in sensor display
of the radio-controlled clock disappears although there is no gene-
ral and continual interference of the radio reception. 
The battery replacement procedure is described above. As soon
as the batteries have been replaced, the sensor is operable again.

3.3 Observing the regulations for the use of batteries

Attention! Always pay attention to the regulations for use of batte-
ries!

Used batteries and accumulators (rechargable batteries) must not
reach the usual household waste!

Please dispose of used batteries and accumulators at your local
dealer, at the public toxic waste or used battery dump.

4. Addressing and installation of the outside sensor AS 2000

4.1 Addressing the sensor

The basic sensor address programmed by the manufacturer is ”1”.
There are 8 addresses available (1 to 8, according to the display).
1. You can program the address by setting the jumpers on the

sensor board yourself: Remove the front section of the housing.

2. Remove the protective cap above the sensor housing and take

out the batteries. 

3. Next unscrew both screws on the left and right beside the wall

bracket on the reverse side as well as the screw above the

before inserting the new ones!

3.2 Radio temperature sensor AS 2000

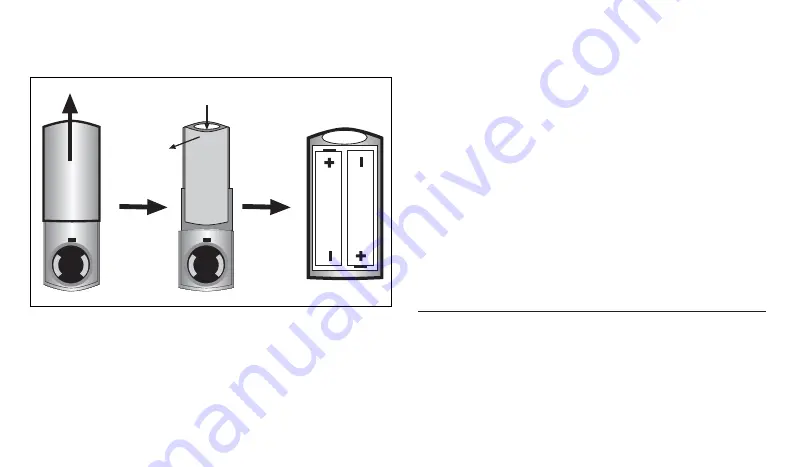
Remove the protective cap from the outside sensor and open the

battery compartment as illustrated in the following picture:
Insert two 1.5V miniature batteries (AA, LR6, alkali type) paying
attention to correct polarity (see picture) into the battery compart-
ment and close it again.
Put the protective cap back and press the lid closed until it snaps.

24

1

2

Содержание 53166

Страница 1: ...meteorological station Mode d emploi montre radio pilotée à station météorologique intégrée Instrucciones para el uso reloj radiocontrolado con estación meteorológica Instruzioni per l uso orologio radiocommandato con stazione meteo Gebruiksaanwijzing Atoomklok met weerstation www be connected org ...

Страница 2: ...Funkuhr mit Wetterstation 9 3 2 Funk Temperatursensor AS 2000 10 3 3 Beachtung der Batterieverordnung 10 4 Adressierung und Anbringung des Außensensors AS 2000 10 4 1 Sensor adressieren 10 4 2 Montage Demontage des Außensensors 11 4 3 Reichweite Empfangsstörungen 12 5 Die Anzeigen auf dem Display der Funkuhr mit Wetterstation 13 6 Einstellen der Funktionen 14 6 1 Weckzeit einstellen und abstellen ...

Страница 3: ...es 23 3 1 radio controlled clock with meteorological station 23 3 2 Radio temperature sensor AS 2000 24 3 3 Observance of regulations for use of batteries 24 4 Addressing and installation of the outside sensor AS 2000 24 4 1 Addressing of the sensor 24 4 2 Installation Removal of the outside sensor 25 4 3 Range Interference 26 5 Symbols of the radio controlled clock with meteorological station dis...

Страница 4: ...ur de température radio piloté AS 2000 38 3 3 Observation du mode d emploi des piles 38 4 Réglage et montage du capteur externe AS 2000 38 4 1 Réglage du capteur 38 4 2 Montage Démontage du capteur externe 39 4 3 Portée géographique du capteur Troubles de réception 40 5 L affichage sur l écran de la montre radio pilotée à station météorologique intégrée 41 6 Réglage des fonctions 42 6 1 Programmat...

Страница 5: ...n estación meteorológic 51 3 2 Sensor de temperatura radiocontrolado AS 2000 52 3 3 Legislación sobre el desecho de pilas 52 4 Dirección y colocación del sensor externo AS 2000 52 4 1 Asignar una dirección al sensor 52 4 2 Montaje Desmontaje del sensor externo 53 4 3 Alcance Interferencias de recepción 54 5 Indicaciones en la pantalla del reloj radiocontrolado con estación meteorológica 55 6 Ajust...

Страница 6: ...3 1 orologio radiocommandato con stazione meteo 65 3 2 sensoree radio di temperatura AS 2000 66 3 3 Osservare l ordine delle batterie 66 4 Indirizzamento e posizionamento del sensore esterno AS 2000 66 4 1 Indirizzare il sensore 66 4 2 Montaggio Smontaggio del sensore esterno 67 4 3 Portata Problemi di ricezione 68 5 I simboli sul display del orologio radiocommandato con stazione meteo 69 6 Regola...

Страница 7: ...ssel 79 3 1 Atoomklok met weerstation 79 3 2 Temperatuursensor AS 2000 80 3 3 Opvolging van de batterijveroudering 80 4 Adresseren en aanbrengen van de buitensensor AS 2000 80 4 1 Sensor adresseren 80 4 2 Montage Demontage van de buitensensor 81 4 3 Reikwijdte Ontvangststoringen 82 5 De weergaven op de display van de atoomklok met weerstation 83 6 Instellen van de functies 84 6 1 Wektijd instellen...

Страница 8: ...ßenbereich im Gewächshaus im Keller der Garage Lagerraum u v m montiert werden und erlaubt so eine komplexe Überwachung verschiedener Standorte Es handelt sich um einen frei adressierbaren batteriebetriebenen Funk Universal Temperatursensor für den Temperaturbereich 30 C bis 70 C Bestimmungsgemäßer Gebrauch Bitte lesen Sie diese Anleitung vor der ersten Inbetriebnahme kom plett und sorgfältig Sie ...

Страница 9: ...00 angezeigt erscheint im Display als Wochentag SA deutsche Sprachein stellung und als Kalenderwoche 52 Danach werden angezeigt die Luftfeuchtigkeit die Innentem peratur der Luftdruck die Wettervorhersage wolkig Standard prognose Die Analoguhr wird auf 12 00 gestellt Danach blinkt das Symbol Nach erfolgreichem Funkkontakt wird die aktuelle Zeit sowie Datum Wochentag und Kalender woche angezeigt un...

Страница 10: ...des Außensensors AS 2000 4 1 Sensor adressieren Die werksseitige Grundeinstellung des Sensors ist die Adresse 1 Verfügbar sind 8 Adressen 1 bis 8 entsprechend der Anzeige 1 Sie können die Adressierung selbst mittels Jumpern auf der Sensorplatine vornehmen Nehmen Sie die vordere Gehäusehälfte ab 2 Nehmen Sie die Schutzkappe über dem Sensorgehäuse ab und entfernen Sie die Batterien 3 Danach entferne...

Страница 11: ...danach das Gehäuse indem Sie die beiden Gehäusehälften wieder zusammenfügen und mit den drei Schrauben miteinander verbinden 7 Legen Sie dann die Batterien wieder polrichtig ein stecken Sie den Außensensor in seine Halterung und stecken Sie die Schutzhaube wieder auf 4 2 Montage Demontage des Außensensors Der Außensensor kann mit dem mitgelieferten Montagefuß sehr ein fach an eine senkrechte Fläch...

Страница 12: ...Arbeitsfrequenzen können ebenfalls den Empfänger beeinflussen Schlecht abgeschirmte PC s können in den Empfänger einstrah len und die Reichweite vermindern Bei Empfangsstörungen drehen Sie die Funkuhr mit Wetter station bis die Daten des Sensors wieder empfangen werden können Achtung Wählen Sie einen Montageort aus der nicht direkt Niederschlägen starker Staubeinwirkung oder direkter Sonneneinstra...

Страница 13: ...ge 2 Luftdruck geografische Höhe Symbol 3 Frostwarnung bei Außen temperatur kleiner oder gleich 3 C 4 Außentemperatur 5 Adresse des Außensensors 6 Wettertendenz INNENFELD Raumwerte 7 Innentemperatur 8 Luftfeuchtigkeit Symbol KALENDERFELD Kalender 9 Datum 10 Wochentag Anzeige von der gewählten Sprache abhängig 11 Kalenderwoche ZEITFELD Uhr 12 aktuelle Zeit 13 Datum in der Memo Funktion STATUSFELD E...

Страница 14: ...f der Funktion erscheint die Zeitanzeige 6 00 Uhr Wenn schon eine Weckzeit eingestellt ist erscheint diese Rechts im ZEITFELD blinkt das Wort Alarm 2 Betätigen Sie die SYNC SET Taste Nun können Sie die Weck zeit eingeben Die Minutenanzeige blinkt Die Wettertendenz Feld 6 der Display Abbildung Wettertendenz sprich starke Luft druckänderung zeigt die allgemeine Wettertendenz Der Pfeil nach oben hin ...

Страница 15: ...ut Drücken Sie sie länger als 3 Sekunden wird der Alarm ausgeschaltet Glocke aus Snooze Modus Wenn Sie noch ein Weilchen schlummern wollen drücken Sie statt 24H OFF ON OFF die Taste PROG SNOOZE Der Weckruf ver stummt Nach 3 4 Minuten beginnt die Wecksequenz wieder von vorn Sie können PROG SNOOZE beliebig oft benützen 6 2 Memo Termin einstellen und abstellen Memo Termin einstellen Sie haben einen w...

Страница 16: ... SNOOZE länger als 3 Sekunden 2 Der Wert für die Höhe über NN blinkt Passen Sie ihn mit den drücken Sie SYNC SET und kommen damit jeweils zur näch sten Eingabe 4 Beenden Sie Ihre Eingabe indem Sie noch einmal die Taste PROG SNOOZE drücken Sie kehren damit zu Ihrer Grund anzeige zurück Stattdessen können Sie auch ca zehn Sekunden warten dann kehrt die Anzeige automatisch in den Grundzustand zurück ...

Страница 17: ...synchronisiert sich dadurch ebenfalls neu Es erscheint eine blinkende 1 bzw die Nummer der eingestellten Adresse siehe 4 1 Sensor adressieren auf dem Display bis Daten vom Sensor empfangen wurden oder 3 Minuten abgelaufen sind kein Empfang Der mitgelieferte Außensensor hat die voreingestellte Adresse 1 Sollte eine Störung auf dieser Adresse durch einen anderen Sensor z B in der Nachbarschaft festz...

Страница 18: ... Bestätigung dass die neuen Werte übernommen wurden links von den Temperaturanzeigen und der Anzeige für die Luftfeuchtigkeit die Angaben MIN und MAX gleichzeitig Achtung Bei einer Änderung der Temperatureinheit in den Setup Einstellungen werden die aktuellen Minima Maxima Werte für Innen und Aussentemperatur überschrieben 18 7 Fehleranzeigen und mögliche Ursachen 7 1 Außensensor AS 2000 Fehleranz...

Страница 19: ...ht angezeigt 2 Sensor defekt Innentemperatur Sensor defekt wird nicht angezeigt Luftfeuchtigkeit wird Sensor defekt nicht angezeigt Batteriesymbol Batterie ist leer bitte wechseln siehe 3 1 leuchtet Batteriewechsel Funkuhr mit Wetterstation Wettervorhersage Der Höhenwert stimmt nicht Ein falscher stimmt sehr häufig Höhenwert führt zu einer falschen Wetter nicht vorhersage Zum Überprüfen und Korrig...

Страница 20: ...ngungsfläche 30 mm 9 2 Technische Daten Funkuhr mit Wetterstation Empfangsfrequenz 77 5 KHz DCF Codierung Senderreichweite Empfangsempfindlichkeit im Radius um Frankfurt Main 1 500 km Stromversorgung 2 x 1 5V Mignonzellen AA LR6 Alkaline Typ Batterielaufzeit ca 1 Jahr Luftfeuchtigkeit Messbereich 1 rH 99 rH Genauigkeit 5 Luftdruck Messbereich 750 1 100 hPa Genauigkeit 1 5 hPa 20 Innentemperatur Me...

Страница 21: ...21 GB Instructions for use ...

Страница 22: ...tain any components you need to maintain In case of failure please Functions of the radio controlled clock with meteorological station Your radio controlled clock with meteorological station consists of an analogue clock a digital display LCD for all supplemental functions and radio temperature sensor AS 2000 providing your radio controlled clock with meteorological station with outside tempe ratu...

Страница 23: ...y counting the date 1 01 2000 shows up the display shows SA German language setting as the week day and 52 as calendar week Thereafter following appears on the display humidity inside tem perature atmospheric pressure the weather forecast cloudy standard forecast The analogue clock is set to 12 00 Thereafter the symbol starts blinking After successfully establishing radio reception both correct ti...

Страница 24: ... Addressing and installation of the outside sensor AS 2000 4 1 Addressing the sensor The basic sensor address programmed by the manufacturer is 1 There are 8 addresses available 1 to 8 according to the display 1 You can program the address by setting the jumpers on the sensor board yourself Remove the front section of the housing 2 Remove the protective cap above the sensor housing and take out th...

Страница 25: ... screw 6 When finished close the housing screwing both housing ele ments together with the three screws 7 Insert the batteries paying attention to correct polarity insert the outside sensor in its mounting and attach the protective cap again 4 2 Installation Removal of the outside sensor Using the enclosed fixture it is easy to install the outside sensor to 3 2 1 321 Adresse 8 7 6 5 4 3 2 1 Nur AS...

Страница 26: ...also the range Broadband interference in municipal areas can reach a level reducing the signal to noise ratio across the whole frequency band thus reducing the range Devices operating on neighboring frequencies can also affect the receiver Poorly shielded PCs can radiate into the receiver and reduce the range any vertical surface Attention Select an installation place which is not directly exposed...

Страница 27: ... information in concrete terms general METEO FIELD Meteorological 1 Weather forecast station 2 Atmospheric pressure elevation 3 Frost warning at outside Symbol temperatures below or equaling 3 C 4 Outside temperature 5 Address of the outside sensor 6 Weather trend INSIDE FIELD Room values 7 Inside temperature 8 Humidity Symbol CALENDAR FIELD Calendar 9 Date 10 Weekday display depending on selected...

Страница 28: ...time before it appears now On the right side of the TIME FIELD the word Alarm is blinking 2 Press the SYNC SET key Now you can enter the time of alarm The minute indicator is blinking 3 With the help of MIN and MAX keys you can change displayed minutes Holding the relevant key pressed results in The weather trend Field 6 of the pictured display weather trend i e intensive atmos pheric pressure cha...

Страница 29: ...re than 3 seconds the alarm is shut off bell disappears Snooze mode If you wish to snooze for a while yet press the PROG SNOOZE key instead of 24H OFF ON OFF key The alarm signal is muted After 3 4 minutes the alarm sequence starts again You can use PROG SNOOZE as often as you wish 6 2 Programming and canceling memo appointment Programming a memo appointment You have an important appointment which...

Страница 30: ...me field of your display shows the date That means There is a memo appointment today Upon reaching the time of your memo appointment the indication MEMO 1 or MEMO 2 starts blinking In addition a signal consi sting of three tones is sounded During the first minute you can hear it every 10 seconds After that only one tone sequence per minute reminds you of your appointment After 60 minutes the acous...

Страница 31: ...s of your radio control led clock with meteorological station to correspond with the address of sensor see 6 3 Setup Settings If you do not wish to use the outside sensor you can deactivate the outside temperature indicator of your radio controlled clock For this purpose change the address in the setup settings to 6 5 Adjusting the volume of alarm and memo signal see 6 3 Setup Settings 6 6 Setting...

Страница 32: ... clock with correspond with the radio controlled clock meteorological setting station cannot 2 Is the outside sensor out of range of the establish connection radio controlled clock to the outside 3 Is the outside sensor battery power too low sensor 4 Is there any interference For causes see 4 3 Range Interference 7 2 radio controlled clock with meteorological station Indication of failure Possible...

Страница 33: ...ng displayed 2 Sensor failed Inside temperature Sensor failed is not being displayed Humidity is not Sensor failed being displayed Battery symbol Battery energy becomes low please replace is displayed battery soon see 3 1 Replacement of bat tery radio controlled clock with meteorologi cal station Weather forecast Is the value of altitude above sea level is often incorrect correct An incorrect valu...

Страница 34: ...F time 9 Specifications 9 1 Outside sensor specifications Radio data transmission 433 92 MHz Unobstructed range 85 m Data transmission cycle 3 min Outside temperature measuring range 30 0 C to 70 0 C Temperature measuring resolution 0 1 C Temperature measuring accuracy 1 C Measurements Ø x H 54 x 125 mm Distance of outside sensor to installation surface 30 mm 9 2 radio controlled clock with meteor...

Страница 35: ...35 F Mode d emploi ...

Страница 36: ...d entretenir En cas de mauvais fonctionnement merci de renvoyer l appareil défectueux à notre service après vente 1 Fonctions de la montre radio pilotée à station météorologique intégrée Votre montre radio pilotée à station météorologique intégrée se compose d une montre analogique d un affichage digital écran à cristaux liquides pour toutes les fonc tions auxiliaires et d un capteur de températur...

Страница 37: ...nde activée et le chiffre 52 s affichent sur l é cran dans la partie réservée au jour de la semaine et au numéro de semaine du calendrier S affichent ensuite l humidité de l air la température interne la pres sion atmosphérique ainsi que la prévision météorologique nuageux prévision standard L heure analogique se règle alors sur 12 00 Puis le symbole clignote Après le premier contact radio piloté ...

Страница 38: ...rne AS 2000 4 1 Réglage du capteur Le réglage principal du capteur correspond à l adresse 1 En tout huit adresses sont disponibles numérotées de 1 à 8 comme affiché sur l é cran de la montre 1 Vous pouvez vous même procéder au réglage de l adresse du cap teur en fixant les jumpers correspondants sur la platine du capteur enlevez la moitié avant du boîtier 2 Enlevez le couvercle de protection recou...

Страница 39: ...mettant en place les deux moitiés et en les revissant à l aide des trois vis 7 Réintroduisez les piles en respectant le sens des pôles remettez le capteur dans son support et remettez en place le couvercle de pro tection du capteur 4 2 Montage Démontage du capteur externe Le capteur externe peut être très simplement assemblé sur une surface verticale à l aide du support de montage livré avec l app...

Страница 40: ...ils ayant des fréquences de travail voisines à celles du cap teur peuvent également influencer le récepteur Des ordinateurs mal isolés peuvent irradier le récepteur et troubler la portée géographique du capteur En cas de troubles de réception tournez la montre radio pilotée à station météorologique intégrée jusqu à ce que les données du cap teur puissent à nouveau être reçues Attention Choisissez ...

Страница 41: ... votre montre radio pilotée en relation avec la station météoro logique 1 Prévision météorologique 2 Pression atmosphérique hauteur géographique 3 Avertisseur de gel pour une température extérieure inférieure ou égale à 3 C 4 Température extérieure 5 Adresse du capteur externe 6 Tendance du temps 7 Température intérieure 8 Humidité de l air 9 Date 10 Jour de la semaine l affichage dépend de la lan...

Страница 42: ... brièvement sur la touche PROG SNOOZE ATTENTION si vous enfoncez la touche pendant plus de trois secon des vous activez le mode set up cf 6 3 Programmation en mode set up Attendez alors que l écran retourne à l affichage habituel avant de ré appuyer sur la touche PROG SNOOZE mais cette fois ci de façon brève Tendance du temps La sixième case sur le schéma de l écran tendance du temps c est à dire ...

Страница 43: ... un signal sonore Pendant les vingt secondes suivantes le signal retentit une fois toutes les secondes et pendant les vingt secon des d après deux fois par seconde A partir de la deuxième minute de sonnerie le signal se fait entendre trois fois par seconde Au bout de cinq minutes l alarme s arrête auto matiquement Vous pouvez arrêter l alarme de réveil en appuyant sur la touche 24H OFF ON OFF Si v...

Страница 44: ...us pouvez désactiver le rap pel de votre rendez vous mémo alablement programmée c est celle ci qui apparaîtra A droite de l ESPACE HEURE le mot Alarme clignote 2 Appuyez encore une fois brièvement sur la touche PROG SNOOZE Vous passez ainsi de la fonction ALARME à la fonction MEMO 1 Si vous ré appuyez sur la touche PROG SNOOZE vous accédez à la fonction MEMO 2 Si vous n avez pas encore programmé d...

Страница 45: ...u bout de ce laps de temps l affichage de base fonction time out 6 4 Fonction de recherche du capteur Le capteur externe émet à intervalle régulier les données de températu re à la montre radio pilotée à station météorologique intégrée la montre et le capteur fonctionnent de manière synchrone ensemble Lorsque vous voulez les synchroniser manuellement par exemple après un changement des piles de la...

Страница 46: ...du réveil et du signal mémo Cf ci dessus point 6 3 6 6 Programmation de la valeur de la hauteur par rapport au niveau de la mer Ce n est seulement lorsque la valeur indiquant la hauteur de votre lieu de séjour par rapport au niveau de la mer NN est correcte que les prévi sions météorologiques et la valeur de la pression atmosphérique indi quées sur votre montre sont exactes Au sujet de la programm...

Страница 47: ...re montre radio pilotée n est plus capable de recevoir les signaux temporels Dans l intérêt d une réception non perturbée vous ne devriez pas placer votre montre radio pilotée à proximité directe de telles sources de perturbation 2 Sources de perturbation externes la trans mission de l émetteur de signaux temporels à votre montre radio pilotée à station météor ologique intégrée est perturbée 3 Vou...

Страница 48: ...veau de la mer est exacte ne s affiche pas 2 Le capteur est défectueux La température intéri Le capteur est défectueux eure ne s affiche pas L humidité de l air Le capteur est défectueux ne s affiche pas Le symbole de la pile Les piles sont vides veuillez les changer cf le s allume point 3 1 Changement des piles de la montre radio pilotée à station météorologique intégrée Les prévisions Est ce que...

Страница 49: ... 750 à 1100 hPa exactitude 1 5 hPa Température intérieure Champ de mesure de 10 C à 60 C exactitude 0 8 C Durée de la sonnerie de l alarme 5 minutes maximum Durée de la fonction snooze 3 à 4 minutes Durée du signal mémo 60 minutes Nous vous souhaitons bien du plaisir avec votre montre radio pilotée Toute modification technique réservée Ce produit correspond aux directives EMV de l Union Européenne...

Страница 50: ...ción al sensor El sensor no contiene piezas que pueda reparar Ud mismo En caso de avería es necesario que envíe el aparato a nuestro 1 Funciones del reloj radiocontrolado con estación meteorológica Su reloj radiocontrolado con estación meteorológica consta de un reloj analógico una pantalla digital LCD para todas las funciones adicionales así como un sensor de temperatura vía radio AS 2000 que fac...

Страница 51: ...omo día de la semana SA idioma español y como semana 52 A continuación se indicarán la humedad ambiental la temperatura interior la presión atmosférica el pronóstico del tiempo nublado pronóstico estándar El reloj analógico se pone en 12 00 horas A continuación parpadea el símbolo Una vez recibida la señal horaria aparece la hora correcta así como la fecha el día de la sem ana y la semana y el sím...

Страница 52: ...2000 4 1 Asignar una dirección al sensor El ajuste por defecto del sensor es la dirección 1 Existen 8 direccio nes 1 a 8 según la indicación 1 Puede asignar la dirección Ud mismo mediante los puentes de conexión situados en la pletina del sensor Retire la mitad delantera de la caja 2 Retire la tapa protectora situada encima de la caja del sensor y quite las pilas 3 A continuación afloje los dos to...

Страница 53: ... tornillo Aflojar tornillo Aflojar tornillo 6 Una vez realizado el ajuste cierre la caja juntando las dos mitades y apretando los tres tornillos 7 Finalmente ponga las pilas con la polaridad correcta coloque el sen sor externo en su soporte mural y ponga la tapa protectora 4 2 Montaje Desmontaje del sensor externo El soporte permite el fácil montaje del sensor externo en superficies 3 2 1 321 Adre...

Страница 54: ...aratos con frecuencias de funcionamiento cercanas pueden asi mismo perturbar el receptor Ordenadores personales con insuficiente blindaje pueden reducir el alcance En caso de interferencias de recepción gire el reloj radiocontrola do con estación meteorológica hasta que vuelva a recibir los datos del sensor verticales Atención Elija un lugar de montaje que no está expuesto a precipitaciones polvo ...

Страница 55: ...peratura exterior inferior o igual a 3 C 4 Temperatura exterior 5 Señalización del sensor externo 6 Tendencia del tiempo TEMPERATURA Interior 7 Temperatura interior INTERIOR 8 Humedad del aire Símbolo CALENDARIO Calendario 9 Fecha 10 Día de la semana depende del idioma seleccionado 11 Semana HORA Reloj 12 Hora actual 13 Fecha en la función de aviso CONFIGURACIÓN Ajustes 14 Torre emisora para la fu...

Страница 56: ...uración véase 6 3 Configuraciones En este caso espere hasta que la pantalla vuelva a su estado normal y pulse el botón PROG SNOOZE de nuevo La primera vez que acceda a esta función aparece la indicación 6 00 horas Si está ajustada una hora de alarma aparecerá ésta En el lado derecho del campo de la HORA parpadea la palabra Alarma La tendencia del tiempo El campo 6 de la ilustración de la pantalla ...

Страница 57: ...e la alarma vuelve a sonar 24 horas después Si pulsa el botón durante más de 3 segundos la alarma se desactiva el símbolo de la campana desaparece Repetición de alarma Snooze Si desea descansar un rato más pulse el botón PROG SNOOZE en vez de 24H OFF ON OFF La alarma se interrumpe para volver a sonar al cabo de 3 4 minutos Puede repetir la función de PROG SNOOZE las veces que desea 6 2 Ajuste y de...

Страница 58: ...pulse el botón SYNC SET que le llevará a la siguien te opción de ajuste 4 Para finalizar la programación pulse de nuevo el botón PROG SNOOZE Con ello el reloj vuelve a su estado normal También puede esperar unos diez segundos hasta que la pantalla vuelva automáticamente a su estado normal función de exceso de tiem po Si tiene programado y activado una cita ésta se indicará con MEMO 1 o MEMO 2 Si i...

Страница 59: ...rolado con estación meteorológica véase 6 3 Configuraciones Si no desea disponer de sensor externo puede desactivar la indi cación de la temperatura exterior en su reloj radiocontrolado Para ello ajuste en Configuraciones la dirección del sensor al valor 6 5 Ajuste del volumen del tono de alarma y de aviso Véase 6 3 Configuraciones 6 6 Ajuste de la altitud La indicación del pronóstico del tiempo y...

Страница 60: ...Indicación de error Posible causa El reloj radiocon 1 Coincide el ajuste de la dirección en el trolado con estación sensor externo con el ajuste en el reloj meteorológica no radiocontrolado puede establecer 2 Está el sensor externo fuera del alcance conexión con el de reloj radiocontrolado sensor externo 3 Están bajas las pilas del sensor externo 4 Hay interferencias de recepción Para las causas v...

Страница 61: ...00 km alrededor de Frankfurt Alemania Solución El reloj también puede funcionar como reloj de cuarzo véase 8 Modo manual No se indica la No se puede establecer el contacto con el temperatura exterior sensor externo angezeigt Está defectuoso el sensor externo Están agotadas las pilas Está el sensor fuera del alcance máximo No se indica la No se puede establecer el contacto con el temperatura exteri...

Страница 62: ... continuación se indicarán la hora fecha día de la semana y ajuste de idioma El símbolo del idioma ajustado parpadea Ajuste el idioma deseado con los botones MIN o MAX no permite avance rápido Con el botón Set Sync accede al siguien te ajuste Siga configurando de este modo todos los datos rele vantes Una vez realizados todos los ajustes pulse el botón PROG SNOO ZE Ahora su reloj funciona como relo...

Страница 63: ...recisión 1 5 hPa Temperatura interior Rango de medición 10 C 60 C Precisión 0 8 C Duración tono de alarma máx 5 minutos Repetición alarma 3 a 4 minutos Duración tono de aviso 60 minutos Disfrute de su reloj radiocontrolado Reservado el derecho a modificaciones Este producto cumple las directivas sobre CEM de la Unión Europea I Istruzioni per l uso ...

Страница 64: ...e l apparecchio difettoso al nostro servizio clienti 1 Funzioni del orologio radiocommandato con stazione meteo Il Vostro orologio radiocommandato con stazione meteo è formato da Un orologio analogico Un display digitale a cristalli liquidi per tutte le funzioni supple mentari Ed un radio sensore per temperatura AS 2000 che fornisce i dati della temperatura esterna al Vostro orologio radiocommanda...

Страница 65: ...A per la rego lazione in lingua tedesca e come settimana di calendario 52 In seguito vengono visualizzati l umidità dell aria la temperatura interna la pressione atmosferica la previsione del tempo nuvolo so previsione standard L orologio analogico si regola sulle 12 00 Poi lampeggia il simbolo Dopo un contatto radio efficace vengono visualizzati l ora esatta la data il giorno della settima e la s...

Страница 66: ...0 4 1 Indirizzare il sensore La regolazione di base del sensore è l indirizzo 1 Sono disponibili 8 indirizzi da 1 a 8 a seconda del simbolo 1 Potete fare l Indirizzamento da soli per mezzo di jumper sulla pian tina del sensore togliete la metà anteriore dell apparecchio 2 Togliete il coperchio protettivo posto sull alloggiamento del senso re e togliete le batterie 3 Poi togliete le due viti poste ...

Страница 67: ...to riassemblando le due metà dell al loggiamento riunendole con le tre viti 7 Reinserite poi le batterie rispettando la polarità infilate il sensore esterno nel suo supporto ed infilate nuovamente il casco di prote zione 4 2 Montaggio Smontaggio del sensore esterno il sensore esterno può venire montato in maniera molto semplice con il supporto di montaggio fornitovi su di una superficie verticale ...

Страница 68: ...uenze di lavoro adiacenti possono comunque influenzare il ricevitore PC mal schermati possono irradiare nel ricevitore e ridurre la por tata In caso di problemi di ricezione orientate il orologio radiocom mandato con stazione meteo fino a che i dati del sensore ven gono nuovamente ricevuti Attenzione Scegliete un luogo per il montaggio che non sia posto direttamente a precipitazioni atmosferiche a...

Страница 69: ...ra esterna 5 Indirizzo del sensore esterno 6 Tendenza del tempo CAMPO Valori dello 7 Temperatura interna INTERNO spazio 8 Umidità dell aria simbolo CAMPO Calendario 9 Data CALENDARIO 10 Giorno della settimana gli avvisi dipendono dalla lingua scelta 11 Settimana di calendario CAMPO ORA Ora 12 Ora attuale 13 Data nella funzione memo CAMPO Regolazioni che 14 Torre emittente per la STATO riguardano i...

Страница 70: ...ompare l indicazione dell ora 6 00 Se è già stata regolata una sveglia compare questa A destra nel CAMPO TEMPO lampeggia la parola Alarm 2 Premete il tasto SYNC SET Adesso potete regolare la sveglia L indicazione dei minuti lampeggia La tendenza del tempo Il campo 6 dell immagine del display tendenza del tempo esprime una forte modifica della pressione atmosferica mostra la tendenza generale del t...

Страница 71: ...remete per più di 3 secondi l allarme viene disinserito la campana scompare Modalità snooze Se volete dormicchiare ancora un po premete anziché il tasto 24H OFF ON OFF il tasto PROG SNOOZE La sveglia tace Trascorsi 3 4 minuti ricomincia la sequenza della sveglia dall inizio Potete usare PROG SNOOZE quante volte volete 6 2 Regolare e spegnere il memo appuntamenti Regolare il memo appuntamenti Avete...

Страница 72: ...ifica passate all inserimento successivo con il tasto SYNC SET 4 Terminate questi inserimenti premendo ancora una volta il tasto PROG SNOOZE In questo modo ritornate alle vostre regolazioni di base Oppure potete anche attendere circa dieci secondi che il display ritorni automaticamente alle regolazioni di base funzio ne timeout Se è regolata e attivata un ora per il memo viene visualizzato MEMO 1 ...

Страница 73: ... del sensore In seguito dovete anche regolare di conseguenza l indirizzo al vostro orologio radiocommandato con stazione meteo in base all indirizzo regolato al sensore vedi 6 3 Se non desiderate un sensore esterno allora potete eliminare la scritta della temperatura esterna dal vostro orologio radiocomman dato Modificate quindi l indirizzo nelle regolazioni del setup su 6 5 Regolare il volume del...

Страница 74: ...egolazione dell indirizzo al sensore commandato con esterno non concorda con quella del stazione meteo non orologio radiocommandato riceve un collega 2 il sensore esterno si trova al di fuori della mento verso il portata della ora radio sensore esterno 3 le batterie del sensore esterno sono vuote 4 ci sono problemi di ricezione Per le cause vedi punto 4 3 Portata Problemi di ricezione 7 2 orologio...

Страница 75: ...è difettoso Le sue batterie sono vuote E stato collocato al di fuori della massima portata possibile Non viene visualiz 1 Controllare se il valore dell altezza è corretto zata la pressione 2 sensore difettoso atmosferica Non viene visualiz Sensore difettoso zata la temperatura interna Non viene visualiz Sensore difettoso zata l umidità Il simbolo delle La batteria è vuota si prega di sostituirla b...

Страница 76: ...temperatura 0 1 C Precisione nella misurazione della temperatura 1 C Dimensioni Ø x H 54 x 125 mm Distanza del sensore esterno rispetto alla superficie di posizionamento 30 mm 76 9 2 Dati tecnici del orologio radiocommandato con stazione meteo Frequenza di ricezione 77 5 KHz codificazione DCF Portata del trasmettitore sensibilità di ricezione Nel raggio di Francoforte sul Meno 1 500 km Alimentazio...

Страница 77: ...77 NL Gebruiksaanwijzing ...

Страница 78: ...d in het buiten bereik in de serre in de kelder in de garage in het magazijn enz worden gemonteerd en maakt zo een complexe controle van ver schillende standplaatsen mogelijk Dit is een vrij adresseerbare batterijbedreven universele tempera tuursensor voor het temperatuurbereik 30 C tot 70 C Reglementaire toepassing Leest u alstublieft vóór de eerste ingebruikname deze gebruiks aanwijzing compleet...

Страница 79: ...g SA Duitse taalinstelling en als kalenderweek 52 Vervolgens worden weergegeven de luchtvochtigheid de binnentemperatuur de luchtdruk de weervoorspelling bewolkt standaardprognose De analoge klok wordt op 12 00 gezet Vervolgens knippert het symbool Na succesvol radiocontact wordt de actuele tijd alsook de datum weekdag en kalender week weergegeven en het symbool blijft zichtbaar Daarna neemt de at...

Страница 80: ...ensor weer klaar voor gebruik 3 3 Opvolging van de batterijenveroudering Attentie Houdt alstublieft in rekening met de batterijverordening Verbruikte batterijen en accu s horen niet bij het huisafval Geef verbruikte batterijen en accu s bij uw plaatselijke handelaar af of breng ze naar een openlijke verzamelplek voor batterijen 4 Adresseren en plaatsing van de buitensensor AS 2000 4 1 Sensor adres...

Страница 81: ...n weer samen te voegen en met de drie schroeven vast te zetten 7 Leg de batterijen er weer correct in steek de buitensensor in zijn houder en breng de beschermkap weer aan 4 2 Montage Demontage van de buitensensor De buitensensor kan met de meegeleverde montagevoet heel een voudig op een verticale vlakte worden gemonteerd Schroef losmaken Schroef losmaken Schroef losmaken 3 2 1 321 Adresse 8 7 6 5...

Страница 82: ...er bedraagt onder optimale voorwaarden ongeveer 85 meter Wanden en zelfs constructies uit gewapend beton zijn geen hindernis de reikwijdte reduceert zich hierbij echter overeenkomstig Een gereduceerde reikwijdte kan de volgende oorzaken hebben hoge frequentie storingen van ieder soort Bebouwingen van ieder soort of vegetatie Negatieve beïnvloeding van de stralingskarakteristiek door ongunstige afs...

Страница 83: ...k geografische hoogte 3 Vorstalarm bij buitentemperatuur Symbool kleiner of gelijk 3 C 4 Buitentemperatuur 5 Adres van de buitensensor 6 Weertendens BINNENVELD Ruimtewaarde 7 Weertendens 8 Luchtvochtigheid Symbool KALENDERVELD Kalender 9 Datum 10 Weekdag weergave van de gekozen taal afhankelijk 11 Kalenderweek TIJDSVELD Klok 12 actuele tijd 13 Datum in de memo functie STATUSVELD Instellingen 14 Ze...

Страница 84: ...t de weergave naar de grondweergave terug keert als U 10 seconden lang geen toets ingedrukt heeft 6 1 Wektijd instellen en afzetten Wektijd instellen 1 Druk kort de toets PROG SNOOZE in Attentie Als u de toets langer dan 3 seconden indrukt activeert u de setup instellingen zie 4 3 Setup instellingen Wacht dan tot de display weer naar de normale weergave terugkeert en druk opnieuw kort de toets PRO...

Страница 85: ...is niet meer te zien Snooze modus Als u nog een beetje wilt sluimeren drukt u in plaats van 24 H off ON OFF de toets PROG SNOOZE De wekroep verstomt Na 3 à 4 minuten begint de weksequentie weer opnieuw U kunt PROG SNOOZE herhalen zo vaak u wilt 6 2 Memotermijn instellen en uitschakelen Memotermijn instellen U hebt een belangrijke termijn die u niet mag vergeten Uw atoom klok met weerstation herinn...

Страница 86: ... Is het moment van uw memotermijn bereikt knippert de weergave MEMO 1 resp MEMO 2 Bovendien weerklinkt een drie tonen signaal in de eerste minuut is het alle 10 seconden te horen dan wordt alleen nog met één toon sequentie per minuut aan uw termijn herinnert Na 60 minuten schakelt de akoestische herinnering automatisch uit De weergave van de verstreken termijn knippert nog zo lang verder tot 24 H ...

Страница 87: ... atoomklok met weerstation in overeenstemming met het inge stelde adres op de sensor veranderen zie 6 3 Setup instellingen Indien u geen buitensensor wenst schakelt u de buitentempera tuurweergave van uw atoomklok gewoon uit Verander hiervoor het adres in de setup instellingen op 6 5 Volume van wekroep en memosignaal instellen zie 6 3 Setup instellingen 6 6 Hoogtewaarde instellen Alleen als de waa...

Страница 88: ... en buitentemperatuur overschreven 7 Storingsindicaties en mogelijke oorzaken 7 1 Buitensensor AS 2000 Storingsindicatie Mogelijke oorzaak De atoomklok met 1 De instelling van het adres op de weerstation kan buitensensor stemt niet overeen met de geen verbinding klok naar de buiten 2 De buitensensor bevindt zich buiten sensor verkrijgen de reikwijdte van de klok 3 De batterijen van de buitensensor...

Страница 89: ... Sensor defect wordt niet weergegeven Luchtvochtigheid Sensor defect wordt niet weergegeven Batterijsymbool Batterij is leeg alstublieft wisselen zie 3 1 Batterijwissel atoomklok met weerstation Weersvoorspelling De hoogtewaarde is niet correct Een ver is vaak niet correct keerde hoogtewaarde leidt tot een ver keerde weersvoorspelling voor controle en correctie zie 6 3 Setup instellingen 8 Manuele...

Страница 90: ...7 5 KHz DCF codering Zenderreikwijdte Ontvangstgevoeligheid Radius 1 500 km rond om Frankfurt M Stroomverzorging 2 x 1 5V mignoncellen AA LR6 alkalinetype Gebruikstijd van de batterijen ca 1 jaar Luchtvochtigheid meetbereik 1 rH 99 rH exactheid 5 Luchtdruk Meetbereik 750 1 100 hPa exactheid 1 5 hPa Binnentemperatuur Meetbereik 10 C 60 C exactheid 0 8 C Weksignaalduur max 5 minuten SNOOZE duur 3 to...

Страница 91: ...91 ...

Страница 92: ...42051 5436 0403 EUROCHRON Be connected Postfach 100 D 78701 Schramberg ...

Отзывы: