61
The time is automatically synchronised with the internet time server every day at 12:00 and 24:00.
To synchronise the internet time manually, press the
REFRESH
button (22). Time synchronisation should have taken
place within approx. 1 minute.
2
Manually setting the time and date
Manual time and calendar setting is only necessary if the weather station does not have access to the
internet or you intend to use it without the internet and WLAN connection.
This weather station usually receives its time setting by synchronising with the designated internet time service. If you
wish to use it offline, you can set the time and date manually.
1.
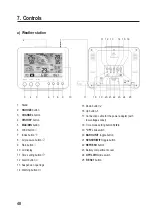
Once you have established the power supply, press the
SENSOR/WIFI
toggle button (21) for 6 seconds. The
weather station switches to normal mode.
2. Press and hold the time setting button (11) for 2 seconds to open a setting.
3.
The setting sequence begins and proceeds as follows: Time Zone → DST ON/OFF → Hour → Minute → 12/24
hour format →Year → Month → Day → M-D/D-M format → Time sync ON/OFF → Day of week → Language.
4. Press the Up button (16) or the Down button (15) to select a value. Press and hold the respective button to
quickly scroll through the digits.
5. Press the Time setting button to save the setting and to exit the settings at the end of the setting sequence.
6. While implementing the setting, you can press and hold the time setting button for 2 seconds to return to the
normal display.
7. If you do not press a button for 60 seconds, the weather station automatically returns to the normal display and
cancels the settings.
In normal mode, press the Time setting button to switch between year and date display.
8. Press the
12/24
time mode setting button (18) to switch between 12 and 24-hour time format.
e) Setting the alarm and alarm time
The weather station has an alarm that is triggered, set and switched according to the time.
• Press and hold the Alarm button
(12) for approx. 2 seconds. The hour value for the alarm time starts to flash.
• Press the Up button (16) or the Down button
(15) to change the hour setting of the alarm. Confirm the setting
with the Alarm
button (12). The minute flashes on the display.
• Press the Up button (16) or the Down button
(15) to change the minute setting of the alarm. Confirm the
setting by pressing the Alarm button.
• The alarm function is switched on automatically as soon as you have set the alarm time. The ‘ ’ symbol is shown
on the LC display.
1
Displaying the alarm time and activating/deactivating the alarm
•
Briefly press the Alarm button
(12) once. The set alarm time is displayed for approx. 5 seconds.
• Press the Alarm button during this time to activate the alarm with the set alarm time.
• When the alarm is activated, press the Alarm button to deactivate the alarm. The ‘ ’ disappears from the LC
display (10).

