54
Ensure that no existing cables or pipes (including water pipes) are damaged when drilling mounting holes
or securing screws.
9. Setup and installation
a) Weather station
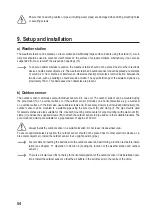
The weather station can be placed on a level, stable and sufficiently large surface indoors using the stand (1). A suit
-
able mat should be used to prevent scratch marks on the surface of valuable furniture. Alternatively, it can also be
suspended from a screw with the suspension openings (13).
To ensure optimal wireless reception, the weather station should not be placed next to other electronic
devices, cables, metal objects, etc. The weather station and outdoor sensor should be placed at a distance
of around 2 m from sources of interference. Obstacles that impair wireless communication between the
two devices, such as buildings, should also be avoided. The open-field range of the wireless signal is ap
-
proximately 150 m. This decreases when obstacles are present.
b) Outdoor sensor
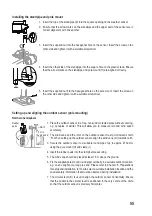
The outdoor sensor combines several individual sensors into one unit. The outdoor sensor can be mounted using
the pole mount (H) on a vertical surface or, if the outdoor sensor protrudes on a horizontal surface, e.g. a wall end,
on a vertical surface. In the first case, use suitable screws and, if necessary, dowels (not included). Alternatively, the
outdoor sensor can be mounted to a suitable pipe using the pole mount (H) and clamp (I). The pipe mounts used
for satellite dishes are also suitable for this. Use both mounting components for pipe mounting (with pole mount (H),
clamp (I)) and use the supplied screws (M) to attach the outdoor sensor to pipe ends or other suitable brackets. The
pole mount and clamp are suitable for a pipe diameter of approx. Ø 30 mm.
Always install the outdoor sensor in a suitable location. Do not leave it loose/unsecured.
To ensure optimal wireless reception, the outdoor sensor should not be placed next to other electronic devices, ca-
bles, metal objects etc. Install the outdoor sensor in an upright position (pipe).
We recommend inserting the batteries into the outdoor sensor and performing a function test before instal-
lation (see Chapter ‘11. Operation’ in Section ‘b) Testing the function of the weather station and outdoor
sensor’).
There is a circular level (B) on the top for horizontal alignment of the outdoor sensor in all installation posi-
tions. Install the outdoor sensor so that the air bubble in the spirit level is in the centre of the circle.

