background image

7

OPERATING INSTRUCTIONS

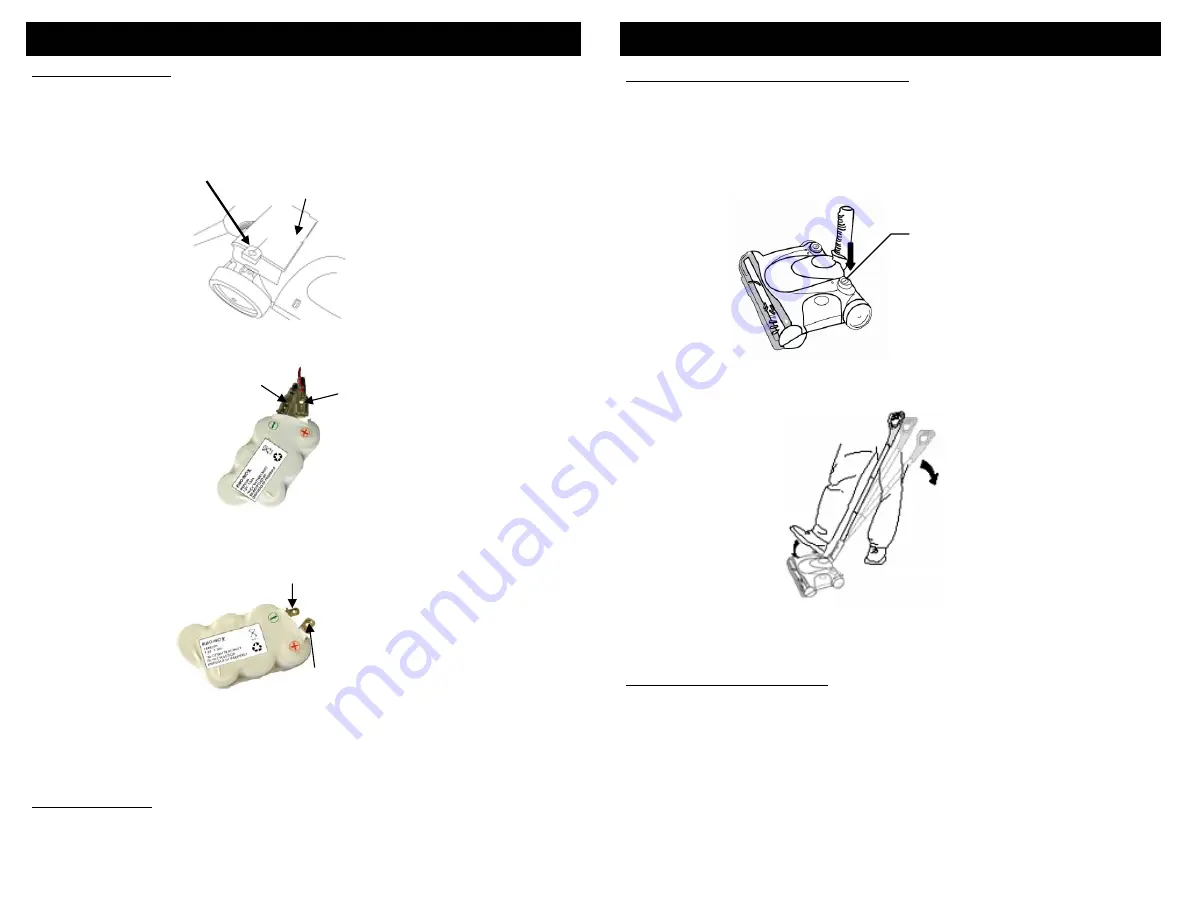
"On/Off“ switch

Fig. 7

Fig. 8

4.

To change the speed of the brush roll, press the speed control button once. One 
light “On” indicates the unit is on the optimal speed for cleaning hard floors. Two 
lights “On” indicate the unit is on the optimal speed for cleaning carpets.

Anti-Jam Brush Roll Feature

3.

To release the handle to a comfortable position, apply pressure to the top of the 
sweeper head with your foot while pulling back on the handle. (Fig. 8)

This feature protects your unit’s motor from damage due to overheating, that may be 
caused by the rotating brush gets jammed or tangled in something. If the rotating brush 
becomes overloaded it will stop turning and both speed indicator lights will remain lit at 
the same time. To reset the unit:
1.

Press “On/Off” switch.

2.

Remove the transparent brush cover from the sweeper power head to remove any 
build up of lint, hair or fiber on the rotating brushes. 

3.

Wait for 10 seconds to allow the unit to cool down.

4.

Press “On/Off” switch again, the unit should restart.

MODE D’EMPLOI

Retrait du Bloc-Pile

30

1. Retirez les poignées de rallonge et la coupelle à poussière.
2. Retournez l’appareil à l’envers afin que sa base fasse face vers le haut. Prenez soin 

de ne pas mettre l’appareil en marche. 

3. À l’aide d’un tournevis à tête cruciforme nº 1. retirez la vis de fixation du couvercle 

du compartiment du bloc-pile de l’appareil et mettez-le de côté. (Fig. 4) 

Borne positive

(rouge)

Borne négative

(noire)

Fig. 5

Fig. 4

Vis

Couvercle du 
compartiment du bloc-pile

Connecteur 

négatif

Connecteur 

positif

Fig. 6

4. Soulevez doucement le bloc-pile et débranchez les bornes. (Fig. 5)

5. Branchez les bornes au nouveau bloc-pile en prenant soin de brancher d’abord le fil 

rouge (+) au connecteur positif (plus grand), et ensuite le fil noir (-) au connecteur 
négatif (petit). (Fig. 6) Placez la nouvelle pile dans le compartiment à pile.

6. Insérez le filage dans le compartiment à pile afin qu’il n’interfère pas avec le 

couvercle au moment du remplacement.

7. Réinstallez le couvercle du compartiment à pile. Téléphonez au service à la clientèle 

au 1 (866) 826-6941 pour tout problème de retrait de la pile.  

Ne remplacez pas

les 

piles de ce produit avec un autre type de pile.

MISE EN GARDE:

Cet appareil contient des piles ni-cad. Les piles doivent être 

recyclées ou éliminées correctement selon la réglementation locale. Veuillez 
consulter vos Pages jaunes ou votre centre de recyclage local pour plus de 
renseignements.

How to Operate Your Cordless Sweeper

1.

Before using, please ensure that the cordless sweeper has been initially 
charged for 20 hours.

Your cordless sweeper will only operate properly when the batteries are fully 
charged. Your sweeper will operate for varying lengths of time on a full charge. 
This will depend upon the type of surface being cleaned. (Longer operating time on 
bare floors vs. carpets.)

2.

Push the “On/Off” switch to operate the unit. To turn off, press switch again. (Fig. 7)

Содержание Shark UV612C

Страница 1: ...EURO PRO Operating LLC Canada EURO PRO Operating LLC 94 Main Mill Street Door 16 4400 Bois Franc Plattsburgh NY 12901 St Laurent QC H4S 1A7 1 800 798 7398 www sharkvac com OWNER S MANUAL MANUAL DEL PR...

Страница 2: ......

Страница 3: ...reil au complet et ses accessoires port pay Aux U EURO PRO Operating LLC 94 Main Mill Street Door 16 Plattsburgh NY 12901 Au Canada EURO PRO Operating LLC 4400 Bois Franc St Laurent QC H9S 1A7 Si EURO...

Страница 4: ...Remplacez le fusible ou r initialisez le disjoncteur 3 T l phonez au service la client le 4 Faites correspondre le de la pile sur le du compartiment 5 Retirez toute obstruction de la brosse rotative t...

Страница 5: ...ld be the first on the assembly 3 Place the handle into the upward storage position 34 MODE D EMPLOI Soin et Entretien Afin d augmenter le rendement et la dur e de vie de votre appareil nous vous reco...

Страница 6: ...been charged and discharged two 2 or three 3 times IMPORTANT To maintain peak performance of your cordless sweeper it is recommended that the unit be fully discharged then completely re charged at lea...

Страница 7: ...tteries and you need to dispose of them properly When the batteries are no longer good for use they must be removed from the sweeper for disposal Do not remove the batteries for any reason other than...

Страница 8: ...ez le couvercle transparent de la brosse du devant de la balayeuse et liminez toute accumulation de peluche cheveux ou fibres de la brosse rotative 3 Attendez 10 secondes pour laisser refroidir l appa...

Страница 9: ...nt du bloc pile de l appareil et mettez le de c t Fig 4 Borne positive rouge Borne n gative noire Fig 5 Fig 4 Vis Couvercle du compartiment du bloc pile Connecteur n gatif Connecteur positif Fig 6 4 S...

Страница 10: ...ch et branch 3 Ne rechargez les piles que lorsqu elles sont compl tement d charg es ou le plus d charg es possible 4 Ne rangez pas l appareil dans un endroit humide ou temp rature lev e 5 Apr s 3 mois...

Страница 11: ...chWorld AD 0920 UL Fig 3 28 MODE D EMPLOI 2 Cette balayeuse sans fil est aliment e par des piles ni cad Ces piles doivent tre charg e durant un minimum de 20 heures avant la premi re utilisation 3 Lor...

Страница 12: ...oign es de rallonge en m tal en pressant l encart en plastique dans le tube en m tal correspondant 2a Appuyez jusqu ce que presque tout l encart en plastique ne soit plus visible ou que vous ne puissi...

Страница 13: ...HARGE 1 Electrical outlet not working 2 Charging Adapter not working 3 Batteries no longer functioning 4 Unit left in On position 1 Check to ensure outlet is working properly Easily checked by pluggin...

Страница 14: ..._____________________________________________________________ Owner s name _____________________________________________________________________________ Address City Prov Postal Code UV612C Printed in...

Страница 15: ...eto a las siguientes condiciones exclusiones y excepciones Si su artefacto no funciona correctamente al utilizarlo bajo condiciones dom sticas normales dentro del per odo de garant a devuelva el artef...

Страница 16: ...Quite las obstrucciones del cepillo y o de la barredora 2 Vac e y limpie el recipiente para la tierra BARREDORA NO SE RECARGA 1 El tomacorriente donde enchufa el cargador no funciona 2 El Cargador no...

Страница 17: ...si n inferior tiene el extremo de pl stico diferente ste tubo debe insertarse primero que los dem s 3 Coloque el mango en la posici n vertical de almacenamiento 22 INSTRUCCIONES DE USO Cuidado y Mante...

Страница 18: ...chWorld AD 0920 UL Fig 3 16 INSTRUCCIONES DE USO 2 Esta barredora inal mbrica contiene bater as de Ni Cd Antes de usarla por primera vez debe cargarse durante 20 horas como m nimo 3 Al cargar la unida...

Страница 19: ...r la bater a Esta barredora est equipada con una bater a de Ni Cd y necesita descartarla correctamente Cuando la bater a no funcione m s debe ser extra da de la barredora para ser descartada No extrai...

Страница 20: ...nte del cepillo del cabezal de la barredora para remover la acumulaci n de pelusa cabellos o fibras en el cepillo giratorio 3 Espere 10 segundos para que el producto se enfr e 4 Presione nuevamente el...

Отзывы: