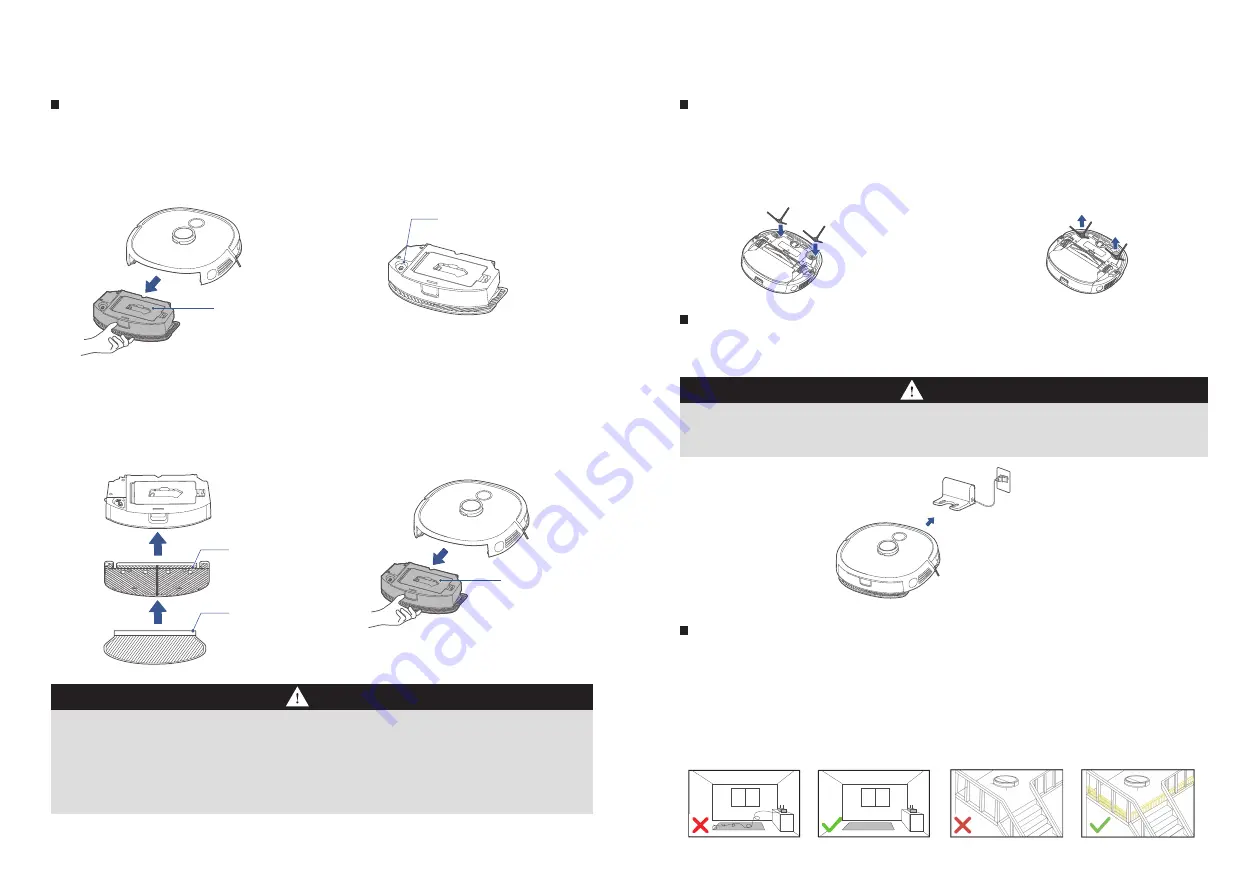
Installation of mop assembly (this step can be skipped, please install when
needing to mop the floor)
INSTALLATION
Installation of side brush
Machine charging
INSTALLATION
To improve the mopping, recommend cleaning three times before using the mopping function;
The mop has been stuck to the mop holder, and it can be removed for cleaning and replacement;
No installation of the water tank in place may result in dropped tank;
Please remove the mopping plate support when the main unit is charged in the charging dock;
Do not fill in boiling water to prevent tank deformation at high temperature;
If carpets exist in the mopping environment, place roll them at the edge or set a virtual wall in the App;
In case of poor mopping efect or occurrence of slipping, choose a proper water volume in the App;
When the mopping function is not in use, keep the water tank in place and remove the mop holder.
1.
2.
3.
4.
5.
6.
7.
8.
When the main unit gets contact with the charging block, the power indicator flashes to indicate the main
unit is charging;
If the main unit fails to charge, check whether the charging chips of the machine at the bottom are blocked
by
1.
2.
Remove the strip seal according to prompt texts on the machine;
By aligning the machine to the charging block in the indicated direction, push the machine into the charging block
in order for charging.
1.
2.
Instructions prior to use
Prior to startup, clean up scattered wires and debris on the floor, and remove objects that are easy to fall, fragile,
valued, and possibly result in hazards. Prevent from being entangled, stuck, dragged, or knocked down by the main
unit, resulting in damages to people and property;
If overhead structures exist in the cleaning area, secure and block them with appropriate objects to prevent
damages to people and property due to their possible falling;
Recommend following the robot throughout the initial cleaning to assist in dealing with some possible small
problems. After these problems are solved, the robot will smoothly carry out its automatic cleaning in the future. If
no cleaning is required or the robot may be trapped in some special areas, it is possible to add exclusion zones or
virtual walls at corresponding positions in the map shown in the App, in order to prevent the robot from
entering these areas.
1.
2.
3.
Press the water tank release key,
and remove the tank from the
main unit;
1.
Remove the rubber plug from the
tank and fill water in the tank;
2.
By ensuring the side brush has a
consistent color with that of its
slot,directly push the side brush
into the slot, and a "click" sound
indicates complete installation;
1.
When disassembly is required, use
two hands to hold the rubber-cov-
ered leg of the side brush (take care
of not pulling its hair bundle forci-
bly) to remove it by keeping the
machine bottom facing up.
2.
Align clips in the Mop holder to
holes in the water tank support,
and a "click"sound indicates
successful installation;
3.
Push the water tank in the main
unit.
4.
Water tank
Mop holder
Water tank
Mop
Water inlet and
outlet
15
16
Notes
Notes


