Euphonix Max Air Mixing Console Operation Manual
Touchscreen
63
4.4
Patching Examples
These examples assume that the steps in
Mic/Line Interface Patching
on page 60 have
been successfully completed.
4.4.1
Patch 12 Mics Into Channels 25–36
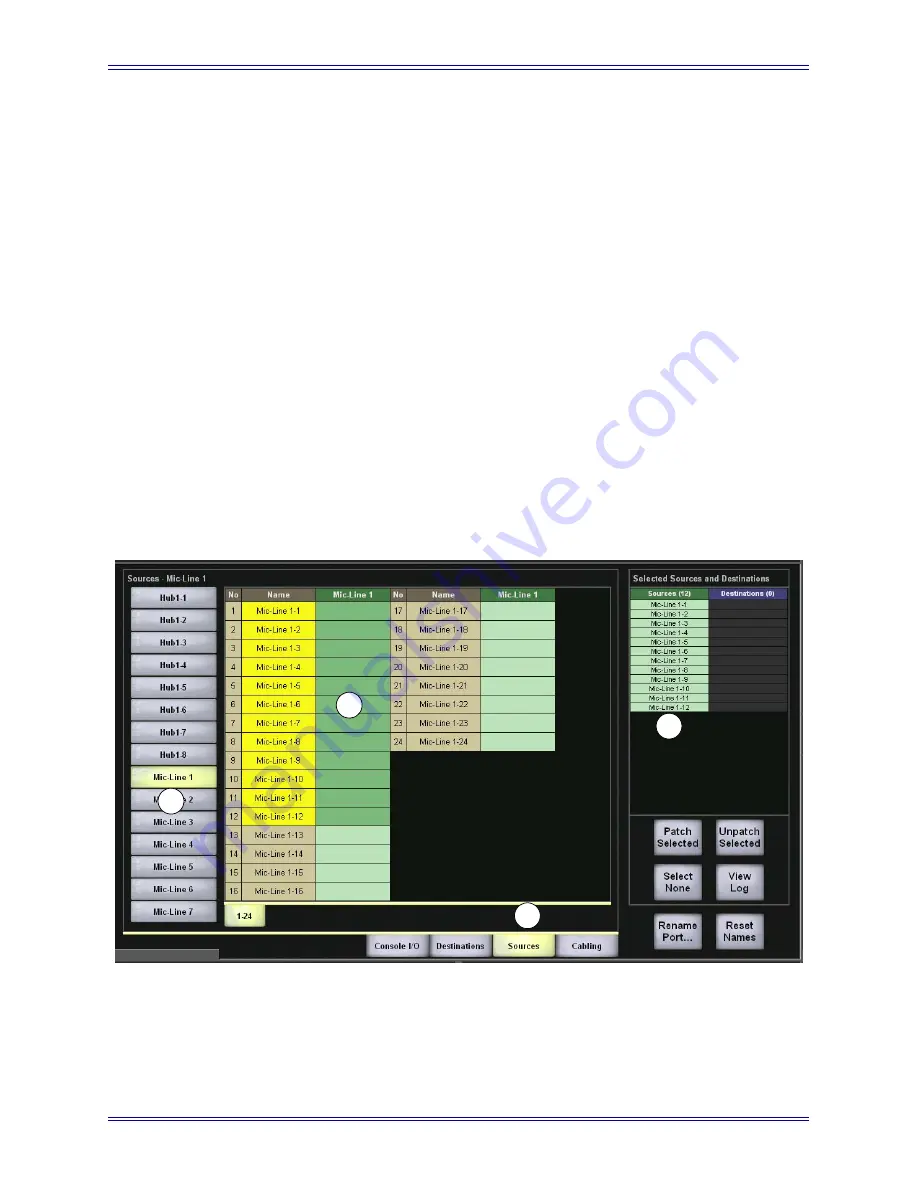
Select the Sources
1.
Select the
Sources
tab (1 in Figure 4-19).
2.
Select Mic-Line 1 from the sub-categories (2 in Figure 4-19).
This displays all inputs from the first Mic-Line Interface in the
Name
column.
The Mic-Line Interface is connected as part of the initial studio setup.
3.
Select Mic1-1–Mic1-12 from the
Mic-Line
column by touching and dragging
through the cells (3 in Figure 4-19).
These entries are highlighted in green in the
Sources
column of the
Selected
Sources and Destinations
area (4 in Figure 4-19). If there were more than 24
sources, additional tabs would appear to the right of the
1–24
tab.
Figure 4-19
Sources View with 12 Mic-Line Sources Selected
1
2
3
4
Содержание Max Air
Страница 11: ...Euphonix Max Air Mixing Console Operation Manual xi Index 183 ...
Страница 12: ...Euphonix Max Air Mixing Console Operation Manual xii ...
Страница 24: ...Euphonix Max Air Mixing Console Operation Manual Introduction 24 ...
Страница 26: ...Euphonix Max Air Mixing Console Operation Manual New Features in Version 1 4 26 ...
Страница 44: ...Euphonix Max Air Mixing Console Operation Manual Quickstart to Common Tasks 44 ...
Страница 86: ...Euphonix Max Air Mixing Console Operation Manual Touchscreen 86 ...
Страница 154: ...Euphonix Max Air Mixing Console Operation Manual Control Groups and Multi Format Masters 154 ...
Страница 160: ...Euphonix Max Air Mixing Console Operation Manual Layouts and Snapshots 160 ...
Страница 188: ...Euphonix Max Air Mixing Console Operation Manual 188 ...


