ETT Olfactometer 2 Скачать руководство пользователя страница 63


63 

© Emerging Tech Trans, LLC 

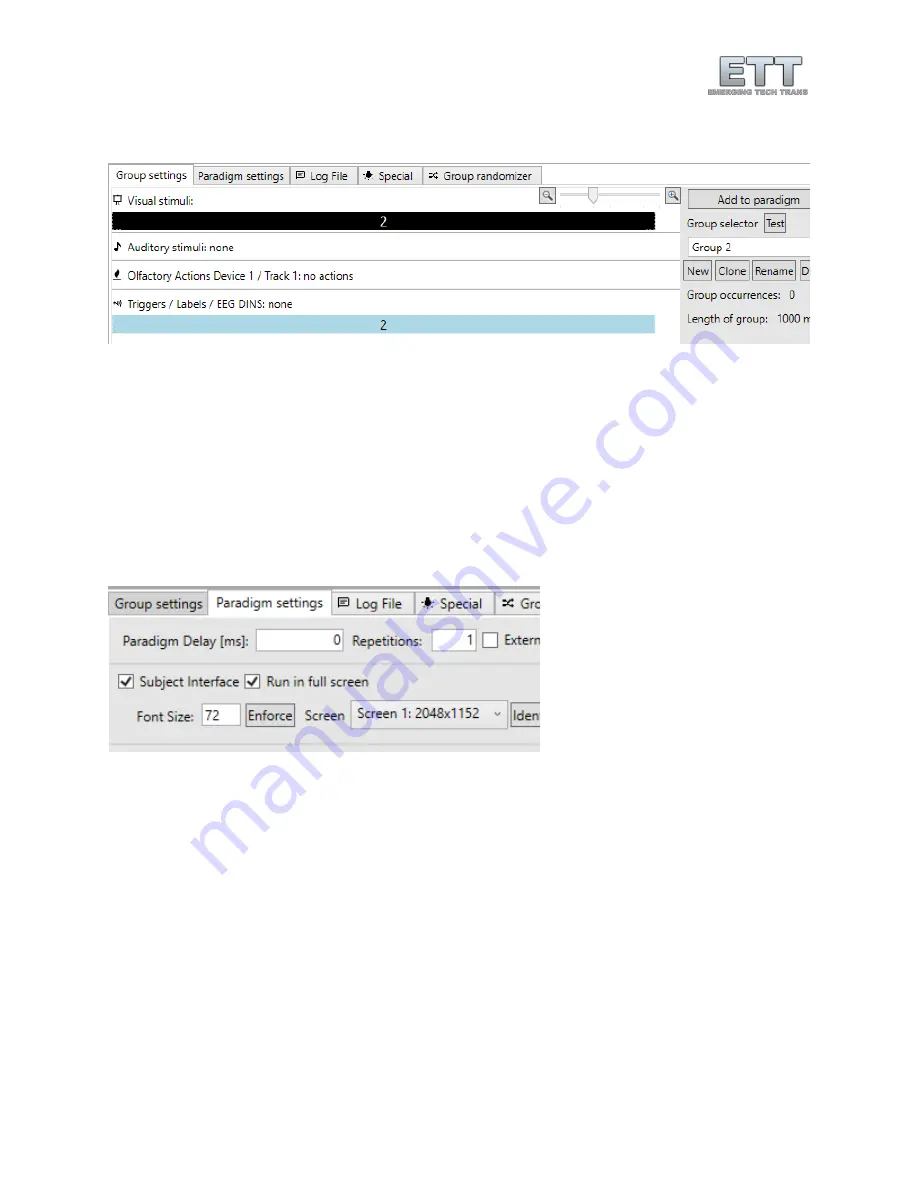
visual stimulus (set the label to 2 instead of 1) and after insert a new DIN label (again, set the label to 2 
instead of 1) just as shown in Figure 90. 


Figure 90 - Setting up Group 2 

In 

Paradigm Settings

 check 

Subject Interface

 and 

Run in full screen 

(Figure 91).  Now switch to the 

Group 

randomizer

 and click 

Update and Re-shuffle List

 until you like the distribution of group calls. Then click 

on 

Append trial list to paradigm

 and hit F1 on your keyboard to save the paradigm (Figure 92). 

As shown in Figure 93, this will create a problem if the desire is to label the onset of each group in the 
EEG system. Since the EEG DINs have the same duration as the visual stimulus (general group length), 
when switching to the same group twice in a row the ETT EEG Interface will not send another DIN. This 
behavior is intentional for different scenarios, but to work around it, we can edit the duration of the 
DINs in each of the groups to be slightly shorter than the overall group length as shown in Figure 94. 


Figure 91 - Paradigm settings to show the paradigms visual stimuli in full screen 


Содержание Olfactometer 2

Страница 1: ...ETT Olfactometer ETTDirectControl The First Paradigm Manual and Tutorial Revision 2021 1 ...

Страница 2: ...2 Emerging Tech Trans LLC ...

Страница 3: ...ETT Olfactometer 2 17 ETT Olfactometer S ETT Olfactometer C 19 Prerequisites 21 The paradigm 21 Preparing the odorants 21 Connecting the tubing 22 Flow rate adjustments 24 Creating a simple paradigm 25 Creating a new paradigm 25 Configuring an olfactory condition 27 Configuring the visual component 29 Managing cloning and adjusting groups 31 Assembling paradigm 32 Labeling conditions for data anal...

Страница 4: ...g the carrier top 46 Cleaning the bottles 50 Cleaning the tubing 50 Odorant flow setup 52 Carrier Setup 52 Check valve layout in the odorant carrier 52 Typical air flow configuations 53 Configuration for multiple channels at once 55 Setting up multiple channels within ETTDirectControl 56 ETT EEG Trigger Interface 57 Hardware setup 57 System overview 57 Software Setup 58 Prerequisites 58 EGI NetSta...

Страница 5: ...h our support Additional accounts can be created at any time upon request to support emergingtechtrans com With access to our support section Figure 1 there are two to three different versions of ETTDirectControl accessible Depending on your request we can unlock specific preview version access All installer packages describe supported operating systems and contain all necessary dependencies in th...

Страница 6: ...as chosen a click on the download button will download the software All installers automatically contain 32 64bit compatible installers Figure 2 Double click on the downloaded executable to initiate the setup process Since ETTDirectControl requires device drivers it will require to be installed with Administrator privileges Figure 3 ...

Страница 7: ...nstalled on the same machine change the installation path Make sure to check to install both pre requisites 1 Microsoft NET Framework 4 2 FTDI USB drivers Under some circumstances failed to install NET Framework these options must be unchecked and installed separately Follow Figure 4 through Figure 10 to complete the installation At last the installer will offer to run ETTDirectControl Yet again a...

Страница 8: ... Adjust the installation path if necessary Select NET and USB drivers as they are needed for ETTDirectControl to operate any needed extras will be automatically checked Figure 6 Define path of installation Figure 7 Set Start Menu folder ...

Страница 9: ...al installation Figure 10 Step through FTDI USB driver and NET Framework 4 installers After successfully completing the installation and first starting the application it is a good time to first plug the ETT Olfactometer into the USB port consult Connecting the Device on page 16 if necessary ...

Страница 10: ...will adjust with the number of valves that your specific Olfactometer has Figure 11 Manual Mode with connected ETT Olfactometer 2 with active simulated respiratory signal Valve 3 with the blue background color is opened Features custom to each device and their current state will be represented below In the depicted case of an ETT Olfactometer 2 these are TTL Trigger for external triggers and contr...

Страница 11: ...onents into group a Create rename clone delete groups b Assembling of repeatable items from section 1 into groups conditions c Reorganizing of group elements temporally d Adding of groups to paradigm section 3 in desired order e Further paradigm settings and randomizer in other sub tabs 3 Assembly of groups into paradigm sequence a Assembling of groups into paradigm b Reordering removing cloning o...

Страница 12: ...eceives an update for either ETTDirectControl or the connects device firmware it will be shown here Figure 14 We suggest to only allow automatic updates on systems that are not currently used in an active study as updates may cause unexpected disturbance to your current setup As updates on the preview rings usually come with free access to new features it might be worth installing these on a separ...

Страница 13: ...edited to adjust settings If changes prevent the application from starting or working a default will be recreated upon deleting the broken file Warning if you were on a specific update ring other than release stable ETTDirectControl will switch back to this as the default ring Meaning of Update Rings Release Stable Usually a relatively old version is well tested but it might be limited in certain ...

Страница 14: ...ome of the most important controls are additionally labeled with icons to support interpretation Figure 15 Typical Tool Tip describing the function or typical use of most features in ETTDirectControl Under the Help tab in ETTDirectControl short 1 to 2 minute tutorials can be found Figure 16 A click will automatically jump around topic related controls in the software A small textbox next to the ma...

Страница 15: ...7 Example of a speech bubble when using the integrated help system Beyond using the listed features and our other online resources please feel free to contact us if you have any further questions or problems support emeringtechtrans com ...

Страница 16: ... the slider is closest to your local AC power supply Not following this advice might cause severe damage to internal components in your device If you are unsure please contact us before you switch on your device ETT Olfactometer 2 ETT Olfactometer 2C ETT Olfactometer 2S To control the olfactometer from a PC connect the provided USB cord to the PC CONTROL USB port on the front panel Make sure to no...

Страница 17: ... the olfactometer It should display device specific control features Potential firmware updates of your device can be executed directly from the software ETT Olfactometer 2 Power on the device and connect it to the PC via the included USB cable through the C_BYPASS port of the device see yellow box Figure 22 On the main screen of the touch screen operating system of your Olfactometer press the Man...

Страница 18: ...ech Trans LLC Figure 22 Olfactometer 2 front panel with USB port to PC yellow Respiratory response port red and TLL Trigger in port green Figure 23 Main screen of the ETT Olfactometer 2 touchscreen operating system ...

Страница 19: ...cted PC Figure 25 The ETT Olfactometer 2 screen is switched to external control from a connected PC and the ETTDirectControl software or the EPrime package ETT Olfactometer S ETT Olfactometer C To change the control context between the front panel valve buttons and software control via the connected PC use the MANUAL PC physical button on the front panel of the ETT Olfactometer S Just ...

Страница 20: ...gger signals as well as connected respiratory signals will also be transmitted to the connected software Depending on the currently active context an LED light will light up indicating MANUAL or PC control Figure 26 ETT Olfactometer S front panel Figure 27 ETT Olfactometer C front panel ...

Страница 21: ...from our example Preparing the odorants With the paradigm plan in mind we will also prepare the odorants and load them into the odorant carrier for this experiment Clean each of the jars from odors if used in previous experiments Most odorants are oil based so a mild odorless detergent will remove usually remove any residual odor Two main ingredients will be needed Solvent 1 2 propanediol Sigma St...

Страница 22: ... tubing in straight without bending it until the tube is all the way into the connector The tubing is released by first pushing the blue or black ring sleeve on the connector into the connector as far as possible While holding the sleeve into the connector one can now safely pull the Teflon tubing out of it without damage Figure 30 Figure 30 Connect and release the provided Teflon tubing without d...

Страница 23: ...the device back panel with the labels of the odorant carrier Figure 32 The latest version of the applicator guides a PTFE tube to the subjects nose The flexible and easy to remove Loc Line system can either be table mounted for EEG or coil mounted for fMRI studies ...

Страница 24: ...Replace kinked or damaged tubing to assure similar internal flow resistance between each channel and proper seal at the connector Flow rate adjustments Each device has an integrated oil free compressor that takes in room air from underneath the Olfactometer Alternatively some of our devices have a gas input port for compressed air Both ways the air will pass through several stages of filters charc...

Страница 25: ...ent gasses from room air make sure to measure the output flow rate with the proper flow column at the output of Point A of Figure 33 For more information on the proper adjustment of flow rates between carrier and flush please consult the separate manual Olfactomer Flow Principles Figure 35 Air flow columns for stimuli carrier and baseline flush There is also a total air flow regulator next to the ...

Страница 26: ...a new folder 2 Name it Four Concentrations 3 Select the newly created folder Figure 38 Successfully created empty paradigm The newly created paradigm can be saved within the previously defined folder by clicking the Save button To save the same paradigm under a different name click Save As You can either chose to save it in an existing folder or create a new folder which will be the name of your n...

Страница 27: ...39 Configuration of olfactory stimuli via the valve tab This can be used to add and edit valves within a group The paradigm already contains a predefined device with six possible stimulus channels If the user were to connect an ETT Olfactometer C or similar device with more possible channels this number will automatically adjust Valve 1 is already preselected as the active channel To the right of ...

Страница 28: ...on to accept the new definition Figure 42 To reverse simply re select the definition in the group settings tab and uncheck the checkbox in the valve configuration tab Apply changes again and proceed to adding visual stimuli More detailed information on potential trigger conditions can be found in the section Using triggers in this manual It is possible to open multiple channels at once or in compl...

Страница 29: ...dition looped 6 times via context menu Figure 46 Three examples of using the multi select feature Configuring the visual component This paradigm also has a visual component While the olfactory stimulus is presented the subject will be prompted with a white Smell text on black background In the Add edit visuals tab visual stimuli can be configured Figure 47 Text or images can be used as stimuli It ...

Страница 30: ...d and full screen settings during paradigm execution in Paradigm Settings tab Insert the visual stimulus into the paradigm via the Add to group button and repeat with the 30 second Rest condition The final setup should look as shown in Figure 49 Figure 49 Final group with visual stimuli and olfactory stimulus definitions Figure 50 If the Olfactory stimulus already defines the length of the group t...

Страница 31: ...are trying to build in this tutorial can thus be created within just a few minutes Groups can also simply be cloned and altered to define similar conditions To exemplify this process rename Group 1 to Lavender 3 0 Figure 51 Figure 51 Rename groups to label experimental conditions By hitting the clone button a new identical copy of this group will be created The name of the cloned group will be app...

Страница 32: ... 55 Figure 55 Labeling conditions Lavender x y and Baseline for post processing in an external tool Labels will appear in a separate log file called TrialMarkers The onset of a label can also be tied to a condition like a respiratory exhalation onset For more information consult the Using Triggers section at the end of this manual Group randomizer The paradigm proposed in this tutorial is intentio...

Страница 33: ... button label ends in Enabled for success The paradigm is now ready to be externally triggered via the TTL trigger in port of the Olfactometer This feature additionally allows for keyboard keys t T or custom to trigger the start of the paradigm when connected to peripherals from other manufacturers If the use of such triggers is necessary the visual Subject Interface must have keyboard focus durin...

Страница 34: ...exhalation onsets Paradigm execution is controlled via the Start Paradigm Stop and Manual Trigger buttons in the top are of the Paradigm Designer tab They will be visible based on the current context A subject ID can be assigned and will be used in the file names of all protocol files Once everything is ready the paradigm can be started by clicking the Start Paradigm button If set in the Paradigm ...

Страница 35: ...digm designer in multiple ways Next to the control buttons a status bar and timer will show progress through the paradigm The progress will also be drawn in red into the actual paradigm once events have passed Figure 63 Figure 63 ETTDirectControl progressing through a paradigm Trigger events or user input into the Subject Interface are logged into protocol files as well as instantly presented in t...

Страница 36: ...a separated values csv Files can easily be opened in any text editor or tabulation software like Excel but also Matlab or R Studio Should your specific data analysis pipeline need different or more information please contact us to customize the data output for your scenario Typically the files are named ParadigmName date time string separated by _ OutputFileType SubjectID csv The first column is a...

Страница 37: ...37 Emerging Tech Trans LLC 3 VisualQueue Timing of visual stimuli as presented and context information like colors text image paths 4 SubjectInput Timing of Subject Interface keyboard inputs ...

Страница 38: ... Tech Trans LLC 5 Respiration Log of respiratory amplitude values 6 TrialMarkers Timing of specifically marked sections in paradigm to process later as conditions also custom trigger log and EEG interface if used ...

Страница 39: ...ol gives an overview on valve states and other device parameters like TTL Trigger on connected device off in this case Figure 66 The TTL Trigger and Respiratory sensor signals can be activated with a click on the respective buttons To start a specific paradigm with an external TTL switch the context to the Paradigm Designer tab The checkbox External TTL Triggered Start in the Paradigm Settings tab...

Страница 40: ...control our paradigm based on inhalation and exhalation To track the respiratory information the subject needs to wear the provided chest belt below the base of the sternum The belt must be connected to the provided receiver box which is plugged into the RESPONSE port on the ETT Olfactometer front panel Similarly to the use of external TTL triggers the respiratory signal needs to be enabled within...

Страница 41: ...with added noise Figure 70 A larger version of this plot is provided in the Paradigm Designer on the top right corner above the assembled paradigm This plot additionally provides vertical lines on the time points of detected inhalation and exhalation onsets which are possible trigger conditions to the paradigm Figure 70 Simulated respiratory signal to debug paradigms without a human subject The ea...

Страница 42: ...re 72 For testing purposes it is possible to manually fulfill the trigger condition by clicking the Manual Trigger button Beyond basics Under certain conditions the use of the predefined triggers External TTL Triggered Start and Synchronize stimulus onset with inhalation onset might not be sufficient When paradigms require complex trigger conditions the use of the Add edit Triggers Labels EEG DINs...

Страница 43: ...n none must be checked Currently there is no further indication within the paradigm as to which trigger condition is currently selected Clicking on a specific segment marked by a blue box surrounded with a red dotted rectangle will reveal the specific setup and can be changed at any time Figure 73 Using the Add edit Triggers Labels EEG DINs tab to synchronize each group onset with an external TTL ...

Страница 44: ...75 Figure 75 Visual queue and device actions defined prior to attaching more trigger conditions Assuming for this specific cohort the full respiratory cycle is about 4 seconds long with 1 5 s inspiration and 2 5 s expiration to assure the stimulus valve is opening while the subject is still exhaling we will insert an exhalation trigger one second prior to the stimulus onset into the paradigm Figur...

Страница 45: ... bottom on the blue background Figure 78 Configuration of an Exhalation onset trigger in the paradigm Right after the rest label insert a respiratoryAnalogExhalationOnset from the triggers tab as described in Figure 78 The paradigm will now delay the onset until an exhalation onset event will be detected on the respiratory sensor signal data ...

Страница 46: ...be required ii The choice of detergent or solvent depends on the odorants used iii Alcohol or non odorous soap are typical For questions and advice consult emergingtechtrans com in the support section or contact ETT at support emergingtechtrans com Cleaning the carrier top Please consult the section Before we start This procedure is only recommended for experienced users and comes at the risk of d...

Страница 47: ...from each channel in a cleaning bath 6 Each circle has two plugs to secure the back flow preventing valves inlet and outlet to the glass odorant chamber Under each plug should be a clear valve gasket backflow preventer Do not lose Slowly pull up those plugs and put them in a separate container CAUTION THERE IS A SMALL CLEAR SILICONE VALVE GASKET UNDERNEATH EACH PLUG DO NOT DISCARD VALVE MIGHT GET ...

Страница 48: ...ulus channel Depending on the odorant carrier version there may be one or two additional valves in the flush channel 8 Place the whole carrier top into the cleaning bath WARNING This may remove the top sticker on the odorant carrier An alternative to full submersion is to thoroughly wipe the underside and gasket receptacles with alcohol soaked lint free cloth ...

Страница 49: ...stilled water 10 Fill until all items are covered with water 11 Use the clear non scented soap or alcohol and put a small amount in the cleaning bath 12 Place a watertight pump into the water or aggravate the water by hand make sure it is fully immersed in the water ...

Страница 50: ...re reassembly Cleaning the bottles ETT Olfactometer glassware is dishwasher compatible We recommend to handwash the lids contain a plastic threaded part and a Teflon insert to assure a tight odorless seal 1 Dump the old odorant with tap water down the sink 2 Soak the bottles in warm soapy water optional when using dishwasher in step 3 3 Clean the bottles with warm soapy water run through dishwashe...

Страница 51: ...51 Emerging Tech Trans LLC alcohol depending on the intensity of the spill It is advised to use the air of the olfactometer to blow tubing dry after washing before storing it ...

Страница 52: ...52 Emerging Tech Trans LLC Odorant flow setup Carrier Setup Check valve layout in the odorant carrier ...

Страница 53: ...53 Emerging Tech Trans LLC Typical air flow configuations ...

Страница 54: ...54 Emerging Tech Trans LLC ...

Страница 55: ...55 Emerging Tech Trans LLC Configuration for multiple channels at once ...

Страница 56: ...56 Emerging Tech Trans LLC Setting up multiple channels within ETTDirectControl ...

Страница 57: ...ware For this to work the Parallel Port of the ETT EEG Trigger needs to be plugged into the EGI AV DEVICE DIN Adapter Figure 79 Previous version of the EET EEG Interface Figure 80 Current version of the ETT EEG Interface A full system overview can be seen in Figure 81 The EGI AV Device DIN Adapter is connected via Serial Port to the EEG system specific CLOCK SYNC I O device This is then connected ...

Страница 58: ...hat has ETT Direct Control loaded To see it working one first has to get the EGI NetStation software ready EGI NetStation NetStation should be loaded with the preferred session template that would normally be used for the study The system should work without measuring gains and all other prerequisites that the program steps through during startup So those can be skipped for initial testing A net a...

Страница 59: ...on and Marks as shown in Figure 83 At this point everything should be ready to continue with the setup in ETT Direct Control Once that setup is completed submitted events will be marked as labeled DINS in the DIN track within the NetStation main window Figure 84 Figure 83 For DIN visualization click on Events to activate the Events track DIN 1 ...

Страница 60: ...e should get automatically recognized once connected to ETT Direct Control Figure 85 At this point all functions in this Manual Mode tab can be ignored only confirm it is connected A switch to the Paradigm Designer tab and then a switch to the EEG labels setup as shown in Figure 86 Figure 85 ETT EEG Interface EGI in ETT Direct Control Manual Mode tab once successfully connected ...

Страница 61: ...nd 63 Clicking the Preview on connected EEG Interface Figure 87 will submit the DIN to the EEG system and visualize it in the waveform window under DIN1 with its respective ID in EGI NetStation Setting and Previewing this field to 0 will reset the DIN settings If everything worked so far a simple group can be compiled First Save the paradigm as EEG DIN sample Switch to the Add edit visuals tab and...

Страница 62: ...and click the Add to Group button Figure 89 Figure 89 Insert a 1s EEG DIN1 to the Group 1 that already contains a visual stimulus Hit F1 on your keyboard for a quick save Now create a new group by clicking on the New button in the group settings The text above should state Group 2 Now repeat the same steps above First insert a ...

Страница 63: ...nd hit F1 on your keyboard to save the paradigm Figure 92 As shown in Figure 93 this will create a problem if the desire is to label the onset of each group in the EEG system Since the EEG DINs have the same duration as the visual stimulus general group length when switching to the same group twice in a row the ETT EEG Interface will not send another DIN This behavior is intentional for different ...

Страница 64: ...d when calling the same group twice in a row Figure 94 Reducing the EEG DIN duration to anything shorter than the group length will assure that the DIN is sent out at the start of each group call Now it s time to save the paradigm one more time F1 and do a confirm the ETT EEG Interface is still connected in the Manual Mode tab Then we can start the paradigm and observe the DINS in NetStation as sh...

Отзывы: