background image

21

3  ETROLINK™ CONFIGURATION PORT

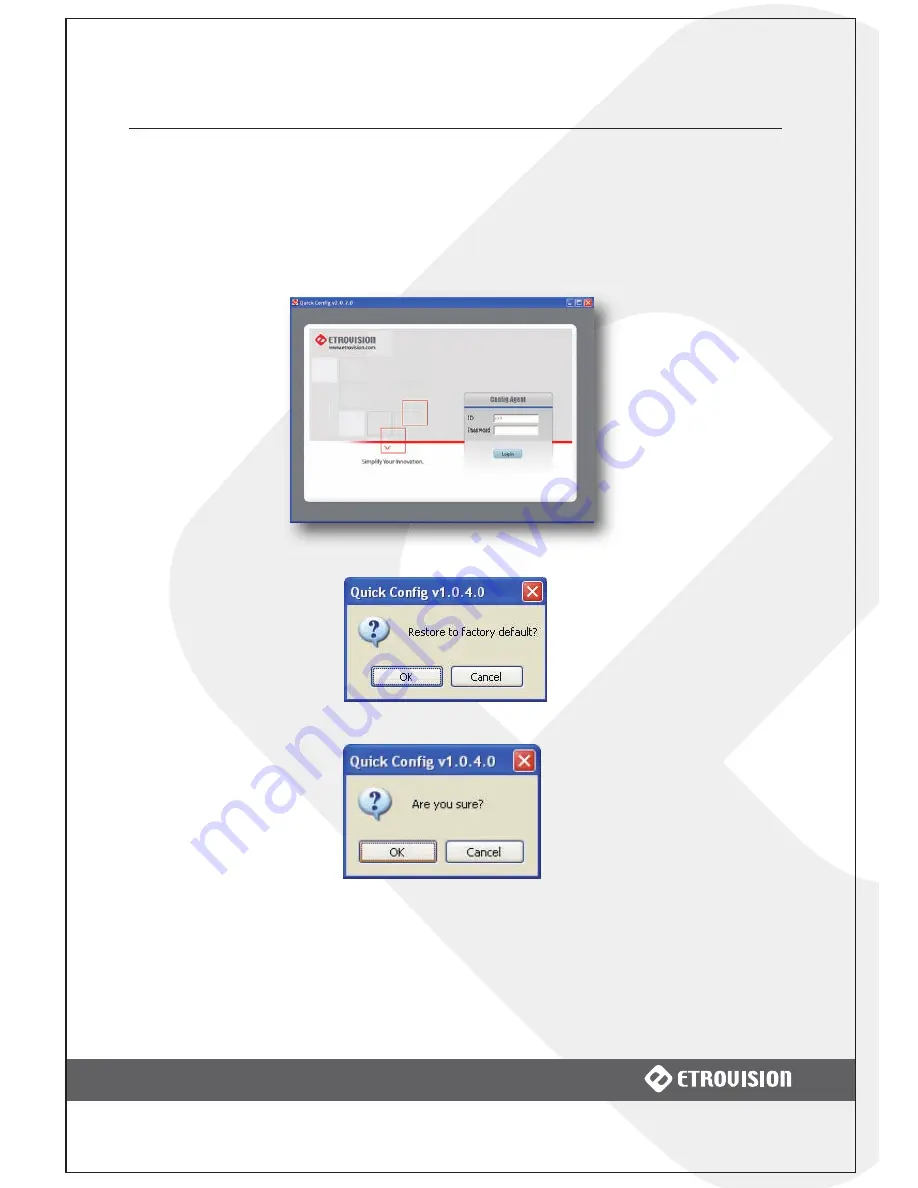
3.4  Missing root Password

If the root password has been forgotten, then factory settings will need to be
restored using the EtroLink™ USB port.
At the Quick Config login screen, use CTRL+ALT+F to restore factory settings

Type CTRL+ALT+F:

Click OK

Click OK

The following message shows that the operation is complete.

Содержание EV3151

Страница 1: ...etrosales etrovision com TEL 886 2 26551518 2F Block C Nan Kang Software Park 19 5 San chung Rd Nan Kang District Taipei 115 Taiwan EV3151 EV3151A Box IP Camera Installation Guide Version 6 2...

Страница 2: ...icon indicates an action that will likely impair the system Disclaimer 2007 Etrovision Technology All rights reserved EtroLink AnyUSB are trademarks of Etrovision Technology other product or service n...

Страница 3: ...5 EV3151A 6 2 USING THE EV3151 FOR THE FIRST TIME 7 2 1 Initial Requirements 7 Software Requirements 7 Install EtroScan 7 2 2 Physical IP Camera Connections 8 Connect to the Network 8 Connect CCTV to...

Страница 4: ...EtroLink Config Port 15 Connecting the IP camera to the PC 15 Quick Config Login 16 Quick Wizard Network 17 Manually Starting the Quick Config Wizard 19 3 3 Factory Default 20 3 4 Missing root Passwor...

Страница 5: ...ding Compression Video Audio Video Input 1 0Vp p with 75 Loading Ethernet RJ45 10 100 Base T IP Network Protocol TCP IP DHCP PPPoE HTTP DDNS NTP FTP SMTP UDP RTP RTSP 3GPP UPnP Power Supply DC 12V 350...

Страница 6: ...ADPCM Compression Video Audio Connector 3 5mm Input Output Wireless Wi Fi IEEE 802 11 b g External USB Adapter Support Ethernet RJ45 10 100 Base T IP Network Protocol TCP IP DHCP PPPoE HTTP DDNS NTP F...

Страница 7: ...igital I O No Yes Wireless USB Port No Yes 1 3 EV3151 EV3151A Differences 1 4 Dual Streaming Capabilities Simultaneous dual streaming is supported Combination options include Stream 1 Stream 2 H 264 M...

Страница 8: ...Checklist The EV3151 packaging will include the following materials EV3151 EV3151A Video Server x 1 Power Adapter x 1 USB Cable x 1 Mini DIN Cable x 1 Product CD x 1 1 7 Product CD The product CD con...

Страница 9: ...ver Outer View 1 10 Physical Connections EV3151 1 10 Physical Connections 1 10 Physical Connections EV3151 EV3151 1 12V DC Power Input 2 RJ 45 Network Cable Port 3 EtroLink USB Config Port 4 BNC Video...

Страница 10: ...1 PRODUCT OVERVIEW 6 EV3151A 1 Audio I O 2 BNC Video In 3 mini DIN port 4 Power LED 5 EtroLink USB Config Port 6 WiFi USB Port 7 RJ 45 Network Cable Port 8 12V DC Input...

Страница 11: ...cameras and other devices i e NVR EtroScan is available via two methods Install EtroStation 3 0 EtroStation 3 0 includes the EtroScan utility EtroStation is on the product CD that accompanies the EV31...

Страница 12: ...Connect Audio In Out EV3151A Only For audio functionality connect the audio input cable Video flicker may occur when enabling disenabling audio This situation normally only lasts for a second Video fl...

Страница 13: ...R THE FIRST TIME IP Address 192 168 1 2 Subnet Mask 255 255 255 0 Gateway 192 168 1 1 Using EtroScan EtroScan allows users to easily find an IP camera and configure the settings Select EtroScan from t...

Страница 14: ...an button to list the IP and MAC address list for IP cameras on the network A new IP camera will display the factory IP address 192 168 1 2 However if multiple new devices are present on the network t...

Страница 15: ...elow is an example of the label displaying the MAC address Change Network Setting via EtroScan There are two ways to modify the network settings 1 Double click on a specific IP address the setting pag...

Страница 16: ...l become stable once reboot is complete Exit the Setting Page by clicking Close and wait for the reboot to complete After rebooting press Scan to verify the new IP address If using DHCP then the MAC a...

Страница 17: ...anged after installation is complete Please refer to the User Manual for more information Upon login the error ActiveX control failed to load OCX may be encountered The error indicates the browser req...

Страница 18: ...A confirmation message box will be displayed choose Run Wait for the add on to complete and the page to attempt reloading Most likely other ActiveX controls will be required Repeat the above procedure...

Страница 19: ...require manually running the EtroLink Quick Config Wizard 3 2 Setup Using the EtroLink Config Port The following discusses using the EtroLink Config Port using Windows XP With the exception of the au...

Страница 20: ...be displayed Quick Config Login Unless the password has already been modified use the default administrator login is ID root Password pass NOTE restoring factory settings will restore default login pa...

Страница 21: ...twork and DDNS settings Clicking Quick Wizard will display Step 1 Step 1 Clicking Quick Wizard will display Step 1 Clicking Quick Wizard will display Step 1 The network configuration options include S...

Страница 22: ...PPoE and Next Enter all the relevant network settings and click Next Step 3 Regardless of network connection type step 3 and 4 are the same Regardless of network connection type step 3 and 4 are the s...

Страница 23: ...d Manually Starting the Quick Config Wizard When using Windows 2000 or 98 the EtroLink Quick Config Wizard will not be automatically started after connecting the IP camera and PC To start it manually...

Страница 24: ...n the loss of the current IP camera s configuration In the User s Manual see System Configuration in the Maintenance chapter for more information on backup restore functionality From the Quick Config...

Страница 25: ...password has been forgotten then factory settings will need to be restored using the EtroLink USB port At the Quick Config login screen use CTRL ALT F to restore factory settings Type CTRL ALT F Click...

Страница 26: ...video server camera will now be configured with the default 192 168 1 2 IP address and the default username password of root pass Use EtroScan or the Web UI to manually reconfigure the device or a bac...

Страница 27: ...LED Green network connection LED Orange network transmission LED The table below highlights various camera states and corresponding Power LED indicators Booting Blinking light Camera operational Stab...

Страница 28: ...deo Server please see the firmware User s Manual These manuals are available on the product CD or they can be downloaded from the Etrovision website www etrovision com In addition the latest firmware...

Отзывы: