background image

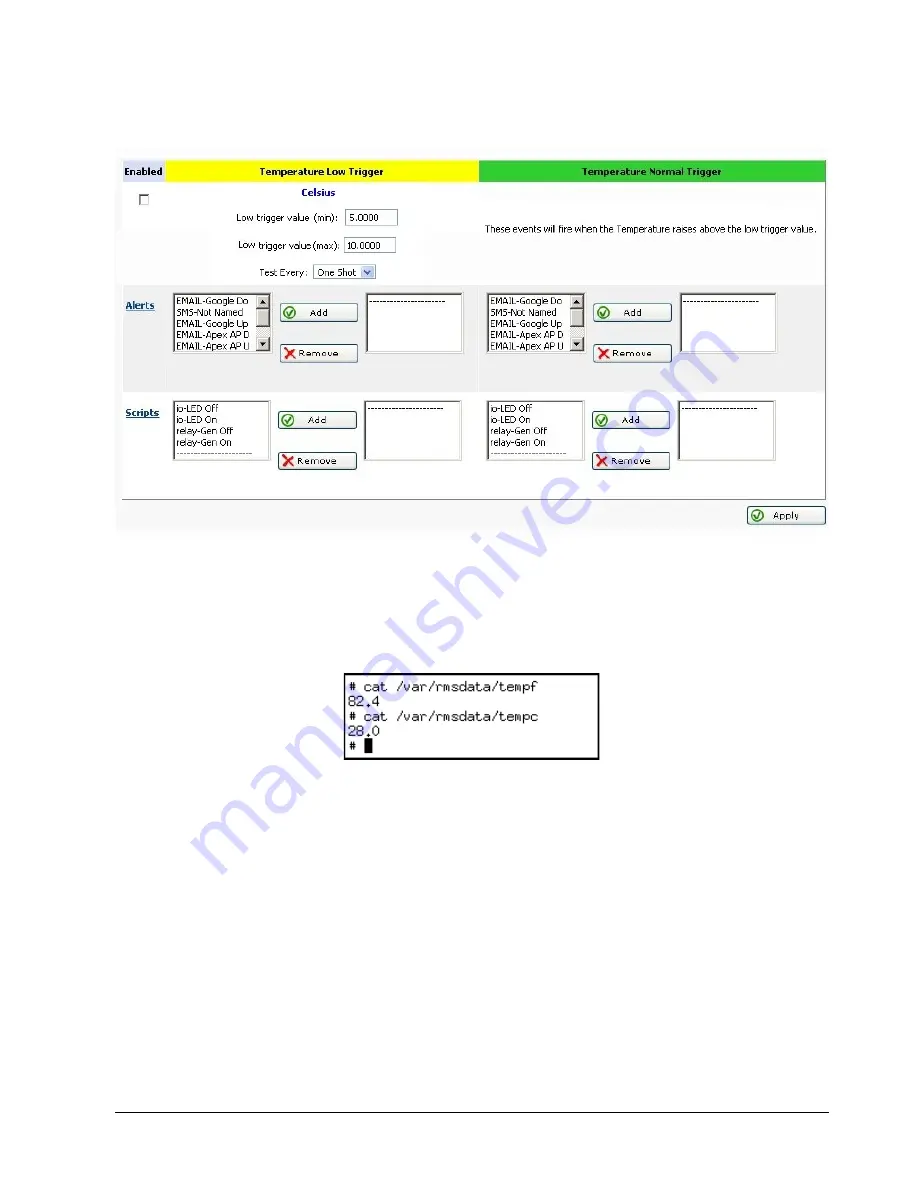
Below is the Low Trigger interface. The Low Trigger is used when the temperature falls below 
the Low Trigger value. The Normal Trigger is used when the temperature raises above the 
Low Trigger value.

Below is an example of reading the temperature on the command line. 

Note:

 the file tempf 

contains the board temperature in Fahrenheit. The file tempc contains the board temperature 
in Celsius.

Содержание RMS-200

Страница 1: ...RMS 200 C EtherTek Circuits...

Страница 2: ...O w n e r s M a n u a l...

Страница 3: ...R E M O T E M O N I TO R I N G M A D E E A S Y RMS 200 Owners Manual Rev 1b June 6 2011 EtherTek Circuits 473 Corina Ave Unit 38 Princeton B C Canada...

Страница 4: ...le 1 7 Basic installation example 2 8 Basic installation example 3 9 Basic installation example 4 10 The Relays 11 Need More Relays 15 The Voltmeters 18 Voltmeter Graphs 21 How to measure amperage by...

Страница 5: ...FTP Based Upgrade 39 Downloads 42 Specs 42 Base System 256Mb Flash 64Mb Ram 42 General Board Information 42 Block Diagram 43 Graphs 44 Warranty 45...

Страница 6: ...3 power relays giving it the unique ability to turn on off devices remotely using an Internet connection Use the power relays to remote start a generator RMS 200 has 5 dedicated input pins used for do...

Страница 7: ...to low voltage shunt mode 2 VDC Two Power Relays for devices using 1 240v 5 amps AC DC current One Power Relay for devices using 1 240v 15 amps AC DC current Two programmable push buttons Four general...

Страница 8: ...e connectors for ease of use A partial list of programs and packages included SQLlite v3 database Telnet Drop Bear SSH Light Http and Https Server Pro FTP Cron scheduling agent Busy Box PPP Net SNMP N...

Страница 9: ...on off switch It takes the RMS 200 board approximately 30 seconds to bring up the Linux operating system The RMS 200 will signal it is ready by first blinking the green status light in a continuous he...

Страница 10: ...s by pressing and holding down the micro push button 2 located near the console port and then turning the RMS 200 device on with the on off switch Release the button when the alarm leds start to flash...

Страница 11: ...icon This takes you to the System Setup area shown below Here you will want to visit the following areas Company Setup Network System Time and Change Password Adjust the Station Name Location Domain N...

Страница 12: ...les of how to install the RMS 200 unit Installation Basic installation example 1 Monitoring your Battery Bank To monitor your main battery power supply run a wire from the positive side of the battery...

Страница 13: ...ng signal strength can be monitored with ease Simply attach the RSSI output from the radio to one of the Voltmeter inputs on the RMS 200 board see Figure 3 Monitor the signal strength of your radios w...

Страница 14: ...ay Reset your device at any time using RMS 200 Note in the Normally Closed configuration power still flows to your device even when the RMS 200 device is turned off Virtually any 1 to 240 volt AC or D...

Страница 15: ...y are in close proximity with each other RMS 200 can sense when the contacts are together or apart Program the alarm pins to send an email run a custom file and or toggle a relay when the door gets op...

Страница 16: ...ul for on site testing Each relay also has a jumper shunt connector that allows the relay to be engaged manually for hands free testing Control of each relay can be done with a web browser The picture...

Страница 17: ...trol the relays Complex relay actions can be performed to control your equipment For example starting a generator Below is a screen shot of making a relay script to toggle relay 1 on wait 2 seconds th...

Страница 18: ...the rmsrelay command to toggle relay 1 on and off Below is an example of reading the status of Relay 1 using the command line interface Note the relay1 relay2 and relay3 file will contain a 0 when th...

Страница 19: ...programmers may want to write their own programs to control the relays Below are two example PHP functions that use the PHP system command to turn relay 1 on and off php EtherTek Circuits 2001 2010 Re...

Страница 20: ...e USB Relay Board gives you control of 5 SPDT relays for general purpose use via the standard USB Bus See the USB Relay Board user manual for additional information on how to hook up the USB Relay Boa...

Страница 21: ...ich Relay Daughter Board you want to work with Decide if you want the USB Relay Board to start when the RMS 200 system is booted then click OK When a USB Relay board has been selected an icon in the l...

Страница 22: ...shows at a glance the status of each relay and provides a gateway for more relay options To refresh the web page you can press the Refresh button To have the web page automatically refresh set the ref...

Страница 23: ...ry charger voltage and amperage Each voltmeter has a Mode Jumper that when removed puts the voltmeter into low voltage mode In this mode the volmeter has a range of 2 0 VDC and has over 4 million step...

Страница 24: ...it is measuring the charge going into the battery bank via a 50 millivolt 50 amp current shunt more on using shunts below Voltmeter 3 is measuring the output of a negative 24 volt power supply Note A...

Страница 25: ...tions on Boot check box is used to stop actions from happening when the RMS 200 board is warm or cold started Each voltmeter has a High Normal and Low trigger range Each High and Low trigger range has...

Страница 26: ...e of reading the voltmeters on the command line The voltmeter data files can be found in the var rmsdata directory Note the voltmeter readings are stored in files Voltmeter 1 s storage file is called...

Страница 27: ...h which electricity is diverted Often the resistance of a shunt is known precisely and is used to determine amperage by measuring the voltage across it and using Ohm s law I V R It also allows high cu...

Страница 28: ...the positive battery terminal by way of a 50 millivolt 50 amp current shunt From one side of the shunt there is a sense wire run to the negative input on VM3 From the other side of the shunt there is...

Страница 29: ...corresponding voltmeter This puts the voltmeter in low voltage mode in this mode the maximum voltage must not exceed 2 0v to 2 0v If everything is hooked up correctly you should be able to see how mu...

Страница 30: ...battery terminal by way of a 50 millivolt 25 amp current shunt From one side of the shunt there is a sense wire run to the negative input on VM3 From the other side of the shunt there is a sense wire...

Страница 31: ...l for additional information on how to hook up the USB Isolated Voltmeter Board to your RMS 100 RMS 200 or RMS 300 unit To access the USB Isolated Voltmeter Board interface go to the Device Manager an...

Страница 32: ...ws at a glance all voltmeter readings and provides a gateway for more voltmeter options In the screen shot above voltmeter 6 is displaying a positive reading of a 24v battery bank Note A green bar gra...

Страница 33: ...oard is warm or cold started Each voltmeter has a High Normal and Low trigger range Each High and Low trigger range has a maximum and minimum value The range in between the maximum and minimum value a...

Страница 34: ...low is the Low Trigger interface The Low Trigger is used when the voltage falls below the Low Trigger maximum value The Normal Trigger is used when the voltage rises above the Low Trigger minimum valu...

Страница 35: ...ormat The RMS 200 web interface has High and Low triggers that can be set to fire alerts or scripts when the temperature is either too high or too low Use the relay scripts to turn on a cooling fan fo...

Страница 36: ...he Low Trigger value The Normal Trigger is used when the temperature raises above the Low Trigger value Below is an example of reading the temperature on the command line Note the file tempf contains...

Страница 37: ...on door contacts to monitor entry points RMS 200 also has 4 general purpose pins that can be set as Inputs or Outputs These multi purpose I O pins can be controlled or read from either the web page in...

Страница 38: ...n shot of the RMS 200 I O setup page for GPIO 1 GPIO pins can be configured to be 3 3 volt Inputs or Outputs Use these pins to control any manner of devices or sense condition changes and react with a...

Страница 39: ...Pin 4 is General Purpose I O pin 3 Pin 5 is General Purpose I O pin 4 Pin 6 is GND ALARMS Below is a pinout diagram of the Alarm pins on the RMS 200 board These input pins are pulled up to 3 3 volts N...

Страница 40: ...e When the RMS 200 is booting up it first checks to see if Button 2 is being held down If Button 2 is held down then all of the configuration files in etc are re written bringing the RMS 200 unit to a...

Страница 41: ...B to Serial converter drivers Support for generic type and USB to Serial converters that use the Prolific chipset USB WIRELESS RMS 200 uses the RayLink wireless device driver Some USB wireless devices...

Страница 42: ...may either choose the Web Browser based method or the FTP based method Web Based Upgrade To perform a web browser based firmware upgrade first download the latest Kernel or RootFS file from the firmw...

Страница 43: ...plete Cleanmarker written at 0 Erasing 128 Kibyte 20000 0 complete Cleanmarker written at 20000 Writing data to block 0 Writing data to block 20000 Checksum 2020866943 File Stamp 2020866943 Root File...

Страница 44: ...s will be similar on any OS The examples below assume a folder on the C drive called RMS200 that contains the firmware that you would like to upload to your RMS 200 board The example below assumes tha...

Страница 45: ...ged in as shown below type out bin and press Enter Next type out cd data and press Enter Then type out put rootfs XXX xxxxxxxxxx where XXX is the firmware build number and xxxxxxxxxx is the checksum a...

Страница 46: ...the firmware build number and xxxxxxxxxx is the checksum and then press Enter You should see similar output to what is shown below When the firmware programming is complete the RMS 200 board will reb...

Страница 47: ...n Software Features Hardware Features Linux Kernel 2 6 33 Services HTTP Server FTP server SSH SNMP Agent TELNET Server PPP Drivers USB to Ethernet USB to Serial USB flash stick USB Web Cameras Relays...

Страница 48: ...Block Diagram...

Страница 49: ...Graphs The graphs below were created by the RMS 200 board using RRD Tool Graphs are available for each voltmeter temperature and system load...

Страница 50: ...ation software and user data are not covered under this Limited Warranty EtherTek Circuits and its Authorized Resellers are not liable for any damage to equipment buildings and or property by the use...

Страница 51: ...FICALLY DISCLAIMS ANY AND ALL IMPLIED WARRANTIES INCLUDING WITHOUT LIMITATION WARRANTIES OF MERCHANTABILITY AND FITNESS FOR A PARTICULAR PURPOSE IF EtherTek Circuits CANNOT LAWFULLY DISCLAIM IMPLIED W...

Отзывы: