background image

21

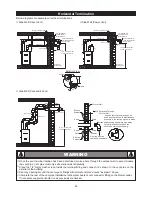
Vertical Termination

Below diagrams are examples of vertical terminations.

Through roof (Direct Vent)

Through roof (Concentric Vent)

Through roof (Power Vent)

Minimum twelve (12) inches above anticipated 

snow level.

It cannot be connected to existing vent piping or 

chimney.

The total vertical and horizontal runs cannot exceed 

the maximum length with a maximum number of 90 

degree elbows as specified in the table of page 20.

Eternal can be vented straight up and a horizontal 

section is not required for vertical terminations.


WARNING

!

!

An  open  tee  is  optional  and  can  be 

used as a termination to alleviate back 

pressure in the venting system in areas 

experiencing abnormally high winds.

Содержание GU145/508111145

Страница 1: ... and maintained Failure to follow these instructions exactly could result in fire explosion serious bodily injury and or property damage Do not store or use gasoline or other flammable vapors and liquids in the vicinity of this or any other appliance WARNING IMPORTANT Only specially trained and authorized personnel are permitted to service this water heater NOTE TO ASSEMBLER INSTALLER Leave this m...

Страница 2: ...on P24 Common Venting Installationmon Vent Installation P25 Concentric Vent Kit Outdoor Vent Kit Installation P26 Vent Pipe Installation Terminator Position P27 Gas Supply Piping P28 LP Conversion P29 Water Supply Connection P30 Condensate Piping P31 Temperature and Pressure Relief Valve Recirculation Pump Connection P32 Electrical Connection P33 Optional Remote Controller Installation P34 35 MCU ...

Страница 3: ...cs Wall Bracket x1pcs 1 4 x1 1 2 screws x6pcs 1 LP Orifice 1 150150197 Mounting Bracket Assembly Water Heater Stand 314080136 1 1 T Fitting 195140195 for condensate line 1 EC Adapter 312070025 Item Description Qty 2 73 Eternal Hybrid Condensing Water Heater Operating and Installation Manual Registration Card 151140066 151140067 T P Relief Valve Drain Valve Assembly Mesh Screen 1 1 1 1 2 190006019 ...

Страница 4: ...ull Modulation Air Ratio Internal Piping Material Stainless Steel Reserve Tank 2 Gallons Electrical Consumption Standby 8W Max 45W Standby 8W Max 85W Maximum Noise Level 40dB a 50dB a Remote Controller Up to 3 kits Multi Unit Capable Up to 2 in manifold No Built In MCU M Option MCU up to 8 Units GPM Capacity Range 0 1 to 14 5 GPM 0 1 to 19 5 GPM Temperature Sensing Tank Cold Inlet Hot Outlet Air T...

Страница 5: ...5 Dimensions GU145 S 508 11 12 21 22 1145 S GU195 S M 508 11 12 21 22 1195 S M ...

Страница 6: ...6 Parts Diagram for Model GU145 S 508 11 12 21 22 1145 S GU195 S M 508 11 12 21 22 1195 S M 11 12 5 9 13 6 14 3 4 7 2 10 1 15 8 18 16 17 19 7 20 31 ...

Страница 7: ...7 Parts Diagram for Model GU145 S 508 11 12 21 22 1145 S 21 22 23 24 25 26 27 28 29 30 ...

Страница 8: ...ing 13 Rubber Foot 14 Drain Valve Assembly 15 Main Power Cord 16 Handle 17 Condensing Nipple 18 Plug 19 Mesh Screen 20 Outdoor Venting Cap Optional 21 Trap Cleaner Assembly 22 Radial Blower Assembly 23 Gas Valve 24 Air Pressure Switch GU145 S 25 Burner Assembly 26 Main Controller GU145 S 27 Cold Water Tube Assembly GU145 S 28 Hot Water Tube Assembly GU145 S 29 Flexible Silencer Kit 30 Mixing Valve...

Страница 9: ...9 Parts Diagram for Model GU195 S 508 11 12 21 22 1195 S Parts Diagram for Model GU195 M 508 11 12 21 22 1195 M 21 22 23 24 25 26 27 28 29 30 21 22 23 24 26 27 28 30 25 29 30 ...

Страница 10: ...f Valve Cash Acme 11 Vent Collar 12 Vent Collar Packing 13 Rubber Foot 14 Drain Valve Assembly 15 Main Power Cord 16 Handle 17 Condensing Nipple 18 Plug 19 Mesh Screen 20 Outdoor Venting Cap Optional 21 Trap Cleaner Assembly 22 Radial Blower Assembly 23 Gas Valve 24 Air Pressure Switch GU195 S M 25 Burner Assembly 26 Main Controller GU195 S M 27 Cold Water Tube Assembly GU195 S M 28 Hot Water Tube...

Страница 11: ...lly lights the burner Do not try to light the burner by hand Smell all around the water heater area for evidence of leaking gas Be sure to smell next to the floor because LP gas is heavier than air and will settle on the floor Use only your hand to turn the manual gas valve knob Never use tools If the knob will not turn by hand don t try to repair it Call a qualified service technician Force or at...

Страница 12: ...rough an outside wall or through the roof using 3 vent piping the total vent run cannot exceed 95 feet with one 90 elbow If more elbows are required the venting distance must be reduced 5 feet for every 90 elbow Vent piping should slope downward towards the unit Horizontal runs require adequate support at 3 feet intervals and vertical runs supported at 5 feet intervals Condensation may be created ...

Страница 13: ...he trap must be cleaned CLEANING OUT THE TRAP The condensate trap must be filled with water prior to using the water heater Fill 3 0 oz of water through the exhaust collar per figure 1 Eternal water heater will typically produce a condensate that is considered slightly acidic with a Ph content of approximately 3 4 Install a neutralizing filter if required by authority having jurisdiction See figur...

Страница 14: ...inch per 15 000 Btu hour of the total input ratings of all appliances in the enclosed area When combustion air is supplied from inside the building each opening should give a minimum free area of one square inch per 3 750 Btu hour of the total input ratings of all appliances in the enclosed area These openings should never be less than 40 sq in The minimum required inside air volume should be 50 c...

Страница 15: ...f the appliance Locate the water heater in an open unroofed area and maintain the above minimum clearances from combustible materials Exhaust Ventilation Do not have the flue terminal pointing toward an opening into the building Do not locate your heater in a pit or any location where gas and water can accumulate WARNING Do not install the water heater where water debris or flammable vapors may ge...

Страница 16: ...d combustion design so as to separate the water heater s combustion and venting system from the interior atmosphere of the manufactured home and trailer In accordance with code water heaters must be direct vented Please refer to direct venting instructions and diagrams on page 21 Placement of Water Heater Locate the water heater as desired make certain the minimum clearances are maintained For ind...

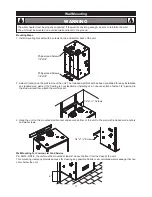
Страница 17: ...f the framing is not standard or installing on an uneven surface fasten 3 4 plywood to the stud wall and then attach the wall bracket Hang the unit on the mounted wall bracket and secure bottom of the unit to the wall with included wall anchors and wall screws 2 3 WARNING 1 4 x1 Screws Wall Mounting For Commercial Food Service Per ANSI NSF 5 the unit must be mounted at least 6 above the floor from...

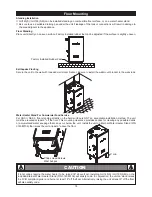
Страница 18: ...t must be elevated at least 6 off the floor This mounting clearance provides access for clearing any possible debris or accumulated water seepage that can occur below the unit Install the unit on Eternal Water Heater Stand P N 314080136 that raises the unit at least 6 above the floor Standing Installation Floor Standing Earthquake Proofing Water Heater Stand For Commercial Food Service 6 min Facto...

Страница 19: ...pipe of any other water heater or appliance NOTICE VENTING GUIDELINES This water heater must be properly vented for removal of exhaust gases to the outside of the home Correct installation of the vent pipe system is mandatory for the safe and efficient operation of this water heater and is an important factor in the life of the unit WARNING If the Eternal combustion air inlet is located in an area...

Страница 20: ... allowable length for each elbow used as follows 45 degree elbow Deduct 2 feet 90 degree elbow Deduct 5 feet How To Configure Unit For Power Vent Maximum Allowable Vent and Combustion Air Piping Length Minimum Required Air Volume 2 inch Piping 3 inch Piping Feet Max of 90 elbows Feet Max of 90 elbows 35 3 100 6 Insufficient air supply used with Power Vent appliance may cause the building to experi...

Страница 21: ...isting vent piping or chimney The total vertical and horizontal runs cannot exceed the maximum length with a maximum number of 90 degree elbows as specified in the table of page 20 Eternal can be vented straight up and a horizontal section is not required for vertical terminations WARNING An open tee is optional and can be used as a termination to alleviate back pressure in the venting system in a...

Страница 22: ... Grade or above snow level 12 min above Grade or above snow level 1 Min 2 Max Combustion Air 12 min above Grade or above snow level Strap Intake pipe Exhaust pipe 11 2 Min Extension Through Exterior Wall Exterior Wall Screw Collar Silicone Sealer Collar Silicone Sealer Screw Screw Screw An open tee is optional and can be used as termination to alleviate back pressure in the venting system in areas...

Страница 23: ...ndow or gravity air inlet into any building 3 above any forced air inlet within 10 Maintain the following clearances to any opening in any building From the top of the unit 1 below 1 horizontally from or 1 above any door operable window or gravity air inlet into any building 3 above any forced air inlet within 10 For outdoor installation we recommend using the outdoor venting cap for rain protecti...

Страница 24: ... 12 Min Combustion Air Vent 12 Min 12 Min Combustion Air Vent 12 Min 12 Min 18 Min CANADA 2 Horizontal Termination 12 Min Above Grade Highest Anticipated Snow Level Horizontal Termination Min 12 Combustion Air Termination 12 Min 12 Min Vent Termination 12 Min Above Grade Highest Anticipated Snow Level Min 12 Combustion Air Termination 12 Min 12 Min Vent Termination 12 Min 12 Min Above Grade Highes...

Страница 25: ...d Vent Multi Units With Common Vent POWER VENTED Dimensions Of Installation DIRECT VENTED The maximum length is the sum of the equivalent of straight horizontal runs vertical runs and elbows of common vent pipe One 90º elbow is equivalent of 5 feet Example when installing 2 units on 4 common vent the maximum vent length is 50 and if 3 elbows are used then the run cannot be more than 35 Horizontal ...

Страница 26: ...d or recirculation of combustion byproducts may occur Water may also collect inside the larger combustion air pipe and flow to the burner enclosure Failure to follow this warning could result in product damage or improper operation personal injury or death Do not allow insulation or other materials to accumulate inside the pipe assembly when installing through the hole Ensure termination height is...

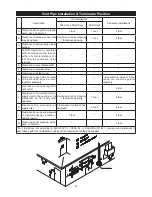
Страница 27: ...e to each side of center line extended above meter regulator assembly 3 feet within a height 15 feet above the meter regulator assembly I Clearance to service regulator vent outlet 3 feet J Clearance to non mechanical air supply inlet to the building or the combustion air inlet to any other appliance 4 feet below or to side of opening 1 foot above opening 1 foot 3 feet K Clearance to a mechanical ...

Страница 28: ...diminish and it would not be able to reach maximum performance Size gas piping system correctly following ANSI Z223 1 NFPA 54 or by local code Based on 0 60 specific gravity for natural gas at 0 5 W C pressure drop DOE standard is 1100 BTU per cubic ft of natural gas Based on 11 W C supply pressure Gas Piping System Codes NATURAL GAS SUPPLY PIPING PROPANE GAS SUPPLY PIPING Recommended Gas Pipe Siz...

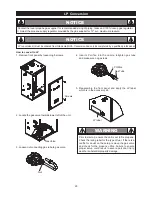
Страница 29: ...izing of piping tanks and 100 lockup gas regulator NOTICE 5 Prior to start up ensure the unit is set to fire propane Check the rating label for the type of fuel If there is a conflict or doubt on the setup remove the gas valve and check for the propane orifice Failure to ensure proper setup could result in severe personal injury death or substantial property damage WARNING Gas Valve LP label Nut G...

Страница 30: ...ater usage or significant dump loads WARNING Close water supply shut off valve to the unit first Connect garden hose to the draining valve located on the lower leftsider of the unit Open the valve by using a flat head screw driver to drain water with the hose After draining the tank turn the valve body to remove the draining valve from the unit and clean the filter FILLING THE WATER DRAINING THE W...

Страница 31: ...te is freely flowing from the drain piping after the system has been installed Condensate will begin flowing out of the water heater within 15 minutes after operation has started Take measures to prevent the condensate drain lines from freezing insulation heat tape electric heaters etc Condensate piping to floor drain Condensate piping to Condensate pump Vent stops vacuum air lock and clean out fo...

Страница 32: ...p Control Function Step 1 Push 1 switch of group 2 like below figure 3 2 20 min Intermittent time GROUP 2 GROUP 2 3 2 40 min Intermittent time GROUP 2 3 2 60 min Intermittent time GROUP 2 3 2 90 min Intermittent time GROUP 2 3 2 20 min Intermittent time GROUP 2 GROUP 2 3 2 40 min Intermittent time GROUP 2 3 2 60 min Intermittent time GROUP 2 3 2 90 min Intermittent time GROUP 2 How IPC Operates Th...

Страница 33: ...up may be used to supply hot water during periods of power outages We recommend a computer grade UPS uninterruptable power supply with at least a 600VA rating for extened coverage Grounding and Surges Label all wires prior to disconnection when servicing controls Wiring error can cause improper and dangerous operation Verify proper operation after servicing A means for switching off the 120 VAC po...

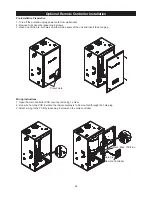
Страница 34: ...ing 5 screws 3 Open one of the pre cut holes on either side panels of the unit and insert the hole plug 1 Open the main controller PCB cover by removing 1 screw 2 Run wire from the PCB to where the remote display is to be mounted through the hole plug 3 Attach wiring to the PCB by loosening 2 screws on the main controller Precut Hole Note Max 100ft run Hole Plug Remote Controller ...

Страница 35: ...2 screws Secure the Remote controller to the Wall Anchors using the included Mounting Screw 2 pcs and replace the cover to hide the mounting hardware Remote Display Mounting Instructions 1 2 3 4 5 6 Template Configuring Multiple Remote Controllers Remote Controller Selection Switch Setting Layout Kitchen Bathroom 1 Room A Room B 1 Left 3 N A 1 Right 3 Left 1 Right 3 Right 1 N A 3 N A 1 N A 3 N A 2...

Страница 36: ...col ensures good communication between units Alternate Host Firing distributes wear and tear across all units every 24 hours Redundancy program allows remaining units to work when a units breaks down Synchronized temperature control changes settings on all units from any unit Up to 8 Eternals can be networked Automated staged firing allows one or all linked units to fire up as needed Automated loa...

Страница 37: ...e to CN6 of main controller of each unit 5 MCU Installation Connect MCU Wire to next MCU Wire 7 Connect Male Termination Wire M1 to MCU Wire at the last unit 8 When multiple units are installed the MCU wire Y wire with 3 connectors 1 CANBUS to main controller 2 short female termination 3 long male termination must be connected that the short female termination connects to long male termination so ...

Страница 38: ...w as 2A capacity However when multiple Eternals are used together the power supply requirement is significantly increased Proper power supply design is important to ensure the safe operation of Eternal When multiple units are used the electrical supply needs to increase in capacity Calculate by the below formula of units installed X 2A per unit Total Amperage For example for 8 units 16A circuit is...

Страница 39: ...uld be engineered properly and compliant to Local and State Codes Supply Fixtures Cold Water DHW Gas IPC control Circulation Pump Expansion Tank Optional Line Strainer Supply Cold Water Storage Tank Aquastat control wire Gas Building Building Hot Water Return Line Circulation Pump Hot Water Supply Aquastat should set to 20 F below Eternal temperature setting ...

Страница 40: ...es Supply Fixtures Cold Water 2 1 Gas Circulation Pump Aquastat should set to 20 F below Eternal temperature setting Line Strainer 3 4 3 4 3 4 3 4 1 1 4 1 1 4 3 4 3 4 1 1 4 Gas 1 1 4 3 4 Shower Fixtures Supply Cold Water Solar Panel Pre Heater Pre Heat Water Hot Water Mixing Valve 3 Way set at 110 F Gas IPC control Pump Aquastat should set to 20 F below Eternal temperature setting Line Strainer Aq...

Страница 41: ...Sub 1 Sub 2 Expansion Tank Circulation Pump Aquastat should set to 20 F below Eternal temperature setting Line Strainer 1 1 4 Gas Gas 3 4 3 4 3 4 1 1 2 3 4 1 1 2 1 1 2 1 1 4 Reducer 3 4 3 4 3 4 Building Building Hot Circulation Pump Storage Tank Aquastat set at 20 F below Eternal temperature setting Supply Line Building Hot Water Aquastat control wire Gas Master Sub 1 Sub 2 Supply Cold Water 3 4 3...

Страница 42: ...a large amount of water in a very short time For example 6 gallons in 15 seconds then recirculation and an optional storage tank is needed NOTICE System for rapid ON OFF and large volume usage If the unit is not controlling the pump by the internal relay use a Aquastat pump and set at 20 F below Eternal temperature setting Size the pump to provide a minimum of 5 0GPM through the system at 10ft of ...

Страница 43: ...ill be adequate in each unit Reverse return system maintains equal pressure drop throughout the entire piping system and ensures adequate flow to all the units Non reverse return system NOT RECOMMENDED In above drawing the difference in water pressure will cause differential water flow More water pressure more variations in flow rate In the above diagram the farthest unit might have no flow or ver...

Страница 44: ...o ensure complete filling of the heat exchanger tank allow air to exit by opening the nearest hot water faucet Allow water to run until a constant flow is obtained This will let air out of the water heater and piping Open a hot water tap to check that water will flow to that tap Then close the hot water tap Fully open the manual shut off gas valve Plug in the 120 VAC 60Hz power supply to the water...

Страница 45: ...ding Children disabled and elderly are at the highest risk of being scalded Feel water temperature before bathing or showering Temperature limiting valves are available please ask a certified professional DANGER Burner Indicator ON Indicator Priority Indicator Digital Monitor Power Button Priority Button Temperature Setting Button Diagnosis Button Indicates when burner is in operation Indicates un...

Страница 46: ...t the water temperature Press either the Hotter up or Cooler down temperature setting button with the unit ON temperature setting is only adjustable when the burner is not in use To lock the remote controller Press the priority button with the unit ON The priority indicator should light and now temperature can only be adjusted at the remote control control cannot be transferred while burner is ON ...

Страница 47: ...ction A visual inspection should be made on the venting system at least once a year Clean Up The flue outlet and the air intake hole on the top of the water heater should be checked Clean as needed to prevent the entry of water insects rodents or other foreign materials such as fallen leaves and dust that could cause blockages Do not obstruct the flow of combustion air and exhaust air flow Water S...

Страница 48: ...ersion for CPU B SB 01 CPU B running version 1 E1 through E9 E2 13 Error 2 in history is code 13 Press the D button when the unit is in standby mode burner off Diagnostic Content Example Explanation Outlet Temperature O O 125 Outlet is 125 F Heat Exchanger Temperature H H 135 Heat exchanger is 135 F Inlet Temperature I I 65 Inlet is 65 F Air Temperature A A 60 Air is 60 F Fan Motor RPM P P5800 Fan...

Страница 49: ...ter supply line is clean 2 Make sure that the gas supply type is correct 3 Check the supply gas pressure is sufficient 2 Improper venting termination make sure that the venting termination complies with specifications 3 Make sure the supply gas pressure is sufficient Insufficient gas pressure will cause unstable burner flame and noise 1 This is normal because the blower still keeps operating for 1...

Страница 50: ...heck wire connection of 14p wire and thermistor wire Check the inlet thermistor Check wire connection of 14p wire and thermistor wire Check DC motor Check wire connection of 6p wire Check the water filled in tank Check water pressure switch Check connection of 14p wire and water pressure wire Check the adjust control valve movement noise Check wire connection of 16p wire and adjust valve wire Chec...

Страница 51: ...n of 8p wire and pump wire Check the pump Check connection of 3p wire and MCU wire Check connection of termination wire and resistor 120Ω Check connection of 3p wire and MCU wire Check connection of termination wire and resistor 120Ω E57 Pump is not connected Call service center E40 Main RAM failure Call service center A controller failure concerning Subsidiary flame signal E39 E41 E42 Call servic...

Страница 52: ...he CO level should not exceed 100 ppm for Natural gas or not exceed 200 ppm for Propane LPG WARNING Recommended Combustion Levels Setting values O2 CO2 Model Gas type Natural gas Propane gas O2 CO2 O2 CO2 GU145 S 3 0 6 5 8 0 10 0 3 7 6 9 9 0 11 0 GU195 S M 3 0 6 5 8 0 10 0 3 7 6 9 9 0 11 0 Table 1 52 EC Adapter Cap Analyzer Probe Gas Analyzer Gas Air Ratio Valve Inlet pressure port Adjustment scre...

Страница 53: ...o high turn the screw anti clockwise which decrease the gas rate Flip dipswitch 3 in group 3 to OFF Cold flush the unit and let it take itself through at least 1 cycle on standby fire for boot up diagnostics Check the flame through the sight glass which should be stable with a regular flame distribution Reinstall the flue stack cap when finished testing Only make small adjustments of the adjusting...

Страница 54: ...BK BK R O R O BK BK BL BK R BK W BK W W BK BK R R Y BK Y Y 1 2 1 2 M BL W R BK 6 5 7 8 1 BL 2 3 BK 4 Y O R BL 10 9 11 12 13 14 W BL R BK 6 5 1 W 2 3 BK 4 BL Y R R BK BL Y R Y Y BK BK 2 1 3 4 5 1 2 G 120V 60Hz G G 3 1 2 8 7 6 5 4 3 1 2 8 7 6 5 4 3 1 2 8 7 6 5 4 3 1 2 8 7 6 5 4 9 10 11 12 13 14 15 16 17 18 19 20 21 22 23 24 3 1 2 8 7 6 5 4 9 10 11 12 13 14 15 16 17 18 19 20 21 22 23 24 1 2 3 4 5 6 7...

Страница 55: ...BK R BK W BK W W BK BK R R Y BK Y Y 1 2 1 2 M BL W R BK 6 5 7 8 1 BL 2 3 BK 4 Y O R BL 10 9 11 12 13 14 W BL R BK 6 5 1 W 2 3 BK 4 BL Y R R BK BL Y R Y Y BK BK 2 1 3 4 5 1 2 G 120V 60Hz G G 3 1 2 8 7 6 5 4 3 1 2 8 7 6 5 4 3 1 2 8 7 6 5 4 3 1 2 8 7 6 5 4 9 10 11 12 13 14 15 16 17 18 19 20 21 22 23 24 3 1 2 8 7 6 5 4 9 10 11 12 13 14 15 16 17 18 19 20 21 22 23 24 1 2 3 4 5 6 7 8 3 1 2 3 1 2 3 1 2 3 ...

Страница 56: ...y by location Installation instructions and all applicable codes must be followed or property damage severe injury or death can result Failure to use a licensed plumber or contractor follow venting plumbing and building codes or follow installation instructions may be unlawful and will void the product warranty Grand Hall is not responsible for any costs incurred for repairing any problems resulti...

Отзывы: