background image

  VM-4 Installation Guide          Rev 04.12                Page 17 of 21                Essential Trading Systems Corp. 

Appendix 


Microsoft .NET Framework (Option) 


Note: The following steps are highly recommended if the microphone will be unplugged on a 
regular basis. 


When a USB audio device is disconnected the volume levels usually revert back to the factory 
default settings.  For maximum ETC equipment operation, these levels need to be set and stay 

constant.  The provided ETC Utility (installed later in this guide) uses Microsoft’s .NET Framework 
4 to achieve this. Microsoft's .NET Framework 4 is free and can be downloaded at 
http://www.microsoft.com/NET/  

 
ETC Driver Utility Installation (Option)


By a quirk of Windows, sound devices were never meant to be portable / removable.  Some of 

these drivers date back to Windows-95 era.  Since there are no provisions for portability, when a 
device is disconnected the volume levels usually revert back to what is programmed in the 

hardware of the soundcard.  With the ETC series of USB microphones and sound cards this can be 
inconvenient.  
 
ETC’s Driver Utility makes sure the volume settings remain constant. This is a service running in 
Windows, not actually a driver in the strict sense.  As the volume changes these values are written 
to the Registry. When a microphone is removed and later re-plugged, the previous volume levels 
are read out of the registry and set in the Windows mixer panel.    
 
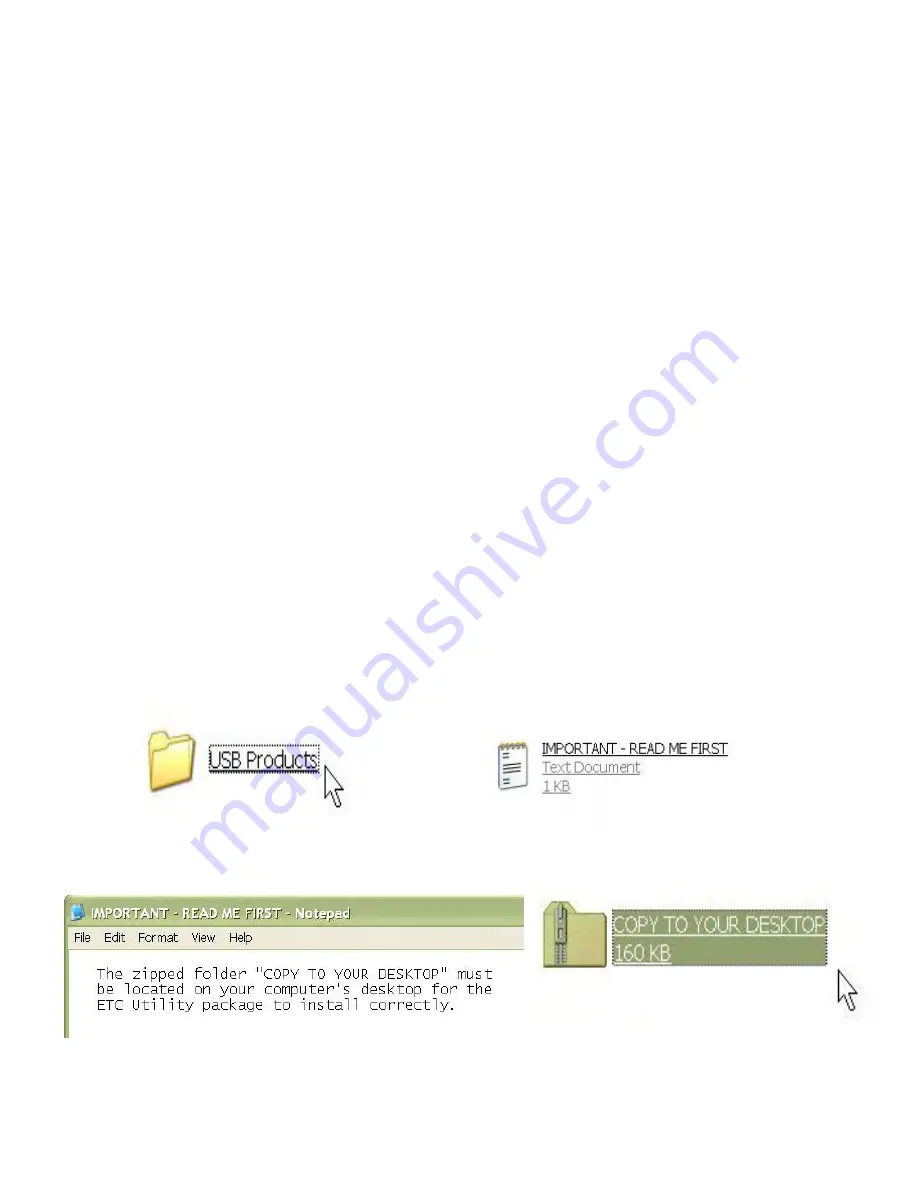
Insert the provided Utility disc (Figure C, pg. 3) and open the 

U

U

S

S

B

B


P

P

r

r

o

o

d

d

u

u

c

c

t

t

s

s folder (Figure 42). In 

the 

U

U

S

S

B

B


P

P

r

r

o

o

d

d

u

u

c

c

t

t

s

s


 folder, click on the 

I

I

M

M

P

P

O

O

R

R

T

T

A

A

N

N

T

T


R

R

E

E

A

A

D

D


M

M

E

E


F

F

I

I

R

R

S

S

T

T


 icon (Figure 42A) and read 

the enclosed text message (Figure 43).  Make sure you copy the 

C

C

O

O

P

P

Y

Y


T

T

O

O


Y

Y

O

O

U

U

R

R


D

D

E

E

S

S

K

K

T

T

O

O

P

zipped folder to your local computer’s desktop (Figure 43A). 


           Figure 42 


     Figure 42A 


            Figure 43 


     Figure 43A 


Содержание VM-4

Страница 1: ...IE ES S A AR RE E E EN ND DL LE ES SS S 9 9 A Au us st ti in n D Dr ri iv ve e M Ma ar rl lb bo or ro ou ug gh h C CT T 0 06 64 44 47 7 8 86 60 0 2 29 95 5 8 81 10 00 0 w ww ww w e es ss se en nt ti...

Страница 2: ...evice Hardware Configuration 4 Windows 7 Audio Device Hardware Configuration 9 WAVE 4 8 Desktop Communicator Software Configuration 12 Appendix 17 Microsoft NET Framework Option 17 ETC Driver Utility...

Страница 3: ...OT TE E I In n a a W Wi in nd do ow ws s 9 95 5 X XP P o or r V Vi is st ta a e en nv vi ir ro on nm me en nt t w wh he er re e t th he e m mi ic cr ro op ph ho on ne e m ma ay y b be e d di is sc co...

Страница 4: ...automatically with Windows Linux drivers when you power on your computer Please note that it takes the system time to recognize new hardware has been hooked up and that the VM 4 should not be disconne...

Страница 5: ...3 Figure 2 Figure 3 To ensure proper VM 4 Microphone performance sound card settings must be adjusted after initial device installation or sudden disconnect or power loss Click on the A Ad dv va an nc...

Страница 6: ...M Mi ic cr ro op ph ho on ne e box Figure 6 then click the O OK K button Figure 7 Figure 6 Figure 7 You will see a M Mi ic cr ro op ph ho on ne e device for ETC VM 4 in the S Sp pe ea ak ke er r wind...

Страница 7: ...o on ne e volume lever must be down all the way and the Microphone Mute box must c ch he ec ck ke ed d F Fi ig gu ur re e 9 9 F Fi ig gu ur re e 9 9 ATTENTION The microphone Mute box must be checked A...

Страница 8: ...me for the VM 4 can now be adjusted From the O Op pt ti io on ns s drop down menu choose P Pr ro op pe er rt ti ie es s Figure 10 Figure 10 In the P Pr ro op pe er rt ti ie es s window click on the R...

Страница 9: ...ured with WAVE Desktop Communicator software Figure 13 Figure 14 NOTE The VM 4 utilizes standard Windows Linux USB audio device drivers If the unit is disconnected without using the ETC Utility the se...

Страница 10: ...ie es s button Figure 16 In the S Sp pe ea ak ke er rs s P Pr ro op pe er rt ti ie es s window choose the L Le ev ve el ls s tab Adjust the S Sp pe ea ak ke er rs s level to 90 the M Mi ic cr ro op ph...

Страница 11: ...ic cr ro op ph ho on ne e E ET TC C V VM M 4 4 D De ef fa au ul lt t D De ev vi ic ce e and click the P Pr ro op pe er rt ti ie es s button Figure 19 Figure 18 Figure 19 In the M Mi ic cr ro op ph ho...

Страница 12: ...e started by clicking on the WAVE icon The first screen to appear in W WA AV VE E D De es sk kt to op p C Co om mm mu un ni ic ca at to or r is your L Lo og gi in n screen Click on the S Se er rv ve e...

Страница 13: ...ne e and choose the correct network zone Figure 27 Figure 26 Figure 27 Click the O OK K button Figure 28 and wait for the W WA AV VE E D De es sk kt to op p C Co om mm mu un ni ic ca at to or r windo...

Страница 14: ...ed d C Ch ha an nn ne el ls s C Cl li ic ck k o on n t th he e f fi ir rs st t c ch ha an nn ne el l y yo ou u w wa an nt t t to o a ac ct ti iv va at te e H Ho oo ot t 1 1 i in n t th hi is s e ex x...

Страница 15: ...e procedure until you have activated all desired channels To arrange the channels in the order you want this is how they will display in your W WA AV VE E D De es sk kt to op p C Co om mm mu un ni ic...

Страница 16: ...pl li ic ca at ti io on ns s check box Figure 38 This allows operation of a minimized Wave client Repeat this procedure until all channels have been programmed Figure 37 Figure 38 Click the O OK K but...

Страница 17: ...device is disconnected the volume levels usually revert back to what is programmed in the hardware of the soundcard With the ETC series of USB microphones and sound cards this can be inconvenient ETC...

Страница 18: ...TA AL LL LE ER R icon Figure 44 The E ET TC C V Vo ol lu um me e C Co on nt tr ro ol l window will open Click on the R Re ep pa ai ir r E ET TC C V Vo ol lu um me e C Co on nt tr ro ol l circle Figur...

Страница 19: ...gure 49 Figure 48 Figure 48A Figure 49 USB Microphone Removal Procedure Option By right clicking on the E ET TC C icon in the system tray Figure 49 the U Un np pl lu ug g M Mi ic cr ro op ph ho on ne...

Страница 20: ...rvice In the Windows Control Panel under Add or Remove Programs find ETC Volume Control and click the R Re em mo ov ve e button Figure 53 Figure 53 Click the Yes button to remove the program Figure 54...

Страница 21: ...g on where you purchased your product please check with ETC for details Warranty claims or other product related questions should be addressed directly to ETC The addresses and customer service contac...

Отзывы: