Use Fixture in Stand-alone Mode
17
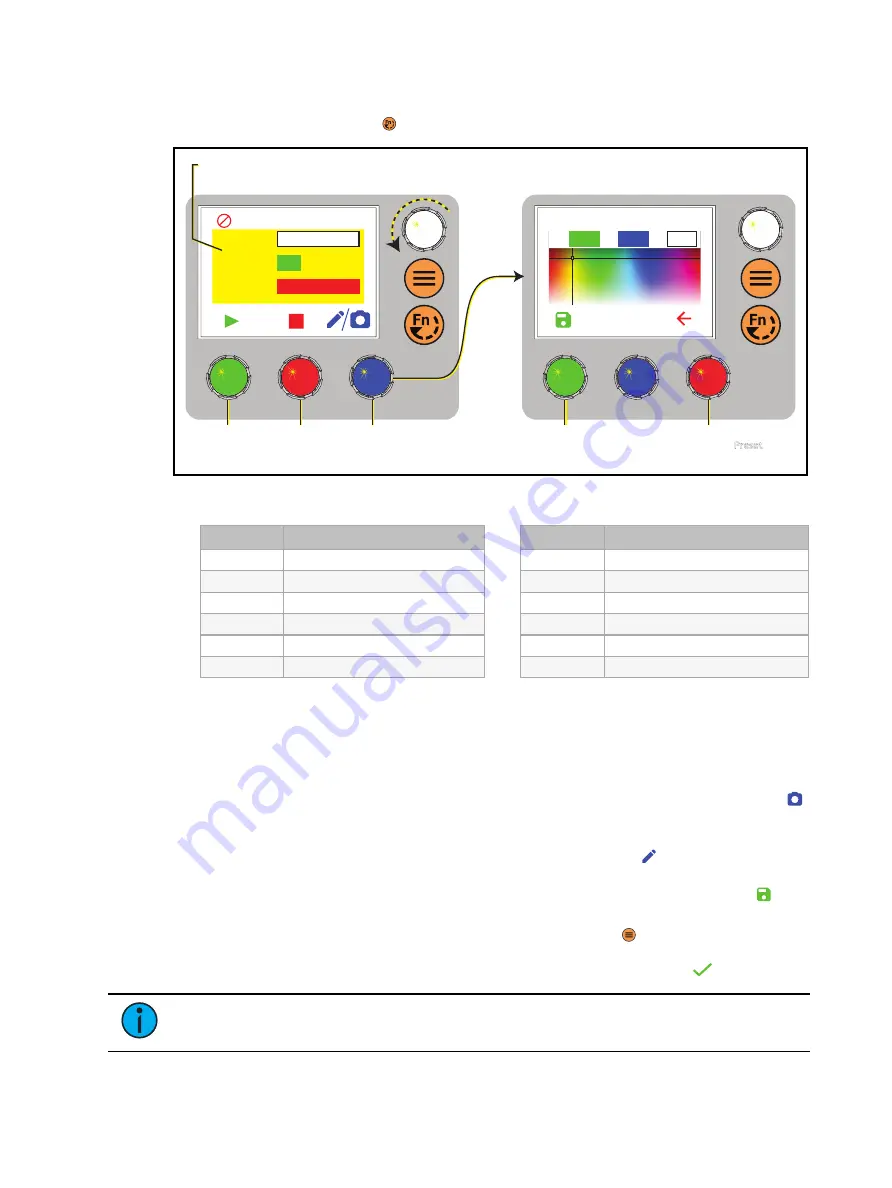
Preset Mode
1. Press the Function button (
) until the display shows the Preset screen.
Edit Preset Color 4
100%
215
39
H: S: I: 100%
Preset
Preset
4
Fade
3 seconds
Int
100%
Yellow
Press to
play/pause
the preset.
Turn an encoder to modify the
value in the matching field.
Press to
stop the
preset.
Press to modify the
preset color, or hold
to capture DMX.
Press to return
to the Preset
screen.
The background approximates
the preset color.
Press to
save the
new color.
DMX
2. Turn the green encoder to select a preset, and then press the encoder to play the preset.
Number
Preset
1
3200 K
2
4500 K
3
5600 K
4
Yellow
5
Dark Straw
6
Red
Number
Preset
7
Medium Pink
8
Magenta
9
Medium Blue
10
Primary Blue
11
Blue Green
12
Green
More Options
•
Pause the preset fade: Press the green encoder to toggle between play and pause.
•
Stop the preset: Press the red encoder.
•
Modify the preset: Turn the Intensity encoder to change the intensity, or turn the red
encoder to change the fade value.
•
Capture the current DMX look: Press and hold the blue encoder (for the Snapshot icon
).
The display shows a 3-second countdown before re-recording the preset. Capture is
limited to three DMX modes: 3 Ch RGB, Studio, and Expanded.
•
Modify the preset color: Press the blue encoder (for the Edit icon
). In the Edit Preset
Color screen, turn the encoders to change the corresponding values. The crosshairs on the
display indicate the approximate color. Press the green encoder (for the Save icon
) to
save the new color to the preset.
•
Push the preset to connected fixtures: Press the Menu button (
), and then use the
Intensity encoder to navigate through the menu: Local Settings > Push Presets. When the
screen prompts you to confirm, press the green encoder (for the OK icon
) to continue.
Note:
Changes that you make to presets in the Preset screen also affect presets in
the Color screen and the Effects screen.


