
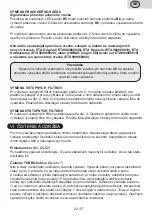


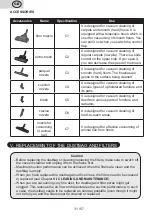


DUSTBAG REPLACEMENT
Full bag indicator light
If the red indicator
B5
is steadily ON on the LED light panel, the dustbag needs to be
replaced. If the indicator
B6
occasionally flashes when you are vacuuming, you can ignore it.
To remove the dustbag, follow the procedure indicated in Fig. 2. To fit a new dustbag in the
vacuum cleaner, proceed in reverse order. Used dustbags are to be disposed of with regular
household waste.
Once the dustbag is full, purchase one of the following new dustbags: ETA Original
(ETA960068000), ETA Hygienic (ETA960068010), ETA Antibacterial (ETA960068020),
or UNIBAG (the ETA990068010 starter kit first) and then just individual bags
(ETA990068000).
Note
When the plastic fixture
A8
with the dustbag
A9
is properly fitted in the suction
compartment of the vacuum cleaner, the mechanical safety lock is released and the
vacuum cleaner cover can be closed.
REPLACEMENT OF INPUT FILTERS
To remove the input filters, follow the procedure indicated in Fig. 2. The inner grid
A12
is
held by two plastic protrusions and if you wish to remove the grid, one of the protrusions
needs to be released in the direction of the arrow (see the detail in Fig. 2, step 6). To fit new/
cleaned input filters in the vacuum cleaner, proceed in reverse order. Used filters are to be
disposed of with regular household waste.
REPLACEMENT OF OUTPUT FILTERS
To remove the output filters, follow the procedure indicated in Fig. 3. To fit new output filters
in the vacuum cleaner, proceed in reverse order. Used filters are to be disposed of with
regular household waste.
VI
. CLEANING AND MAINTENANCE
Treat surface of the appliance with a soft and damp cloth, do not use coarse and aggressive
detergents! Store the appliance properly cleaned at a dry, dust-free place out of reach of
children and incapacitated people.
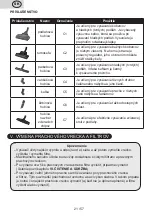
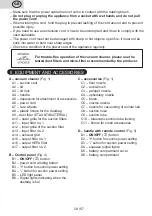
Accessories (C1, C3-C7)
After any vacuuming it is recommended to check visually the brushes or collectors for
possible impurities. If there are some impurities, remove them.
Cleaning the TURBO nozzle C2
(Fig. 7)
Cut the threads and hairs with scissors. Turn on the vacuum cleaner. The cleaner vacuums
the cut hairs and threads. In case hairs or threads got tangled up around the attachment of
the brush cylinder and cannot be removed with the above-mentioned steps, it is necessary
to remove them with a suitable tool (e.g. tweezers). For simpler and more comfortable
maintenance, remove the upper cover by releasing the locking latches on the sides. At the
same time, make sure no dirt is stuck on the inner side of the nozzle (i.e. turbine).
GB
32 / 57