background image

Cleaning and maintenance

Cleaning (customer)

23

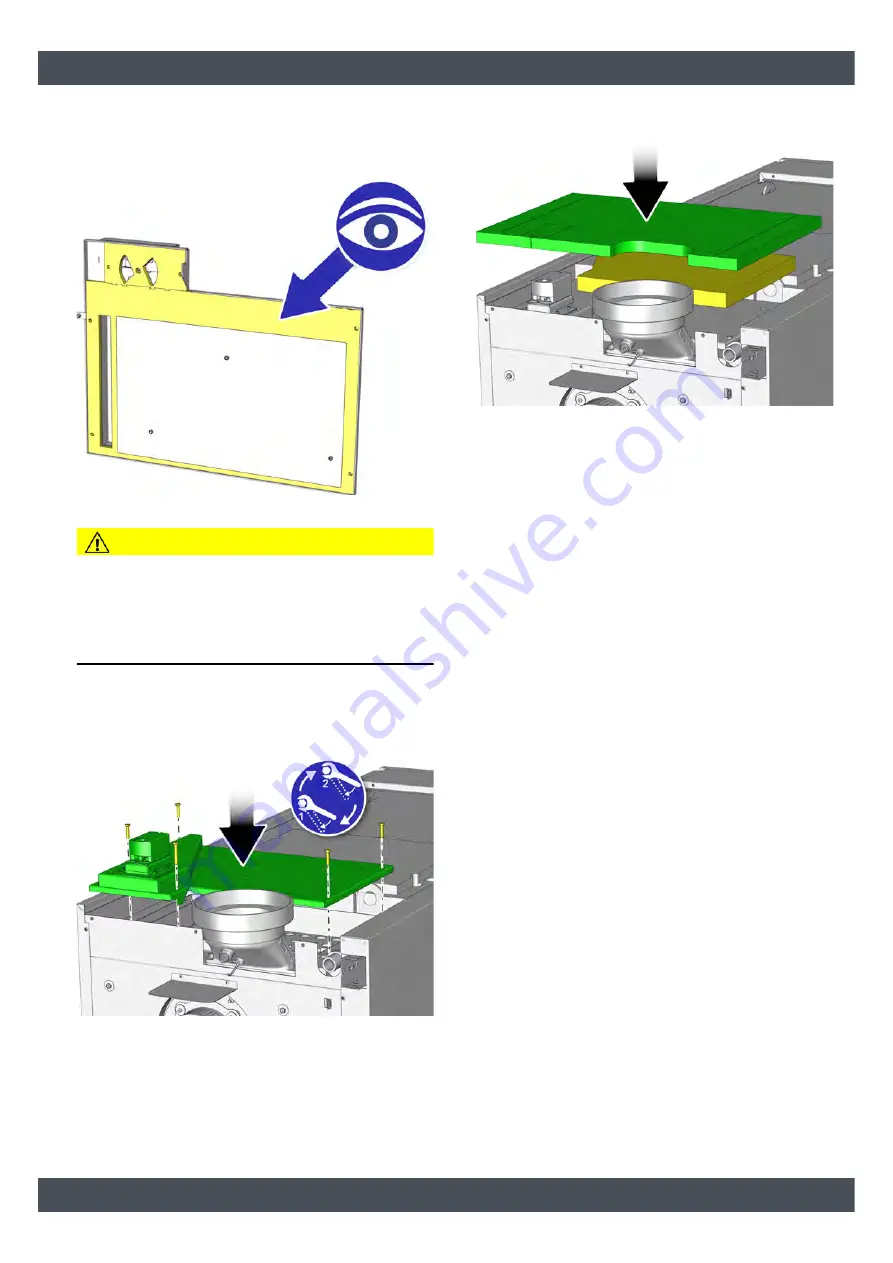
Checking the seal on the maintenance cover

Check  if the seal on the maintenance cover is  intact
and replace if necessary.

Fig. 2-43: Seal

CAUTION!

Do not operate with damaged seals

Never  operate  the  boiler  with  damaged  seals.
Otherwise,  unwanted  air  is  sucked  in,  disturbing  the
combustion process and causing increased wear.

Always replace damaged seals immediately.

Installing the maintenance cover

Re-attach the maintenance cover. Tighten the screws
alternately and evenly.

Fig. 2-44: Maintenance cover

Place the insulation back onto the maintenance cover.

Fig. 2-45: Insulation

Содержание ePE-K

Страница 1: ...2019 07 10 EN 0000000453 V 002 3 47 0 5300 00 939076 001 Pellet boiler ePE K 140 170 kW Service manual ...

Страница 2: ...ETA Heiztechnik Gewerbepark 1 A 4716 Hofkirchen an der Trattnach Tel 43 0 7734 22 88 0 Fax 43 0 7734 22 88 22 info eta co at www eta co at ...

Страница 3: ...from the owner Subject to technical changes We reserve the right to make technical modifications without notice Printing and typesetting errors or changes of any kind made in the interim are not cause for claims Individual configurations depicted or described here are only available optionally In the event of contradictions between individual documents regarding delivery scope the information in o...

Страница 4: ...enance Persons who lack experience and knowledge as well as children may not operate clean or maintain the product Display maintenance steps on the screen With this boiler the maintenance steps can also be displayed on the ETAtouch control system screen The required activities will be explained to you step by step and supplemented with detailed graphics Each maintenance is saved and the details ca...

Страница 5: ... Maintenance switch The maintenance switch is marked with the symbol and has two settings 1 regular operation This is the standard position of the maintenance switch The boiler can execute heating mode in this position 0 maintenance mode In this position all drives are disconnected to perform maintenance The circuit boards however are still live Explanation of pictograms Switch the boiler on off w...

Страница 6: ...The sealant to use is listed in the respective step Use adhesive to affix the seals for example Only blow out the components with your mouth Affix a seal The required cross section and sealing material are given at each step Tighten the screws or nuts alternately and evenly Do not use compressed air to clean the components Do not use cleaning brushes to clean the components Do not use an ash vacuu...

Страница 7: ...Cleaning and maintenance Maintenance notes 7 ...

Страница 8: ...ellet hopper with stoker on the left side These are equally representative of a boiler with the pellet module on the right side 1 Pellets vacuum turbine 2 Fill level sensor for pellet hopper 3 Combustion chamber door 4 Firebed switch safety switch 5 Firebed level sensor 6 Grate drive 7 Actuator for primary air 8 Ash screw 9 Grate position switch 10 Connection for underpressure measurement 11 Vacuu...

Страница 9: ... for stoker screw 4 Drive chain of the stoker screw 5 Ignition 6 Retaining tube of the lambda probe 7 Heat exchanger cleaner maintenance cover 8 Safety switch for the maintenance cover 9 De ashing drive 10 Flue gas temperature sensor in heat exchanger 11 Water pressure sensor 12 Draught fan 13 Flue gas temperature sensor on flue gas connector ...

Страница 10: ...oiler Cleaning and maintenance 1 Actuator of flue gas recirculation 2 Precipitator maintenance cover 3 Heat exchanger cover 4 Release button for safety temperature limiter STB 5 Mains switch symbol 6 Maintenance switch symbol 7 Door contact switch ...

Страница 11: ...ber Clean the primary and secondary combustion chamber Clean the tilting grate Clean the secondary air openings Clean the ignition tubes Check the firebed lever and firebed switch Check fire clay X X Customer or specialist Clean flue gas ducts Check the air valve for flue gas recirculation Clean the inner walls of the flue gas duct Clean the flue gas recirculation ducts Check the seal on the maint...

Страница 12: ...st Clean the lambda probe X Specialist Check the boiler doors X Specialist Check the pellet hopper Check the stoker drive chains Check the clearance gap of the position sensor for the stoker screw Clean the fill level sensor Clean the strainer X Specialist Calibrate the lambda probe X Specialist Reset the maintenance counter X Specialist Perform a heating test X Specialist Tasks Regular ly Cleanin...

Страница 13: ...o check the ash level without opening the box A full ash box makes a short dull thump When empty it makes a hollower sound like a drum To empty the ash box fold the locking lever on the boiler forward Remove the ash box from the boiler Fig 2 5 Locking lever Close the flap on the ash box Fig 2 6 Flap Open the lock for the lid and empty the ash box Fig 2 7 Lid Check the ashes for pieces of embers Ne...

Страница 14: ...etween 1 and 2 bar For a warm heating system the optimum water pressure is between 1 5 and 2 5 bar Fig 2 10 Pressure gauge If the water pressure is too low fill the cold heating system to approx 2 bar Do not fill to a higher pressure because water expands as the temperature rises and the water pressure also rises in heating mode The safety valve triggers at approx 2 8 bar If the water pressure dro...

Страница 15: ...ler to cool down sufficiently before starting any activities 2 5 2 Check safety devices Check safety valves Check all safety valves of the heating system by means of a visual inspection The outlets of the safety valves must not drip Fig 2 11 Safety valve If the safety valve drips open and rinse the safety valve with a 1 4 turn of the red cap danger of scalding If the safety valve still cannot be s...

Страница 16: ...y that the seal will be damaged in the process and thus the outlet will drip Therefore only carry out the check on weekdays never on weekends in the cold winter because there is probably no heating technician available if the seal is defective 2 5 3 Chimney Clean flue tube Sweep the flue duct from the flue outlet to the chimney and remove the fly ash from the chimney with an ash vacuum cleaner Fig...

Страница 17: ...imary and secondary combustion chamber In the primary combustion chamber remove the two part combustion chamber cover Fig 2 16 Combustion chamber cover Using the poker stoke all the ash out of the primary combustion chamber into the secondary combustion chamber Fig 2 17 Combustion chamber Do not vacuum the ash at the outer edge or under the combustion chamber cover This is because there is a ceram...

Страница 18: ... Do not hit the tilting grate with the poker Cleaning the secondary air openings Clean the opening for the secondary air above the tilting grate with an ash vacuum for example Fig 2 20 Secondary air openings Cleaning the ignition tubes Clean both ignition tubes by suction and carefully remove any deposits Fig 2 21 Ignition tubes Remove the cover on the front Remove the cover from the front of the ...

Страница 19: ...ifting Fig 2 24 Firebed switch Check fire clay Check the fire clay in the primary and secondary combustion chamber for damage and cracks Replacing the combustion chamber cover Re install the two part combustion chamber cover again and ensure that it is centred Fig 2 25 Combustion chamber cover The convex surface of the combustion chamber cover must point to the top of the boiler Mounting the cover...

Страница 20: ...ck that it moves smoothly Fig 2 28 Actuator of flue gas recirculation For manual actuation push the unlocking device red button and turn the drive 90 with the locking screw Fig 2 29 Manually actuating the actuator If the actuator is difficult to move remove it Fig 2 30 Actuator Clean the PTFE sealing washer on the air valve or replace it if damaged Fig 2 31 PTFE sealing washer Clean the sealing ar...

Страница 21: ...e encrustation and sluggishness Check if the seal on the cover is intact and replace if necessary Fig 2 33 Seal Re install the actuator Tighten the screws alternately and evenly Fig 2 34 Actuator Removing the maintenance cover Remove the insulation above the maintenance cover Fig 2 35 Insulation Remove the maintenance cover Fig 2 36 Maintenance cover Cleaning the inner walls of the flue gas duct C...

Страница 22: ... cover and the enclosed seal for the primary air valve Fig 2 39 Maintenance cover Remove the ash from the flue gas duct with the clean ing brush and an ash vacuum Fig 2 40 Flue gas duct Check if the seal on the maintenance cover is intact and replace if necessary Re attach the maintenance cover Fig 2 41 Maintenance cover Mounting the cover on the ash duct Re install the cover on the front of the a...

Страница 23: ...ith damaged seals Never operate the boiler with damaged seals Otherwise unwanted air is sucked in disturbing the combustion process and causing increased wear Always replace damaged seals immediately Installing the maintenance cover Re attach the maintenance cover Tighten the screws alternately and evenly Fig 2 44 Maintenance cover Place the insulation back onto the maintenance cover Fig 2 45 Insu...

Страница 24: ...r Fig 2 46 Insulation Remove the maintenance cover Fig 2 47 Maintenance cover Cleaning the upper section of the precipitator Unhook the perforated plates and remove them from the boiler Fig 2 48 Perforated plates Clean the ash in the upper section of the precipitator above the sliding rake with the poker Allow the ash to fall down Fig 2 49 Upper section of the precipitator ...

Страница 25: ...loth Fig 2 51 Electrode holder Afterwards carry out a status check of all electrode holders The best way to do this is to stroke your hand over the electrode holder and above all check the area near the flushing air opening If cracks or small holes can be felt there is damage In this case contact ETA Customer Support Check the alignment of the electrodes The electrodes must be in the centre of the...

Страница 26: ...erate with damaged seals Never operate the boiler with damaged seals Otherwise unwanted air is sucked in disturbing the combustion process and causing increased wear Always replace damaged seals immediately Installing the maintenance cover Re attach the maintenance cover Tighten the screws alternately and evenly Fig 2 54 Maintenance cover Place the insulation back onto the maintenance cover Fig 2 ...

Страница 27: ... on the top Re install the cover back on top of the boiler Fig 2 56 Cover Switch the boiler on via the mains switch and start ash removal Switch the boiler back on at the mains switch Press the De ash button for the boiler to start the de ashing process Switch the boiler back on using the on off switch ...

Страница 28: ...erious injuries Stop heating Stop the heating mode of the boiler with the on off switch in the overview of the boiler The boiler emits a glowing charge and then switches to operating mode Switched off Then press the De ash key to allow the boiler to perform a final ash removal WARNING Switch off the electricity to the boiler via the mains switch Switch off the electricity to the boiler via the mai...

Страница 29: ...t lubricant and re attach the draught fan to the boiler Tighten the nuts alternately and evenly Plug the power supply back into the draught fan 2 6 3 Cleaning the heat exchanger Remove the cover on the top Remove the cover from the top of the boiler Fig 2 60 Cover Removing the heat exchanger cover Remove the insulation laid over the heat exchanger cover Fig 2 61 Insulation Loosen the nuts and remo...

Страница 30: ...e lambda probe an incorrectly calibrated lambda probe Insufficient boiler runtime start stop operation Checking the seal on heat exchanger cover Check if the seal on the heat exchanger cover is intact and replace if necessary Fig 2 65 Heat exchanger cover CAUTION Do not operate with damaged seals Never operate the boiler with damaged seals Otherwise unwanted air is sucked in disturbing the combust...

Страница 31: ...switch for the ash box It must be actuated when the ash box is attached Fig 2 68 Position switch for ash box 2 6 5 Check air valve Dismantling the side covers Remove the side covers from the side of the boiler on which the stoker is mounted Fig 2 69 Side covers Removing the cover on the ash duct Remove the cover on the front of the ash duct Fig 2 70 Cover ...

Страница 32: ...lace it if necessary A glued ceramic fibre seal can also be used as a seal Fig 2 73 Seal Remount the primary air valve back onto the boiler Tighten the screws alternately and evenly Fig 2 74 Primary air valve Checking the air valve for primary and secondary air Actuate the actuator for the primary air manually and check that it moves smoothly Fig 2 75 Actuator for primary air Actuate the actuator ...

Страница 33: ...if they are difficult to move Mounting the cover on the ash duct Re install the cover on the front of the ash duct Fig 2 78 Cover 2 6 6 Check underpressure sensor Remove the cover on the front Remove the cover from the front of the boiler Fig 2 79 Cover Cleaning the silicon hoses for the vacuum sensor Take the silicone hose off the vacuum sensor Fig 2 80 Vacuum sensor Clean the silicon hose by car...

Страница 34: ...ue can be seen with the Service authorisation in the text menu under If a different value is shown a calibration using the Offset parameter must be carried out For this parameter enter the difference from the target value of 0 Pa Example Negative pressure 2 Pa Offset 2 Reconnecting the silicone hose Reconnect the silicon hose to the vacuum actuator Ensure the correct position when connecting The s...

Страница 35: ...ts The reason for this is because ash will adhere to the lubricant and cause encrustation and sluggishness 2 6 8 Clean temperature sensor Cleaning the flue gas temperature sensor on the flue gas connection Loosen the screws and pull out the flue gas temperature sensor Clean it with a soft cloth Then replace the temperature sensor Only hand tighten the screws so as not to damage the temperature sen...

Страница 36: ...f the seal on the maintenance cover is intact and replace if necessary Fig 2 90 Seal CAUTION Do not operate with damaged seals Never operate the boiler with damaged seals Otherwise unwanted air is sucked in disturbing the combustion process and causing increased wear Always replace damaged seals immediately Mount the heat exchanger cleaner maintenance cover Replace the maintenance cover of the hea...

Страница 37: ...at the door can be closed fully and with force The sealing edges of the door frame must leave an obvious indentation in the sealing cord of the combustion chamber door Fig 2 94 Check Leaks can be detected by variations in the colouration of the sealing cord If leaks are found it is usually sufficient to adjust the hinges and the closing roller mount If the hinges cannot be adjusted any further the...

Страница 38: ...or next to the boiler 1 Closing roller holder 2 Hinge Loosen the flange nuts top and bottom on the hinge and the closing roller holder and evenly reduce the gap only slightly to the boiler Fig 2 96 Reduceing the gap Retighten the flange nuts Suspend the door and check whether it now closes fully If not repeat the process Fig 2 97 Check Always adjust the hinges and the closing roll er mount so that...

Страница 39: ...eck the chain tension see the following graphic Tension the chain by shifting the motor Lubricate the drive chains with chain spray Fig 2 99 Stoker drive chains Checking the position sensor clearance Check the clearance between the sensor and the washer The clearance should be about 2 3 mm Fig 2 100 Checking the clearance Re attaching the cover Re install the cover back onto the pellet hopper Fig ...

Страница 40: ...sor Check the seal on the bottom of the mounting panel and replace if necessary Clean the fill level sensor with a soft cloth Fig 2 105 Checking the seal cleaning the fill level sensor Cleaning the strainer in the pellet hopper Manually clean the strainer in the pellet hopper by wiping and tapping with your fingers Fig 2 106 Strainer A visual check of the strainer is difficult without dismantling ...

Страница 41: ...ours of operation If you wish to perform an additional lambda probe cal ibration the control system features the Addl calibra tion function This function can be selected with the Service access level and can be found under Switch on this function and the additional calibration will now start If the boiler is heating it is automatically stopped first De ashing begins then the boiler is purged with ...

Страница 42: ...now button so the boiler will start immediately The control system ensures that sufficient heat is channelled to the buffer the heating circuits and the hot water tank After around 10 minutes of heating the residual oxygen value should reach 6 to 9 The current residual oxygen content is displayed in the boiler s text menu under If the value does not drop below 12 residual oxygen content the boiler...

Страница 43: ......

Страница 44: ...www eta co at www eta co at downloads DOWNLOAD ...

Отзывы: