ESX VN730 FI-DUCATO Скачать руководство пользователя страница 24

24

INSTALLATION EXAMPLE / Einbaubeispiel

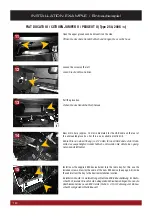
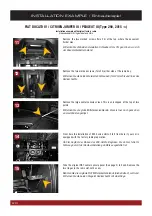
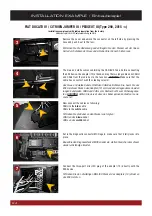
Set in the diagnostic connector MOD again, make sure that it fully locks into 
place.

Bauen Sie den Diagnosestecker MOD wieder ein, stellen Sie sicher dass dieser 
wieder vollständig einrastet.

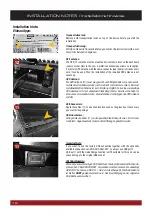
Connect the three-part mini-ISO plug of the adapter (13) directly with the 
ESX device.

Schließen Sie den dreiteiligen Mini-ISO Stecker des Adapters (13) direkt an 
das ESX Gerät an.

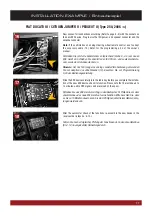
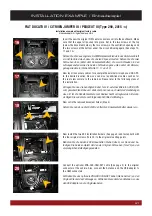
Remove the cover and unlock the connector on the left side by pressing the 
nose and push it out to the rear.

Entfernen Sie die Abdeckung und entriegeln Sie den Stecker auf der linken 
Seite durch drücken der Nase und schieben Sie ihn nach hinten raus.

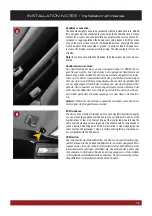
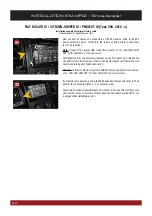
The blue and white cables containing the CAN BUS. Take, before connecting 
the ESX device, the adapter (13) at hand and lay the two long cable ends CANH 
and CANL from the radio bay to the fuse box. 

WARNING:

 Make sure that the 

cable has no contact with the steering column!

Das blaue und weiße Kabel enthält den CAN-Bus. Nehmen Sie, bevor Sie das 
ESX Gerät anschließen, den Adapter (13) zur Hand und verlegen dessen beiden 
langen Kabelenden CANH und CANL vom Radioschacht zum Sicherungskas-
ten. 

ACHTUNG:

 Achten Sie darauf, dass das Kabel keinen Kontakt zur Lenk-

säule hat!

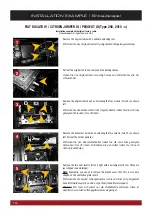
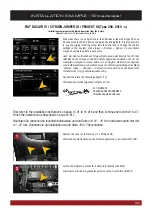
Now connect the cables as following: 
CANH to the 

blue

 cable 

CANL to the 

white

 cable

Schließen Sie die Kabel an den Stecker wie folgt an: 
CANH an das 

blaue

 Kabel 

CANL an das 

weiße

 Kabel

4

5

6

7

3

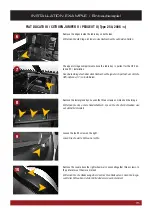
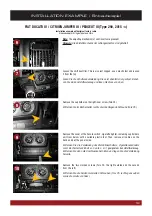
FIAT DUCATO IV / CITROEN JUMPER III / PEUGEOT III (Type 290, 2015 ->)

Installation example only with radio preparation from the factory

Einbaubeispiel nur mit Radiovorbereitung ab Werk

Содержание VN730 FI-DUCATO

Страница 1: ...E IN B A U A N L E IT U N G IN S T A L L A T IO N G U ID E V 1 2 VNC730 FI DUCATO VN730 FI DUCATO...

Страница 2: ...te alle Teile des Soundsystems und die Komponenten Ihres Fahrzeugs grunds tzlich mit Vorsicht 2 Beachten Sie unter allen Umst nden die Vorschriften des Fahrzeugherstellers und nehmen Sie keine Ver nde...

Страница 3: ...Antennenadapter Fakra auf ISO 50 Ohm USB Adapter USB A auf Mini USB B Kupplung Unterst tzt originale R ckfahrkamera und originalen AUX Eingang Scope of delivery 4 Lieferumfang 4 Connection Diagram 6 A...

Страница 4: ...ationssoftware 1 4 REMOTE CONTROL Fernbedienung 1 5 G71 AUD0205 AUDIO VIDEO AV INPUTS Audio Video AV Eing nge 1 6 G71 MNV0012 AUDIO OUTPUTS 5 1 WITH REMOTE TURN ON Audio Ausg nge 5 1 mit Einschaltleit...

Страница 5: ...IDEO OUTPUTS 1 2 Audio Video Ausg nge 1 11 G71 USB0107 USB PORT 1 2 WITH QUICK CHARGE FUNCTION USB Anschluss 1 2 mit Schnellldadefunktion 2 12 GPS ANTENNA GPS Antenne 1 13 G71 WHE0078 CAN BUS ADAPTOR...

Страница 6: ...NTENNA AM FM Antenne FUSE Ger tesicherung CONNECTION DIAGRAM Anschlussdiagramm EXTERNAL BT MICROPHONE Externes BT Mikrofon VAR SYSTEM CONNECTIONS E G DAB BOX Div System Anschl sse z B DAB Box AUDIO VI...

Страница 7: ...PEAKER FRONT LEFT SPEAKER FRONT LEFT SPEAKER REAR LEFT SPEAKER REAR LEFT KEY1 KEY2 AUX GROUND AUX SIGNAL R AUX SIGNAL L CAN LOW CAN HIGH Dauerplus Antenne Beleuchtung Z ndungsplus Masse Lautsprecher h...

Страница 8: ...CONT OUT brown Control cable for special ESX devices please do not use BRAKE IN pink Connect to the parking brake signal to the device The cable provides ground when the parking brake is operated Plea...

Страница 9: ...es must not be connected mandatory but can be used as a power supply for the camera Now activate the CCD Camera checkbox under APPS OPTIONS DISPLAY at the ESX device Operation note Special feature Pus...

Страница 10: ...seleitung zu 12V OUT TV CONT OUT braun Steuerleitung f r spez ESX Ger te Bitte nicht verwenden BRAKE IN rosa Schlie en Sie hier das Handbremssignal an das Ger t an Das Kabel f hrt Masse wenn die Handb...

Страница 11: ...s Stromversorgung f r die Kamera verwendet werden Aktivieren sie abschlie end den Punkt CCD Kamera unter APPS OPTIONEN Bildschirm Bedienhinweis Als besondere Funktion kann die R ckfahrkamera bei diese...

Страница 12: ...he glove box If necessary you must drill openings USB Anschl sse Verlegen Sie die Kabel 11 an den gew nschten Einbauort wie z B im Hand schuhfach Gegebenenfalls m ssen daf r ffnungen gebohrt werden Im...

Страница 13: ...nected with the included cable 5 BRAKE IN The signal must be connected to ground with the handbrake closed Please contact for a correct and safe installation your automotive service center Ac cordance...

Страница 14: ...cato III Modell von Dethleffs Aufgrund der vielen verschiedenen Ausstattungs varianten der Fiat Ducato Plattform k nnten einige Beschreibungen und Installa tionshinweise in dieser Einbauanleitung nich...

Страница 15: ...ieren Remove the lower glove box Loosen the three screws as marked on the image Entfernen Sie das untere Handschuhfach L sen Sie die drei Schrauben wie auf dem Bild markiert Loosen the fourth screw on...

Страница 16: ...eferumfang enthaltene ESX Einbauhalterung im Radio schacht Verwenden Sie daf r die beiliegenden Schrauben Verlegen Sie nun die Anschlusskabel des neuen ESX Ger ts Siehe S 4 5 im Fahrzeug vom Einbau sc...

Страница 17: ...beh rkabel 13 Beachten Sie zur Programmierung S 40 der Bedienungsanleitung Slide the ESX device carefully into the radio bay Before you complete the installa tion of the new ESX device check its funct...

Страница 18: ...s Entfernen Sie den Dokumentenhalter indem Sie die zwei links gezeigten Schrauben Torx 25 l sen Entnehmen Sie den Halter indem Sie ihn nach oben herausnehmen Remove the two vent inserts left and right...

Страница 19: ...of the hazard switch cigarette lighter including cup holders unit from below with a suitable plastic tool Then remove all cables on the back and put the panel aside Entfernen Sie die Verkleidung des...

Страница 20: ...noch ganz oben an zwei Punkten geclipst From here the installation of ESX device starts Start from here if your car is equipped with the factory radio preparation Ab hier beginnt der Einbau des ESX Ge...

Страница 21: ...externes Mikrofon USB GPS zum gew nschten Einbauort Zudem k nnen nun auch weitere Verkabelungen wie z B f r die R ckfahrkamera zum Radioschacht verlegt werden Ber ck sichtigen Sie zudem die nachfolgen...

Страница 22: ...en Sie eine Funktionspr fung aller Funktionen durch Hinweis Verbinden Sie den originalen USB Anschluss Adapter des Anschluss sets VNA DUC CAN SET mit dem USB Port 2 des Naviceivers If all functions ar...

Страница 23: ...t ist ggf Softwareupdate n tig Connect therefore the following adapter 13 Schlie en Sie hierf r folgenden Adapter 13 an Remove the cover of the fuse box 2 x Phillips PH2 Entfernen Sie die Abdeckung de...

Страница 24: ...g the CAN BUS Take before connecting the ESX device the adapter 13 at hand and lay the two long cable ends CANH and CANL from the radio bay to the fuse box WARNING Make sure that the cable has no cont...

Страница 25: ...25 NOTES Notizen...

Страница 26: ...26 NOTES Notizen...

Страница 27: ...27 NOTES Notizen...

Страница 28: ...D E S I G N ESX Car Media Systems Audio Design GmbH Am Breilingsweg 3 D 76709 Kronau Germany Tel 49 7253 9465 0 Fax 49 7253 946510 www esxnavi de www audiodesign de 2017 All Rights Reserved...

Отзывы: