7
6.3.1. Main menu
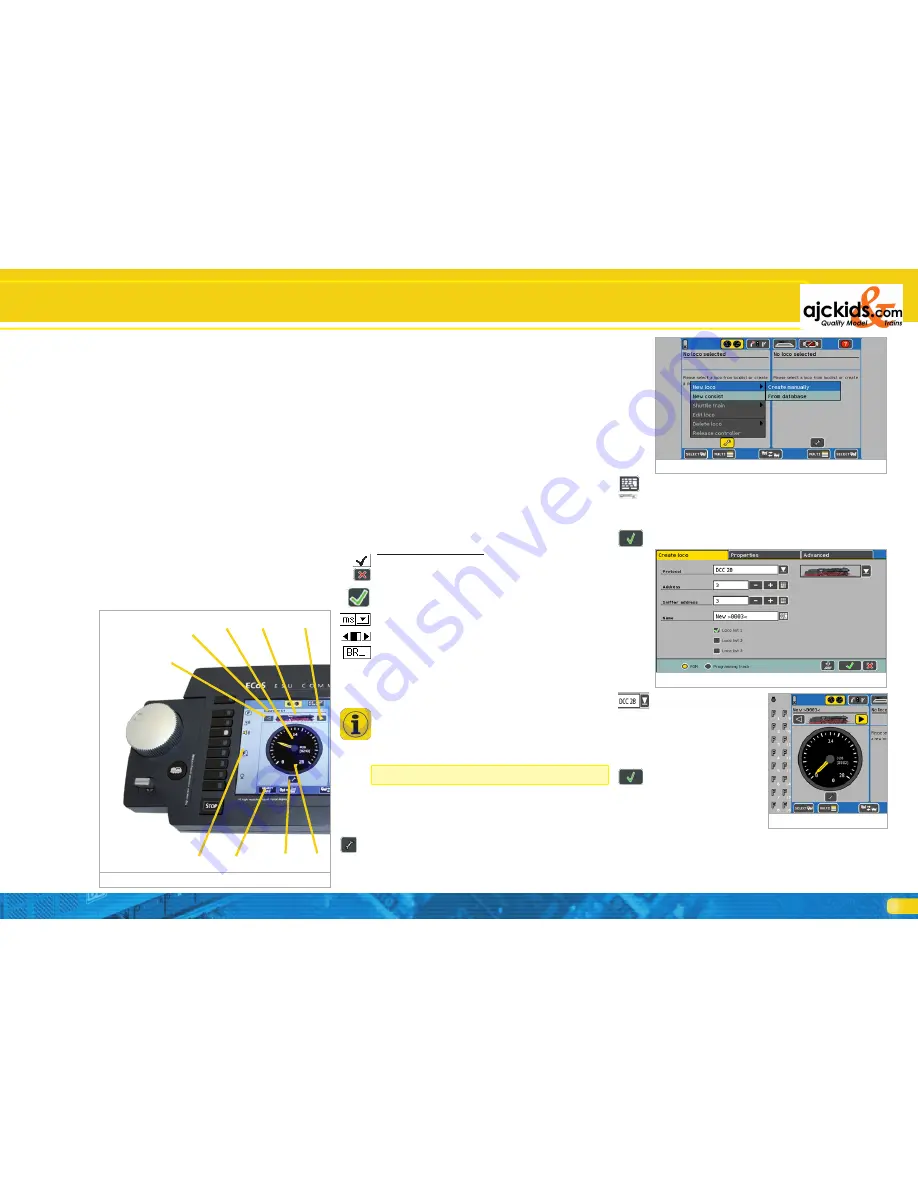
Besides the operating controls the touch screen provides more
important information for each displayed locomotive.
a) Name of locomotive: displays the name of the locomotive
(can be made up of letters and numbers).
b) Locomotive symbol: displays the symbol of your choice (can
be freely selected).
c) Speedometer display: shows the current speed.
d) Speed indicator: displays the current speed step. The range
of values depends on the data format of the locomotive de-
coder. Subject to the locomotive settings the speed in km/h
may displayed instead of the speed steps.
e) Direction of travel „Forward“: is highlighted, if the locomo-
tive travels forward.
f) Direction of travel „Reverse“: is highlighted, if the locomo-
tive travels backwards.
g) Locomotive selection button: Pressing this screen button
on the touch screen opens the locomotive selection menu.
Press this screen button every time you wish to run another
locomotive with this cab. Alternatively you may press the
locomotive selection button.
h) Locomotive menue: after pressing this screen button you
can enter, edit or delete new locomotives or consists or as-
sign shuttle trains.
i) Function button symbols. Depending on the data format
and setting you may switch on and off up to 20 functions in
each locomotive by touching the appropriate symbol.
Your first train
Figure 6
6.3.2. Touch screen
As the name says the touch screen responds to contact with
your finger or with the stylus. Please do not use any hard or
pointed objects; this could lead to permanent scratches on the
surface.
6.3.2.1. Calibration
The touch screen is normally calibrated ex works. Calibration
allows equalising any manufacturing tolerances. After a soft-
ware update the device may not be calibrated any more. In that
case the calibration window opens immediately after starting
the ECoS.
Push the small cross on the screen with the “stylus” provided.
The cross will jump to another position immediately. Try to
press this symbol as close to it’s centre as possible. After you
have repeated this process three times calibration is completed.
For further information see page 37, chapter 21.9.
Confirm the calibration by pressing the screen button on the
left of “Save calibration and exit this menu”.
At all times certain information as well as screen buttons are
displayed on the screen. Whenever you press one of these
screen buttons an action will be triggered.
Examples for screen buttons:
Touching this screen button confirms an action.
Touching this screen button cancels an action; any data ente-
red during this particular process will not be saved.
In some menues you can select or cancel certain options by
touching the screen button („ticking them off electronically”).
Choice lists are opened by touching the right arrow on the hea-
ding of the list. Then a list of available elements appears.
Slider: Slide controllers enable you to comfortably set values.
Input fields are for entering text or numbers with the aid of the
display keyboard.
6.4. Your first train – call up a locomotive and run it
We want to show you how easy it is to enter, call up and run a
locomotive. First make sure that ECoS is connected as per the
instructions and turn on the power supply.
ECoS needs one to two minutes for initialisation („start-up“).
A small square at the bottom of the monitor runs from left
to right to indicate this process. As soon as ECoS is ready the
„Go”-button lights up (green). During the booting it could
happen that the screen switches off from time to time. This is
a normal occurance.
Any audible chirping from the command station is quite nor-
mal and no reason for concern.
Before we can run a locomotive we must enter this locomotive
in the internal locomotive list of the ECoS. In our example we
assume that you have a locomotive operating with the Moto-
rola® data format that does not report automatically to the
command station.
Press the screen button “Locomotive menu” on the display and
select ”New locomotive” and then “Manual entry”.
a)
c)
b)
d)
e)
f)
g)
In our example we would like to run a locomotive with the
address “44”. Therefore we have to replace the number in this
field (currently: 3) by the desired number.
Press the screen button “Display keyboard” in order to open
the data entry window.
Press the “Delete” screen button in order to cancel the number
“3”. Then type “44” and confirm by pressing “Ok”.
In our example we assume
that this locomotive opera-
tes in the Motorola® format.
This is the default setting. If
you wish to run this loco in
the DCC format, press the
arrow behind “Data format”
and select “DCC 28”.
Confirm your entry by pres-
sing “Ok”. Then you will
arrive at the train control
screen (cab) automatically;
the newly entered locomoti-
ve is called up and ready to
run.
• Turn the throttle to the right and the locomotive will start mo-
ving. The speedometer will display the correct speed right away
while the speed steps for precise control are displayed as well
(refer to Fig. 6d).
i)
h)
Figure 7
Figure 8
Figure 9
Содержание ECoS 50200
Страница 44: ...44 Notes...
Страница 48: ...48 ESU P N 00810 08526 2010 by ESU electronic solutions ulm GmbH Co KG...


