background image

ET2 / ET4

9

Do not attempt to move the unit unless it is in the folded and locked position. Be sure the power
cord is secured to avoid possible damage. Use both handrails to maneuver the unit to the desired
position.

To Fold The Treadmill:

Make certain the treadmill is at minimum incline

. Lift the treadmill running deck until it

is secured by the locking telescoping tube assembly in center back of running deck.

To Unfold The Treadmill:

Apply slight forward pressure* on the treadmill running deck with one hand. Pull down on the
unlocking lever and slowly lower the running deck to the floor. The deck will lower unassisted
when it reaches about waist high.

*At the rear roller area to relieve pressure on the locking system.

The treadmill is equipped with four transport wheels that are engaged when the treadmill is folded.
After folding simply roll the treadmill away.

Folding  Instructions

Transport

Содержание Esprit ET2

Страница 1: ...PLEASE CAREFULLY READ THIS ENTIRE MANUAL BEFORE OPERATING YOUR NEW TREADMILL OWNER S MANUAL ET2 ET4 ...

Страница 2: ...uctions 5 Assembly instructions 6 Folding Transport Instructions 9 Operation of Your New Treadmill 10 Programmable Features 18 Target Heart Rate 20 Using a Heart Rate Transmitter 21 Heart Rate Control Operation 22 General Maintenance 23 Service Checklist Diagnosis Guide 26 Manufacturer s Limited Warranty 27 Table of Contents ...

Страница 3: ...their telephone number and the date of purchase below to make any future needed contact easy We appreciate your support and we will always remember that you are the reason that we are in business Please complete and mail your registration card today and enjoy your new treadmill Yours in Health Spirit Manufacturing Inc Name of Dealer______________________________________ Telephone Number of Dealer_...

Страница 4: ... pinch points and other caution areas that can cause harm Keep hands away from all moving parts Never operate the treadmill if it has a damaged cord or plug If the treadmill is not working properly call your dealer Keep the cord away from heated surfaces Do not operate where aerosol spray products are being used or where oxygen is being administered Sparks from the motor may ignite a highly gaseou...

Страница 5: ...ped with a cord having an equipment grounding plug The plug must be plugged into an appropriate outlet that is properly installed and grounded in accordance with all local codes and ordinances DANGER Improper connection of the equipment grounding conductor can result in a risk of electric shock Check with a qualified electrician or serviceman if you are in doubt as to whether the product is proper...

Страница 6: ...s incline speed etc Do not use excessive pressure on console control keys They are precision set to function properly with little finger pressure Pushing harder is not going to make the unit go faster or slower If you feel the buttons are not functioning properly with normal pressure contact your Spirit dealer A safety tether cord is provided with this unit It is a simple magnetic design that shou...

Страница 7: ...x1 2 Button Head Socket Bolt 12 pcs Lubricant 1pc M6 Allen Wrench 1pc Combination M5 Allen Wrench Phillips Head Screw Driver 1 pc M5 Speed Nut 6 pcs 5x 16m m Screw 6 pcs Safety Key 1pc Assembly Pack Check List ET2 ET4 ...

Страница 8: ...dmill s folding mechanism to spring open If the end of the Velcro strap that you need to grab to remove it happens to be under the treadmill deck reach under the deck to grab it but do not tilt the treadmill up to gain access to the strap end Assembly STEP 1 Remove all parts from the carton Locate the left and right frame base covers Insert six M5 Speed Nuts on the small plates Install the cover a...

Страница 9: ...ET2 ET4 8 Assembly Instructions ET2 ET4 ...

Страница 10: ...cking telescoping tube assembly in center back of running deck To Unfold The Treadmill Apply slight forward pressure on the treadmill running deck with one hand Pull down on the unlocking lever and slowly lower the running deck to the floor The deck will lower unassisted when it reaches about waist high At the rear roller area to relieve pressure on the locking system The treadmill is equipped wit...

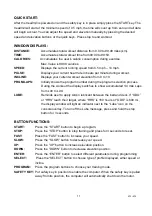
Страница 11: ...he power is initially turned on the display will light up and show ODO in the center of the display and a number in the Distance window This is an odometer reading that shows how many virtual miles the treadmill gone Then HRS is displayed and a number in the Time window shows how many hours the treadmill has been used Then VER is displayed and a number in the Speed window shows the current softwar...

Страница 12: ...isplay switches to show accumulated 1 4 mile Laps from L00 to L99 LUBE Reminds user to apply silicon lubricant between the belt and deck If ODO or HRS reach their target where HRS is 180 hours or ODO is 600 mi the display window will light an indicator next to the Lube icon on the console overlay To turn off the Lube message press and hold the stop button for 3 seconds BUTTON FUNCTIONS START Press...

Страница 13: ...ired setting and press enter The Calorie window will be blinking If you want to set the Calories as your target make sure that you have entered zero for both Time and Distance then set the Calories to the desired setting and press enter Step 3 After setting a target you may press Start to begin the program Step 4 Press STOP button to stop your workout or pull safety key away from its position to d...

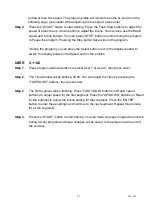
Страница 14: ...play between the Speed and Incline profiles USER U1 U2 Step 1 Press program up down buttons to select User 1 or User 2 then press enter Step 2 The Time window will be blinking 20 00 You can adjust the Time by pressing the FAST SLOW buttons then press enter Step 3 The first segment will be flashing Press FAST SLOW buttons or Rapid speed buttons to adjust speed for the first segment Press the UP DOW...

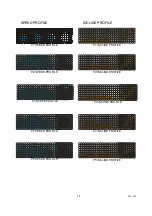
Страница 15: ...4 P1 SPEED PROFILE P2 SPEED PROFILE P3 SPEED PROFILE P4 SPEED PROFILE P5 SPEED PROFILE SPEED PROFILE P1 INCLINE PROFILE P2 INCLINE PROFILE P3 INCLINE PROFILE P4 INCLINE PROFILE P5 INCLINE PROFILE INCLINE PROFILE ...

Страница 16: ...hout it When the power is turned on a message will scroll across the dot matrix showing the current software version Then the Time and Distance windows will display Odometer readings for a short time Time window will show how many hours the treadmill has been in use and the Distance window will show how many miles or Kilometers if the treadmill is set to metric readings the treadmill has gone The ...

Страница 17: ... Calorie readings will hold while the unit is in the pause mode After 5 minutes the display will reset and return to the start up screen STEP 2 To resume your exercise when in Pause mode press the Start key The speed and incline will return to their previous settings l Pause is executed when the Stop button is pressed once If the Stop key is pressed a second time the program will end and a workout...

Страница 18: ...ck The 1 4 mile track will be displayed around the dot matrix window The flashing dot indicates your progress Once the 1 4 mile is complete this feature will begin again The number of completed laps is displayed in the laps window which is below the PULSE window Pulse Grip Feature The Pulse Heart Rate console window will display your current heart rate in beats per minute during the workout You mu...

Страница 19: ...n press enter A note about the Calorie display No exercise machine can give you an exact calorie count because there are too many factors which determine exact calorie burn for a particular person Even if someone is the exact same body weight age and height their calorie burn may be very different than yours The Calorie display is to be used as a reference only to monitor improvement from workout ...

Страница 20: ...rst segment then press enter The second column will now be blinking Repeat the above process until all segments have been programmed The first column will be blinking again This is for the incline programming Repeat the above process to program all segments for incline STEP 6 Press the Start button to begin the workout and also save the program to memory ...

Страница 21: ...t control The black columns on the chart above represent the Maximum Heart Rate for a person whose age is listed at the bottom of each column The heart rate training zone for either cardiovascular fitness or weight loss are represented by two different lines that cut diagonally through the chart shown above A definition of the lines goal is in the bottom left hand corner of the chart If your goal ...

Страница 22: ...eady signal The length of range may vary somewhat but generally stay close enough to the console to maintain good strong reliable readings Wearing the transmitter immediately against bare skin assures you of proper operation If you wish you may wear the transmitter over a shirt To do so moisten the areas of the shirt that the electrodes will rest upon Erratic Operation Caution Do not use this trea...

Страница 23: ...mode CAUTION The target value used in H 1 and H 2 programs is a suggestion only for normal healthy individuals Do not exceed your limits You may not be able to obtain your chosen target If in question enter a higher age value that will set a lower target goal CAUTION Intended for wireless transmitter chest strap only Do not use Pulse Grip bar for Heart Rate Control You must receive a strong steady...

Страница 24: ...IS TASK BELT ADJUSTMENTS Treadmill belt Tension Adjustment Belt tension is not critical for most users It is very important for joggers and runners in order to provide a smooth steady running surface Adjustment must be made from the right side of the rear roller in order to adjust tension with the 6 mm Allen wrench provided in the parts package The adjustment bolt is located at the end of the righ...

Страница 25: ...wrench is provided to adjust the rear roller Make tracking adjustments from the left side only Set belt speed at approximately 2 to 3 mph A small adjustment can make a dramatic difference Turn the bolt only a 1 4 turn and wait a few minutes for the belt to adjust itself Continue to make 1 4 turns until the belt stabilizes in the center of the running deck The belt may require periodic tracking adj...

Страница 26: ...s Make sure to loosen both bolts the same amount of turns and also remember how many turns because when finished you will need to tighten the bolts back to the point they were before Once the belt is loose wipe the deck with a clean lint free cloth to remove any dirt Apply the whole tube of lubricant onto the deck surface about 18 inches from the motor cover Squeeze out the contents of the tube ac...

Страница 27: ...esponsive Display is lit Make certain clock is running If it is then service may be Needed Treadmill will only achieve approximately 7 mph but shows higher speed on display This indicates motor should be receiving power to operate Low AC voltage to treadmill Do not use an extension cord If an extension cord is required it should be as short as possible and heavy duty 16 gauge minimum Low household...

Страница 28: ...d the service call reimbursement period for treadmills not requiring component replacement or treadmills not in ordinary household use 3 Damages caused by services performed by persons other than authorized Spirit service companies use of parts other than original Spirit parts or external causes such as alterations modifications abuse misuse accident improper maintenance inadequate power supply or...

Отзывы: