background image

9

4. Function and intended use

This solar-powered watering system is intended for use outdoors or in a greenhouse. It can be 

used to water plants through several water sprinklers in the garden, greenhouse, hotbed, balcony 

or raised bed. 
The esotec ‘Multi 100; Professional watering computer takes care of the water supply. It supplies 

the sprayer with water and is universally adjustable. For installation and commissioning, please 

refer to the instructions for the watering computer. At this point, we are working on the assump-

tion that the watering computer is already installed.
This system offers you an ideal solution for automatic and mains-independent watering!

5. Scope of delivery:

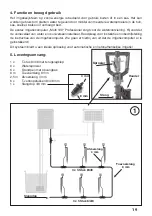
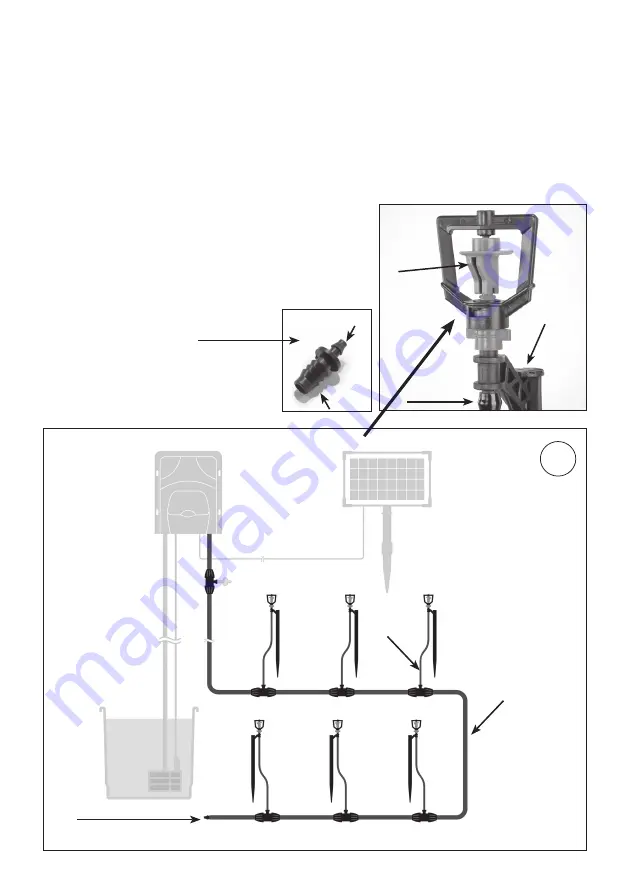
1 x        T-piece 8/4/8 with check valve

6 x        Water sprinkler

6 x        Ground spike with receptacle

8 m      Supply hose 8 mm  

2.5 m    Outlet hose 4 mm

6 x        T-reducer 8/4/8 mm 

1 x        Hose cap 4/8 mm

1

outlet 

hose 

4 mm

supply hose

8 mm

sprinkler

hose

holder

3 x T-reducer 8/4/8

hose cap

3 x T-reducer 8/4/8

4 mm

8 mm

Содержание 101116

Страница 1: ...manual Watering set Water Sprinkler Professional Mode d emploi Kit d irrigation Water Sprinkler Professional Gebruiksaanwijzing Irrigatie set Water Sprinkler Professional Istruzioni per l uso Set di i...

Страница 2: ...rsacht werden erlischt der Garantieanspruch F r Folgesch den bernehmen wir keine Haftung Bei Sach oder Personensch den die durch unsachgem e Handhabung oder Nichtbeachten der Sicherheitshinweise verur...

Страница 3: ...von diesem Artikel trennen wollen so bedenken Sie bitte dass viele seiner Komponenten aus wertvol len Rohstoffen bestehen und wiederverwertet werden k nnen Entsorgen Sie ihn daher nicht in der M llton...

Страница 4: ...Inbetriebnahme ent nehmen Sie bitte der Anleitung des Bew sserungscomputers Wir gehen hier davon aus dass der Bew sserungscomputer bereits installiert ist Dieses System bietet Ihnen eine ideale L sun...

Страница 5: ...erwenden Sie dazu keine Zange oder hnliches 4 Sobald Sie den Hauptversorgungsschlauch verlegt haben ver schlie en Sie diesen am Ende mit der mitgelieferten Schlauchver schlusskappe Bild 4 5 Positionie...

Страница 6: ...5 l 0 7 l pro Sprinkler 8 l 1 3 l pro Sprinkler 16 l 2 6 l pro Sprinkler Diese Angaben sind Durchschnittsmengen und k nnen je nach Schlauchl nge abweichen 8 Pflege und Wartung Um eine zuverl ssige Bew...

Страница 7: ...n if you pass on these products to third par ties You should archive this operating manual for future reference 2 Safety Instructions Damage caused by not following the operating instructions will voi...

Страница 8: ...ant this product anymore please re member that many of its components are made of valuable raw materials and can be recycled Therefore do not dispose of it in the normal trashcan but please take it to...

Страница 9: ...installation and commissioning please refer to the instructions for the watering computer At this point we are working on the assump tion that the watering computer is already installed This system of...

Страница 10: ...nd Do not use pliers or similar for this 4 As soon as you have laid out the main supply hose close it at the end with the hose cap supplied Fig 4 5 Now position the 6 water sprinklers as shown in Figu...

Страница 11: ...nklers 1 l 0 2 l per sprinkler 2 l 0 3 l per sprinkler 4 5 l 0 7 l per sprinkler 8 l 1 3 l per sprinkler 16 l 2 6 l per sprinkler These figures are average volumes and may vary depending on the length...

Страница 12: ...Les transformations de son propre chef ou autres modifications apport es au produit ne sont pas autoris es Dans ce cas la demande de garantie et le certificat CE expirent Veillez ce que ce produit ne...

Страница 13: ...s est obligatoire Si jamais vous souhaitez vous s parer de cet article gardez l esprit que bon nombre de ses composants sont constitu s de mati res premi res pr cieuses et peuvent tre recycl s Par con...

Страница 14: ...r le guide d uti lisation de l ordinateur d arrosage pour le montage et la mise en service partir de maintenant nous supposons que l ordinateur d arrosage est d j install Ce syst me vous offre une sol...

Страница 15: ...s outils pour cela 4 D s que vous avez plac le tuyau d entr e principal fermez le au bout avec le capuchon de fermeture de tuyau fourni Illustration 4 5 Ensuite positionnez les 6 arroseurs tel que d m...

Страница 16: ...l par arroseur 2 l 0 3 l par arroseur 4 5 l 0 7 l par arroseur 8 l 1 3 l par arroseur 16 l 2 6 l par arroseur Ces chiffres sont des volumes moyens et peuvent varier en fonction de la longueur du tuyau...

Страница 17: ...g of het niet in acht nemen van de veiligheidsinstructies Eigenmachtige ombouwen of andere wijzigingen aan het product zijn niet toegestaan In dit geval vervalt de garantieclaim en de CE goedkeuring Z...

Страница 18: ...verplicht Mocht u ooit afscheid willen nemen van dit artikel vergeet dan niet dat veel van de onderdelen zijn gemaakt van waardevolle grondstoffen en kunnen worden gerecy cled Gooi het daarom niet in...

Страница 19: ...universeel instelbaar Raadpleeg voor installatie en inbedrijfstelling de instructies van de irrigatiecomputer We gaan er hierbij van uit dat de irrigatiecomputer al is ge nstalleerd Dit systeem biedt...

Страница 20: ...bruik hiervoor geen tang of iets dergelijks 4 Zodra u de hoofdtoevoerslang heeft gelegd sluit u deze aan het einde af met de bijgeleverde slangdop fig 4 5 Plaats nu de 6 watersproeiers zoals weergegev...

Страница 21: ...rs 1 l 0 2 l per sproeier 2 l 0 3 l per sproeier 4 5 l 0 7 l per sproeier 8 l 1 3 l per sproeier 16 l 2 6 l per sproeier Deze cijfers zijn gemiddelde volumes en kunnen vari ren naargelang de lengte va...

Страница 22: ...ito apportare alcuna modifica non autorizzata al prodotto Ogni e qualsiasi modifica apportata senza preventiva autorizzazione comporter la decadenza della garanzia e dell approvazione CE Assicurati ch...

Страница 23: ...re questo articolo tieni presente che molti dei suoi componenti sono costituiti da materie prime preziose che possono essere riciclate Pertanto non gettarlo nel bidone della spazzatura ma piuttosto co...

Страница 24: ...istruzioni del computer di irrigazione Partiamo dal presupposto che il computer per l irrigazione sia gi installato Il sistema offre una soluzione ideale per l irrigazione automatica e indipendente da...

Страница 25: ...principale chiuderlo all estremit con il terminale in dotazione Fig 4 5 Ora posare la rete di irrigazione come mostrato nella Figura 1 Per procedere utilizzare il tubo di uscita da 4 mm e i raccordi...

Страница 26: ...tori 1 ltr 0 2 l per irrigatore 2 ltr 0 3 l per irrigatore 4 5 ltr 0 7 l per irrigatore 8 ltr 1 3 l per irrigatore 16 ltr 2 6 l per irrigatore Queste cifre sono volumi medi e possono variare a seconda...

Страница 27: ...icaciones de seguridad No se permiten modificaciones no autorizadas u otros cambios en el producto En este caso quedan anulados tanto el derecho de garant a como la homologaci n CE Aseg rese de que qu...

Страница 28: ...r momento desea deshacerse de este art culo tenga en cuenta que muchos de sus componentes est n formados por materias primas valiosas que pueden reciclarse Por lo tanto no lo tire a la basura sino que...

Страница 29: ...servi cio consulte las instrucciones del ordenador de irrigaci n Aqu se asume que el ordenador de irrigaci n ya est instalado Este sistema le ofrece una soluci n ideal para el riego autom tico e indep...

Страница 30: ...s o similares 4 Tan pronto como haya colocado la manguera de suministro prin cipal ci rrela por el extremo con el capuch n de manguera sumi nistrado Fig 4 5 Ahora coloque los 6 rociadores de agua como...

Страница 31: ...aspersor 6 rociadores 1 l 0 2 l por aspersor 2 l 0 3 l por aspersor 4 5 l 0 7 l por aspersor 8 l 1 3 l por aspersor 16 l 2 6 l por aspersor Estas cifras son vol menes medios y pueden variar en funci n...

Страница 32: ...32...

Отзывы: