background image

ESU1808 

ESI


Although we strongly recommend a Power PC G5 or Intel Macintosh system, this setting would 
allow you to use ESU1808 under a G4 (equipped with USB 2.0 port) with limited performance. 

7.4 Cubase LE 4 

ESU1808 ships with a DVD-ROM with Cubase LE 4 from Steinberg. If you are using a different 
recording software, you can skip this section. 

Installation 

To install Cubase LE 4, insert the DVD-ROM into the DVD-ROM drive of your computer. Under 
Windows, the installation will normally start automatically – if not, you can launch it manually by 
starting the installer from the DVD-ROM drive. To install Cubase LE 4 under Mac OS X, double 
click on the installer icon. 

To proceed with the installation, follow all instructions on screen. During the installation the 

Syncrosoft License Control 

software will be installed as well. To use Cubase LE 4 for more than 15 

days, you need to activate it with this software via the internet. This means that you need an active 
internet connection on the computer you are installing Cubase LE 4. We recommend you to activate 
the software as early as possible. 

Initial Setup 

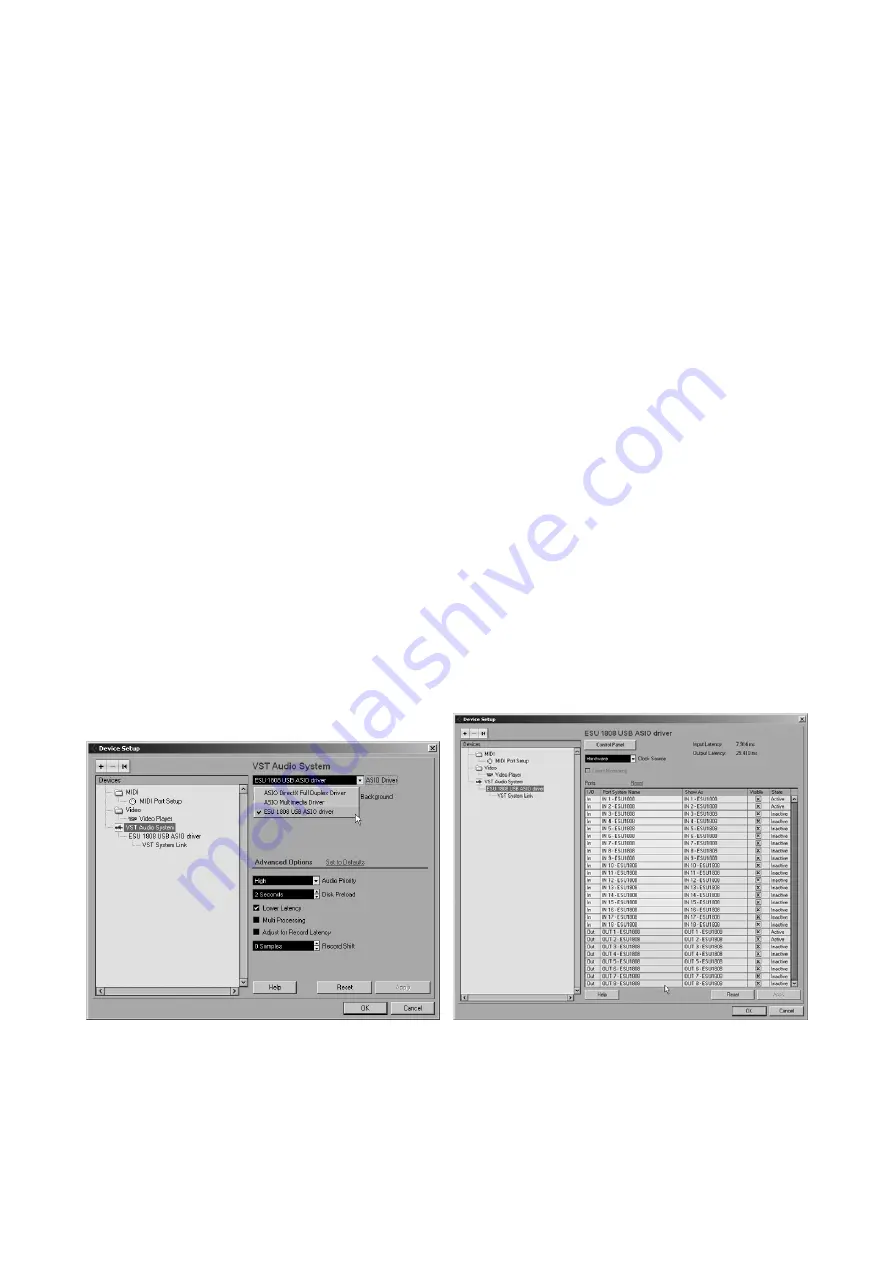
As most digital audio applications, Cubase LE 4 requires some initial configuration, before it can be 
used properly with a new audio interface like ESU1808. Start Cubase LE 4 and select 

Device Setup


from the 

Devices

 menu. In the dialog (the Windows Version is displayed below, under Mac OS X 

the look is slightly different but the functions are identical), select 

VST Audio System

 on the tree 

structure on the left part of the window. 


Make sure to select 

ESU 1808 USB ASIO driver

 as 

ASIO Driver

 entry. You can verify your 

selection by selecting the 

ESU 1808 USB ASIO driver

 device on the left. The dialog (as shown 

above on the right), now lists all input and output channels. Note that the 

Control Panel

 button has 

no effect. Confirm your changes by clicking 

OK


19

Содержание ESU1808

Страница 1: ...18 in 8 out USB 2 0 Hi Speed External Recording Interface User s Guide...

Страница 2: ...ESI Copyright 2007 Revision 1 November 2007 www esi audio com...

Страница 3: ...Windows 15 5 4 Pull Down Menu Mac OS X 15 6 Hardware Monitoring Mix Out 15 6 1 Enable Monitoring MIX button 15 6 2 Monitoring volume for input channels 16 6 3 Monitoring volume for playback channels 1...

Страница 4: ...nels on a USB audio product in this price range 1 1 What s in the box ESU1808 USB audio interface as 1U rack device Steinberg Cubase LE 4 DVD ROM ESI ESU1808 Driver CD ROM incl additional bundle softw...

Страница 5: ...t is shown by the peak LEDs above the gain knob Input 3 4 Hi Z instrument inputs Input 3 4 are provided as high impedance HI Z inputs with individual GAIN control and a peak LED next to each input Use...

Страница 6: ...put enabled or the signal from output channel 1 2 only disabled A detailed description of monitoring signals with ESU1808 is provided in chapter 6 Headphone Output The headphone output is provided as...

Страница 7: ...turning ESU1808 on off use the POWER switch located here at the rear panel MIDI I O The MIDI IN and OUT connectors are provided on the rear panel Use these connectors to connect ESU1808 to a controlle...

Страница 8: ...this output works as mix and monitoring output If disabled this output works as balanced unbalanced line output 7 8 Output 1 6 analog line outputs Output 1 6 are provided as balanced unbalanced line l...

Страница 9: ...e LE 4 installation internet connection for Cubase LE 4 activation Mac OS X 10 4 4 or higher 3 2 Installation After unpacking ESU1808 connect the power supply to the special connector on the rear pane...

Страница 10: ...picture below Click Next The installer now informs you that the driver installation will start as shown on the right picture below Confirm this with Next During the following process you will see a d...

Страница 11: ...n completed successfully Uninstallation If you are not intending to use ESU1808 for a longer time on your Windows computer we recommend to uninstall the driver To do this go to My Computer Control Pan...

Страница 12: ...on by clicking Install After the files have been copied to your hard disk the following confirmation dialog appears After clicking Restart your Mac will reboot Congratulations the installation is fini...

Страница 13: ...con in the task notification area To open it under Mac OS X launch the ESU1808 Panel application in your Applications folder if you use it frequently you might want to move it to your dock 5 1 Informa...

Страница 14: ...ed in 0 5dB steps With the mute button M under each channel playback can be muted or unmuted again The LINK button under a channel pair links the left and right volume slider allowing you to control t...

Страница 15: ...e rather than in the ESU1808 Control Panel 6 Hardware Monitoring Mix Out ESU1808 provides extensive features for hardware monitoring You can monitor signals via the MIX OUT output located on the rear...

Страница 16: ...l time This is especially a problem when monitoring with headphones The solution is a mono down mix that can be enabled with this button When activated both signals from input 1 2 are audible on left...

Страница 17: ...at startup or shutdown If this bothers you please disable the Windows system sounds completely or use your internal onboard soundcard for them rather than ESU1808 7 1 Windows Multimedia setup The Win...

Страница 18: ...ks or small drop outs when Mac OS X system sounds are played We recommend to play these signals via built in audio instead If you want to change settings of ESU1808 you need to select it under Propert...

Страница 19: ...ubase LE 4 for more than 15 days you need to activate it with this software via the internet This means that you need an active internet connection on the computer you are installing Cubase LE 4 We re...

Страница 20: ...With Add Bus you can add a new Mono or Stereo bus The screen shot above shows several mono busses which allows you use each single channel as a separate mono input in your projects In the Device Port...

Страница 21: ...dB Microphone Preamplifier Type Balanced XLR 48V Phantom Power support Max Input Level 5dBu max PAD OFF 15 0dBu max PAD ON Gain Range 20 0dB min 68dB max PAD OFF 0dB min 48dB max Equivalent Input Nois...

Страница 22: ...aution Any changes or modifications in construction of this device with are not expressly approved by the party responsible for compliance could void the user s authority to operate equipment Note Thi...

Страница 23: ...ESU1808 ESI 23 Parts of this manual are continually being updated Please check our web site www esi audio com occasionally for the most recent update information...

Отзывы: